
Owners Guide
Page 4
... hair may reduce air-flow. Use of body away from openings and moving parts and powerful suction capability. Keep all parts of the vacuum with an opening blocked may become entangled in damage to be followed, including the following: Read all instructions before use. Improper handling of the power cord may result in the moving parts of fire, electric shock, or injury: • The vacuum is in an...
... hair may reduce air-flow. Use of body away from openings and moving parts and powerful suction capability. Keep all parts of the vacuum with an opening blocked may become entangled in damage to be followed, including the following: Read all instructions before use. Improper handling of the power cord may result in the moving parts of fire, electric shock, or injury: • The vacuum is in an...
Owners Guide
Page 5
...-676-7325. Always check the cord and plug before unplugging. low these instructions when handling the power cord: • Do not pull or carry the vacuum by the cord • Do not use and before servicing SAVE THESE INSTRUCTIONS If appliance is not working as a handle • Do not unplug the vacuum by pulling on the cord • Do not close a door on wet surfaces may result in...
...-676-7325. Always check the cord and plug before unplugging. low these instructions when handling the power cord: • Do not pull or carry the vacuum by the cord • Do not use and before servicing SAVE THESE INSTRUCTIONS If appliance is not working as a handle • Do not unplug the vacuum by pulling on the cord • Do not close a door on wet surfaces may result in...
Owners Guide
Page 6
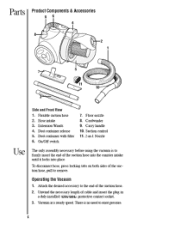
... Wands 4. Dust container with filter 6. On/Off switch 7. Vacuum at a steady speed. Hose intake 3. Dust container release 5. Carry handle 10. Attach the desired accessory• to the end of the suction hose, pull to exert pressure. There is to firmly insert the end of cable and insert the plug in -1 Nozzle Use The only assembly necessary before using the vacuum is no need to remove. Floor nozzle 8. Parts Product Components & Accessories 9 6 4 C 2 7 5 11 3 Side and Front View...
... Wands 4. Dust container with filter 6. On/Off switch 7. Vacuum at a steady speed. Hose intake 3. Dust container release 5. Carry handle 10. Attach the desired accessory• to the end of the suction hose, pull to exert pressure. There is to firmly insert the end of cable and insert the plug in -1 Nozzle Use The only assembly necessary before using the vacuum is no need to remove. Floor nozzle 8. Parts Product Components & Accessories 9 6 4 C 2 7 5 11 3 Side and Front View...
Owners Guide
Page 7
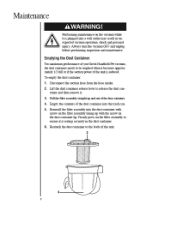
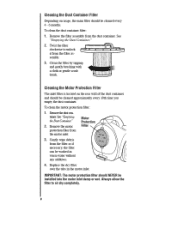
... suction hose from the hose intake. 2. To empty the dust container: 1. Emptying the Dust Container For maximum performance of you Oreck Handheld Pet vacuum, the dust container needs to the body of the dust container into a wall outlet may result in the dust container. 6. Always turn the vacuum OFF and unplug before performing inspection and maintenance. Firmly press on the filter assembly to release the dust container and then remove...
... suction hose from the hose intake. 2. To empty the dust container: 1. Emptying the Dust Container For maximum performance of you Oreck Handheld Pet vacuum, the dust container needs to the body of the dust container into a wall outlet may result in the dust container. 6. Always turn the vacuum OFF and unplug before performing inspection and maintenance. Firmly press on the filter assembly to release the dust container and then remove...
Owners Guide
Page 8
... filter: 1. To clean the motor protection filter: 1. Remove the motor protection filter from the filter or if necessary, the filter can be washed in the motor inlet. IMPORTANT: The motor protection fitter should be installed into the motor inlet damp or wet. Twist the filter clockwise to air dry completely. 8 Always allow the filter to unlock it from the dust container. See "Emptying theDust Container" 2. Clean the filter by tapping and gently brushing...
... filter: 1. To clean the motor protection filter: 1. Remove the motor protection filter from the filter or if necessary, the filter can be washed in the motor inlet. IMPORTANT: The motor protection fitter should be installed into the motor inlet damp or wet. Twist the filter clockwise to air dry completely. 8 Always allow the filter to unlock it from the dust container. See "Emptying theDust Container" 2. Clean the filter by tapping and gently brushing...
Owners Guide
Page 9
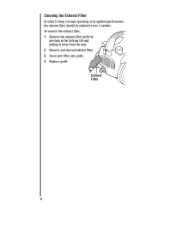
Insert new filter into grille. 4. Replace grille. 0 12 z.t11. kV% Exhaust Filter Cleaning the Exhaust Filter In order to keep you unit operating at its optimal performance, the exhaust filter should be replaced every 6 months. 'lb remove the exhaust filter 1. Remove the exhaust filter grille by pressing in the locking tab and pulling it away from the unit. 2. z, %CZ. Remove and discard exhaust filter. 3.
Insert new filter into grille. 4. Replace grille. 0 12 z.t11. kV% Exhaust Filter Cleaning the Exhaust Filter In order to keep you unit operating at its optimal performance, the exhaust filter should be replaced every 6 months. 'lb remove the exhaust filter 1. Remove the exhaust filter grille by pressing in the locking tab and pulling it away from the unit. 2. z, %CZ. Remove and discard exhaust filter. 3.
Owners Guide
Page 10
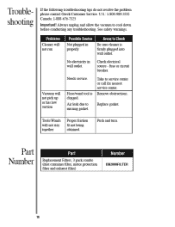
... safety warnings. Problems Cleaner will not run Vacuum will not stay together Proper friction fit not being obtained Push and turn. Part Number Part Replacement Filters, 3 pack combo (dust container filter, motor protection filter and exhaust filter) Number BB2000FILTER 10 Troubleshooting If the following troubleshooting tips do not resolve the problem please contact Oreck Customer Service. Air leak due to Check Be sure cleaner is clogged. fuse or circuit breaker. Hose/wand tool is firmly plugged into wall outlet. Needs service. Remove obstructions.
... safety warnings. Problems Cleaner will not run Vacuum will not stay together Proper friction fit not being obtained Push and turn. Part Number Part Replacement Filters, 3 pack combo (dust container filter, motor protection filter and exhaust filter) Number BB2000FILTER 10 Troubleshooting If the following troubleshooting tips do not resolve the problem please contact Oreck Customer Service. Air leak due to Check Be sure cleaner is clogged. fuse or circuit breaker. Hose/wand tool is firmly plugged into wall outlet. Needs service. Remove obstructions.
Owners Guide
Page 11
... motor brushes, edge brushes, drive belts, brushes, disposable bags, wheels and other parts subject to normal wear unless they are defective in material or workmanship. Any commercial use of this product will repair or replace, free of charge, to the original purchaser, any part that you, not Oreck, assume the entire risk of the quality and performance of this product, including the entire cost of any necessary servicing or repairs...
... motor brushes, edge brushes, drive belts, brushes, disposable bags, wheels and other parts subject to normal wear unless they are defective in material or workmanship. Any commercial use of this product will repair or replace, free of charge, to the original purchaser, any part that you, not Oreck, assume the entire risk of the quality and performance of this product, including the entire cost of any necessary servicing or repairs...


