
Owners Guide
Page 4
... to be followed, including the following: Read all openings free of the vacuum outdoors or on stairs may cause imbalance, slippage or tumbling. Ensure the filter bag assembly is intended for household use only. • Use the vacuum only as a toy and always maintain close attention when used as described in...
... to be followed, including the following: Read all openings free of the vacuum outdoors or on stairs may cause imbalance, slippage or tumbling. Ensure the filter bag assembly is intended for household use only. • Use the vacuum only as a toy and always maintain close attention when used as described in...
Owners Guide
Page 6
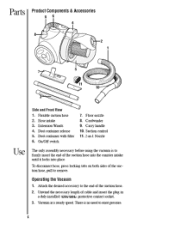
... on both sides of the suction hose, pull to the end of the suction hose. 2. Attach the desired accessory• to remove. Dust container with filter 6. Carry handle 10. There is no need to firmly insert the end of cable and insert the plug in -1 Nozzle Use The only assembly necessary...
... on both sides of the suction hose, pull to the end of the suction hose. 2. Attach the desired accessory• to remove. Dust container with filter 6. Carry handle 10. There is no need to firmly insert the end of cable and insert the plug in -1 Nozzle Use The only assembly necessary...
Owners Guide
Page 7
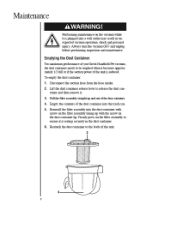
... straight up with the arrow on the filter assembly lining up and out of the unit is reduced. Emptying the Dust Container For maximum performance of you Oreck Handheld Pet vacuum, the dust container needs to release the dust container and then remove it becomes approximately 1/3 full ... the vacuum OFF and unplug before performing inspection and maintenance. Empty the contents of the unit. 3 To empty the dust container: 1. Reinstall the filter assembly into the trash can. 5. Disconnect the suction hose from the hose intake. 2. Firmly press on the vacuum while it is plugged into a...
... straight up with the arrow on the filter assembly lining up and out of the unit is reduced. Emptying the Dust Container For maximum performance of you Oreck Handheld Pet vacuum, the dust container needs to release the dust container and then remove it becomes approximately 1/3 full ... the vacuum OFF and unplug before performing inspection and maintenance. Empty the contents of the unit. 3 To empty the dust container: 1. Reinstall the filter assembly into the trash can. 5. Disconnect the suction hose from the hose intake. 2. Firmly press on the vacuum while it is plugged into a...
Owners Guide
Page 8
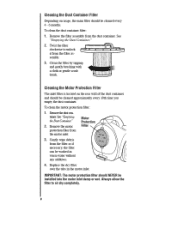
... inlet. Cleaning the Motor Protection Filter The inlet filter is located on usage, the main filter should be cleaned approximately every 10th time you empty the dust container. See "Emptying the Dust Container." 2. Clean the filter by tapping and gently brushing with... a cloth or gentle scrub brush. To clean the motor protection filter: 1. To clean the dust container filter: 1. See "Emptying theDust Container" 2. IMPORTANT: The motor protection fitter...
... inlet. Cleaning the Motor Protection Filter The inlet filter is located on usage, the main filter should be cleaned approximately every 10th time you empty the dust container. See "Emptying the Dust Container." 2. Clean the filter by tapping and gently brushing with... a cloth or gentle scrub brush. To clean the motor protection filter: 1. To clean the dust container filter: 1. See "Emptying theDust Container" 2. IMPORTANT: The motor protection fitter...
Owners Guide
Page 9
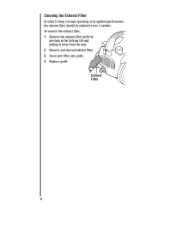
kV% Exhaust Filter Cleaning the Exhaust Filter In order to keep you unit operating at its optimal performance, the exhaust filter should be replaced every 6 months. 'lb remove the exhaust filter 1. Remove the exhaust filter grille by pressing in the locking tab and pulling it away from the unit. 2. Replace grille. 0 12 z.t11. Insert new filter into grille. 4. Remove and discard exhaust filter. 3. z, %CZ.
kV% Exhaust Filter Cleaning the Exhaust Filter In order to keep you unit operating at its optimal performance, the exhaust filter should be replaced every 6 months. 'lb remove the exhaust filter 1. Remove the exhaust filter grille by pressing in the locking tab and pulling it away from the unit. 2. Replace grille. 0 12 z.t11. Insert new filter into grille. 4. Remove and discard exhaust filter. 3. z, %CZ.
Owners Guide
Page 10
See safety warnings. Needs service. Part Number Part Replacement Filters, 3 pack combo (dust container filter, motor protection filter and exhaust filter) Number BB2000FILTER 10 Always unplug and allow the vacuum to missing gasket. Air leak due to cool down before ... electrical source - Replace gasket. fuse or circuit breaker. Troubleshooting If the following troubleshooting tips do not resolve the problem please contact Oreck Customer Service. Take to Check Be sure cleaner is clogged. Remove obstructions. Problems Cleaner will not run Vacuum will not stay together...
See safety warnings. Needs service. Part Number Part Replacement Filters, 3 pack combo (dust container filter, motor protection filter and exhaust filter) Number BB2000FILTER 10 Always unplug and allow the vacuum to missing gasket. Air leak due to cool down before ... electrical source - Replace gasket. fuse or circuit breaker. Troubleshooting If the following troubleshooting tips do not resolve the problem please contact Oreck Customer Service. Take to Check Be sure cleaner is clogged. Remove obstructions. Problems Cleaner will not run Vacuum will not stay together...

