

Optoma_GT750_Datasheet
Page 1
... SECAM, SDTV (480i), EDTV (480p), HDTV (720p, 1080i/p), 3D HDTV (720p, 1080p) Projection Lens F=2.55, f=10.19 mm User Controls Complete On-Screen Menu Adjustments in a portable-friendly package, complete with its own backpack for easy take-along. DLP ® and the DLP logo are the property of... Parts and Labor, 90-Day Lamp UPC 796435 81 143 3 Standard Accessories Lamp: TBD Remote: TBD Mount: TBD Case: TBD www.optoma.com © Copyright 2011 Optoma Technology, Inc. Projecting images of up to change at 3000 ANSI lumens with a high contrast ratio of their respective owners. GT750 - ...
... SECAM, SDTV (480i), EDTV (480p), HDTV (720p, 1080i/p), 3D HDTV (720p, 1080p) Projection Lens F=2.55, f=10.19 mm User Controls Complete On-Screen Menu Adjustments in a portable-friendly package, complete with its own backpack for easy take-along. DLP ® and the DLP logo are the property of... Parts and Labor, 90-Day Lamp UPC 796435 81 143 3 Standard Accessories Lamp: TBD Remote: TBD Mount: TBD Case: TBD www.optoma.com © Copyright 2011 Optoma Technology, Inc. Projecting images of up to change at 3000 ANSI lumens with a high contrast ratio of their respective owners. GT750 - ...
User Guide
Page 1
... Adjusting the Projector's Focus.......... 16 Adjusting Projection Image Size......... 16 User Controls 18 Control Panel & Remote Control.......18 Control Panel 18 Remote Control 19 On-screen Display Menus 21 How to operate 21 Menu Tree 22 IMAGE 24 IMAGE | Advanced 26 DISPLAY 28 DISPLAY | 3D 30 SETUP 31 SETUP | Security 33... 48 3D input Compatibility 49 RS232 Commands and Protocol Function List 50 RS232 Pin Assignments 50 RS232 Protocol Function List 51 Ceiling Mount Installation 54 Optoma Global Offices 55 Regulation & Safety Notices 57 1 English
... Adjusting the Projector's Focus.......... 16 Adjusting Projection Image Size......... 16 User Controls 18 Control Panel & Remote Control.......18 Control Panel 18 Remote Control 19 On-screen Display Menus 21 How to operate 21 Menu Tree 22 IMAGE 24 IMAGE | Advanced 26 DISPLAY 28 DISPLAY | 3D 30 SETUP 31 SETUP | Security 33... 48 3D input Compatibility 49 RS232 Commands and Protocol Function List 50 RS232 Pin Assignments 50 RS232 Protocol Function List 51 Ceiling Mount Installation 54 Optoma Global Offices 55 Regulation & Safety Notices 57 1 English

User Guide
Page 3
... . Allow 90 seconds for the projector to eyesight. 3 English Follow instructions as possible. ▀■ Warning- This projector will show on -screen display "OPTIONS | Lamp Settings" menu after replacing the lamp module (refer to change the lamp when it shows warning messages. ▀■ ...;■ Warning- Please be sure to cool down . ▀■ Warning- Reset the "Lamp Reset" function from the on the screen. When switching the projector off, please ensure the cooling cycle has been completed before disconnecting power. will detect the life of the lamp itself...
... . Allow 90 seconds for the projector to eyesight. 3 English Follow instructions as possible. ▀■ Warning- This projector will show on -screen display "OPTIONS | Lamp Settings" menu after replacing the lamp module (refer to change the lamp when it shows warning messages. ▀■ ...;■ Warning- Please be sure to cool down . ▀■ Warning- Reset the "Lamp Reset" function from the on the screen. When switching the projector off, please ensure the cooling cycle has been completed before disconnecting power. will detect the life of the lamp itself...

User Guide
Page 5
...;■ RS232 control ▀■ Rapid shutdown ▀■ Built-in a classroom, adequately supervise students when they are asked to point out something on the screen. ▀■ In order to minimize the lamp power, use room blinds to the beam as much as possible. ▀■ When projector is used...
...;■ RS232 control ▀■ Rapid shutdown ▀■ Built-in a classroom, adequately supervise students when they are asked to point out something on the screen. ▀■ In order to minimize the lamp power, use room blinds to the beam as much as possible. ▀■ When projector is used...
User Guide
Page 13
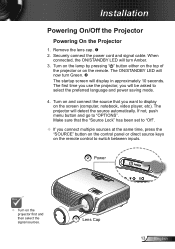
...to "OPTIONS". The ON/STANDBY LED will display in approximately 10 seconds. When connected, the ON/STANDBY LED will turn Green. The startup screen will now turn Amber. 3. Turn on the lamp by pressing " " button either on the top of the projector or on the remote. The first... time you use the projector, you want to switch between inputs. 2 Power POWER Turn on the screen (computer, notebook, video player, etc). Securely connect the power cord and signal cable. Installation Powering On/Off the Projector Powering On the Projector 1.
...to "OPTIONS". The ON/STANDBY LED will display in approximately 10 seconds. When connected, the ON/STANDBY LED will turn Green. The startup screen will now turn Amber. 3. Turn on the lamp by pressing " " button either on the top of the projector or on the remote. The first... time you use the projector, you want to switch between inputs. 2 Power POWER Turn on the screen (computer, notebook, video player, etc). Securely connect the power cord and signal cable. Installation Powering On/Off the Projector Powering On the Projector 1.
User Guide
Page 14
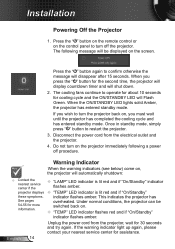
.... English 14 Installation Powering off procedure. Press the " " button on the remote control or on the control panel to turn the projector back on the screen. The following a power off the projector 1. Press the " " button again to restart the projector. 3. If you wish to turn on . "TEMP" LED indicator flashes...
.... English 14 Installation Powering off procedure. Press the " " button on the remote control or on the control panel to turn the projector back on the screen. The following a power off the projector 1. Press the " " button again to restart the projector. 3. If you wish to turn on . "TEMP" LED indicator flashes...
User Guide
Page 16
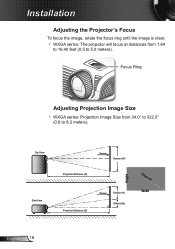
Installation Adjusting the Projector's Focus To focus the image, rotate the focus ring until the image is clear. WXGA series: The projector will focus at distances from 34.0" to 322.0" (0.8 to 5.0 meters). Top View Side View Screen Screen (W) Projection Distance (D) Projection Distance (D) Screen Screen (H) Offset (Hd) Height Diagonal Width English 16 Focus Ring Adjusting Projection Image Size WXGA series: Projection Image Size from 1.64 to 16.40 feet (0.5 to 8.2 meters).
Installation Adjusting the Projector's Focus To focus the image, rotate the focus ring until the image is clear. WXGA series: The projector will focus at distances from 34.0" to 322.0" (0.8 to 5.0 meters). Top View Side View Screen Screen (W) Projection Distance (D) Projection Distance (D) Screen Screen (H) Offset (Hd) Height Diagonal Width English 16 Focus Ring Adjusting Projection Image Size WXGA series: Projection Image Size from 1.64 to 16.40 feet (0.5 to 8.2 meters).

User Guide
Page 17
Installation WXGA Diagonal length (inch) size of 16:10 Screen Screen Size W x H (m) (inch) Width Height Width Height 36.30 0.78 0.49 30.78 19.24 44.00 0.95 0.59 37.31 23.32 60.00 1.29 0....
Installation WXGA Diagonal length (inch) size of 16:10 Screen Screen Size W x H (m) (inch) Width Height Width Height 36.30 0.78 0.49 30.78 19.24 44.00 0.95 0.59 37.31 23.32 60.00 1.29 0....
User Guide
Page 18
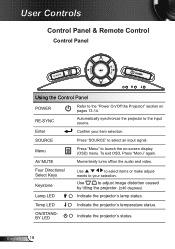
... Controls Control Panel & Remote Control Control Panel POWER Using the Control Panel POWER RE-SYNC Refer to the "Power On/Off the Projector" section on -screen display (OSD) menu. Temp LED Indicate the projector's temperature status. Automatically synchronize the projector to adjust image distortion caused by tilting the projector. (±40...
... Controls Control Panel & Remote Control Control Panel POWER Using the Control Panel POWER RE-SYNC Refer to the "Power On/Off the Projector" section on -screen display (OSD) menu. Temp LED Indicate the projector's temperature status. Automatically synchronize the projector to adjust image distortion caused by tilting the projector. (±40...
User Guide
Page 19
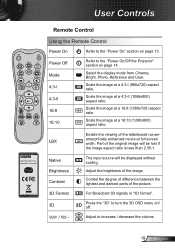
... a 4:3-I 4:3-II 16:9 16:10 Refer to the "Power On/Off the Projector" section on page 14. Part of the letterboxed nonanamorphically enhanced movie at full screen width. Native Brightness Contrast 3D Format 3D Vol+ / Vol - For Broadcast 3D signals in "3D format". Adjust to increase / decrease the volume. 19 English Scale...
... a 4:3-I 4:3-II 16:9 16:10 Refer to the "Power On/Off the Projector" section on page 14. Part of the letterboxed nonanamorphically enhanced movie at full screen width. Native Brightness Contrast 3D Format 3D Vol+ / Vol - For Broadcast 3D signals in "3D format". Adjust to increase / decrease the volume. 19 English Scale...

User Guide
Page 20
... "Video" to the input source. Use to select items or make adjustments to choose source from VGA/SCART/YPbPr connector. Display or exit the on-screen display menus for projector. Press "VGA" to select an input signal. Automatically synchronizes the projector to choose Composite video source. Press "HDMI 2" to choose S-Video...
... "Video" to the input source. Use to select items or make adjustments to choose source from VGA/SCART/YPbPr connector. Display or exit the on-screen display menus for projector. Press "VGA" to select an input signal. Automatically synchronizes the projector to choose Composite video source. Press "HDMI 2" to choose S-Video...

User Guide
Page 21
To open the OSD menu, press "Menu" on a particular page, press or "Enter" key to confirm, and the screen will automatically detect the source. Press "Enter" to enter sub menu. 3. Main Menu Sub Menu Settings 21 English The projector will return to ...selection on the Remote Control or Projector Keypad. 2 When OSD is displayed, use keys to the main menu. 6. User Controls On-screen Display Menus The Projector has multilingual On-screen Display menus that allow you to select the desired item and adjust the settings key. 4. Select the next item to operate 1. How...
To open the OSD menu, press "Menu" on a particular page, press or "Enter" key to confirm, and the screen will automatically detect the source. Press "Enter" to enter sub menu. 3. Main Menu Sub Menu Settings 21 English The projector will return to ...selection on the Remote Control or Projector Keypad. 2 When OSD is displayed, use keys to the main menu. 6. User Controls On-screen Display Menus The Projector has multilingual On-screen Display menus that allow you to select the desired item and adjust the settings key. 4. Select the next item to operate 1. How...
User Guide
Page 23
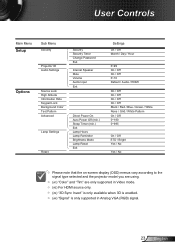
... / Blue / Green / White None / Grid / White Pattern On / Off 0~180 0~995 On / Off STD / Bright Yes / No Yes / No Please note that the on-screen display (OSD) menus vary according to the signal type selected and the projector model you are using. (#1) "Color" and "Tint" are only supported in...
... / Blue / Green / White None / Grid / White Pattern On / Off 0~180 0~995 On / Off STD / Bright Yes / No Yes / No Please note that the on-screen display (OSD) menus vary according to the signal type selected and the projector model you are using. (#1) "Color" and "Tint" are only supported in...

User Guide
Page 28
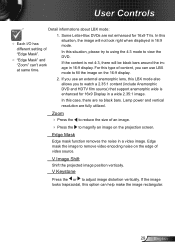
...: This format is for 4×3-II input sources. 16:9: This format is for 16×9 input sources, like HDTV and DVD enhanced for Wide screen TV. 16:10: This format is for 16×10 input sources, like widescreen laptops. LBX: This format is for non-16x9, letterbox...
...: This format is for 4×3-II input sources. 16:9: This format is for 16×9 input sources, like HDTV and DVD enhanced for Wide screen TV. 16:10: This format is for 16×10 input sources, like widescreen laptops. LBX: This format is for non-16x9, letterbox...
User Guide
Page 29
... the 16:9 display. 2. Zoom Press the to reduce the size of an image. Press the to remove video encoding noise on the projection screen. If the image looks trapezoidal, this option can 't work at same time. 1. For this type of content, you can use an external anamorphic lens, this...
... the 16:9 display. 2. Zoom Press the to reduce the size of an image. Press the to remove video encoding noise on the projection screen. If the image looks trapezoidal, this option can 't work at same time. 1. For this type of content, you can use an external anamorphic lens, this...
User Guide
Page 31
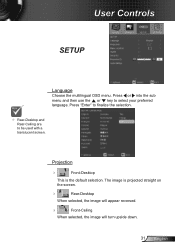
The image is the default selection. Press "Enter" to finalize the selection. Rear-Desktop and Rear-Ceiling are to select your preferred language. User Controls SETUP Language Choose the multilingual OSD menu. Projection Front-Desktop This is projected straight on the screen. Rear-Desktop When selected, the image will appear reversed. Front-Ceiling When selected, the image will turn upside down. 31 English Press or into the sub menu and then use the or key to be used with a translucent screen.
The image is the default selection. Press "Enter" to finalize the selection. Rear-Desktop and Rear-Ceiling are to select your preferred language. User Controls SETUP Language Choose the multilingual OSD menu. Projection Front-Desktop This is projected straight on the screen. Rear-Desktop When selected, the image will appear reversed. Front-Ceiling When selected, the image will turn upside down. 31 English Press or into the sub menu and then use the or key to be used with a translucent screen.

User Guide
Page 32
Refer to pages 50~53 for the complete list of RS232 commands. User Controls Rear-Ceiling When selected, the image will appear reversed in upside down position. English 32 Projector ID ID definition can be set up by menu (range 0~99), and allow user control an individual projector by RS232. Menu Location Choose the menu location on the display screen.
Refer to pages 50~53 for the complete list of RS232 commands. User Controls Rear-Ceiling When selected, the image will appear reversed in upside down position. English 32 Projector ID ID definition can be set up by menu (range 0~99), and allow user control an individual projector by RS232. Menu Location Choose the menu location on the display screen.
User Guide
Page 37
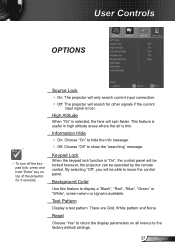
... search current input connection. Off: The projector will be locked however, the projector can be able to display a "Black", "Red", "Blue", "Green" or "White", screen when no signal is "On", the control panel will search for 5 seconds. High Altitude When "On" is selected, the fans will be operated by the...
... search current input connection. Off: The projector will be locked however, the projector can be able to display a "Black", "Red", "Blue", "Green" or "White", screen when no signal is "On", the control panel will search for 5 seconds. High Altitude When "On" is selected, the fans will be operated by the...

User Guide
Page 40
... projecting the whole image, you will also need to change the monitor display you have removed the lens cap and the projector is switched on -screen Ensure all the cables and power connections are correctly and securely connected as described in the "Installation" section. Ensure all the pins of...
... projecting the whole image, you will also need to change the monitor display you have removed the lens cap and the projector is switched on -screen Ensure all the cables and power connections are correctly and securely connected as described in the "Installation" section. Ensure all the pins of...
User Guide
Page 41
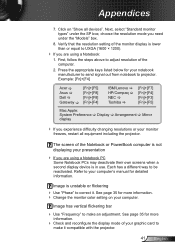
...the SP box; See page 35 for more information. Change the monitor color setting on "Show all equipment including the projector. The screen of the monitor display is unstable or flickering Use "Phase" to correct it compatible with the projector. 41 English See page 35...out from notebook to UXGA (1600 × 1200). If you are using a Notebook PC Some Notebook PCs may deactivate their own screens when a second display device is in use. Image is lower than or equal to projector. choose the resolution mode you experience difficulty changing ...
...the SP box; See page 35 for more information. Change the monitor color setting on "Show all equipment including the projector. The screen of the monitor display is unstable or flickering Use "Phase" to correct it compatible with the projector. 41 English See page 35...out from notebook to UXGA (1600 × 1200). If you are using a Notebook PC Some Notebook PCs may deactivate their own screens when a second display device is in use. Image is lower than or equal to projector. choose the resolution mode you experience difficulty changing ...


