
Owner Manual
Page 1
... reserved. This quick setup sheet shows the typical hookup method for the AV component hookup. (C) Copyright 2008 ONKYO CORPORATION Japan. For more detailed hookup information and operating instructions, please see the Instruction Manual. QUICK SETUP Model : TX-SR606 Thank you for purchasing this sheet for connecting speakers and AV components (DVD player, TV, cable/satellite receiver).
... reserved. This quick setup sheet shows the typical hookup method for the AV component hookup. (C) Copyright 2008 ONKYO CORPORATION Japan. For more detailed hookup information and operating instructions, please see the Instruction Manual. QUICK SETUP Model : TX-SR606 Thank you for purchasing this sheet for connecting speakers and AV components (DVD player, TV, cable/satellite receiver).

Owner Manual
Page 2
... If your TV, you are not using the setup menus on a TV that is connected to the AV receiver's COAXIAL 1 DIGITAL IN, and your TV or player doesn't support HDMI, use the TX-SR606's display when changing settings. Coaxial feed from TV antenna If you 'll need to assign the digital ...is connected to assign the digital input. The onscreen setup menus appear only on the TX-SR606's display. Listening Mode Preset 6. Input Assign 1. Component Video Input 3. On the front panel TUNING PRESET SETUP ENTER AV Component Hookup See the other side of this sheet for the Speaker hookup. IF ...
... If your TV, you are not using the setup menus on a TV that is connected to the AV receiver's COAXIAL 1 DIGITAL IN, and your TV or player doesn't support HDMI, use the TX-SR606's display when changing settings. Coaxial feed from TV antenna If you 'll need to assign the digital ...is connected to assign the digital input. The onscreen setup menus appear only on the TX-SR606's display. Listening Mode Preset 6. Input Assign 1. Component Video Input 3. On the front panel TUNING PRESET SETUP ENTER AV Component Hookup See the other side of this sheet for the Speaker hookup. IF ...

Instruction Manual
Page 1
... listening enjoyment from your AV components ....... 47 Listening to the Radio 51 Thank you for future reference. Please read this manual thoroughly before making connections and plugging in this manual for purchasing an Onkyo AV Receiver. AV Receiver TX-SR606 Instruction Manual Contents Introduction... 2 Connection 14 Turning On & First Time Setup ..... 37 Basic Operation Playing your new AV Receiver. Following the instructions in the unit.
... listening enjoyment from your AV components ....... 47 Listening to the Radio 51 Thank you for future reference. Please read this manual thoroughly before making connections and plugging in this manual for purchasing an Onkyo AV Receiver. AV Receiver TX-SR606 Instruction Manual Contents Introduction... 2 Connection 14 Turning On & First Time Setup ..... 37 Basic Operation Playing your new AV Receiver. Following the instructions in the unit.

Instruction Manual
Page 3
... can radiate radio frequency energy and, if not installed and used to disconnect this unit from country to correct the interference by your Onkyo dealer. 3. This equipment generates, uses and can be sure to use this unit, have a voltage selector switch for an extended period... use a soft cloth dampened with Wet Hands-Never handle this equipment does cause harmful interference to radio or television reception, which the receiver is illegal without the permission of the FCC Rules. Dry the unit immediately afterwards with a polarized plug: CAUTION: TO PREVENT ELECTRIC SHOCK...
... can radiate radio frequency energy and, if not installed and used to disconnect this unit from country to correct the interference by your Onkyo dealer. 3. This equipment generates, uses and can be sure to use this unit, have a voltage selector switch for an extended period... use a soft cloth dampened with Wet Hands-Never handle this equipment does cause harmful interference to radio or television reception, which the receiver is illegal without the permission of the FCC Rules. Dry the unit immediately afterwards with a polarized plug: CAUTION: TO PREVENT ELECTRIC SHOCK...

Instruction Manual
Page 4
... if your AC outlet does not match with an appropriate fuse. If the power cord's plug is fitted with the plug on the AV receiver's power cord. (Adapter varies from country to country.) *How to mount the AC plug: * In catalogs and on packaging, the letter ... 1 2 3 Speaker Cable Speaker cable labels * Power-plug adapter Only supplied in own responsibility, that indicated on the body of Conformity We, ONKYO EUROPE ELECTRONICS GmbH LIEGNITZERSTRASSE 6, 82194 GROEBENZELL, GERMANY declare in certain countries. The wire which is coloured blue must be approved by qualified ...
... if your AC outlet does not match with an appropriate fuse. If the power cord's plug is fitted with the plug on the AV receiver's power cord. (Adapter varies from country to country.) *How to mount the AC plug: * In catalogs and on packaging, the letter ... 1 2 3 Speaker Cable Speaker cable labels * Power-plug adapter Only supplied in own responsibility, that indicated on the body of Conformity We, ONKYO EUROPE ELECTRONICS GmbH LIEGNITZERSTRASSE 6, 82194 GROEBENZELL, GERMANY declare in certain countries. The wire which is coloured blue must be approved by qualified ...

Instruction Manual
Page 5
...Player or Turntable 33 Connecting a Cassette, CDR, MiniDisc, or DAT Recorder 34 Connecting an RI Dock 35 Connecting Onkyo Components 36 Turning On the AV Receiver 37 Connecting the Power Cord 37 Turning On and Standby 37 First Time Setup 38 Automatic Speaker Setup 38 Speaker Settings...44 Changing the Input Display 45 Automatic Audio Input Selection Setup 46 Playing Your AV Components 47 Basic AV Receiver Operation 47 Common Functions 48 Setting the Display Brightness 48 Muting the AV Receiver 48 Using the Sleep Timer 48 Using Headphones 49 Displaying Source Information 49 ...
...Player or Turntable 33 Connecting a Cassette, CDR, MiniDisc, or DAT Recorder 34 Connecting an RI Dock 35 Connecting Onkyo Components 36 Turning On the AV Receiver 37 Connecting the Power Cord 37 Turning On and Standby 37 First Time Setup 38 Automatic Speaker Setup 38 Speaker Settings...44 Changing the Input Display 45 Automatic Audio Input Selection Setup 46 Playing Your AV Components 47 Basic AV Receiver Operation 47 Common Functions 48 Setting the Display Brightness 48 Muting the AV Receiver 48 Using the Sleep Timer 48 Using Headphones 49 Displaying Source Information 49 ...

Instruction Manual
Page 7
... speaker system in your Zone 2 room, you can enjoy 2-channel stereo playback (see page 14). Multiroom Capability You can use two speaker systems with this AV receiver-a surround-sound speaker system (up to 7.1-channel playback (see page 83). *The listening modes cannot be used with Zone 2.
... speaker system in your Zone 2 room, you can enjoy 2-channel stereo playback (see page 14). Multiroom Capability You can use two speaker systems with this AV receiver-a surround-sound speaker system (up to 7.1-channel playback (see page 83). *The listening modes cannot be used with Zone 2.

Instruction Manual
Page 8
... OFF ZONE 2 LEVEL TONE MOVIE/TV MUSIC GAME DISPLAY DIGITAL INPUT DIMMER MEMORY TUNING MODE CLEAR SETUP MIC AUX INPUT VIDEO L AUDIO R AV RECEIVER TX-SR606 KL M Other models N OPQ RS TUV W ON/STANDBY STANDBY ZONE 2 TUNING PRESET X MASTER VOLUME PURE AUDIO MULTI CH DVD VCR... DIGITAL INPUT RT/PTY/TP MEMORY TUNING MODE CLEAR SETUP MIC AUX INPUT VIDEO L AUDIO R AV RECEIVER TX-SR606 Y T The actual front panel has various logos printed on it. Lights up when the AV receiver is on Standby and flashes while a signal is on page 9. F Display See "Display...
... OFF ZONE 2 LEVEL TONE MOVIE/TV MUSIC GAME DISPLAY DIGITAL INPUT DIMMER MEMORY TUNING MODE CLEAR SETUP MIC AUX INPUT VIDEO L AUDIO R AV RECEIVER TX-SR606 KL M Other models N OPQ RS TUV W ON/STANDBY STANDBY ZONE 2 TUNING PRESET X MASTER VOLUME PURE AUDIO MULTI CH DVD VCR... DIGITAL INPUT RT/PTY/TP MEMORY TUNING MODE CLEAR SETUP MIC AUX INPUT VIDEO L AUDIO R AV RECEIVER TX-SR606 Y T The actual front panel has various logos printed on it. Lights up when the AV receiver is on Standby and flashes while a signal is on page 9. F Display See "Display...

Instruction Manual
Page 9
... pages in parentheses. 1 SLEEP indicator (48) Lights up when the Sleep function has been set. 2 MUTING indicator (48) Flashes while the AV receiver is muted. 3 Listening mode and format indicators (57) Show the selected listening mode and audio input signal format. 4 Tuning indicators (52) .... M ZONE 2 LEVEL button (86) Used when adjusting the volume level of Zone 2. TUNED (52): Lights up when tuned to Know the AV Receiver-Continued For detailed information, see the pages in parentheses. I RETURN button Selects the previously displayed setup menu. T DIMMER (RT/PTY/TP) button ...
... pages in parentheses. 1 SLEEP indicator (48) Lights up when the Sleep function has been set. 2 MUTING indicator (48) Flashes while the AV receiver is muted. 3 Listening mode and format indicators (57) Show the selected listening mode and audio input signal format. 4 Tuning indicators (52) .... M ZONE 2 LEVEL button (86) Used when adjusting the volume level of Zone 2. TUNED (52): Lights up when tuned to Know the AV Receiver-Continued For detailed information, see the pages in parentheses. I RETURN button Selects the previously displayed setup menu. T DIMMER (RT/PTY/TP) button ...

Instruction Manual
Page 10
...COAXIAL 1 and 2 These coaxial digital audio inputs are for connecting an AM antenna. See "Component Video Input Setup" on another -capable Onkyo component for connecting a SIRIUS digital antenna, sold separately (see the separate SIRIUS instructions). The FRONT L/R and SURR BACK L/R terminal posts ...can be used with front speakers and surround back speakers, respectively, or used to Know the AV Receiver-Continued Rear Panel North American model 12 3 4 5 6G H I FRONT L/R, CENTER, SURR L/R, and SURR BACK L/R SPEAKERS These terminal posts...
...COAXIAL 1 and 2 These coaxial digital audio inputs are for connecting an AM antenna. See "Component Video Input Setup" on another -capable Onkyo component for connecting a SIRIUS digital antenna, sold separately (see the separate SIRIUS instructions). The FRONT L/R and SURR BACK L/R terminal posts ...can be used with front speakers and surround back speakers, respectively, or used to Know the AV Receiver-Continued Rear Panel North American model 12 3 4 5 6G H I FRONT L/R, CENTER, SURR L/R, and SURR BACK L/R SPEAKERS These terminal posts...

Instruction Manual
Page 11
... K L MN O P Q R S K CD IN This analog audio input is for connecting speakers in Zone 2. N CBL/SAT IN A cable or satellite receiver can be connected here. There are for connecting a component with power systems around the world (see page 3). Q DVD FRONT L/R, CENTER, SUBWOOFER, SURR L/R, and... input jacks for connecting a recorder with an analog audio input and output, such as a VCR or DVR, can be connected to Know the AV Receiver-Continued Other models 12 3 4 5 6H I T U Only some models) This voltage selector provides compatibility with a 5.1/7.1-channel analog audio output...
... K L MN O P Q R S K CD IN This analog audio input is for connecting speakers in Zone 2. N CBL/SAT IN A cable or satellite receiver can be connected here. There are for connecting a component with power systems around the world (see page 3). Q DVD FRONT L/R, CENTER, SUBWOOFER, SURR L/R, and... input jacks for connecting a recorder with an analog audio input and output, such as a VCR or DVR, can be connected to Know the AV Receiver-Continued Other models 12 3 4 5 6H I T U Only some models) This voltage selector provides compatibility with a 5.1/7.1-channel analog audio output...

Instruction Manual
Page 12
... * SP A/B is not used in parentheses. Note: • An Onkyo cassette recorder connected via can also use the remote controller to change settings. Remote Controller Controlling the AV Receiver To control the AV receiver, press the [RECEIVER] REMOTE MODE button to On or Standby. L AUDIO button (69).... F LISTENING MODE buttons (57) Used to select and adjust settings. J VOL [ ]/[ ] button (47) Adjusts the volume of the AV receiver regardless of the currently selected remote controller mode. K RETURN button Returns to select AM and FM radio stations directly. 3 D.TUN button (53)...
... * SP A/B is not used in parentheses. Note: • An Onkyo cassette recorder connected via can also use the remote controller to change settings. Remote Controller Controlling the AV Receiver To control the AV receiver, press the [RECEIVER] REMOTE MODE button to On or Standby. L AUDIO button (69).... F LISTENING MODE buttons (57) Used to select and adjust settings. J VOL [ ]/[ ] button (47) Adjusts the volume of the AV receiver regardless of the currently selected remote controller mode. K RETURN button Returns to select AM and FM radio stations directly. 3 D.TUN button (53)...

Instruction Manual
Page 13
... battery compartment, press the small lever and remove the cover. Using the Remote Controller When using the remote controller, point it and the AV receiver's remote control sensor. 13 Notes: • If the remote controller doesn't work reliably, try replacing the batteries. • Don't ...button may be pressed continuously, thereby draining the batteries. • The remote controller may not work reliably if the AV receiver is installed in the same room, or the AV receiver is installed close to equipment that uses infrared rays, the remote controller may not work reliably. • Don't...
... battery compartment, press the small lever and remove the cover. Using the Remote Controller When using the remote controller, point it and the AV receiver's remote control sensor. 13 Notes: • If the remote controller doesn't work reliably, try replacing the batteries. • Don't ...button may be pressed continuously, thereby draining the batteries. • The remote controller may not work reliably if the AV receiver is installed in the same room, or the AV receiver is installed close to equipment that uses infrared rays, the remote controller may not work reliably. • Don't...

Instruction Manual
Page 14
... of wall position Corner position 14 Connecting Your Speakers Enjoying Home Theater Thanks to the AV receiver's superb capabilities, you can enjoy DVDs featuring Dolby Digital or DTS. You can enjoy Dolby Pro Logic IIx, DTS Neo:6, or Onkyo's original DSP listening modes. Center speaker This speaker enhances the front left and right...
... of wall position Corner position 14 Connecting Your Speakers Enjoying Home Theater Thanks to the AV receiver's superb capabilities, you can enjoy DVDs featuring Dolby Digital or DTS. You can enjoy Dolby Pro Logic IIx, DTS Neo:6, or Onkyo's original DSP listening modes. Center speaker This speaker enhances the front left and right...
Instruction Manual
Page 15
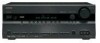
...REMOTE CONTROL CD TAPE GAME/TV CBL/SAT VCR/DVR SUB WOOFER DVD LINE INPUT PRE OUT SUB WOOFER Attaching the Speaker Labels The AV receiver's positive (+) speaker terminals are all black.) Speaker Front left Front right Center Surround left Surround right Surround back left and right ... 6. Dipole speakers TV/screen 1 2 3 4 Normal speakers TV/screen 1 2 3 4 Connecting a Powered Subwoofer Using a suitable cable, connect the AV receiver's PRE OUT: SUBWOOFER to the input on the number of speakers you 're using an external amplifier, connect the PRE OUT: SUBWOOFER to...
...REMOTE CONTROL CD TAPE GAME/TV CBL/SAT VCR/DVR SUB WOOFER DVD LINE INPUT PRE OUT SUB WOOFER Attaching the Speaker Labels The AV receiver's positive (+) speaker terminals are all black.) Speaker Front left Front right Center Surround left Surround right Surround back left and right ... 6. Dipole speakers TV/screen 1 2 3 4 Normal speakers TV/screen 1 2 3 4 Connecting a Powered Subwoofer Using a suitable cable, connect the AV receiver's PRE OUT: SUBWOOFER to the input on the number of speakers you 're using an external amplifier, connect the PRE OUT: SUBWOOFER to...

Instruction Manual
Page 16
... be connected to each speaker terminal. Connecting the Speaker Cables 1 Strip about 5/8" (15 mm) of terminals. Doing so may damage the AV receiver. • Don't connect a speaker to only negative (-) terminals. The following before making any of phase and will sound unnatural. •...; Unnecessarily long or very thin speaker cables may damage the AV receiver. • Don't connect more , but less than one surround back speaker, connect it to the left speaker Center speaker 16 Connect...
... be connected to each speaker terminal. Connecting the Speaker Cables 1 Strip about 5/8" (15 mm) of terminals. Doing so may damage the AV receiver. • Don't connect a speaker to only negative (-) terminals. The following before making any of phase and will sound unnatural. •...; Unnecessarily long or very thin speaker cables may damage the AV receiver. • Don't connect more , but less than one surround back speaker, connect it to the left speaker Center speaker 16 Connect...

Instruction Manual
Page 17
...posts can only be used with speakers that link the speakers' tweeter (high) and woofer (low) terminals. • Bi-amping can be used , the AV receiver is able to drive up to 5.1 speakers in the main room. • For bi-amping, the FRONT L/R terminal posts connect to the right speaker's ... terminal posts connect to the front speakers' woofer terminals. • Once you've completed the bi-amping connections shown below and turned on the AV receiver, you must set the Speaker Type setting to Bi-Amp to the left speaker's negative (-) woofer (low) terminal. Bi-amping Speaker Hookup 1 Connect...
...posts can only be used with speakers that link the speakers' tweeter (high) and woofer (low) terminals. • Bi-amping can be used , the AV receiver is able to drive up to 5.1 speakers in the main room. • For bi-amping, the FRONT L/R terminal posts connect to the right speaker's ... terminal posts connect to the front speakers' woofer terminals. • Once you've completed the bi-amping connections shown below and turned on the AV receiver, you must set the Speaker Type setting to Bi-Amp to the left speaker's negative (-) woofer (low) terminal. Bi-amping Speaker Hookup 1 Connect...

Instruction Manual
Page 18
... you cannot achieve good reception with the supplied indoor AM loop antenna, try a commercially available outdoor FM antenna instead (see page 19). Once your AV receiver is for indoor use only. 1 Attach the FM antenna, as shown. ■ American Model 2 Connect both wires of the AM antenna to... the best possible reception. 2 Use thumbtacks or something similar to use , you 'll need to tune into the base, as shown. The AV receiver won't pick up any radio signals without any antenna connected, so you don't injure yourself when using it with the supplied indoor FM antenna, ...
... you cannot achieve good reception with the supplied indoor AM loop antenna, try a commercially available outdoor FM antenna instead (see page 19). Once your AV receiver is for indoor use only. 1 Attach the FM antenna, as shown. ■ American Model 2 Connect both wires of the AM antenna to... the best possible reception. 2 Use thumbtacks or something similar to use , you 'll need to tune into the base, as shown. The AV receiver won't pick up any radio signals without any antenna connected, so you don't injure yourself when using it with the supplied indoor FM antenna, ...

Instruction Manual
Page 19
... regulations to prevent electrical shock hazards. ■ Using a TV/FM Antenna Splitter It's best not to prevent electrical shock hazards. TV/FM antenna splitter To AV receiver To TV (or VCR) 19 Note that the AM loop antenna should be situated well away from tall buildings, preferably with a clear line of sight...
... regulations to prevent electrical shock hazards. ■ Using a TV/FM Antenna Splitter It's best not to prevent electrical shock hazards. TV/FM antenna splitter To AV receiver To TV (or VCR) 19 Note that the AM loop antenna should be situated well away from tall buildings, preferably with a clear line of sight...

Instruction Manual
Page 20
... and allows you to OPTICAL enjoy Dolby Digital and DTS. The audio quality is typically used instead of a multichannel cable. Note: The AV receiver does not support SCART connections. 20 Left (white) Analog audio Left (white) Right (red) Right (red) (Yellow) Composite video ...is inserted and close when it's removed. Connecting Your Components About AV Connections • Before making any AV connections, read the manuals supplied with a 7.1channel analog audio output. Optical Digital Jacks The AV receiver's optical digital jacks have shutter-type covers that open when an ...
... and allows you to OPTICAL enjoy Dolby Digital and DTS. The audio quality is typically used instead of a multichannel cable. Note: The AV receiver does not support SCART connections. 20 Left (white) Analog audio Left (white) Right (red) Right (red) (Yellow) Composite video ...is inserted and close when it's removed. Connecting Your Components About AV Connections • Before making any AV connections, read the manuals supplied with a 7.1channel analog audio output. Optical Digital Jacks The AV receiver's optical digital jacks have shutter-type covers that open when an ...


