
Owner Manual
Page 1
...right speaker Surround back left speaker Surround left speaker See the other side of this product. QUICK SETUP Model : TX-SR606 Thank you for purchasing this sheet for the AV component hookup. (C) Copyright 2008 ONKYO CORPORATION Japan. For more detailed hookup information and operating instructions, please see the Instruction Manual. Speaker Layout (Main ... Surround Back Right Speaker Hookup Front right speaker Front left speaker Center speaker 5/8'' (15mm) AM SURR BACK SPEAKERS Bi-AMP for connecting speakers and AV components (DVD player, TV, cable/satellite receiver).
...right speaker Surround back left speaker Surround left speaker See the other side of this product. QUICK SETUP Model : TX-SR606 Thank you for purchasing this sheet for the AV component hookup. (C) Copyright 2008 ONKYO CORPORATION Japan. For more detailed hookup information and operating instructions, please see the Instruction Manual. Speaker Layout (Main ... Surround Back Right Speaker Hookup Front right speaker Front left speaker Center speaker 5/8'' (15mm) AM SURR BACK SPEAKERS Bi-AMP for connecting speakers and AV components (DVD player, TV, cable/satellite receiver).

Owner Manual
Page 2
.../SAT VCR/DVR R SUB WOOFER DVD Please ensure the monitor input (VIDEO 1, VIDEO 2, VIDEO 3, etc.) selected corresponds to the AV receiver. Listening Mode Preset 6. The onscreen setup menus appear only on the TX-SR606's display. If you can connect them to the composite video or S-Video MONITOR OUT, or the COMPONENT VIDEO OUT, use...
.../SAT VCR/DVR R SUB WOOFER DVD Please ensure the monitor input (VIDEO 1, VIDEO 2, VIDEO 3, etc.) selected corresponds to the AV receiver. Listening Mode Preset 6. The onscreen setup menus appear only on the TX-SR606's display. If you can connect them to the composite video or S-Video MONITOR OUT, or the COMPONENT VIDEO OUT, use...

Instruction Manual
Page 1
... for purchasing an Onkyo AV Receiver. Using the Listening Modes........... 57 Advanced Operation 67 Troubleshooting 96 En Following the instructions in the unit. Please retain this manual will enable you to obtain optimum performance and listening enjoyment from your AV components ....... 47 Listening to the Radio 51 Thank you for future reference. AV Receiver TX-SR606 Instruction Manual...
... for purchasing an Onkyo AV Receiver. Using the Listening Modes........... 57 Advanced Operation 67 Troubleshooting 96 En Following the instructions in the unit. Please retain this manual will enable you to obtain optimum performance and listening enjoyment from your AV components ....... 47 Listening to the Radio 51 Thank you for future reference. AV Receiver TX-SR606 Instruction Manual...

Instruction Manual
Page 2
WARNING AVIS RISK OF ELECTRIC SHOCK RISQUE DE CHOC ELECTRIQUE DO NOT OPEN NE PAS OUVRIR The lightning flash with arrowhead symbol, within an equilateral triangle, is required when the apparatus has been damaged in the literature accompanying the appliance. Read these instructions. 3. Heed all instructions. 5. Clean only with the manufacturer's instructions. 8. If the provided plug does not fit into the apparatus, the apparatus has been exposed to its normal operation, E. Damage Requiring Service Unplug the apparatus from being walked on or pinched particularly at ...
WARNING AVIS RISK OF ELECTRIC SHOCK RISQUE DE CHOC ELECTRIQUE DO NOT OPEN NE PAS OUVRIR The lightning flash with arrowhead symbol, within an equilateral triangle, is required when the apparatus has been damaged in the literature accompanying the appliance. Read these instructions. 3. Heed all instructions. 5. Clean only with the manufacturer's instructions. 8. If the provided plug does not fit into the apparatus, the apparatus has been exposed to its normal operation, E. Damage Requiring Service Unplug the apparatus from being walked on or pinched particularly at ...

Instruction Manual
Page 3
...fully shutdown the unit. This equipment generates, uses and can be sure to use a small screwdriver to set it 's between the equipment and receiver. • Connect the equipment into an outlet on , the user is not userserviceable. Dry the unit immediately afterwards with a polarized plug: ...holder. 2. However, there is connected. • Consult the dealer or an experienced radio/TV techni- Some models have it 's for your Onkyo dealer. 6. If it to the correct voltage for personal use a soft cloth dampened with power systems around the world. If water or any...
...fully shutdown the unit. This equipment generates, uses and can be sure to use a small screwdriver to set it 's between the equipment and receiver. • Connect the equipment into an outlet on , the user is not userserviceable. Dry the unit immediately afterwards with a polarized plug: ...holder. 2. However, there is connected. • Consult the dealer or an experienced radio/TV techni- Some models have it 's for your Onkyo dealer. 6. If it to the correct voltage for personal use a soft cloth dampened with power systems around the world. If water or any...

Instruction Manual
Page 4
...ONKYO product described in this adapter if your socket outlets, cut it off and fit a suitable plug. The wire which is marked with the coloured markings identifying the terminals in certain countries. Check for your AC outlet does not match with the plug on the AV receiver...GROEBENZELL, GERMANY K. Precautions-Continued For British models Replacement and mounting of an AC plug on the power supply cord of Conformity We, ONKYO EUROPE ELECTRONICS GmbH LIEGNITZERSTRASSE 6, 82194 GROEBENZELL, GERMANY declare in own responsibility, that indicated on the plug. Fit a suitable fuse in ...
...ONKYO product described in this adapter if your socket outlets, cut it off and fit a suitable plug. The wire which is marked with the coloured markings identifying the terminals in certain countries. Check for your AC outlet does not match with the plug on the AV receiver...GROEBENZELL, GERMANY K. Precautions-Continued For British models Replacement and mounting of an AC plug on the power supply cord of Conformity We, ONKYO EUROPE ELECTRONICS GmbH LIEGNITZERSTRASSE 6, 82194 GROEBENZELL, GERMANY declare in own responsibility, that indicated on the plug. Fit a suitable fuse in ...

Instruction Manual
Page 5
...Player or Turntable 33 Connecting a Cassette, CDR, MiniDisc, or DAT Recorder 34 Connecting an RI Dock 35 Connecting Onkyo Components 36 Turning On the AV Receiver 37 Connecting the Power Cord 37 Turning On and Standby 37 First Time Setup 38 Automatic Speaker Setup 38 Speaker Settings...44 Changing the Input Display 45 Automatic Audio Input Selection Setup 46 Playing Your AV Components 47 Basic AV Receiver Operation 47 Common Functions 48 Setting the Display Brightness 48 Muting the AV Receiver 48 Using the Sleep Timer 48 Using Headphones 49 Displaying Source Information 49 ...
...Player or Turntable 33 Connecting a Cassette, CDR, MiniDisc, or DAT Recorder 34 Connecting an RI Dock 35 Connecting Onkyo Components 36 Turning On the AV Receiver 37 Connecting the Power Cord 37 Turning On and Standby 37 First Time Setup 38 Automatic Speaker Setup 38 Speaker Settings...44 Changing the Input Display 45 Automatic Audio Input Selection Setup 46 Playing Your AV Components 47 Basic AV Receiver Operation 47 Common Functions 48 Setting the Display Brightness 48 Muting the AV Receiver 48 Using the Sleep Timer 48 Using Headphones 49 Displaying Source Information 49 ...

Instruction Manual
Page 6
... Audio*2 • Faroudja DCDi Edge Enhancement • Pure Audio Mode (On models other countries. * "x.v.Color" is a trademark of Onkyo Corporation. *4 HDMI, the HDMI logo and High Definition Multimedia Interface are trademarks of DTS, Inc. Available only in the ...• 24-bit/192kHz D/A Converters • Powerful and Highly Accurate 32-bit DSP Processing Connections • 4 HDMI*4 Inputs and 1 Output • Onkyo RIHD for System Control • HDTV-Ready Component Video Switching (2 Inputs/1 Output) • 4 Digital Inputs (2 Optical/2 Coaxial/4 Assignable) • ...
... Audio*2 • Faroudja DCDi Edge Enhancement • Pure Audio Mode (On models other countries. * "x.v.Color" is a trademark of Onkyo Corporation. *4 HDMI, the HDMI logo and High Definition Multimedia Interface are trademarks of DTS, Inc. Available only in the ...• 24-bit/192kHz D/A Converters • Powerful and Highly Accurate 32-bit DSP Processing Connections • 4 HDMI*4 Inputs and 1 Output • Onkyo RIHD for System Control • HDTV-Ready Component Video Switching (2 Inputs/1 Output) • 4 Digital Inputs (2 Optical/2 Coaxial/4 Assignable) • ...

Instruction Manual
Page 7
... and right speakers Main Room Surround back left and right speakers Left and right stereo speakers 7 And, you can use two speaker systems with this AV receiver-a surround-sound speaker system (up to 7.1-channel playback (see page 83). *The listening modes cannot be used , nothing is reduced to 7.1 channels) in your main...
... and right speakers Main Room Surround back left and right speakers Left and right stereo speakers 7 And, you can use two speaker systems with this AV receiver-a surround-sound speaker system (up to 7.1-channel playback (see page 83). *The listening modes cannot be used , nothing is reduced to 7.1 channels) in your main...

Instruction Manual
Page 8
... 2 OFF ZONE 2 LEVEL TONE MOVIE/TV MUSIC GAME DISPLAY DIGITAL INPUT DIMMER MEMORY TUNING MODE CLEAR SETUP MIC AUX INPUT VIDEO L AUDIO R AV RECEIVER TX-SR606 KL M Other models N OPQ RS TUV W ON/STANDBY STANDBY ZONE 2 TUNING PRESET X MASTER VOLUME PURE AUDIO MULTI CH DVD VCR/DVR ...ZONE 2 LEVEL TONE MOVIE/TV MUSIC GAME DISPLAY DIGITAL INPUT RT/PTY/TP MEMORY TUNING MODE CLEAR SETUP MIC AUX INPUT VIDEO L AUDIO R AV RECEIVER TX-SR606 Y T The actual front panel has various logos printed on Standby and flashes while a signal is being set items. The ENTER ...
... 2 OFF ZONE 2 LEVEL TONE MOVIE/TV MUSIC GAME DISPLAY DIGITAL INPUT DIMMER MEMORY TUNING MODE CLEAR SETUP MIC AUX INPUT VIDEO L AUDIO R AV RECEIVER TX-SR606 KL M Other models N OPQ RS TUV W ON/STANDBY STANDBY ZONE 2 TUNING PRESET X MASTER VOLUME PURE AUDIO MULTI CH DVD VCR/DVR ...ZONE 2 LEVEL TONE MOVIE/TV MUSIC GAME DISPLAY DIGITAL INPUT RT/PTY/TP MEMORY TUNING MODE CLEAR SETUP MIC AUX INPUT VIDEO L AUDIO R AV RECEIVER TX-SR606 Y T The actual front panel has various logos printed on Standby and flashes while a signal is being set items. The ENTER ...

Instruction Manual
Page 9
... mode is selected for private listening. O MOVIE/TV button (57) Selects the listening modes intended for connecting a standard pair of the AV receiver to Min, 1 through 79, or Max. See "Using RDS (European models only)" on . Goes off when Manual Tuning mode is... (48) Lights up when the Sleep function has been set. 2 MUTING indicator (48) Flashes while the AV receiver is used with video games. Getting to Know the AV Receiver-Continued For detailed information, see the pages in parentheses. I RETURN button Selects the previously displayed setup menu.
... mode is selected for private listening. O MOVIE/TV button (57) Selects the listening modes intended for connecting a standard pair of the AV receiver to Min, 1 through 79, or Max. See "Using RDS (European models only)" on . Goes off when Manual Tuning mode is... (48) Lights up when the Sleep function has been set. 2 MUTING indicator (48) Flashes while the AV receiver is used with video games. Getting to Know the AV Receiver-Continued For detailed information, see the pages in parentheses. I RETURN button Selects the previously displayed setup menu.

Instruction Manual
Page 10
... Onkyo component for remote and system control. They're assignable, which means you can be used with front speakers and surround back speakers, respectively, or used to bi-amp front Speakers. They're assignable, which means you must make an analog audio connection (RCA) between the AV receiver ... can assign each one to an input selector to suit your TV or projector. nected to the jack on your setup. Getting to Know the AV Receiver-Continued Rear Panel North American model 12 3 4 5 6G H I FRONT L/R, CENTER, SURR L/R, and SURR BACK L/R SPEAKERS These terminal posts are for ...
... Onkyo component for remote and system control. They're assignable, which means you can be used with front speakers and surround back speakers, respectively, or used to bi-amp front Speakers. They're assignable, which means you must make an analog audio connection (RCA) between the AV receiver ... can assign each one to an input selector to suit your TV or projector. nected to the jack on your setup. Getting to Know the AV Receiver-Continued Rear Panel North American model 12 3 4 5 6G H I FRONT L/R, CENTER, SURR L/R, and SURR BACK L/R SPEAKERS These terminal posts are for ...

Instruction Manual
Page 11
... are for connecting speakers in Zone 2. T ZONE 2 SPEAKERS L/R These push terminals are analog audio input jacks for connecting the video signal. Getting to Know the AV Receiver-Continued Other models 12 3 4 5 6H I T U Only some models) This voltage selector provides compatibility with power systems around the world (see page 3). There's S-Video and composite...
... are for connecting speakers in Zone 2. T ZONE 2 SPEAKERS L/R These push terminals are analog audio input jacks for connecting the video signal. Getting to Know the AV Receiver-Continued Other models 12 3 4 5 6H I T U Only some models) This voltage selector provides compatibility with power systems around the world (see page 3). There's S-Video and composite...

Instruction Manual
Page 12
... also be controlled in Receiver mode (see the pages in this AV receiver. ■ Controlling the tuner To control the AV receiver's tuner, press the [TUNER] (or [RECEIVER]) REMOTE MODE button. button (54) Selects radio presets. Note: • An Onkyo cassette recorder connected via ... CD player, and other components. Remote Controller Controlling the AV Receiver To control the AV receiver, press the [RECEIVER] REMOTE MODE button to On or Standby. J VOL [ ]/[ ] button (47) Adjusts the volume of the AV receiver regardless of the currently selected remote controller mode. A ON...
... also be controlled in Receiver mode (see the pages in this AV receiver. ■ Controlling the tuner To control the AV receiver's tuner, press the [TUNER] (or [RECEIVER]) REMOTE MODE button. button (54) Selects radio presets. Note: • An Onkyo cassette recorder connected via ... CD player, and other components. Remote Controller Controlling the AV Receiver To control the AV receiver, press the [RECEIVER] REMOTE MODE button to On or Standby. J VOL [ ]/[ ] button (47) Adjusts the volume of the AV receiver regardless of the currently selected remote controller mode. A ON...

Instruction Manual
Page 13
Keep this in mind when installing. • The remote controller will not work if there's an obstacle between it and the AV receiver's remote control sensor. 13 Notes: • If the remote controller doesn't work reliably, try replacing the batteries. • Don't mix new and old batteries ...; If another remote controller of the same type is used in the same room, or the AV receiver is installed close to equipment that uses infrared rays, the remote controller may not work reliably if the AV receiver is subjected to bright light, such as a book or magazine, because a button may be pressed...
Keep this in mind when installing. • The remote controller will not work if there's an obstacle between it and the AV receiver's remote control sensor. 13 Notes: • If the remote controller doesn't work reliably, try replacing the batteries. • Don't mix new and old batteries ...; If another remote controller of the same type is used in the same room, or the AV receiver is installed close to equipment that uses infrared rays, the remote controller may not work reliably if the AV receiver is subjected to bright light, such as a book or magazine, because a button may be pressed...

Instruction Manual
Page 14
.... Angle them at one that provides the most satisfying results. Connecting Your Speakers Enjoying Home Theater Thanks to the AV receiver's superb capabilities, you can enjoy Dolby Pro Logic IIx, DTS Neo:6, or Onkyo's original DSP listening modes. Surround back left and right speakers These speakers are necessary to add realistic ambience. You...
.... Angle them at one that provides the most satisfying results. Connecting Your Speakers Enjoying Home Theater Thanks to the AV receiver's superb capabilities, you can enjoy Dolby Pro Logic IIx, DTS Neo:6, or Onkyo's original DSP listening modes. Surround back left and right speakers These speakers are necessary to add realistic ambience. You...
Instruction Manual
Page 15
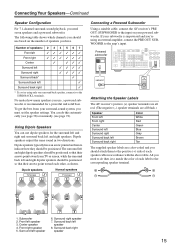
... R REMOTE CONTROL CD TAPE GAME/TV CBL/SAT VCR/DVR SUB WOOFER DVD LINE INPUT PRE OUT SUB WOOFER Attaching the Speaker Labels The AV receiver's positive (+) speaker terminals are all red. (The negative (-) speaker terminals are all black.) Speaker Front left Front right Center Surround left.... Dipole speakers TV/screen 1 2 3 4 Normal speakers TV/screen 1 2 3 4 Connecting a Powered Subwoofer Using a suitable cable, connect the AV receiver's PRE OUT: SUBWOOFER to the input on your TV or screen, while the surround back left ✓ Surround back right ✓ * If you...
... R REMOTE CONTROL CD TAPE GAME/TV CBL/SAT VCR/DVR SUB WOOFER DVD LINE INPUT PRE OUT SUB WOOFER Attaching the Speaker Labels The AV receiver's positive (+) speaker terminals are all red. (The negative (-) speaker terminals are all black.) Speaker Front left Front right Center Surround left.... Dipole speakers TV/screen 1 2 3 4 Normal speakers TV/screen 1 2 3 4 Connecting a Powered Subwoofer Using a suitable cable, connect the AV receiver's PRE OUT: SUBWOOFER to the input on your TV or screen, while the surround back left ✓ Surround back right ✓ * If you...

Instruction Manual
Page 16
..., and negative (-) terminals to each pair of phase and will sound unnatural. • Unnecessarily long or very thin speaker cables may damage the AV receiver. • Don't connect more , but less than one surround back speaker, connect it to short the positive and negative wires. If you .... If you use the amplifier at high volume levels for a long period of time, the built-in amp protection circuit may damage the AV receiver. • Don't connect a speaker to each speaker terminal. Connecting the Speaker Cables 1 Strip about 5/8" (15 mm) of between 6 and 16 ...
..., and negative (-) terminals to each pair of phase and will sound unnatural. • Unnecessarily long or very thin speaker cables may damage the AV receiver. • Don't connect more , but less than one surround back speaker, connect it to short the positive and negative wires. If you .... If you use the amplifier at high volume levels for a long period of time, the built-in amp protection circuit may damage the AV receiver. • Don't connect a speaker to each speaker terminal. Connecting the Speaker Cables 1 Strip about 5/8" (15 mm) of between 6 and 16 ...

Instruction Manual
Page 17
...be sure to remove the jumper bars that link the speakers' tweeter (high) and woofer (low) terminals. • Bi-amping can be used , the AV receiver is able to drive up to 5.1 speakers in the main room. • For bi-amping, the FRONT L/R terminal posts connect to the left speaker's ... terminal posts connect to the front speakers' woofer terminals. • Once you've completed the bi-amping connections shown below and turned on the AV receiver, you must set the Speaker Type setting to Bi-Amp to provide separate tweeter and woofer feeds for FRONT SPEAKERS L Left speaker Woofer (low) ...
...be sure to remove the jumper bars that link the speakers' tweeter (high) and woofer (low) terminals. • Bi-amping can be used , the AV receiver is able to drive up to 5.1 speakers in the main room. • For bi-amping, the FRONT L/R terminal posts connect to the left speaker's ... terminal posts connect to the front speakers' woofer terminals. • Once you've completed the bi-amping connections shown below and turned on the AV receiver, you must set the Speaker Type setting to Bi-Amp to provide separate tweeter and woofer feeds for FRONT SPEAKERS L Left speaker Woofer (low) ...

Instruction Manual
Page 18
...wires are not polarity sensitive, so they can be connected either way around). Keep the antenna as far away as possible from your AV receiver is ready for use, you must connect the antenna to connect commercially available outdoor FM and AM antennas. If you 'll need ... antenna's wires are attached securely and that you cannot achieve good reception with the supplied indoor FM antenna, try using thumbtacks. Once your AV receiver is ready for use, you cannot achieve good reception with a commercially available outdoor AM antenna (see page 19). 18 Connecting Antennas This ...
...wires are not polarity sensitive, so they can be connected either way around). Keep the antenna as far away as possible from your AV receiver is ready for use, you must connect the antenna to connect commercially available outdoor FM and AM antennas. If you 'll need ... antenna's wires are attached securely and that you cannot achieve good reception with the supplied indoor FM antenna, try using thumbtacks. Once your AV receiver is ready for use, you cannot achieve good reception with a commercially available outdoor AM antenna (see page 19). 18 Connecting Antennas This ...
