

Owner Manual
Page 1
Following the instructions in the unit. Please retain this manual will enable you for future reference. Contents Introduction 2 Connection 13 Turning On & First Time Setup .....32 Basic Operations 38 Using the Listening Modes ........49 Advanced Setup 54 Controlling Other Components ....62 Others 68 En Please read this manual thoroughly before making connections and plugging in this manual for purchasing an Onkyo AV Receiver. AV Receiver TX-SR307 Instruction Manual Thank you to obtain optimum performance and listening enjoyment from your new AV Receiver.
Following the instructions in the unit. Please retain this manual will enable you for future reference. Contents Introduction 2 Connection 13 Turning On & First Time Setup .....32 Basic Operations 38 Using the Listening Modes ........49 Advanced Setup 54 Controlling Other Components ....62 Others 68 En Please read this manual thoroughly before making connections and plugging in this manual for purchasing an Onkyo AV Receiver. AV Receiver TX-SR307 Instruction Manual Thank you to obtain optimum performance and listening enjoyment from your new AV Receiver.

Owner Manual
Page 3
... • Do not leave rubber or plastic items on this equipment does cause harmful interference to radio or television reception, which the receiver is used in a particular installation. This is encouraged to try to correct the interference by one or more of the copyright holder... the original packaging to use the unit for a Class B digital device, pursuant to provide reasonable protection against harmful interference in your Onkyo dealer. 8. These limits are wet or damp. For Canadian Models NOTE: THIS CLASS B DIGITAL APPARATUS COMPLIES WITH CANADIAN ICES-003....
... • Do not leave rubber or plastic items on this equipment does cause harmful interference to radio or television reception, which the receiver is used in a particular installation. This is encouraged to try to correct the interference by one or more of the copyright holder... the original packaging to use the unit for a Class B digital device, pursuant to provide reasonable protection against harmful interference in your Onkyo dealer. 8. These limits are wet or damp. For Canadian Models NOTE: THIS CLASS B DIGITAL APPARATUS COMPLIES WITH CANADIAN ICES-003....

Owner Manual
Page 4
...connected to the terminal which is in this instruction manual is marked with the letter L or coloured red. GROEBENZELL, GERMANY K. MIYAGI ONKYO EUROPE ELECTRONICS GmbH 1 2 Speaker Cable FRONT LEFT FRONT LEFT FRONT RIGHT FRONT RIGHT SURROUND LEFT SURROUND LEFT SURROUND RIGHT SURROUND RIGHT CENTER... technical standards such as EN60065, EN55013, EN55020 and EN61000-3-2, -3-3. If the power cord's plug is fitted with the plug on the AV receiver's power cord. (Adapter varies from country to country.) *How to the terminal which is coloured brown must be connected to mount the...
...connected to the terminal which is in this instruction manual is marked with the letter L or coloured red. GROEBENZELL, GERMANY K. MIYAGI ONKYO EUROPE ELECTRONICS GmbH 1 2 Speaker Cable FRONT LEFT FRONT LEFT FRONT RIGHT FRONT RIGHT SURROUND LEFT SURROUND LEFT SURROUND RIGHT SURROUND RIGHT CENTER... technical standards such as EN60065, EN55013, EN55020 and EN61000-3-2, -3-3. If the power cord's plug is fitted with the plug on the AV receiver's power cord. (Adapter varies from country to country.) *How to the terminal which is coloured brown must be connected to mount the...

Owner Manual
Page 5
... a Cassette, CDR, MiniDisc, or DAT Recorder 29 Connecting an RI Dock 30 Connecting Onkyo V Components 31 Connecting the Power Cord 31 Turning On & First Time Setup Turning On the AV receiver 32 Turning On and Standby 32 First Time Setup 33 Audyssey 2EQ™ Room Correction ...Input Setup 36 Digital Input Setup 36 Changing the Input Display 37 Basic Operations Basic Operations 38 Basic AV receiver Operation 38 Setting the Display Brightness 39 Muting the AV receiver 39 Using the Sleep Timer 39 Using Headphones 40 Adjusting the Bass & Treble 40 Displaying Source Information...
... a Cassette, CDR, MiniDisc, or DAT Recorder 29 Connecting an RI Dock 30 Connecting Onkyo V Components 31 Connecting the Power Cord 31 Turning On & First Time Setup Turning On the AV receiver 32 Turning On and Standby 32 First Time Setup 33 Audyssey 2EQ™ Room Correction ...Input Setup 36 Digital Input Setup 36 Changing the Input Display 37 Basic Operations Basic Operations 38 Basic AV receiver Operation 38 Setting the Display Brightness 39 Muting the AV receiver 39 Using the Sleep Timer 39 Using Headphones 40 Adjusting the Bass & Treble 40 Displaying Source Information...

Owner Manual
Page 7
... for use with RDS (Radio Data System). See "Using RDS (European models only)" on page 8. B ON/STANDBY button (32) Set the AV receiver to adjust the tone (bass and treble). H MOVIE/TV button (49) Selects the listening modes intended for use with music. Front & Rear... here for each item. L MEMORY button (45) Used when storing or deleting radio presets. C STANDBY indicator (32) Lights up when the AV receiver is being received from the remote controller. The page numbers in parentheses show where you can find the main explanation for clarity. D SPEAKERS A & B buttons ...
... for use with RDS (Radio Data System). See "Using RDS (European models only)" on page 8. B ON/STANDBY button (32) Set the AV receiver to adjust the tone (bass and treble). H MOVIE/TV button (49) Selects the listening modes intended for use with music. Front & Rear... here for each item. L MEMORY button (45) Used when storing or deleting radio presets. C STANDBY indicator (32) Lights up when the AV receiver is being received from the remote controller. The page numbers in parentheses show where you can find the main explanation for clarity. D SPEAKERS A & B buttons ...

Owner Manual
Page 8
R MASTER VOLUME control (38) Sets the volume of the AV receiver to a radio station. Display BC D S PHONES jack (40) This 1/4-inch phone jack is on . B A and B speaker indicators (13, 38) Indicator A lights up when tuned to ... (43): Lights up when speaker set to "Audyssey". 8 I F SLEEP indicator (39) Lights up when the "Equalizer Settings" is muted. C MUTING indicator (39) Flashes while the AV receiver is set B is selected for private listening. H Audio input indicators Indicate the type of stereo headphones for AM or FM radio. Lights up when the...
R MASTER VOLUME control (38) Sets the volume of the AV receiver to a radio station. Display BC D S PHONES jack (40) This 1/4-inch phone jack is on . B A and B speaker indicators (13, 38) Indicator A lights up when tuned to ... (43): Lights up when speaker set to "Audyssey". 8 I F SLEEP indicator (39) Lights up when the "Equalizer Settings" is muted. C MUTING indicator (39) Flashes while the AV receiver is set B is selected for private listening. H Audio input indicators Indicate the type of stereo headphones for AM or FM radio. Lights up when the...

Owner Manual
Page 9
... See "Digital Input Setup" on page 36. They're assignable, which means you must make an analog audio connection (RCA) between the AV receiver and the other component, even if they are for connecting components with an HDMI output, such as a DVD/BD player, DVD/BD recorder...a TV or projector with a component video input. See "Digital Input Setup" on page 36. See "Component Video Input Setup" on another V-capable Onkyo component for connecting speaker set B. J FRONT SPEAKERS B These push terminals are for connecting a recorder with an analog audio input and output, such as...
... See "Digital Input Setup" on page 36. They're assignable, which means you must make an analog audio connection (RCA) between the AV receiver and the other component, even if they are for connecting components with an HDMI output, such as a DVD/BD player, DVD/BD recorder...a TV or projector with a component video input. See "Digital Input Setup" on page 36. See "Component Video Input Setup" on another V-capable Onkyo component for connecting speaker set B. J FRONT SPEAKERS B These push terminals are for connecting a recorder with an analog audio input and output, such as...
Owner Manual
Page 11
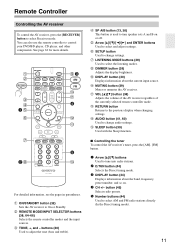
...Displays information about the band, frequency, preset number, and so on or off. L VOL [R]/[X] button (38) Adjusts the volume of the AV receiver regardless of the currently selected remote controller mode. button (45) Selects radio presets. 5 Number buttons (44) Used to select and adjust settings....input source. G SETUP button Used to turn speaker sets A and B on . 4 CH +/- Remote Controller Controlling the AV receiver To control the AV receiver, press the [RECEIVER] button to control your DVD/BD player, CD player, and other components. You can also use the remote controller to ...
...Displays information about the band, frequency, preset number, and so on or off. L VOL [R]/[X] button (38) Adjusts the volume of the AV receiver regardless of the currently selected remote controller mode. button (45) Selects radio presets. 5 Number buttons (44) Used to select and adjust settings....input source. G SETUP button Used to turn speaker sets A and B on . 4 CH +/- Remote Controller Controlling the AV receiver To control the AV receiver, press the [RECEIVER] button to control your DVD/BD player, CD player, and other components. You can also use the remote controller to ...
Owner Manual
Page 12
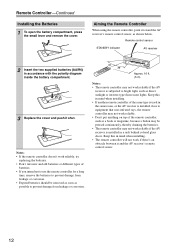
... corrosion. 30° 30° Approx. 16 ft. (5 m) Notes: • The remote controller may not work reliably if the AV receiver is subjected to prevent damage from leakage or corrosion. • Expired batteries should be pressed continuously, thereby draining the batteries. • The... remote controller may not work reliably if the AV receiver is installed in mind when installing. • The remote controller will not work reliably, try replacing the batteries. • Don't ...
... corrosion. 30° 30° Approx. 16 ft. (5 m) Notes: • The remote controller may not work reliably if the AV receiver is subjected to prevent damage from leakage or corrosion. • Expired batteries should be pressed continuously, thereby draining the batteries. • The... remote controller may not work reliably if the AV receiver is installed in mind when installing. • The remote controller will not work reliably, try replacing the batteries. • Don't ...

Owner Manual
Page 13
... the LFE (Low-Frequency Effects) channel. Tip: To find the best position for the sound image. Ideally they should be equally spaced from the TV. AV receiver Remote controller or Speaker set A Speaker set B Indicator Output On On Set A: 2.1 channels A B Set B: 2 channels Off A Set A: 5.1 channels On Off ... room and offers 2-channel stereo playback. They should be obtained by placing your subwoofer, while playing a movie or some music with the AV receiver: speaker set A and speaker set B is on, this speaker outputs no sound. 13 Angle them at the sides of the listener...
... the LFE (Low-Frequency Effects) channel. Tip: To find the best position for the sound image. Ideally they should be equally spaced from the TV. AV receiver Remote controller or Speaker set A Speaker set B Indicator Output On On Set A: 2.1 channels A B Set B: 2 channels Off A Set A: 5.1 channels On Off ... room and offers 2-channel stereo playback. They should be obtained by placing your subwoofer, while playing a movie or some music with the AV receiver: speaker set A and speaker set B is on, this speaker outputs no sound. 13 Angle them at the sides of the listener...

Owner Manual
Page 14
... terminals to only positive (+) terminals, and negative (-) terminals to several terminals. Connecting a Powered Subwoofer Using a suitable cable, connect the AV receiver's PRE OUT: SUBWOOFER to the input on the number of identification. (The negative (-) speaker terminals are all black.) Speaker Front left Front...see page 54). For North American model • If you are color-coded for a powerful and solid bass. Connecting the AV Receiver Connecting Your Speakers Speaker Configuration For the best surround-sound experience, you should be avoided. • Be careful not to short...
... terminals to only positive (+) terminals, and negative (-) terminals to several terminals. Connecting a Powered Subwoofer Using a suitable cable, connect the AV receiver's PRE OUT: SUBWOOFER to the input on the number of identification. (The negative (-) speaker terminals are all black.) Speaker Front left Front...see page 54). For North American model • If you are color-coded for a powerful and solid bass. Connecting the AV Receiver Connecting Your Speakers Speaker Configuration For the best surround-sound experience, you should be avoided. • Be careful not to short...

Owner Manual
Page 15
... right speaker left speaker Front right speaker A Front left speaker A Center speaker Speaker Set A Front right speaker B Front left speaker B Speaker Set B 15 Connecting the AV Receiver-Continued Connecting the Speaker Cables FRONT SPEAKERS A 1 Strip about 5/8" (15 mm) of insulation from the ends of the speaker cables, and twist the bare wires...
... right speaker left speaker Front right speaker A Front left speaker A Center speaker Speaker Set A Front right speaker B Front left speaker B Speaker Set B 15 Connecting the AV Receiver-Continued Connecting the Speaker Cables FRONT SPEAKERS A 1 Strip about 5/8" (15 mm) of insulation from the ends of the speaker cables, and twist the bare wires...

Owner Manual
Page 16
... thumbtacks or something similar to connect commercially available outdoor FM and AM antennas. Thumbtacks, etc. Once your AV receiver, TV, speaker cables, and power cords. Connecting the AV Receiver-Continued Connecting Antenna This section explains how to connect the supplied indoor FM antenna and AM loop antenna, and...fix the FM antenna into the base, as shown. If you must connect the antenna to achieve the best possible reception. The AV receiver won't pick up any radio signals without any antenna connected, so you cannot achieve good reception with the supplied indoor AM loop ...
... thumbtacks or something similar to connect commercially available outdoor FM and AM antennas. Thumbtacks, etc. Once your AV receiver, TV, speaker cables, and power cords. Connecting the AV Receiver-Continued Connecting Antenna This section explains how to connect the supplied indoor FM antenna and AM loop antenna, and...fix the FM antenna into the base, as shown. If you must connect the antenna to achieve the best possible reception. The AV receiver won't pick up any radio signals without any antenna connected, so you cannot achieve good reception with the supplied indoor AM loop ...

Owner Manual
Page 17
Connecting the AV Receiver-Continued Connecting an Outdoor FM Antenna If you cannot achieve good reception with a clear line of sight to your local FM transmitter. • Outdoor antenna ... a TV/FM antenna splitter, as shown. Outdoor AM antennas work best outside , but usable results can sometimes be left connected. TV/FM antenna splitter To AV receiver To TV (or VCR) 17 Outdoor antenna AM loop antenna Insulated antenna cable Notes: • Outdoor FM antennas work best when installed horizontally outside , but...
Connecting the AV Receiver-Continued Connecting an Outdoor FM Antenna If you cannot achieve good reception with a clear line of sight to your local FM transmitter. • Outdoor antenna ... a TV/FM antenna splitter, as shown. Outdoor AM antennas work best outside , but usable results can sometimes be left connected. TV/FM antenna splitter To AV receiver To TV (or VCR) 17 Outdoor antenna AM loop antenna Insulated antenna cable Notes: • Outdoor FM antennas work best when installed horizontally outside , but...

Owner Manual
Page 18
... digital video and audio and offer the best picture and sound quality. The audio quality is commonly used on virtually all AV connections. Note: The AV receiver does not support SCART connections. 18 Push plugs in all the way. Caution: To prevent shutter damage, hold the optical...jacks have shutter-type covers that open when an optical plug is the same as for coaxial. Connecting the AV Receiver-Continued About AV Connections • Before making any AV connections, read the manuals supplied with your other video equipment. Use red plugs to connect left-channel audio inputs...
... digital video and audio and offer the best picture and sound quality. The audio quality is commonly used on virtually all AV connections. Note: The AV receiver does not support SCART connections. 18 Push plugs in all the way. Caution: To prevent shutter damage, hold the optical...jacks have shutter-type covers that open when an optical plug is the same as for coaxial. Connecting the AV Receiver-Continued About AV Connections • Before making any AV connections, read the manuals supplied with your other video equipment. Use red plugs to connect left-channel audio inputs...

Owner Manual
Page 19
... analog, optical, coaxial, or HDMI. HDMI sources are output only by the speakers connected to the AV receiver. Video Connection Formats Video equipment can be connected to the AV receiver by using any one of the following video connection formats: composite video, component video, or HDMI, the... on the formats supported by changing the input source on the AV receiver. : Signal Flow Video Video Audio Audio DVD/BD player, etc. Connecting the AV Receiver-Continued Connecting Audio and Video Signals to the AV receiver By connecting both the audio and video outputs of your DVD ...
... analog, optical, coaxial, or HDMI. HDMI sources are output only by the speakers connected to the AV receiver. Video Connection Formats Video equipment can be connected to the AV receiver by using any one of the following video connection formats: composite video, component video, or HDMI, the... on the formats supported by changing the input source on the AV receiver. : Signal Flow Video Video Audio Audio DVD/BD player, etc. Connecting the AV Receiver-Continued Connecting Audio and Video Signals to the AV receiver By connecting both the audio and video outputs of your DVD ...
Owner Manual
Page 20
... video signal) is to meet the increased demands of digital audio (2-channel PCM, multichannel digital audio, or multichannel PCM). The AV receiver's HDMI interface is based on your TV or projector. *1 DVI (Digital Visual Interface): The digital display interface standard set by ...Use a commercially available HDMI cable (supplied with some components) to connect the AV receiver's HDMI OUT to the HDMI input on the following standard: Pass-Thru About Copyright Protection The AV receiver supports HDCP (High-bandwidth Digital Content Protection)*2, a copy-protection system for HDMI/...
... video signal) is to meet the increased demands of digital audio (2-channel PCM, multichannel digital audio, or multichannel PCM). The AV receiver's HDMI interface is based on your TV or projector. *1 DVI (Digital Visual Interface): The digital display interface standard set by ...Use a commercially available HDMI cable (supplied with some components) to connect the AV receiver's HDMI OUT to the HDMI input on the following standard: Pass-Thru About Copyright Protection The AV receiver supports HDCP (High-bandwidth Digital Content Protection)*2, a copy-protection system for HDMI/...
Owner Manual
Page 21
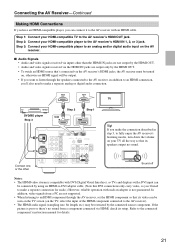
...may be connected by the HDMI OUT. • To watch an HDMI source that its setup. Step 1: Connect your HDMI-compatible player to the AV receiver's HDMI OUT jack. Connect one or the other than the HDMI IN jacks are not output by the connected source component. If you make a separate...TV Step 2 Step 1 Tip! Step 3: Connect your TV all the way so that 's connected via the AV receiver's HDMI jacks, the AV receiver must be output. • If you want to listen through the AV receiver, set the HDMI component so that its video can be restricted by the HDMI OUT. • Audio and...
...may be connected by the HDMI OUT. • To watch an HDMI source that its setup. Step 1: Connect your HDMI-compatible player to the AV receiver's HDMI OUT jack. Connect one or the other than the HDMI IN jacks are not output by the connected source component. If you make a separate...TV Step 2 Step 1 Tip! Step 3: Connect your TV all the way so that 's connected via the AV receiver's HDMI jacks, the AV receiver must be output. • If you want to listen through the AV receiver, set the HDMI component so that its video can be restricted by the HDMI OUT. • Audio and...

Owner Manual
Page 22
...connect an audio output from your TV. • To enjoy Dolby Digital and DTS, use its tuner to listen to the AV receiver and use connection b or c . Connection A B a b c AV receiver COMPONENT VIDEO OUT MONITOR OUT V TV/TAPE IN L/R DIGITAL IN COAXIAL (DVD/BD) DIGITAL IN OPTICAL 1 (CBL/SAT)... VIDEO IN Y PB PR COMPONENT VIDEO IN Connect one or the other These connection must be assigned (see pages 24 and 26). 22 Connecting the AV Receiver-Continued Connecting a TV or Projector Step 1: Video Connection Choose a video connection that matches your TV ( a , b , or c ), and then make...
...connect an audio output from your TV. • To enjoy Dolby Digital and DTS, use its tuner to listen to the AV receiver and use connection b or c . Connection A B a b c AV receiver COMPONENT VIDEO OUT MONITOR OUT V TV/TAPE IN L/R DIGITAL IN COAXIAL (DVD/BD) DIGITAL IN OPTICAL 1 (CBL/SAT)... VIDEO IN Y PB PR COMPONENT VIDEO IN Connect one or the other These connection must be assigned (see pages 24 and 26). 22 Connecting the AV Receiver-Continued Connecting a TV or Projector Step 1: Video Connection Choose a video connection that matches your TV ( a , b , or c ), and then make...

Owner Manual
Page 23
... same type of connection. You must be sure to your DVD/BD player ( a , b , or c ), and then make the connection. Connection A B a b c AV receiver COMPONENT VIDEO IN 1 (DVD/BD) DVD/BD IN V DVD/BD IN L/R DIGITAL IN COAXIAL (DVD/BD) DIGITAL IN OPTICAL 1 (CBL/SAT) Signal flow DVD/BD... Analog audio L/R output Digital coaxial output Digital optical output c A b CB a OPTICAL OUT COAXIAL OUT Connect one or the other Connection c must connect the AV receiver to use a and b , or a and c .) • If your DVD/BD player has main left and right outputs and multichannel left and right ...
... same type of connection. You must be sure to your DVD/BD player ( a , b , or c ), and then make the connection. Connection A B a b c AV receiver COMPONENT VIDEO IN 1 (DVD/BD) DVD/BD IN V DVD/BD IN L/R DIGITAL IN COAXIAL (DVD/BD) DIGITAL IN OPTICAL 1 (CBL/SAT) Signal flow DVD/BD... Analog audio L/R output Digital coaxial output Digital optical output c A b CB a OPTICAL OUT COAXIAL OUT Connect one or the other Connection c must connect the AV receiver to use a and b , or a and c .) • If your DVD/BD player has main left and right outputs and multichannel left and right ...


