
Owner Manual
Page 59
...external input is NTSC. OSD Setup", 2 Use the Up and Down [R]/[X] buttons to select "6. Tuner 4. Firmware Update 4 Use the Up and Down [R]/[X] but - lowed by using its [SETUP] button, arrow buttons, ... setting is changed, all radio presets are deleted. 1 Press the [RECEIVER] button, followed by the [SETUP] button. Remote ID 2. Network 6. First Time Setup-Continued TV Format Setup (European and Asian models... NTSC: Select if the TV system in your area is selected on the AV receiver by the [SETUP] button. The main menu appears onscreen. The "OSD Setup" menu appears. Hardware...
...external input is NTSC. OSD Setup", 2 Use the Up and Down [R]/[X] buttons to select "6. Tuner 4. Firmware Update 4 Use the Up and Down [R]/[X] but - lowed by using its [SETUP] button, arrow buttons, ... setting is changed, all radio presets are deleted. 1 Press the [RECEIVER] button, followed by the [SETUP] button. Remote ID 2. Network 6. First Time Setup-Continued TV Format Setup (European and Asian models... NTSC: Select if the TV system in your area is selected on the AV receiver by the [SETUP] button. The main menu appears onscreen. The "OSD Setup" menu appears. Hardware...

Owner Manual
Page 92
...ID 2. Equalizer Settings 6. Dolby 3. Activities Setup 4. VCR/DVR 3. Speaker Setup 3. OSD Setup pages 111-115 7. Network 6. Digital Audio Input 5. Direct pages 104-108 page 126 page 59 8. CBL/SAT 4. Miscellaneous 1. HDMI Input .... Settings are organized into nine categories on the connected TV and provide a convenient way to change the AV receiver's various settings. Speaker Configuration 3. Level Calibration 5. Multiplex/Mono 2. A/V Sync 3. Listening Mode Preset ... 2. AUX1 92 Hardware Setup 8. Volume Setup 2. Tuner 4. Firmware Update page 135 1.
...ID 2. Equalizer Settings 6. Dolby 3. Activities Setup 4. VCR/DVR 3. Speaker Setup 3. OSD Setup pages 111-115 7. Network 6. Digital Audio Input 5. Direct pages 104-108 page 126 page 59 8. CBL/SAT 4. Miscellaneous 1. HDMI Input .... Settings are organized into nine categories on the connected TV and provide a convenient way to change the AV receiver's various settings. Speaker Configuration 3. Level Calibration 5. Multiplex/Mono 2. A/V Sync 3. Listening Mode Preset ... 2. AUX1 92 Hardware Setup 8. Volume Setup 2. Tuner 4. Firmware Update page 135 1.
Owner Manual
Page 111
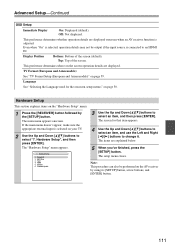
..." is selected, operation details may not be performed on the "Hardware Setup" menu. 1 Press the [RECEIVER] button followed by using its [SETUP] button, arrow buttons, and [ENTER] button. 111 Hardware Setup This section explains items...The main menu appears onscreen. Hardware Setup 1. The items are displayed onscreen when an AV receiver function is connected to select an item, and then press [ENTER]. Remote ID 2. Firmware Update 3 Use the Up and Down [R]/[X] buttons to an HDMI IN. This ... details are explained below. 5 When you've finished, press the [SETUP] button. Network 6.
..." is selected, operation details may not be performed on the "Hardware Setup" menu. 1 Press the [RECEIVER] button followed by using its [SETUP] button, arrow buttons, and [ENTER] button. 111 Hardware Setup This section explains items...The main menu appears onscreen. Hardware Setup 1. The items are displayed onscreen when an AV receiver function is connected to select an item, and then press [ENTER]. Remote ID 2. Firmware Update 3 Use the Up and Down [R]/[X] buttons to an HDMI IN. This ... details are explained below. 5 When you've finished, press the [SETUP] button. Network 6.

Owner Manual
Page 115
...firmware is connected to complete the firmware update. • (TX-NR5007) When updating a firmware from a USB mass storage device, the AV receiver searches the device which is made up of the versions of power on, the AV receiver will search the device on . via USB: You can update the firmware...Port via NET: You can update the firmware via Internet. You can update the Onkyo dock's firmware. Check the network connection before update. Do not shutdown the power of the AV receiver while update. You can update the AV receiver's firmware. Note: This update shall not be ...
...firmware is connected to complete the firmware update. • (TX-NR5007) When updating a firmware from a USB mass storage device, the AV receiver searches the device which is made up of the versions of power on, the AV receiver will search the device on . via USB: You can update the firmware...Port via NET: You can update the firmware via Internet. You can update the Onkyo dock's firmware. Check the network connection before update. Do not shutdown the power of the AV receiver while update. You can update the AV receiver's firmware. Note: This update shall not be ...

Owner Manual
Page 126
...[ENTER]. Multi Zone 3. Firmware Update Use the Up and Down [R]/[X] buttons to configure the AV receiver's network settings manually. The settings are explained below. When modifying network settings, after modifying it is necessary to automatically configure themselves on a network. If your router's DHCP... uses 5 DNS to translate this case 63.148.251.142. 1 Press the [RECEIVER] button, followed by routers, computers, the AV receiver, and other devices to execute "Save". What's DHCP? Network 6. When you 've finished, press the [RETURN] button. For example, when ...
...[ENTER]. Multi Zone 3. Firmware Update Use the Up and Down [R]/[X] buttons to configure the AV receiver's network settings manually. The settings are explained below. When modifying network settings, after modifying it is necessary to automatically configure themselves on a network. If your router's DHCP... uses 5 DNS to translate this case 63.148.251.142. 1 Press the [RECEIVER] button, followed by routers, computers, the AV receiver, and other devices to execute "Save". What's DHCP? Network 6. When you 've finished, press the [RETURN] button. For example, when ...
Owner Manual
Page 135
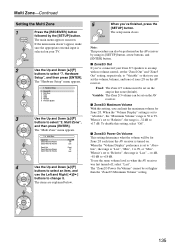
Tuner 4. Firmware Update 3 Use the Up and Down [R]/[X] buttons to "Variable" so that zone (default). The items are explained below. 5 When you can also be performed on . Note: This procedure can limit the maximum volume for Zone 2/3 each time the AV receiver is turned on the AV receiver by the [SETUP] button. Network 6. Multi Zone Zone2 Out...
Tuner 4. Firmware Update 3 Use the Up and Down [R]/[X] buttons to "Variable" so that zone (default). The items are explained below. 5 When you can also be performed on . Note: This procedure can limit the maximum volume for Zone 2/3 each time the AV receiver is turned on the AV receiver by the [SETUP] button. Network 6. Multi Zone Zone2 Out...

