
Owner Manual
Page 1
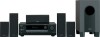
...Onkyo 5.1ch Home Theater System. Please retain this manual will enable you to obtain optimum performance and listening enjoyment from your AV components ....... 36 Using the Tuner 38 Thank you for future reference. Enjoying the Listening Modes ..... 46 Advanced Operation 48 Troubleshooting 55 Specifications 58 En Following the instructions in the unit. 5.1ch Home Theater System HT-SR600... AV Receiver (HT-R340) Front Speakers (SKF-350F L/R) Center Speaker (SKC-350C) Surround Speakers (SKM-350S L/R) Subwoofer (SKW-350) Instruction Manual Contents...
...Onkyo 5.1ch Home Theater System. Please retain this manual will enable you to obtain optimum performance and listening enjoyment from your AV components ....... 36 Using the Tuner 38 Thank you for future reference. Enjoying the Listening Modes ..... 46 Advanced Operation 48 Troubleshooting 55 Specifications 58 En Following the instructions in the unit. 5.1ch Home Theater System HT-SR600... AV Receiver (HT-R340) Front Speakers (SKF-350F L/R) Center Speaker (SKC-350C) Surround Speakers (SKM-350S L/R) Subwoofer (SKW-350) Instruction Manual Contents...
Owner Manual
Page 4
..., thereby removing any of the following code: Blue: Neutral Brown: Live As the colours of the wires in the mains lead of this instruction manual is in compliance with the letter L or coloured red. If the power cord's plug is not suitable for the ASTA mark or the BSI ..., GERMANY K. Sound from the turntable, CD player or DVD player, otherwise lower the unit's output level. MIYAGI ONKYO EUROPE ELECTRONICS GmbH Memory Backup The AV receiver uses a battery-less memory backup system in order to TV or a computer monitor because they may occur. Once it has been charged, the AV receiver...
..., thereby removing any of the following code: Blue: Neutral Brown: Live As the colours of the wires in the mains lead of this instruction manual is in compliance with the letter L or coloured red. If the power cord's plug is not suitable for the ASTA mark or the BSI ..., GERMANY K. Sound from the turntable, CD player or DVD player, otherwise lower the unit's output level. MIYAGI ONKYO EUROPE ELECTRONICS GmbH Memory Backup The AV receiver uses a battery-less memory backup system in order to TV or a computer monitor because they may occur. Once it has been charged, the AV receiver...
Owner Manual
Page 9
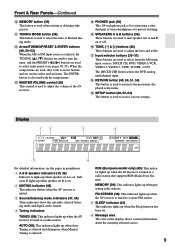
...A & B speaker indicators (19, 36) Indicator A lights up when Auto Tuning is selected and disappears when Manual Tuning is selected. S SETUP button (48, 50-53) This button is used to select the Auto or Manual tuning mode. FM STEREO (38): This indicator lights up when the AV receiver is tuned to a stereo... the DVD analog multichannel input. MEMORY (39): This indicator lights up when the AV Receiver is tuned to a radio station that supports RDS (Radio Data System). R RETURN button (48, 50, 51, 53) This button is used to adjust the volume of the AV receiver. RDS (European model only) (...
...A & B speaker indicators (19, 36) Indicator A lights up when Auto Tuning is selected and disappears when Manual Tuning is selected. S SETUP button (48, 50-53) This button is used to select the Auto or Manual tuning mode. FM STEREO (38): This indicator lights up when the AV receiver is tuned to a stereo... the DVD analog multichannel input. MEMORY (39): This indicator lights up when the AV Receiver is tuned to a radio station that supports RDS (Radio Data System). R RETURN button (48, 50, 51, 53) This button is used to adjust the volume of the AV receiver. RDS (European model only) (...
Owner Manual
Page 12
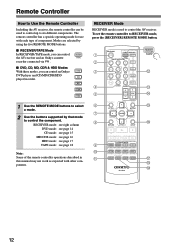
The remote controller has a specific operating mode for use with each type of the remote controller operations described in this manual may not work as expected with other components. Modes are selected by that mode to control the component. MD CDR HDD ...: see page 18 Note: Some of component. Remote Controller How to Use the Remote Controller Including the AV receiver, the remote controller can control an Onkyo DVD DVD player and CD/MD/CDR/HDD C D player/recorder. A 2 3 4 5 6 7 8 ON/STANDBY REMOTE MODE RECEIVER DVD TAPE INPUT SELECTOR 1 2 3 C D V1 V2 V3 4...
The remote controller has a specific operating mode for use with each type of the remote controller operations described in this manual may not work as expected with other components. Modes are selected by that mode to control the component. MD CDR HDD ...: see page 18 Note: Some of component. Remote Controller How to Use the Remote Controller Including the AV receiver, the remote controller can control an Onkyo DVD DVD player and CD/MD/CDR/HDD C D player/recorder. A 2 3 4 5 6 7 8 ON/STANDBY REMOTE MODE RECEIVER DVD TAPE INPUT SELECTOR 1 2 3 C D V1 V2 V3 4...
Owner Manual
Page 21
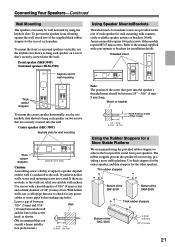
.... Thin rubber stoppers Bottom of the SKF-350F Bottom of the SKM-350S Thick rubber stoppers Bottom of 1/8" (4 mm) or less. If you consult a home installation professional.) 3/16" - 7/16" (5 mm) - (10 mm) Using Speaker Mounts/Brackets Threaded inserts for machine screws are solid, use the keyhole ... mount the center speaker horizontally, use a cable/pipe detector to check for any power cables or water pipes before making any holes. Refer to the manual supplied with a head diameter of 5/16" (9 mm) or less and a shank diameter of the SKC-350C 2-3/16" (55 mm) 1/2" (12 mm)...
.... Thin rubber stoppers Bottom of the SKF-350F Bottom of the SKM-350S Thick rubber stoppers Bottom of 1/8" (4 mm) or less. If you consult a home installation professional.) 3/16" - 7/16" (5 mm) - (10 mm) Using Speaker Mounts/Brackets Threaded inserts for machine screws are solid, use the keyhole ... mount the center speaker horizontally, use a cable/pipe detector to check for any power cables or water pipes before making any holes. Refer to the manual supplied with a head diameter of 5/16" (9 mm) or less and a shank diameter of the SKC-350C 2-3/16" (55 mm) 1/2" (12 mm)...
Owner Manual
Page 24
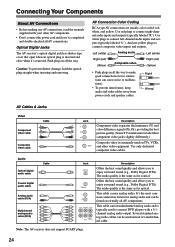
... carries analog audio. It's the most common connection format for coaxial. Connecting Your Components About AV Connections • Before making any AV connections, read the manuals supplied with a 5.1channel analog audio output. Right! And use yellow plugs to connect composite video inputs and outputs. Optical Digital Jacks The AV receiver's optical...
... carries analog audio. It's the most common connection format for coaxial. Connecting Your Components About AV Connections • Before making any AV connections, read the manuals supplied with a 5.1channel analog audio output. Right! And use yellow plugs to connect composite video inputs and outputs. Optical Digital Jacks The AV receiver's optical...
Owner Manual
Page 32
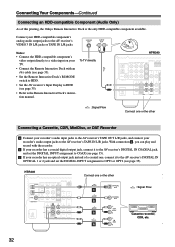
...to COAX (see page 35). • Refer to the Remote Interactive Dock's instruction manual. Connecting Your Components-Continued Connecting an HDD-compatible Component (Audio Only) As of a... AV receiver's Input Display to the AV receiver's VIDEO 3 IN L/R jacks or TAPE IN L/R jacks. HT-R340 Connect one or the other OPTICAL OUT : Signal Flow c COAXIAL OUT b L OUT PLAY a ...a R 32 Connect your recorder has an optical output jack instead of this printing, the Onkyo Remote Interactive Dock is the only HDD-compatible component available. c If your HDD-compatible component's analog ...
...to COAX (see page 35). • Refer to the Remote Interactive Dock's instruction manual. Connecting Your Components-Continued Connecting an HDD-compatible Component (Audio Only) As of a... AV receiver's Input Display to the AV receiver's VIDEO 3 IN L/R jacks or TAPE IN L/R jacks. HT-R340 Connect one or the other OPTICAL OUT : Signal Flow c COAXIAL OUT b L OUT PLAY a ...a R 32 Connect your recorder has an optical output jack instead of this printing, the Onkyo Remote Interactive Dock is the only HDD-compatible component available. c If your HDD-compatible component's analog ...
Owner Manual
Page 33
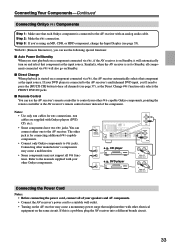
... to hear all components connected via will automatically turn on and select that component as the input source. Refer to the manuals supplied with your speakers and AV components. • Connect the AV receiver's power cord to a suitable wall outlet. ...ANALOG AUDIO OUT Connecting the Power Cord Notes: • Before connecting the power cord, connect all functions. Connecting Your Components-Continued Connecting Onkyo Components Step 1: Make sure that might interfere with other electrical equipment on the same circuit. Connecting other manufacturer's components may cause a ...
... to hear all components connected via will automatically turn on and select that component as the input source. Refer to the manuals supplied with your speakers and AV components. • Connect the AV receiver's power cord to a suitable wall outlet. ...ANALOG AUDIO OUT Connecting the Power Cord Notes: • Before connecting the power cord, connect all functions. Connecting Your Components-Continued Connecting Onkyo Components Step 1: Make sure that might interfere with other electrical equipment on the same circuit. Connecting other manufacturer's components may cause a ...

Owner Manual
Page 35
...; Press and hold down the [TAPE] or [VIDEO 3] input selector button (about 3 seconds) to change the assignments as follows. Please refer to the digital sources' manual. 1 Press the input selector button for the source that input (OPT1) to the AV receiver by using an iPod photo with the DS-A1 Remote...'ll need to assign that you also set your DVD player to the DVD input source. Changing the Input Display If you connect an -capable Onkyo MiniDisc recorder, CD recorder, or next generation HDD-compatible component to the TAPE IN/OUT or VIDEO 3 IN jacks, for the TAPE input selector or...
...; Press and hold down the [TAPE] or [VIDEO 3] input selector button (about 3 seconds) to change the assignments as follows. Please refer to the digital sources' manual. 1 Press the input selector button for the source that input (OPT1) to the AV receiver by using an iPod photo with the DS-A1 Remote...'ll need to assign that you also set your DVD player to the DVD input source. Changing the Input Display If you connect an -capable Onkyo MiniDisc recorder, CD recorder, or next generation HDD-compatible component to the TAPE IN/OUT or VIDEO 3 IN jacks, for the TAPE input selector or...
Owner Manual
Page 38
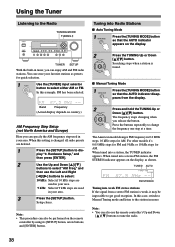
In this case, switch to Manual Tuning mode and listen to the station in mono. Note: • This procedure can also be impossible to get good reception. When tuned into Radio ... select "AM Freq," and then use the remote controller's Up and Down [ ]/[ ] buttons to tune the radio. 38 Searching stops when a station is found. ■ Manual Tuning Mode 1 TUNING MODE Press the [TUNING MODE] button so that the AUTO indicator appears on country.) AM Frequency Step Setup (not North America and...
In this case, switch to Manual Tuning mode and listen to the station in mono. Note: • This procedure can also be impossible to get good reception. When tuned into Radio ... select "AM Freq," and then use the remote controller's Up and Down [ ]/[ ] buttons to tune the radio. 38 Searching stops when a station is found. ■ Manual Tuning Mode 1 TUNING MODE Press the [TUNING MODE] button so that the AUTO indicator appears on country.) AM Frequency Step Setup (not North America and...
Owner Manual
Page 53
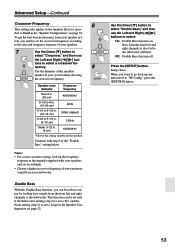
...Left and Right [ ]/[ ] buttons to select: On: Double Bass function on. Continue with your speakers and set to Large in the manuals supplied with step 8 of your system when choosing the crossover frequency. Use the Down [ ] button to select "Double Bass," and then use the Left and Right [ ]/[ ...according to the size and frequency response of the "Double Bass" setting below. quency. Notes: • For a more sound from your speaker system, you need to set to Yes, and the Front setting (step 4) is also fed to the subwoofer (default). Advanced Setup-Continued Crossover ...
...Left and Right [ ]/[ ] buttons to select: On: Double Bass function on. Continue with your speakers and set to Large in the manuals supplied with step 8 of your system when choosing the crossover frequency. Use the Down [ ] button to select "Double Bass," and then use the Left and Right [ ]/[ ...according to the size and frequency response of the "Double Bass" setting below. quency. Notes: • For a more sound from your speaker system, you need to set to Yes, and the Front setting (step 4) is also fed to the subwoofer (default). Advanced Setup-Continued Crossover ...
Owner Manual
Page 54
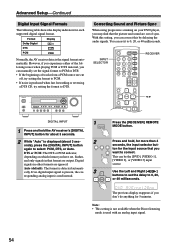
Advanced Setup-Continued Digital Input Signal Formats The following issues when playing PCM or DTS material, you can manually set the delay to select: PCM, DTS, or Auto. DTS or PCM: The DTS or PCM indicator, depending on your DVD player, you V1 V2 ...
Advanced Setup-Continued Digital Input Signal Formats The following issues when playing PCM or DTS material, you can manually set the delay to select: PCM, DTS, or Auto. DTS or PCM: The DTS or PCM indicator, depending on your DVD player, you V1 V2 ...
