

User Manual English
Page 1
... instructions in . Please retain this manual thoroughly before making any connections and plugging it in this manual will enable you for future reference. CR-N765 Network CD Receiver Instruction Manual Thank you to AM/FM radio .......... 23 Using a home network 26 Various settings 29 Troubleshooting 34 En Please read this manual for purchasing an Onkyo CD receiver.
... instructions in . Please retain this manual thoroughly before making any connections and plugging it in this manual will enable you for future reference. CR-N765 Network CD Receiver Instruction Manual Thank you to AM/FM radio .......... 23 Using a home network 26 Various settings 29 Troubleshooting 34 En Please read this manual for purchasing an Onkyo CD receiver.

User Manual English
Page 4
...Refer servicing to open the enclosure. Company makes no representation or warranty of any information, content or services available through this Instruction Manual carefully. Any question or request for service relating to the laser beam, do not remove the cover. USE OF CONTROLS OR ... RADIATION EXPOSURE. Limits for , without limitation, content owner or service provider. RoHS Directive, 2011/65/EU WEEE http://www.onkyo.com/manual/weee/weee.pdf Precautions DISCLAIMER Through this device, and its affiliates (collectively, "Company"). We have distributed this device you are...
...Refer servicing to open the enclosure. Company makes no representation or warranty of any information, content or services available through this Instruction Manual carefully. Any question or request for service relating to the laser beam, do not remove the cover. USE OF CONTROLS OR ... RADIATION EXPOSURE. Limits for , without limitation, content owner or service provider. RoHS Directive, 2011/65/EU WEEE http://www.onkyo.com/manual/weee/weee.pdf Precautions DISCLAIMER Through this device, and its affiliates (collectively, "Company"). We have distributed this device you are...

User Manual English
Page 6
...Listening to AM/FM radio 23 Tuning into a radio station 23 0 Tuning into stations automatically 23 0 Tuning into stations manually 23 0 Tuning into stations by frequency 23 Presetting an AM/FM radio station 24 0 Registering radio stations automatically 24 0 Registering radio stations... manually 24 0 Selecting preset stations 24 0 Receiving RDS 25 Using a home network 26 Playing music stored on DLNA-compatible devices 26 ...
...Listening to AM/FM radio 23 Tuning into a radio station 23 0 Tuning into stations automatically 23 0 Tuning into stations manually 23 0 Tuning into stations by frequency 23 Presetting an AM/FM radio station 24 0 Registering radio stations automatically 24 0 Registering radio stations... manually 24 0 Selecting preset stations 24 0 Receiving RDS 25 Using a home network 26 Playing music stored on DLNA-compatible devices 26 ...
User Manual English
Page 11
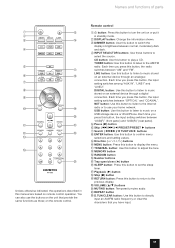
... to display the menu. DISPLAY button: Change the information shown. TUNER button: Use this button to the AM/FM radio. Each time you press this manual are based on or put it in this button, the input setting switches between "USB(F)" (front panel) and "USB(R)" (rear panel). TONE/BAL button: Use...
... to display the menu. DISPLAY button: Change the information shown. TUNER button: Use this button to the AM/FM radio. Each time you press this manual are based on or put it in this button, the input setting switches between "USB(F)" (front panel) and "USB(R)" (rear panel). TONE/BAL button: Use...

User Manual English
Page 13
... input) Required: an audio pin cable To listen to music stored on the connection to make good connections. REMOTE CONTROL (connecting an Onkyo RI Dock) Required: an RI cable You can control an RI Dock with your other components. 0 Don't connect the power cord until... Connecting external devices Getting started on the connected device, press the DIGITAL button repeatedly to switch the input source to "COAXIAL". 0 Read the manuals supplied with the remote control of your ISP (Internet Service Provider). 4. DIGITAL IN COAXIAL (digital audio input) Required: a coaxial digital cable ...
... input) Required: an audio pin cable To listen to music stored on the connection to make good connections. REMOTE CONTROL (connecting an Onkyo RI Dock) Required: an RI cable You can control an RI Dock with your other components. 0 Don't connect the power cord until... Connecting external devices Getting started on the connected device, press the DIGITAL button repeatedly to switch the input source to "COAXIAL". 0 Read the manuals supplied with the remote control of your ISP (Internet Service Provider). 4. DIGITAL IN COAXIAL (digital audio input) Required: a coaxial digital cable ...

User Manual English
Page 16
... button or playback (1) button to enter that folder. 0 To select a folder in the figure below do not appear. 1. Selecting tracks on MP3/WMA discs This manual refer to MP3, WMA, and other music data as "folder". When you select a file on a MP3/WMA disc containing multiple folders, it is activated. 2. For...
... button or playback (1) button to enter that folder. 0 To select a folder in the figure below do not appear. 1. Selecting tracks on MP3/WMA discs This manual refer to MP3, WMA, and other music data as "folder". When you select a file on a MP3/WMA disc containing multiple folders, it is activated. 2. For...

User Manual English
Page 18
... to "My Favorites", which appears when you can display the desired service, menu or radio station on services, see "Inputting characters" under "Various settings". 2. This manual describes operations for TuneIn as you save them on the broadcast station you are provided by the Internet radio service and categorised by registering them...
... to "My Favorites", which appears when you can display the desired service, menu or radio station on services, see "Inputting characters" under "Various settings". 2. This manual describes operations for TuneIn as you save them on the broadcast station you are provided by the Internet radio service and categorised by registering them...
User Manual English
Page 23
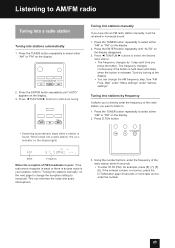
... to monaural. Press the TUNER button repeatedly to . 1. Tuning into a radio station, the indicator on the display. 3. Tuning into stations manually If you press the button. Press the TUNER button repeatedly to select the desired radio station. 0 The frequency changes by looking at the display.... 3. Press D.TUN button. 0 Searching automatically stops when a station is excess noise in your location, refer to "Tuning into an FM radio station manually, it will be received in monaural sound. 1. Press 2 TUN/TUN 1 buttons to select either "AM" or "FM" on the display disappears. ...
... to monaural. Press the TUNER button repeatedly to . 1. Tuning into a radio station, the indicator on the display. 3. Tuning into stations manually If you press the button. Press the TUNER button repeatedly to select the desired radio station. 0 The frequency changes by looking at the display.... 3. Press D.TUN button. 0 Searching automatically stops when a station is excess noise in your location, refer to "Tuning into an FM radio station manually, it will be received in monaural sound. 1. Press 2 TUN/TUN 1 buttons to select either "AM" or "FM" on the display disappears. ...

User Manual English
Page 24
... settings". Naming a preset radio station: 1. Use the direction ( / ) buttons to select "Tuner Setting", and press the ENTER button. 2. Press the MENU button. Registering radio stations manually 1. Use the direction ( / ) buttons to select "AutoPreset" and press the ENTER button. Copying a preset radio station: You can also select by new ones. 1. To overwrite...
... settings". Naming a preset radio station: 1. Use the direction ( / ) buttons to select "Tuner Setting", and press the ENTER button. 2. Press the MENU button. Registering radio stations manually 1. Use the direction ( / ) buttons to select "AutoPreset" and press the ENTER button. Copying a preset radio station: You can also select by new ones. 1. To overwrite...
User Manual English
Page 26
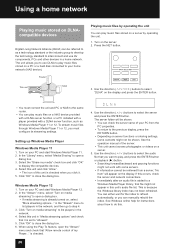
... check box and click "OK" to list players in the network. 4. Click "Turn on media streaming" to display the compatible devices. 4. See the operation manual of your PC and start Windows Media Player 11. 2. Use the direction ( / ) buttons to select the audio file that it . 5. See Windows online...wait for instructions about how to step 4. 3. Select this unit in the network, and then go to do this unit is checked when you can manually rebuild the index. Use the direction ( / ) buttons to refresh automatically, or you click it is added to play music files stored on a...
... check box and click "OK" to list players in the network. 4. Click "Turn on media streaming" to display the compatible devices. 4. See the operation manual of your PC and start Windows Media Player 11. 2. Use the direction ( / ) buttons to select the audio file that it . 5. See Windows online...wait for instructions about how to step 4. 3. Select this unit in the network, and then go to do this unit is checked when you can manually rebuild the index. Use the direction ( / ) buttons to refresh automatically, or you click it is added to play music files stored on a...

User Manual English
Page 27
... the setup with Windows Media Player 12. 1. Music streaming from a shared folder (Home Media) A shared folder is set to access WEB Setup, see the instruction manual for access from the Play To list. Select "Save changes" and click "OK" in the "Home or Work" (Windows 7) or "Private" and "All Networks" (Windows...
... the setup with Windows Media Player 12. 1. Music streaming from a shared folder (Home Media) A shared folder is set to access WEB Setup, see the instruction manual for access from the Play To list. Select "Save changes" and click "OK" in the "Home or Work" (Windows 7) or "Private" and "All Networks" (Windows...

User Manual English
Page 32
... Confirm that the unit and router are using and delete any files on . 5. Update procedures 1. For the setting, see the instruction manual of the decompressed files. 3. For information on the configuration, consult the document provided by connecting the unit to a network. Connect the ...13,*-21,*-28: Internet connection could not be recognized. Various settings 0 This unit may be temporarily down. Download the firmware file to select "CR via NET?" Press the Í ON/STANDBY button on and connected to a network. 0 While updating, never disconnect or turn off this...
... Confirm that the unit and router are using and delete any files on . 5. Update procedures 1. For the setting, see the instruction manual of the decompressed files. 3. For information on the configuration, consult the document provided by connecting the unit to a network. Connect the ...13,*-21,*-28: Internet connection could not be recognized. Various settings 0 This unit may be temporarily down. Download the firmware file to select "CR via NET?" Press the Í ON/STANDBY button on and connected to a network. 0 While updating, never disconnect or turn off this...

User Manual English
Page 34
.... 0 While headphones are exhausted, replace both the unit and the connected device. ∫ Restoring factory default settings If this unit in again. See the instruction manual for tracks. Try the simple measures on the display, press the MUTING button to 30 seconds until the unit recognizes the input. The unit turns...
.... 0 While headphones are exhausted, replace both the unit and the connected device. ∫ Restoring factory default settings If this unit in again. See the instruction manual for tracks. Try the simple measures on the display, press the MUTING button to 30 seconds until the unit recognizes the input. The unit turns...
User Manual English
Page 38
... playback. 0 To remove a disc from cellophane tape, rental discs with labels which are peeling off, or discs with this unit. For details, see the operation manual for storage. Always remove such discs and store them . Audio from PCs cannot be input through this unit's USB ports. 0 This unit might result in...
... playback. 0 To remove a disc from cellophane tape, rental discs with labels which are peeling off, or discs with this unit. For details, see the operation manual for storage. Always remove such discs and store them . Audio from PCs cannot be input through this unit's USB ports. 0 This unit might result in...