

User Manual English
Page 1
CP-1050 Direct Drive Turntable Instruction Manual Thank you to obtain optimum performance and listening enjoyment from your new Onkyo product. Following the instructions in your new product. Please retain this manual will enable you for future reference. Stylus pressure 9 3. Anti-skating 9 Connections 10 Playing ... functions of parts ..... 6 Assembly and installation 7 Preparatory adjustments 8 1. Please read this manual thoroughly before making any connections and plugging in this manual for purchasing an Onkyo product.
CP-1050 Direct Drive Turntable Instruction Manual Thank you to obtain optimum performance and listening enjoyment from your new Onkyo product. Following the instructions in your new product. Please retain this manual will enable you for future reference. Stylus pressure 9 3. Anti-skating 9 Connections 10 Playing ... functions of parts ..... 6 Assembly and installation 7 Preparatory adjustments 8 1. Please read this manual thoroughly before making any connections and plugging in this manual for purchasing an Onkyo product.
User Manual English
Page 5
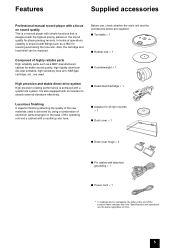
...at the end of the product name indicates the color. Before use, check whether the main unit and the accessories below are supplied. ∫ Turntable k 1 ∫ Rubber mat k 1 ∫ Counterweight k 1 High precision and stable direct drive system High precision rotating performance is achieved...grounding k 1 ∫ Power cord k 1 * In catalogs and on the sound quality for better sound quality, high rigidity aluminum die-cast turntable, high sensitivity tone arm, MM-type cartridge, etc., are the same regardless of highly reliable parts High reliability parts such as a lifter for ...
...at the end of the product name indicates the color. Before use, check whether the main unit and the accessories below are supplied. ∫ Turntable k 1 ∫ Rubber mat k 1 ∫ Counterweight k 1 High precision and stable direct drive system High precision rotating performance is achieved...grounding k 1 ∫ Power cord k 1 * In catalogs and on the sound quality for better sound quality, high rigidity aluminum die-cast turntable, high sensitivity tone arm, MM-type cartridge, etc., are the same regardless of highly reliable parts High reliability parts such as a lifter for ...
User Manual English
Page 6
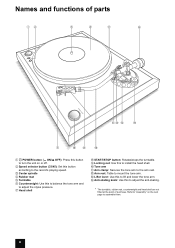
... shell. Refer to assemble them. 6 Locking nut: Use this to mount the tone arm. Anti-skating knob: Use this to adjust the anti-skating. * The turntable, rubber mat, counterweight and head shell are not fitted at the point of parts POWER button ( ON/ OFF): Press this to balance the tone arm... and to the arm rest. Tone arm Arm clamp: Secures the tone arm to adjust the stylus pressure. Center spindle Rubber mat Turntable Counterweight: Use this button to turn the unit on the next page to "Assembly" on or off. Names and functions of purchase. Lifter lever: ...
... shell. Refer to assemble them. 6 Locking nut: Use this to mount the tone arm. Anti-skating knob: Use this to adjust the anti-skating. * The turntable, rubber mat, counterweight and head shell are not fitted at the point of parts POWER button ( ON/ OFF): Press this to balance the tone arm... and to the arm rest. Tone arm Arm clamp: Secures the tone arm to adjust the stylus pressure. Center spindle Rubber mat Turntable Counterweight: Use this button to turn the unit on the next page to "Assembly" on or off. Names and functions of purchase. Lifter lever: ...
User Manual English
Page 7
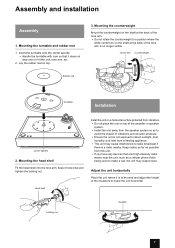
Adjust the unit horizontally Place the unit where it is a radio nearby. Locking nut Insulator 7 Center line Counterweight Rubber mat Turntable Installation Center spindle 2. Mounting the turntable and rubber mat 1. Lay the rubber mat on the shaft at the back of the tone arm is no longer visible. Mounting ...shell into the tone arm, keep it does not drop onto or hit the unit, tone arm, etc. 2. Insert the turntable onto the center spindle. 0 Handle the turntable with care so that emit high-intensity radio waves near the unit, such as to avoid the impact of the insulators to...
Adjust the unit horizontally Place the unit where it is a radio nearby. Locking nut Insulator 7 Center line Counterweight Rubber mat Turntable Installation Center spindle 2. Mounting the turntable and rubber mat 1. Lay the rubber mat on the shaft at the back of the tone arm is no longer visible. Mounting ...shell into the tone arm, keep it does not drop onto or hit the unit, tone arm, etc. 2. Insert the turntable onto the center spindle. 0 Handle the turntable with care so that emit high-intensity radio waves near the unit, such as to avoid the impact of the insulators to...
User Manual English
Page 8
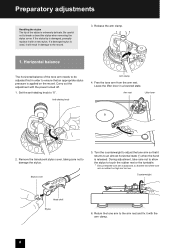
... anti-skating knob to the record. 3. Turn the counterweight to adjust the tone arm so that it returns to touch the rubber mat or the turntable. * Ensure that the tone arm is balanced, so that an appropriate stylus pressure is used, it will result in damage to "0". During adjustment, take care...
... anti-skating knob to the record. 3. Turn the counterweight to adjust the tone arm so that it returns to touch the rubber mat or the turntable. * Ensure that the tone arm is balanced, so that an appropriate stylus pressure is used, it will result in damage to "0". During adjustment, take care...
User Manual English
Page 11
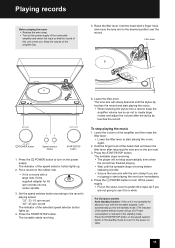
... the head shell and lower the lifter lever after the stylus tip touches the record. Hold the finger hook of this unit comes out. The turntable stops revolving. 0 The player will automatically go off the power supply. 0 Put on the rubber mat. 0 If it for about an hour with ...the turntable stopped, it will not stop playing the music 1. The turntable starts revolving. Raise the lifter lever, hold the head shell's finger hook, and move the tone arm to the record's ...
... the head shell and lower the lifter lever after the stylus tip touches the record. Hold the finger hook of this unit comes out. The turntable stops revolving. 0 The player will automatically go off the power supply. 0 Put on the rubber mat. 0 If it for about an hour with ...the turntable stopped, it will not stop playing the music 1. The turntable starts revolving. Raise the lifter lever, hold the head shell's finger hook, and move the tone arm to the record's ...
User Manual English
Page 12
The indicator of the speed selector button blinks. 0 Check whether the supplied turntable is properly plugged into the center spindle. 0 Check whether the rotation of the amplifier. 0 If a commercial phono-equalizer is connected, check whether its power supply ... /off or disconnecting/connecting the power cord, which is blocked by the locking nut. Sound is too weak. 0 Check the input and volume of the turntable is easier than working on the connection, setting and operating procedure. A low booming sound (hum or buzz) is heard when music is played. 0 Check whether...
The indicator of the speed selector button blinks. 0 Check whether the supplied turntable is properly plugged into the center spindle. 0 Check whether the rotation of the amplifier. 0 If a commercial phono-equalizer is connected, check whether its power supply ... /off or disconnecting/connecting the power cord, which is blocked by the locking nut. Sound is too weak. 0 Check the input and volume of the turntable is easier than working on the connection, setting and operating procedure. A low booming sound (hum or buzz) is heard when music is played. 0 Check whether...

User Manual English
Page 13
...Promptly replace the stylus in a blanket or soft paper. 13 If you no longer have the packaging, do the following: 0 Take off the turntable and rubber mat and carefully wrap them. 0 Remove the counterweight and head shell from the base of pitch or the record may be damaged, resulting... the stylus is extremely delicate. Replacing the stylus The life-span of records Use a commercial record cleaner to replace the stylus for the CP-1050. Handling Handling and maintenance of stylus Take due care when handling the stylus as the stylus tip is normally about 500 hours but varies greatly...
...Promptly replace the stylus in a blanket or soft paper. 13 If you no longer have the packaging, do the following: 0 Take off the turntable and rubber mat and carefully wrap them. 0 Remove the counterweight and head shell from the base of pitch or the record may be damaged, resulting... the stylus is extremely delicate. Replacing the stylus The life-span of records Use a commercial record cleaner to replace the stylus for the CP-1050. Handling Handling and maintenance of stylus Take due care when handling the stylus as the stylus tip is normally about 500 hours but varies greatly...
User Manual English
Page 14
... Drive method: Turning speed: Wow and flutter: Signal to noise ratio: Turntable: Motor: Starting torque: Direct drive 33 1/3 rpm, 45 rpm 0.15 % or less 60 dB or above Aluminum die-cast Diameter 305 mm Brushless DC motor 1.0 ...
... Drive method: Turning speed: Wow and flutter: Signal to noise ratio: Turntable: Motor: Starting torque: Direct drive 33 1/3 rpm, 45 rpm 0.15 % or less 60 dB or above Aluminum die-cast Diameter 305 mm Brushless DC motor 1.0 ...
