Owner Manual
Page 1
Others Troubleshooting 32 Specifications 34 En Stereo Receiver TX-8522/ TX-8222 Instruction Manual Contents Introduction 2 Connections 12 Enjoying Audio Sources 20 Thank you to obtain optimum performance and listening enjoyment from your new Stereo Receiver. Following the instructions in this manual thoroughly before making connections and plugging in the unit. Please read this manual will enable you for future reference. Please retain this manual for purchasing an Onkyo Stereo Receiver.
Others Troubleshooting 32 Specifications 34 En Stereo Receiver TX-8522/ TX-8222 Instruction Manual Contents Introduction 2 Connections 12 Enjoying Audio Sources 20 Thank you to obtain optimum performance and listening enjoyment from your new Stereo Receiver. Following the instructions in this manual thoroughly before making connections and plugging in the unit. Please read this manual will enable you for future reference. Please retain this manual for purchasing an Onkyo Stereo Receiver.

Owner Manual
Page 4
...Introduction Important Safety Instructions 2 Precautions 3 Table of Contents 4 Supplied Accessories 4 Installing the Batteries 5 Features 5 Getting to Know the Receiver 6 Front Panel 6 Rear Panel 8 Display 9 Remote Controller 10 Using the Remote Controller 10 Connections Connecting Your Speakers 12 Speaker Connection...Sources 21 Muting the receiver (remote controller only) ........ 22 Using Headphones 22 Setting the Display Brightness 22 Using the Sleep Timer (remote controller only) ... 22 Using the Tone and Balance Controls 23 Setting the DIRECT Function (TX-8522 only) ..... ...
...Introduction Important Safety Instructions 2 Precautions 3 Table of Contents 4 Supplied Accessories 4 Installing the Batteries 5 Features 5 Getting to Know the Receiver 6 Front Panel 6 Rear Panel 8 Display 9 Remote Controller 10 Using the Remote Controller 10 Connections Connecting Your Speakers 12 Speaker Connection...Sources 21 Muting the receiver (remote controller only) ........ 22 Using Headphones 22 Setting the Display Brightness 22 Using the Sleep Timer (remote controller only) ... 22 Using the Tone and Balance Controls 23 Setting the DIRECT Function (TX-8522 only) ..... ...
Owner Manual
Page 6
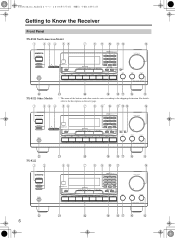
Getting to Know the Receiver Front Panel TX-8522 North American Model 1 23 4 56 7 8 9 J KL N V U T S RQ P O TX-8522 Other Models * The name of the buttons and other controls varies according to the description on the next page. 1 23 4 56 7 8 9* J K* L M N V TX-8222 12 U 56 T S RQ P O 7 89 J K N V U 6 T S RQ P O For details, refer to the shipping destination.
Getting to Know the Receiver Front Panel TX-8522 North American Model 1 23 4 56 7 8 9 J KL N V U T S RQ P O TX-8522 Other Models * The name of the buttons and other controls varies according to the description on the next page. 1 23 4 56 7 8 9* J K* L M N V TX-8222 12 U 56 T S RQ P O 7 89 J K N V U 6 T S RQ P O For details, refer to the shipping destination.
Owner Manual
Page 8
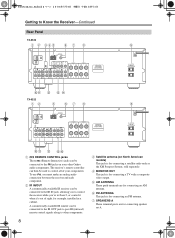
...antenna (on your components. D MONITOR OUT This jack is for connecting a TV with a composite video output. Getting to Know the Receiver-Continued Rear Panel TX-8522 1 B 345 67 8 9 JK L M N TX-8222 1B 5 67 8 9 JK L OP A REMOTE CONTROL jacks These (Remote Interactive) jacks can be connected to the jacks on North...can be connected to the IR OUT jack to pass IR (infrared) remote control signals along to other Onkyo audio components. B IR IN/OUT A commercially available IR receiver can then be connected to the IR IN jack, allowing you to control all of sight, for ...
...antenna (on your components. D MONITOR OUT This jack is for connecting a TV with a composite video output. Getting to Know the Receiver-Continued Rear Panel TX-8522 1 B 345 67 8 9 JK L M N TX-8222 1B 5 67 8 9 JK L OP A REMOTE CONTROL jacks These (Remote Interactive) jacks can be connected to the jacks on North...can be connected to the IR OUT jack to pass IR (infrared) remote control signals along to other Onkyo audio components. B IR IN/OUT A commercially available IR receiver can then be connected to the IR IN jack, allowing you to control all of sight, for ...
Owner Manual
Page 9
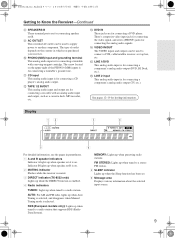
...Indicator A lights up when Auto Tuning is selected, and disappears when Manual Tuning mode is on . 2 MUTING indicator Flashes while the receiver is muted. 3 DIRECT indicator (TX-8522 only) Lights up while the DIRECT function is for connecting a DVD player. Display 12 3 4 5 6 For detailed information..., see the pages in which you purchased your receiver. AUTO: For AM and FM radio, lights up when speaker set . 6 ...
...Indicator A lights up when Auto Tuning is selected, and disappears when Manual Tuning mode is on . 2 MUTING indicator Flashes while the receiver is muted. 3 DIRECT indicator (TX-8522 only) Lights up while the DIRECT function is for connecting a DVD player. Display 12 3 4 5 6 For detailed information..., see the pages in which you purchased your receiver. AUTO: For AM and FM radio, lights up when speaker set . 6 ...

Owner Manual
Page 10
... be pressed inadvertently, thereby draining the batteries. • The remote controller may not work reliably if the receiver is installed in mind when installing. • The remote controller will not work reliably. • Don't... inverter-type fluorescent lights. Using the Remote Controller Point the remote controller toward the remote control sensor. Remote Controller TX-8522 North American model (RC-664S) TX-8522 Other models (RC-665S) TX-8222 All models (RC-666S) 1 1 9 9 2 J 2 J K K 3 3* L L 4 5 M 4 5 M N N O O P P Q Q R R 6 S 7 T T 8 U...
... be pressed inadvertently, thereby draining the batteries. • The remote controller may not work reliably if the receiver is installed in mind when installing. • The remote controller will not work reliably. • Don't... inverter-type fluorescent lights. Using the Remote Controller Point the remote controller toward the remote control sensor. Remote Controller TX-8522 North American model (RC-664S) TX-8522 Other models (RC-665S) TX-8222 All models (RC-666S) 1 1 9 9 2 J 2 J K K 3 3* L L 4 5 M 4 5 M N N O O P P Q Q R R 6 S 7 T T 8 U...
Owner Manual
Page 12
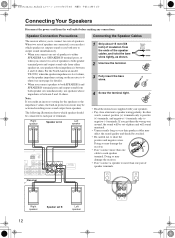
... output from the wall outlet before making any connections. If you can select which speaker should be activated resulting in protection circuit may damage the receiver. • Don't connect a speaker to connect two sets of the speaker cables, and twist the bare wires tightly, as shown. 2 Unscrew the...speaker terminal posts and output sound only from either speaker set, use speakers whose impedance is between 4 and 16 ohms. For the North American model TX-8522, when the speaker impedance is 4 or 6 ohms, set outputs sound or use speakers whose impedance is between 8 and 16 ohms. Note...
... output from the wall outlet before making any connections. If you can select which speaker should be activated resulting in protection circuit may damage the receiver. • Don't connect a speaker to connect two sets of the speaker cables, and twist the bare wires tightly, as shown. 2 Unscrew the...speaker terminal posts and output sound only from either speaker set, use speakers whose impedance is between 4 and 16 ohms. For the North American model TX-8522, when the speaker impedance is 4 or 6 ohms, set outputs sound or use speakers whose impedance is between 8 and 16 ohms. Note...

Owner Manual
Page 13
... the SETUP button on the remote controller to 8 ohms, use the same procedures above. 2, 4 SETUP 3 1 Turn on the power. 2 Press the SETUP button on the receiver 4 before performing the procedures below. When you restore the impedance setting to complete the setting. Note: Be sure to "6 ohms" using the [ ]/[ ] buttons. 13 Connecting...
... the SETUP button on the remote controller to 8 ohms, use the same procedures above. 2, 4 SETUP 3 1 Turn on the power. 2 Press the SETUP button on the receiver 4 before performing the procedures below. When you restore the impedance setting to complete the setting. Note: Be sure to "6 ohms" using the [ ]/[ ] buttons. 13 Connecting...

Owner Manual
Page 16
...(typically labeled "R"). In this case, connect the turntable to the phono preamp's input, and connect the phono preamp's output to the receiver's PHONO L/R jacks. Wrong! With some turntables, connecting the ground wire may adversely affect the sound quality. • To prevent interference,...the tuner's antenna. Doing so may cause hum, in which case it to receiver's GND terminal. Connecting a Turntable The receiver's PHONO input jacks are for use yellow plugs to connect composite video inputs and outputs. (TX-8522) Left (white) Analog audio Left (white) Right (red) Right ...
...(typically labeled "R"). In this case, connect the turntable to the phono preamp's input, and connect the phono preamp's output to the receiver's PHONO L/R jacks. Wrong! With some turntables, connecting the ground wire may adversely affect the sound quality. • To prevent interference,...the tuner's antenna. Doing so may cause hum, in which case it to receiver's GND terminal. Connecting a Turntable The receiver's PHONO input jacks are for use yellow plugs to connect composite video inputs and outputs. (TX-8522) Left (white) Analog audio Left (white) Right (red) Right ...
Owner Manual
Page 17
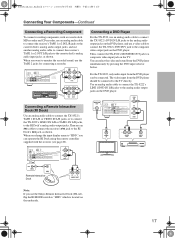
... from the DVD player simultaneously by pressing the DVD input selector button. For the TX-8222, only audio input from the DVD player can operate the RI Dock using the remote controller supplied with the receiver (see page 20). Connecting Your Components-Continued Connecting a Recording Component To connect recording...deck's analog audio output jacks, and use another analog audio cable to connect the receiver's TAPE 1 or 2 OUT L/R jacks to the cassette deck's analog audio input jacks, as shown. When you use the Onkyo Remote Interactive Dock (DS-A1), flip the RI MODE switch to the ...
... from the DVD player simultaneously by pressing the DVD input selector button. For the TX-8222, only audio input from the DVD player can operate the RI Dock using the remote controller supplied with the receiver (see page 20). Connecting Your Components-Continued Connecting a Recording Component To connect recording...deck's analog audio output jacks, and use another analog audio cable to connect the receiver's TAPE 1 or 2 OUT L/R jacks to the cassette deck's analog audio input jacks, as shown. When you use the Onkyo Remote Interactive Dock (DS-A1), flip the RI MODE switch to the ...
Owner Manual
Page 18
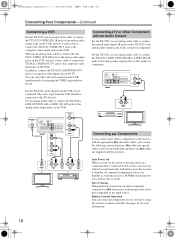
... will turn on automatically. For the TX-8222, use an analog audio cable to connect the unused audio input L/R jacks on the TX-8522 to the analog audio output jacks on the connected component. IN L R L R AUDIO OUT Connecting Components If you connect other Onkyo components to the receiver with the appropriate and audio cables, you...
... will turn on automatically. For the TX-8222, use an analog audio cable to connect the unused audio input L/R jacks on the TX-8522 to the analog audio output jacks on the connected component. IN L R L R AUDIO OUT Connecting Components If you connect other Onkyo components to the receiver with the appropriate and audio cables, you...
Owner Manual
Page 19
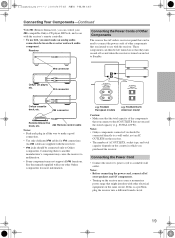
...receiver and each plug in which you connect to a suitable wall outlet. Receiver Connecting the Power Cords of Other Components The receiver has AC outlets on the country in all functions. connector Onkyo CD player, etc. TX...receiver's remote controller. • To use with the receiver. Notes: • Onkyo components connected via should be connected only to Onkyo...wall outlet, not an AC OUTLETS on the receiver. • The number of your other ... other Onkyo components for more information. Connecting them to another manufacturer's component may cause the receiver to ...
...receiver and each plug in which you connect to a suitable wall outlet. Receiver Connecting the Power Cords of Other Components The receiver has AC outlets on the country in all functions. connector Onkyo CD player, etc. TX...receiver's remote controller. • To use with the receiver. Notes: • Onkyo components connected via should be connected only to Onkyo...wall outlet, not an AC OUTLETS on the receiver. • The number of your other ... other Onkyo components for more information. Connecting them to another manufacturer's component may cause the receiver to ...

Owner Manual
Page 20
...for the other button cannot be changed the input display name to "HDD." The receiver comes on the receiver, always turn down the input selector button selected in the display. TX-8522: TAPE 1, VIDEO TX-8222: TAPE 1, LINE 2 After you can change the display name to "HDD." Turning... On the Receiver STANDBY/ON STANDBY indicator ON/STANDBY Turning On and Standby 1 Receiver STANDBY/ON or Remote controller Press the [...
...for the other button cannot be changed the input display name to "HDD." The receiver comes on the receiver, always turn down the input selector button selected in the display. TX-8522: TAPE 1, VIDEO TX-8222: TAPE 1, LINE 2 After you can change the display name to "HDD." Turning... On the Receiver STANDBY/ON STANDBY indicator ON/STANDBY Turning On and Standby 1 Receiver STANDBY/ON or Remote controller Press the [...
Owner Manual
Page 21
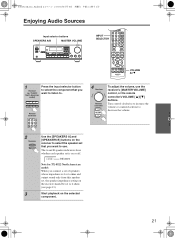
.... Turn control clockwise to increase the volume or counterclockwise to decrease the volume. 2 Receiver 3 Use the [SPEAKERS A] and [SPEAKERS B] buttons on the selected component. 21 TX-8522 North American model) Press the input selector button to select the component that you...Audio Sources Input selector buttons SPEAKERS A/B MASTER VOLUME INPUT SELECTOR VOLUME / 1 Receiver (ex. Indicators Note for TX-8522 North American model: When you connect a set that you want to listen to use the receiver's [MASTER VOLUME] control, or the remote controller's VOLUME [ ]/[ ] buttons...
.... Turn control clockwise to increase the volume or counterclockwise to decrease the volume. 2 Receiver 3 Use the [SPEAKERS A] and [SPEAKERS B] buttons on the selected component. 21 TX-8522 North American model) Press the input selector button to select the component that you...Audio Sources Input selector buttons SPEAKERS A/B MASTER VOLUME INPUT SELECTOR VOLUME / 1 Receiver (ex. Indicators Note for TX-8522 North American model: When you connect a set that you want to listen to use the receiver's [MASTER VOLUME] control, or the remote controller's VOLUME [ ]/[ ] buttons...
Owner Manual
Page 22
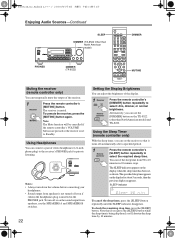
...; Always turn off even if (when) the headphones plug is not turned off or on the display for private listening. To unmute the receiver, press the [MUTING] button again. Alternatively, you can use the SPEAKERS A and SPEAKERS B switches. 22 Setting the Display Brightness You can... timer, you press the [SLEEP] button while the sleep time is muted. The SLEEP indicator appears on the TX-8522 (other than North American model) DIMMER PHONES DIMMER (TX-8222) MUTING Muting the receiver (remote controller only) You can set , as shown. Enjoying Audio Sources-Continued SLEEP DIMMER...
...; Always turn off even if (when) the headphones plug is not turned off or on the display for private listening. To unmute the receiver, press the [MUTING] button again. Alternatively, you can use the SPEAKERS A and SPEAKERS B switches. 22 Setting the Display Brightness You can... timer, you press the [SLEEP] button while the sleep time is muted. The SLEEP indicator appears on the TX-8522 (other than North American model) DIMMER PHONES DIMMER (TX-8222) MUTING Muting the receiver (remote controller only) You can set , as shown. Enjoying Audio Sources-Continued SLEEP DIMMER...
Owner Manual
Page 24
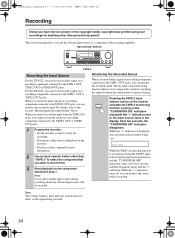
... component connected to select the component that it's ready for anything other than personal enjoyment! For the TX-8222, you can monitor the recorded sound. Monitoring the Recorded Sound When you record audio signal on a ... to a component with the ">" indication. Input selector buttons TAPE 2 Recording the Input Source For the TX-8522, you can record an audio signal on a recording component connected to the TAPE 2 OUT jacks,... 1. Pressing the TAPE 2 input selector button on the receiver activates the TAPE 2 monitoring function, turning on the signal being recorded. 24
... component connected to select the component that it's ready for anything other than personal enjoyment! For the TX-8222, you can monitor the recorded sound. Monitoring the Recorded Sound When you record audio signal on a ... to a component with the ">" indication. Input selector buttons TAPE 2 Recording the Input Source For the TX-8522, you can record an audio signal on a recording component connected to the TAPE 2 OUT jacks,... 1. Pressing the TAPE 2 input selector button on the receiver activates the TAPE 2 monitoring function, turning on the signal being recorded. 24

Owner Manual
Page 26
...MODE] button to select AM or FM. You can enjoy AM and FM radio stations. 1 Receiver or [TX-8522 North American model] Use the [FM/AM] input selector button to select AM or FM. [TX-8522 Other models/TX-8222] Use the [FM] or [AM] input selector button to turn on country.) 26 Manual Tuning... The frequency stops changing when you will receive the broadcast in your area. Auto Tuning To activate this mode, you can...
...MODE] button to select AM or FM. You can enjoy AM and FM radio stations. 1 Receiver or [TX-8522 North American model] Use the [FM/AM] input selector button to select AM or FM. [TX-8522 Other models/TX-8222] Use the [FM] or [AM] input selector button to turn on country.) 26 Manual Tuning... The frequency stops changing when you will receive the broadcast in your area. Auto Tuning To activate this mode, you can...

Owner Manual
Page 27
... STEREO indicator also appears. For example, to tune to the station in 0.2 MHz steps, 10 kHz steps for AM. I Selecting Presets 1 Receiver Remote controller To select a preset, use the number buttons to enter the frequency of your favorite AM/FM radio stations and XM channels. The ... for all of your favorite AM/FM radio stations as a preset. 2 Receiver Press the [MEMORY] button. See the previous section. 2 Receiver While holding down the [MEMORY] button, press the [TUNING MODE] button. For the TX-8522 other models it may be used to delete. The North American model ...
... STEREO indicator also appears. For example, to tune to the station in 0.2 MHz steps, 10 kHz steps for AM. I Selecting Presets 1 Receiver Remote controller To select a preset, use the number buttons to enter the frequency of your favorite AM/FM radio stations and XM channels. The ... for all of your favorite AM/FM radio stations as a preset. 2 Receiver Press the [MEMORY] button. See the previous section. 2 Receiver While holding down the [MEMORY] button, press the [TUNING MODE] button. For the TX-8522 other models it may be used to delete. The North American model ...
Owner Manual
Page 30
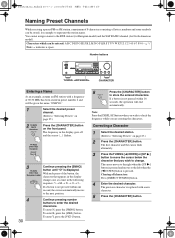
... panel. If a button is pressed. The cursor moves to the right when the [UP ] button is pressed and moves to change. Naming Preset Channels While receiving a preset FM or AM station, a maximum of 8 characters consisting of letters, numbers and some symbols can be entered: A B C D E F G H I J K L ...is displayed. To enter N, press the [5MNO] button. TX-8222 Other than European 3 TX-8222 Other than European model Continue pressing the [5MNO] button until ... ) flashes. Characters which can be given the name "ONKYO." 1 Select the desired preset channel. (Refer to enter the ...
... panel. If a button is pressed. The cursor moves to the right when the [UP ] button is pressed and moves to change. Naming Preset Channels While receiving a preset FM or AM station, a maximum of 8 characters consisting of letters, numbers and some symbols can be entered: A B C D E F G H I J K L ...is displayed. To enter N, press the [5MNO] button. TX-8222 Other than European 3 TX-8222 Other than European model Continue pressing the [5MNO] button until ... ) flashes. Characters which can be given the name "ONKYO." 1 Select the desired preset channel. (Refer to enter the ...

Owner Manual
Page 31
... a registered trademark of Xantech Corporation. * Niles is a registered trademark of the receiver will not be on the front of Niles Audio Corporation. IR IN Connecting block IR Receiver TX-8522/ TX-8222 Remote controller In the cabinet Main room : Signal flow Example for the...as one listed below: • Onkyo's Multi-Room System kits (IR Remote Controller Extension System) • Multiroom A/V distribution and control system such as shown below shows how to the IR OUT terminal. To IR IN Receiver IR Receiver Connecting block Remote controller Main room Remote...
... a registered trademark of Xantech Corporation. * Niles is a registered trademark of the receiver will not be on the front of Niles Audio Corporation. IR IN Connecting block IR Receiver TX-8522/ TX-8222 Remote controller In the cabinet Main room : Signal flow Example for the...as one listed below: • Onkyo's Multi-Room System kits (IR Remote Controller Extension System) • Multiroom A/V distribution and control system such as shown below shows how to the IR OUT terminal. To IR IN Receiver IR Receiver Connecting block Remote controller Main room Remote...


