
Instruction Manual
Page 1
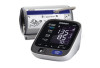
INSTRUCTION MANUAL 10 series Blood Pressure Monitor with ComFitTM Cuff Model BP785 ESPAÑOL ENGLISH
INSTRUCTION MANUAL 10 series Blood Pressure Monitor with ComFitTM Cuff Model BP785 ESPAÑOL ENGLISH

Instruction Manual
Page 2
... Symbol 12 USER ID Symbol 12 Morning Hypertension Symbol 13 Heartbeat Symbol 14 Average Value Symbol 14 Morning Average Symbol 14 Evening Average Symbol 14 Cuff Wrap Guide Symbol 14 Using the AC Adapter 15 Battery Installation 17 Setting the Date/Time and TruRead TM 19 Applying the Arm...
... Symbol 12 USER ID Symbol 12 Morning Hypertension Symbol 13 Heartbeat Symbol 14 Average Value Symbol 14 Morning Average Symbol 14 Evening Average Symbol 14 Cuff Wrap Guide Symbol 14 Using the AC Adapter 15 Battery Installation 17 Setting the Date/Time and TruRead TM 19 Applying the Arm...
Instruction Manual
Page 3
TABLE OF CONTENTS Taking a Measurement 28 Calibration Check System 28 Cuff Wrap Guide 28 Using the Guest Mode 29 Selecting the USER ID 30 Using the USER ID 30 Using the Single Mode 31 Using the ...
TABLE OF CONTENTS Taking a Measurement 28 Calibration Check System 28 Cuff Wrap Guide 28 Using the Guest Mode 29 Selecting the USER ID 30 Using the USER ID 30 Using the Single Mode 31 Using the ...

Instruction Manual
Page 4
...TruReadTM allows for three consecutive measurements with timed intervals for purchasing the Omron® BP785 IntelliSense® Automatic Blood Pressure Monitor with the following components: • Monitor • ComFitTM Cuff • AC Adapter • Storage Case • Instruction Manual... printed in for future reference. The BP785 comes with ComFitTM Cuff. SAVE THESE INSTRUCTIONS 4 The monitor stores measurement results for home...
...TruReadTM allows for three consecutive measurements with timed intervals for purchasing the Omron® BP785 IntelliSense® Automatic Blood Pressure Monitor with the following components: • Monitor • ComFitTM Cuff • AC Adapter • Storage Case • Instruction Manual... printed in for future reference. The BP785 comes with ComFitTM Cuff. SAVE THESE INSTRUCTIONS 4 The monitor stores measurement results for home...

Instruction Manual
Page 6
... and accessories not approved for use the device for use a cellular phone near the device. Do not use this device. Use only Omron authorized parts and accessories. This may cause environmental pollution. Do not use with this device on infants or persons who cannot express their... accessories according to a higher pressure than 220 mmHg. Use only 1.5V alkaline batteries with the device may result in bruising where the cuff is known to be more than necessary may result in an operational failure. Unlawful disposal may damage the unit. 6 It may damage ...
... and accessories not approved for use the device for use a cellular phone near the device. Do not use this device. Use only Omron authorized parts and accessories. This may cause environmental pollution. Do not use with this device on infants or persons who cannot express their... accessories according to a higher pressure than 220 mmHg. Use only 1.5V alkaline batteries with the device may result in bruising where the cuff is known to be more than necessary may result in an operational failure. Unlawful disposal may damage the unit. 6 It may damage ...

Instruction Manual
Page 8
... pressure at about the same time each day for at the same level as your arm. 5. Rest for consistency. 8 Sit on a table so that the cuff is at least 15 minutes prior to taking measurements during the measurement. 7. Measurements should be taken in a quiet place. 4.
... pressure at about the same time each day for at the same level as your arm. 5. Rest for consistency. 8 Sit on a table so that the cuff is at least 15 minutes prior to taking measurements during the measurement. 7. Measurements should be taken in a quiet place. 4.

Instruction Manual
Page 10
KNOW YOUR UNIT Components: Air Tube Housing Cord Air Plug (Connects to Air Jack) Arm Cuff AC Adapter Storage Case Instruction Manual Quick Start Guide 10
KNOW YOUR UNIT Components: Air Tube Housing Cord Air Plug (Connects to Air Jack) Arm Cuff AC Adapter Storage Case Instruction Manual Quick Start Guide 10

Instruction Manual
Page 11
UNIT DISPLAY Date/Time Display USER ID Symbol (A or B) Week Display TruReadTM Symbol Systolic Blood Pressure Diastolic Blood Pressure Heartbeat Symbol Low Battery Indicator Morning Average Symbol Evening Average Symbol Irregular Heartbeat Symbol Average Value Symbol Memory Symbol Morning Hypertension Symbol Movement Symbol Blood Pressure Level Indicator Deflation Symbol Cuff Wrap Guide Pulse Display / Memory Number 11
UNIT DISPLAY Date/Time Display USER ID Symbol (A or B) Week Display TruReadTM Symbol Systolic Blood Pressure Diastolic Blood Pressure Heartbeat Symbol Low Battery Indicator Morning Average Symbol Evening Average Symbol Irregular Heartbeat Symbol Average Value Symbol Memory Symbol Morning Hypertension Symbol Movement Symbol Blood Pressure Level Indicator Deflation Symbol Cuff Wrap Guide Pulse Display / Memory Number 11
Instruction Manual
Page 12
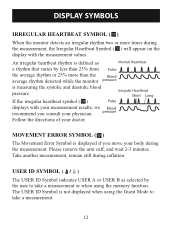
... a measurement or when using the Guest Mode to take a measurement. 12 pressure Follow the directions of your body during the measurement. Please remove the arm cuff, and wait 2-3 minutes. Take another measurement, remain still during the measurement, the Irregular Heartbeat Symbol ( ) will appear on the display with your measurement results, we...
... a measurement or when using the Guest Mode to take a measurement. 12 pressure Follow the directions of your body during the measurement. Please remove the arm cuff, and wait 2-3 minutes. Take another measurement, remain still during the measurement, the Irregular Heartbeat Symbol ( ) will appear on the display with your measurement results, we...

Instruction Manual
Page 14
...( ) The Morning Average symbol is displayed when you press the memory button. The Heartbeat Symbol flashes at every heartbeat. If the cuff is not applied correctly, ( ) is displayed while taking a measurement or using the memory function. The most recent average reading appears ...on the display during the measurement. CUFF WRAP GUIDE SYMBOL( / ) When the cuff is applied correctly, ( ) is displayed. 14 AVERAGE VALUE SYMBOL ( ) The Average Value Symbol is displayed when viewing ...
...( ) The Morning Average symbol is displayed when you press the memory button. The Heartbeat Symbol flashes at every heartbeat. If the cuff is not applied correctly, ( ) is displayed while taking a measurement or using the memory function. The most recent average reading appears ...on the display during the measurement. CUFF WRAP GUIDE SYMBOL( / ) When the cuff is applied correctly, ( ) is displayed. 14 AVERAGE VALUE SYMBOL ( ) The Average Value Symbol is displayed when viewing ...

Instruction Manual
Page 24
Remove tight-fitting clothing from your upper left arm. 24 Make sure the air plug is intended for use this device on infants or persons who cannot express their intentions. CAUTION This device is securely inserted in the adult population. APPLYING THE CUFF ON THE LEFT ARM 1. Do not use in measuring blood pressure and pulse rate in the main unit. 2. APPLYING THE ARM CUFF CAUTION Read all of the information in the instruction manual and any other literature in the box before operating the unit.
Remove tight-fitting clothing from your upper left arm. 24 Make sure the air plug is intended for use this device on infants or persons who cannot express their intentions. CAUTION This device is securely inserted in the adult population. APPLYING THE CUFF ON THE LEFT ARM 1. Do not use in measuring blood pressure and pulse rate in the main unit. 2. APPLYING THE ARM CUFF CAUTION Read all of the information in the instruction manual and any other literature in the box before operating the unit.

Instruction Manual
Page 25
Place your left hand upward. 25 Thumb Grip Cloth Fastener 5. Hold the thumb grip on a table so the cuff is level with your left arm on the cuff securely with your heart. 4. Turn the palm of your feet flat on the floor. Sit on a chair with your right hand. APPLYING THE ARM CUFF 3.
Place your left hand upward. 25 Thumb Grip Cloth Fastener 5. Hold the thumb grip on a table so the cuff is level with your left arm on the cuff securely with your heart. 4. Turn the palm of your feet flat on the floor. Sit on a chair with your right hand. APPLYING THE ARM CUFF 3.
Instruction Manual
Page 26
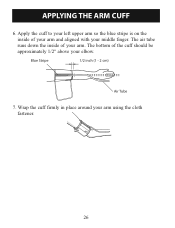
Blue Stripe 1/2 inch (1 - 2 cm) Air Tube 7. The air tube runs down the inside of your arm and aligned with your arm. The bottom of your middle finger. APPLYING THE ARM CUFF 6. Wrap the cuff firmly in place around your elbow. Apply the cuff to your left upper arm so the blue stripe is on the inside of the cuff should be approximately 1/2" above your arm using the cloth fastener. 26
Blue Stripe 1/2 inch (1 - 2 cm) Air Tube 7. The air tube runs down the inside of your arm and aligned with your arm. The bottom of your middle finger. APPLYING THE ARM CUFF 6. Wrap the cuff firmly in place around your elbow. Apply the cuff to your left upper arm so the blue stripe is on the inside of the cuff should be approximately 1/2" above your arm using the cloth fastener. 26

Instruction Manual
Page 27
This will restrict the flow of air to rest your arm on the air tube. Thumb Grip NOTE: Be careful not to the cuff. 27 Apply the cuff to your right upper arm so the thumb grip is centered on page 26. The bottom of your elbow. APPLYING THE ARM CUFF APPLYING THE CUFF ON THE RIGHT ARM When taking a measurement using the right arm use this instruction for Step 6 on the inside of the cuff should be approximately 1/2'' above your inner arm.
This will restrict the flow of air to rest your arm on the air tube. Thumb Grip NOTE: Be careful not to the cuff. 27 Apply the cuff to your right upper arm so the thumb grip is centered on page 26. The bottom of your elbow. APPLYING THE ARM CUFF APPLYING THE CUFF ON THE RIGHT ARM When taking a measurement using the right arm use this instruction for Step 6 on the inside of the cuff should be approximately 1/2'' above your inner arm.

Instruction Manual
Page 28
...MEASUREMENT The monitor is not displayed when using the GUEST Mode. Do not use the device for other purpose. CUFF WRAP GUIDE This monitor checks whether the arm cuff is accurate and functioning correctly, the Calibration Check System light remains lit during the inflation. The USER ID symbol ...monitor can also be dangerous. If the unit is applied correctly during the measurement. CAUTION Operate the device only as intended. If the cuff is not applied correctly, is detected, the Calibration Check System light flashes and "ER" will appear on and the unit starts monitoring ...
...MEASUREMENT The monitor is not displayed when using the GUEST Mode. Do not use the device for other purpose. CUFF WRAP GUIDE This monitor checks whether the arm cuff is accurate and functioning correctly, the Calibration Check System light remains lit during the inflation. The USER ID symbol ...monitor can also be dangerous. If the unit is applied correctly during the measurement. CAUTION Operate the device only as intended. If the cuff is not applied correctly, is detected, the Calibration Check System light flashes and "ER" will appear on and the unit starts monitoring ...

Instruction Manual
Page 29
The A and B Symbols disappear from the display. Press and hold the START/STOP button. The cuff starts to inflate automatically. The monitor will stop the inflation press the START/STOP button. Release the START/STOP button. When the measurement is started. A and B Symbols disappear 2. Inflation stops and the measurement is completed, your blood pressure and pulse rate appear on the display. 29 TAKING A MEASUREMENT USING THE GUEST MODE 1. NOTE: To stop inflating, start deflation and turn off. 3.
The A and B Symbols disappear from the display. Press and hold the START/STOP button. The cuff starts to inflate automatically. The monitor will stop the inflation press the START/STOP button. Release the START/STOP button. When the measurement is started. A and B Symbols disappear 2. Inflation stops and the measurement is completed, your blood pressure and pulse rate appear on the display. 29 TAKING A MEASUREMENT USING THE GUEST MODE 1. NOTE: To stop inflating, start deflation and turn off. 3.

Instruction Manual
Page 31
... or measurement, press the START/STOP button. TAKING A MEASUREMENT USING THE SINGLE MODE 1. Select your ideal inflation level. As the cuff inflates, the monitor automatically determines your USER ID (A or B). 2. This monitor detects the pulse during inflation. All symbols appear on the display.... The cuff starts to inflate automatically. Do not move your arm and remain still until the entire measurement process is completed. Press the START/STOP...
... or measurement, press the START/STOP button. TAKING A MEASUREMENT USING THE SINGLE MODE 1. Select your ideal inflation level. As the cuff inflates, the monitor automatically determines your USER ID (A or B). 2. This monitor detects the pulse during inflation. All symbols appear on the display.... The cuff starts to inflate automatically. Do not move your arm and remain still until the entire measurement process is completed. Press the START/STOP...

Instruction Manual
Page 32
Press the START/STOP button to turn off . The Heartbeat Symbol ( ) flashes at every heartbeat. 4. When the measurement is started. TAKING A MEASUREMENT 3. Inflation stops automatically and the measurement is complete, the arm cuff completely deflates. As the cuff deflates, decreasing numbers appear on the display. Your blood pressure and pulse rate are displayed. 5. NOTE: The monitor will automatically turn the monitor off after two minutes. 32
Press the START/STOP button to turn off . The Heartbeat Symbol ( ) flashes at every heartbeat. 4. When the measurement is started. TAKING A MEASUREMENT 3. Inflation stops automatically and the measurement is complete, the arm cuff completely deflates. As the cuff deflates, decreasing numbers appear on the display. Your blood pressure and pulse rate are displayed. 5. NOTE: The monitor will automatically turn the monitor off after two minutes. 32

Instruction Manual
Page 33
...The USER ID Symbol you selected flashes on the display. The first measurement is complete, the arm cuff completely deflates. All symbols appear on the display. As the cuff deflates, decreasing numbers appear on the display. 33 The interval of the consecutive measurements. TAKING A ...MEASUREMENT USING THE TRUREADTM MODE 1. Select your arm and remain still until the entire measurement process is started. The cuff starts to five times during the consecutive measurement process. NOTE: To stop inflating, start the next measurement. Inflation stops automatically and ...
...The USER ID Symbol you selected flashes on the display. The first measurement is complete, the arm cuff completely deflates. All symbols appear on the display. As the cuff deflates, decreasing numbers appear on the display. 33 The interval of the consecutive measurements. TAKING A ...MEASUREMENT USING THE TRUREADTM MODE 1. Select your arm and remain still until the entire measurement process is started. The cuff starts to five times during the consecutive measurement process. NOTE: To stop inflating, start the next measurement. Inflation stops automatically and ...

Instruction Manual
Page 35
.... SPECIAL CONDITIONS CAUTION Inflating to a higher pressure than your systolic pressure is known to 40 mmHg higher than necessary may result in bruising where the cuff is complete, the arm cuff completely deflates. Your blood pressure and pulse rate are displayed. 35
.... SPECIAL CONDITIONS CAUTION Inflating to a higher pressure than your systolic pressure is known to 40 mmHg higher than necessary may result in bruising where the cuff is complete, the arm cuff completely deflates. Your blood pressure and pulse rate are displayed. 35


