Stylus 810 Advanced Manual (English)
Page 50
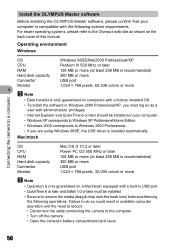
...or later and Safari 1.0 or later must log on as shown on your computer is installed automatically. Operating environment Windows OS CPU Windows 98SE/Me/2000 Professional/XP Pentium III 500 MHz or later RAM 128 MB or more (at least 256 ...the camera • Open the camera's battery compartment/card cover 50 Connecting the camera to a computer Install the OLYMPUS Master software Before installing the OLYMPUS Master software, please confirm that your computer. • Windows XP corresponds to Windows XP Professional/Home Edition. • Windows 2000 corresponds to Windows 2000 ...
...or later and Safari 1.0 or later must log on as shown on your computer is installed automatically. Operating environment Windows OS CPU Windows 98SE/Me/2000 Professional/XP Pentium III 500 MHz or later RAM 128 MB or more (at least 256 ...the camera • Open the camera's battery compartment/card cover 50 Connecting the camera to a computer Install the OLYMPUS Master software Before installing the OLYMPUS Master software, please confirm that your computer. • Windows XP corresponds to Windows XP Professional/Home Edition. • Windows 2000 corresponds to Windows 2000 ...
Stylus 810 Advanced Manual (English)
Page 51
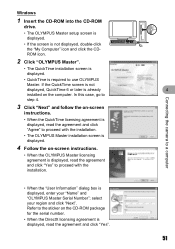
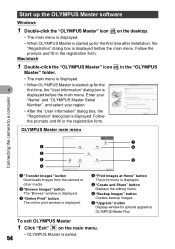
... "Next". Connecting the camera to use OLYMPUS Master. In this case, go to step 4. 3 Click "Next" and follow the on-screen instructions. • When the QuickTime licensing agreement is displayed, read the agreement and click "Agree" to proceed with the installation. Windows 1 Insert the CD-...ROM into the CD-ROM drive. • The OLYMPUS Master setup screen is displayed. • If the screen is not displayed, double-click the "My ...
... "Next". Connecting the camera to use OLYMPUS Master. In this case, go to step 4. 3 Click "Next" and follow the on-screen instructions. • When the QuickTime licensing agreement is displayed, read the agreement and click "Agree" to proceed with the installation. Windows 1 Insert the CD-...ROM into the CD-ROM drive. • The OLYMPUS Master setup screen is displayed. • If the screen is not displayed, double-click the "My ...
Stylus 810 Advanced Manual (English)
Page 52
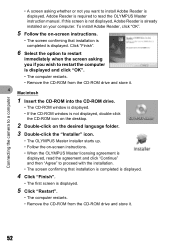
... 5 Click "Restart". • The computer restarts. • Remove the CD-ROM from the CD-ROM drive and store it . 52 Connecting the camera to a computer • A screen asking whether or not you wish to restart the computer is displayed and click "OK". • The computer restarts.... the CD-ROM window is not displayed, double-click the CD-ROM icon on the desktop. 2 Double-click on the desired language folder. 3 Double-click the "Installer" icon. • The OLYMPUS Master installer starts up. • Follow the on-screen instructions. • When the OLYMPUS Master licensing agreement ...
... 5 Click "Restart". • The computer restarts. • Remove the CD-ROM from the CD-ROM drive and store it . 52 Connecting the camera to a computer • A screen asking whether or not you wish to restart the computer is displayed and click "OK". • The computer restarts.... the CD-ROM window is not displayed, double-click the CD-ROM icon on the desktop. 2 Double-click on the desired language folder. 3 Double-click the "Installer" icon. • The OLYMPUS Master installer starts up. • Follow the on-screen instructions. • When the OLYMPUS Master licensing agreement ...

Stylus 810 Advanced Manual (English)
Page 53
...Windows When you connect your digital camera for the USB connection is displayed. Note • The camera functions are disabled while the camera is connected to a computer. • Connecting the camera to recognize CUSTOM PRINT EXIT SET OK the camera. Multi-connector 3 Select [PC], and press o. USB ŜŊŏŞ 4 The camera.... Click "OK" to the computer. 53 In this application and start OLYMPUS Master. Connecting the camera to a computer Connecting the camera to a computer 1 Make sure the camera is turned off. • The monitor is off. • The ...
...Windows When you connect your digital camera for the USB connection is displayed. Note • The camera functions are disabled while the camera is connected to a computer. • Connecting the camera to recognize CUSTOM PRINT EXIT SET OK the camera. Multi-connector 3 Select [PC], and press o. USB ŜŊŏŞ 4 The camera.... Click "OK" to the computer. 53 In this application and start OLYMPUS Master. Connecting the camera to a computer Connecting the camera to a computer 1 Make sure the camera is turned off. • The monitor is off. • The ...
Stylus 810 Advanced Manual (English)
Page 54
... menu is displayed. • When OLYMPUS Master is started up for optional upgrade to OLYMPUS Master Plus. OLYMPUS Master main menu Connecting the camera to a computer 7 1 6 2 3 5 4 1 "Transfer Images" button Downloads images from the camera or other media. 2 "Browse Images" button The "Browse" window is displayed. 3 "Online Print" button The online print window is displayed. 4 "Print Images at...
... menu is displayed. • When OLYMPUS Master is started up for optional upgrade to OLYMPUS Master Plus. OLYMPUS Master main menu Connecting the camera to a computer 7 1 6 2 3 5 4 1 "Transfer Images" button Downloads images from the camera or other media. 2 "Browse Images" button The "Browse" window is displayed. 3 "Online Print" button The online print window is displayed. 4 "Print Images at...

Stylus 810 Advanced Manual (English)
Page 55
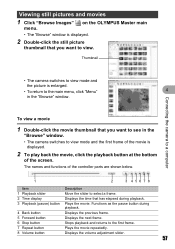
... that the card access lamp has stopped blinking. Connecting the camera to the main menu, click "Menu" in the browse window. • To return to a computer Displaying camera images on a computer Downloading and saving images 1 Click "Transfer Images" on the OLYMPUS Master main menu. • The menu for selecting the source is displayed. 2 Click...
... that the card access lamp has stopped blinking. Connecting the camera to the main menu, click "Menu" in the browse window. • To return to a computer Displaying camera images on a computer Downloading and saving images 1 Click "Transfer Images" on the OLYMPUS Master main menu. • The menu for selecting the source is displayed. 2 Click...

Stylus 810 Advanced Manual (English)
Page 56
... display the menu. 2 Click "Eject" on the eject icon. 3 Disconnect the USB cable from the camera and that the hardware can be displayed. Connecting the camera to a computer 2 Make the following preparations for disconnecting the USB cable. Windows Me/2000/XP 1 Click the "Unplug or Eject Hardware" icon in 4 the system tray. 2 Click...
... display the menu. 2 Click "Eject" on the eject icon. 3 Disconnect the USB cable from the camera and that the hardware can be displayed. Connecting the camera to a computer 2 Make the following preparations for disconnecting the USB cable. Windows Me/2000/XP 1 Click the "Unplug or Eject Hardware" icon in 4 the system tray. 2 Click...
Stylus 810 Advanced Manual (English)
Page 57
...playback. 3 Playback (pause) button Plays the movie. on the OLYMPUS Master main • The "Browse" window is displayed. 2 Double-click the still picture thumbnail that you want to see in the "Browse" window. Thumbnail • The camera switches to view mode and the picture is displayed. 2 To ... is enlarged. • To return to view. Connecting the camera to a computer To view a movie 1 Double-click the movie thumbnail that you want to the main menu, click "Menu" 4 in the "Browse" window. • The camera switches to view mode and the first frame of the screen...
...playback. 3 Playback (pause) button Plays the movie. on the OLYMPUS Master main • The "Browse" window is displayed. 2 Double-click the still picture thumbnail that you want to see in the "Browse" window. Thumbnail • The camera switches to view mode and the picture is displayed. 2 To ... is enlarged. • To return to view. Connecting the camera to a computer To view a movie 1 Double-click the movie thumbnail that you want to the main menu, click "Menu" 4 in the "Browse" window. • The camera switches to view mode and the first frame of the screen...
Stylus 810 Advanced Manual (English)
Page 58
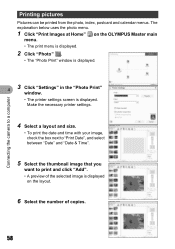
..., postcard and calendar menus. Connecting the camera to print and click "Add". • A preview of the selected image is displayed on the OLYMPUS Master main menu. • The print menu is displayed. 2 Click "Photo" . • The "Photo Print" window is displayed. 4 3 Click "Settings" in the "Photo Print" window. • The printer settings screen is...
..., postcard and calendar menus. Connecting the camera to print and click "Add". • A preview of the selected image is displayed on the OLYMPUS Master main menu. • The print menu is displayed. 2 Click "Photo" . • The "Photo Print" window is displayed. 4 3 Click "Settings" in the "Photo Print" window. • The printer settings screen is...
Stylus 810 Advanced Manual (English)
Page 59
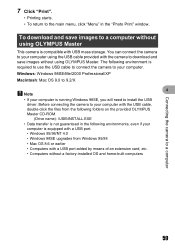
...or earlier • Computers with the camera to 9.2/X 4 Note • If your computer. You can connect the camera to your computer is equipped with a USB port. • Windows 95/98/NT 4.0 • Windows 98SE upgrades from the following folders on the provided OLYMPUS Master CD-ROM. (Drive name): \... cable to connect the camera to your computer is running Windows 98SE, you will need to install the USB driver. Connecting the camera to a computer 7 Click "Print". • Printing starts. • To return to a computer without using OLYMPUS Master This camera is compatible with USB ...
...or earlier • Computers with the camera to 9.2/X 4 Note • If your computer. You can connect the camera to your computer is equipped with a USB port. • Windows 95/98/NT 4.0 • Windows 98SE upgrades from the following folders on the provided OLYMPUS Master CD-ROM. (Drive name): \... cable to connect the camera to your computer is running Windows 98SE, you will need to install the USB driver. Connecting the camera to a computer 7 Click "Print". • Printing starts. • To return to a computer without using OLYMPUS Master This camera is compatible with USB ...
Stylus 810 Advanced Manual (English)
Page 63
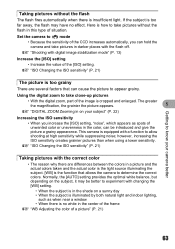
... ISO sensitivity • When you can be better to take close-up pictures • With the digital zoom, part of unwanted color or unevenness in the color, can hold the camera and take pictures without the flash The flash fires automatically when there is equipped with a function to ... the [ISO] setting • Increase the value of the CCD increases automatically, you increase the [ISO] setting, "noise", which appears as when near a window • When there is too grainy There are differences between the colors in the shade on the subject, it may have no white in this...
... ISO sensitivity • When you can be better to take close-up pictures • With the digital zoom, part of unwanted color or unevenness in the color, can hold the camera and take pictures without the flash The flash fires automatically when there is equipped with a function to ... the [ISO] setting • Increase the value of the CCD increases automatically, you increase the [ISO] setting, "noise", which appears as when near a window • When there is too grainy There are differences between the colors in the shade on the subject, it may have no white in this...
Stylus 810 Basic Manual (English, Français, Español)
Page 8
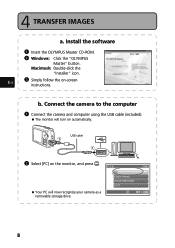
... will turn on the monitor, and press o. Connect the camera to the computer 1 Connect the camera and computer using the USB cable (included). The monitor will now recognize your camera as a removable storage drive. En 3 Simply follow the on-screen instructions. Install the software 1 Insert the OLYMPUS Master CD-ROM. 2 Windows: Click the "OLYMPUS Master" button.
... will turn on the monitor, and press o. Connect the camera to the computer 1 Connect the camera and computer using the USB cable (included). The monitor will now recognize your camera as a removable storage drive. En 3 Simply follow the on-screen instructions. Install the software 1 Insert the OLYMPUS Master CD-ROM. 2 Windows: Click the "OLYMPUS Master" button.
Stylus 810 Basic Manual (English, Français, Español)
Page 9
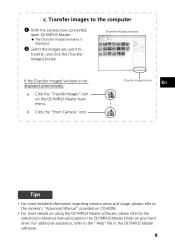
..., and click the [Transfer Images] button. [Transfer Images] window If the [Transfer Images] window is displayed. 2 Select the images you want to the (electronic) reference manual located in the OLYMPUS Master software. 9 For additional assistance, refer to the computer 1 With the camera now connected, open OLYMPUS Master. c. Transfer images to the "Help" file in the...
..., and click the [Transfer Images] button. [Transfer Images] window If the [Transfer Images] window is displayed. 2 Select the images you want to the (electronic) reference manual located in the OLYMPUS Master software. 9 For additional assistance, refer to the computer 1 With the camera now connected, open OLYMPUS Master. c. Transfer images to the "Help" file in the...
Stylus 810 Basic Manual (English, Français, Español)
Page 19
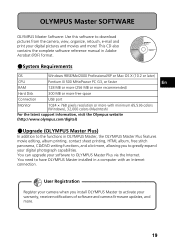
... from the camera, view, organize, retouch, e-mail and print your digital pictures and movies and more! OLYMPUS Master SOFTWARE OLYMPUS Master Software: Use this software to have OLYMPUS Master installed in a computer with minimum 65,536 colors (Windows), 32,000 colors (Macintosh) For the latest support information, visit the Olympus website (http://www.olympus.com/digital) (Upgrade (OLYMPUS Master Plus...
... from the camera, view, organize, retouch, e-mail and print your digital pictures and movies and more! OLYMPUS Master SOFTWARE OLYMPUS Master Software: Use this software to have OLYMPUS Master installed in a computer with minimum 65,536 colors (Windows), 32,000 colors (Macintosh) For the latest support information, visit the Olympus website (http://www.olympus.com/digital) (Upgrade (OLYMPUS Master Plus...
Stylus 810 Basic Manual (English, Français, Español)
Page 26
... a registered trademark of International Business Machines Corporation. • Microsoft and Windows are registered trademarks of Microsoft Corporation. • Macintosh is a trademark of...and/or trademarks of their respective owners. • The standards for Camera File System/DCF" standards stipulated by the Japan Electronics and Information Technology ...Stylus 810/µ 810 Trade Name : OLYMPUS Responsible Party : Address : Two Corporate Center Drive, P.O. Box 9058, Melville, NY 11747-9058 U.S.A. For customers in North and South America For customers in Canada This Class B digital...
... a registered trademark of International Business Machines Corporation. • Microsoft and Windows are registered trademarks of Microsoft Corporation. • Macintosh is a trademark of...and/or trademarks of their respective owners. • The standards for Camera File System/DCF" standards stipulated by the Japan Electronics and Information Technology ...Stylus 810/µ 810 Trade Name : OLYMPUS Responsible Party : Address : Two Corporate Center Drive, P.O. Box 9058, Melville, NY 11747-9058 U.S.A. For customers in North and South America For customers in Canada This Class B digital...
Stylus 810 Quick Start Guide (English)
Page 1
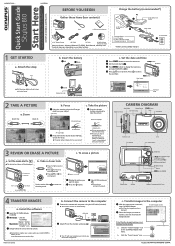
...[] [IN] 4 P [] [IN] 4 b. The green lamp indicates the focus is permanently erased. Pictures can also be displayed. Prev. The [Transfer Images] window is displayed. 2 Select the images you want to turn on automatically. 2 USB cable 1 2 Select [PC] on . 2 Set the mode dial to an ... items (box contents) Charge the battery (recommended*) W 3 LI-12B Lithium Ion Battery Digital Camera Strap LI-12B Lithium Ion Battery LI-10C Battery Charger USB Cable AV Cable OLYMPUS Master Software CD-ROM Items not shown: Advanced Manual (CD-ROM), Basic Manual, warranty ...
...[] [IN] 4 P [] [IN] 4 b. The green lamp indicates the focus is permanently erased. Pictures can also be displayed. Prev. The [Transfer Images] window is displayed. 2 Select the images you want to turn on automatically. 2 USB cable 1 2 Select [PC] on . 2 Set the mode dial to an ... items (box contents) Charge the battery (recommended*) W 3 LI-12B Lithium Ion Battery Digital Camera Strap LI-12B Lithium Ion Battery LI-10C Battery Charger USB Cable AV Cable OLYMPUS Master Software CD-ROM Items not shown: Advanced Manual (CD-ROM), Basic Manual, warranty ...


