STYLUS-7000 Instruction Manual (English)
Page 1
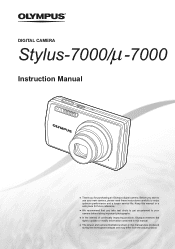
... manual were produced during the development stages and may differ from the actual product. Keep this manual in this manual. ● The screen and camera illustrations shown in a safe place for purchasing an Olympus digital camera. DIGITAL CAMERA Stylus-7000/μ -7000 Instruction Manual ● Thank you for future reference. ● We recommend that you start to use your...
... manual were produced during the development stages and may differ from the actual product. Keep this manual in this manual. ● The screen and camera illustrations shown in a safe place for purchasing an Olympus digital camera. DIGITAL CAMERA Stylus-7000/μ -7000 Instruction Manual ● Thank you for future reference. ● We recommend that you start to use your...

STYLUS-7000 Instruction Manual (English)
Page 2
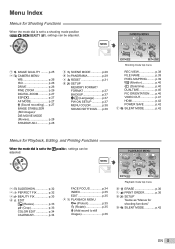
...; Menus for Shooting Functions.... 25 ¾ Menus for Playback, Editing, and Printing Functions 32 ¾ Menus for Other Camera Settings 37 ¾ Printing 43 ¾ Using OLYMPUS Master 2 48 ¾ Usage Tips 50 ¾ Appendix 55 ¾ Index 68 2 EN microSD Attachment 2 Step ... (DPOF)" (p. 46) Contents ¾ Names of the box Strap LI-42B Lithium-Ion Battery LI-41C Battery Charger Digital Camera USB Cable AV Cable OLYMPUS Master 2 CD-ROM Other accessories not shown: Instruction Manual (this manual), warranty card Contents may vary depending on purchase location.
...; Menus for Shooting Functions.... 25 ¾ Menus for Playback, Editing, and Printing Functions 32 ¾ Menus for Other Camera Settings 37 ¾ Printing 43 ¾ Using OLYMPUS Master 2 48 ¾ Usage Tips 50 ¾ Appendix 55 ¾ Index 68 2 EN microSD Attachment 2 Step ... (DPOF)" (p. 46) Contents ¾ Names of the box Strap LI-42B Lithium-Ion Battery LI-41C Battery Charger Digital Camera USB Cable AV Cable OLYMPUS Master 2 CD-ROM Other accessories not shown: Instruction Manual (this manual), warranty card Contents may vary depending on purchase location.

STYLUS-7000 Instruction Manual (English)
Page 3
...menu 3 Use LMNO to this page. Page tab Submenu 2 CAMERA MENU 1 WB 2 ISO DRIVE FINE ZOOM DIGITAL ZOOM EXIT MENU AUTO AUTO o OFF OFF SET OK CAMERA MENU DIGITAL ZOOM 1 WB AUTO 2 ISO OFF AUTO DRIVE ON o FINE ZOOM OFF DIGITAL ZOOM OFF BACK MENU SET OK To quickly move the page ...be selectable due to select the desired submenu 1, and press the E button. Press O to return to complete the setting. 3 EN CAMERA MENU 1 WB 2 ISO DRIVE FINE ZOOM DIGITAL ZOOM EXIT MENU AUTO AUTO o OFF OFF SET OK Submenu 1 4 Use LM to combinations of the selections. Some menus may be ...
...menu 3 Use LMNO to this page. Page tab Submenu 2 CAMERA MENU 1 WB 2 ISO DRIVE FINE ZOOM DIGITAL ZOOM EXIT MENU AUTO AUTO o OFF OFF SET OK CAMERA MENU DIGITAL ZOOM 1 WB AUTO 2 ISO OFF AUTO DRIVE ON o FINE ZOOM OFF DIGITAL ZOOM OFF BACK MENU SET OK To quickly move the page ...be selectable due to select the desired submenu 1, and press the E button. Press O to return to complete the setting. 3 EN CAMERA MENU 1 WB 2 ISO DRIVE FINE ZOOM DIGITAL ZOOM EXIT MENU AUTO AUTO o OFF OFF SET OK Submenu 1 4 Use LM to combinations of the selections. Some menus may be ...
STYLUS-7000 Instruction Manual (English)
Page 5
p.38 CAMERA MENU 1 5 2 6 4 3 7 EXIT MENU SET OK Shooting mode top menu REC VIEW p.38 FILE NAME p.39 PIXEL MAPPING.......... p.37 PW ON SETUP p.37 MENU COLOR p.38 ... dial is set to the q position, settings can be adjusted. 1 G SLIDESHOW p.32 2 H PERFECT FIX p.32 3 F BEAUTY FIX p.33 4 I n), settings can be adjusted. 1 A IMAGE QUALITY ......... p.25 2 B CAMERA MENU WB p.26 ISO p.26 DRIVE p.26 FINE ZOOM p.26 DIGITAL ZOOM p.27 ESP/n p.27 AF MODE p.27 R (Sound recording).....
p.38 CAMERA MENU 1 5 2 6 4 3 7 EXIT MENU SET OK Shooting mode top menu REC VIEW p.38 FILE NAME p.39 PIXEL MAPPING.......... p.37 PW ON SETUP p.37 MENU COLOR p.38 ... dial is set to the q position, settings can be adjusted. 1 G SLIDESHOW p.32 2 H PERFECT FIX p.32 3 F BEAUTY FIX p.33 4 I n), settings can be adjusted. 1 A IMAGE QUALITY ......... p.25 2 B CAMERA MENU WB p.26 ISO p.26 DRIVE p.26 FINE ZOOM p.26 DIGITAL ZOOM p.27 ESP/n p.27 AF MODE p.27 R (Sound recording).....
STYLUS-7000 Instruction Manual (English)
Page 8
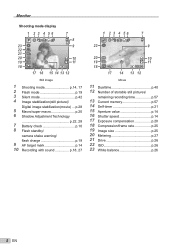
... p.22, 28 7 Battery check p.10 8 Flash standby/ camera shake warning/ flash charge p.19 9 AF target mark p.14 10 Recording with sound p.18, 27 1 2 3 4 56 7 23 9 20 19 VGA 18 15 +2.0 10 11 IN 00:34 17 14 13 12 Movie 11 Dualtime p.40 12 Number of storable still pictures/ remaining recording time... Monitor Shooting mode display 1 2 3 4 56 7 P 23 22 ISO 1600 21 20 19 12M 18 NORM +2.0 1/30 F3.5 8 9 10 11 IN 4 17 16 15 14 13 12 Still image 1 Shooting mode p.14, 17 2 Flash mode p.19 3 Silent mode p.42 4 Image stabilization(still picture...
... p.22, 28 7 Battery check p.10 8 Flash standby/ camera shake warning/ flash charge p.19 9 AF target mark p.14 10 Recording with sound p.18, 27 1 2 3 4 56 7 23 9 20 19 VGA 18 15 +2.0 10 11 IN 00:34 17 14 13 12 Movie 11 Dualtime p.40 12 Number of storable still pictures/ remaining recording time... Monitor Shooting mode display 1 2 3 4 56 7 P 23 22 ISO 1600 21 20 19 12M 18 NORM +2.0 1/30 F3.5 8 9 10 11 IN 4 17 16 15 14 13 12 Still image 1 Shooting mode p.14, 17 2 Flash mode p.19 3 Silent mode p.42 4 Image stabilization(still picture...

STYLUS-7000 Instruction Manual (English)
Page 10
Preparing the Camera Attaching the camera strap Pull the strap tight so that it directly into an AC outlet. Before use, be broken. When to charge the battery until the charging ... battery charger T Lithium-ion battery 3 Battery charger 2 AC outlet AC cable 1 Charging indicator On: Charging Off: Charged Battery comes partially charged. If you purchased the camera. If the charging indicator does not light or it blinks, the battery may not be inserted correctly or the battery or the charger may be...
Preparing the Camera Attaching the camera strap Pull the strap tight so that it directly into an AC outlet. Before use, be broken. When to charge the battery until the charging ... battery charger T Lithium-ion battery 3 Battery charger 2 AC outlet AC cable 1 Charging indicator On: Charging Off: Charged Battery comes partially charged. If you purchased the camera. If the charging indicator does not light or it blinks, the battery may not be inserted correctly or the battery or the charger may be...

STYLUS-7000 Instruction Manual (English)
Page 11
... opening or closing the battery/card compartment cover. 1 2 Press in the card until it clicks into the camera. 1 Notch Contact area Battery/card compartment cover Insert the card straight in until it clicks and comes out slightly. Insert the battery while sliding the ... has a front side and a back side. Do not touch the contact area directly with your hand. 2 4 This camera can take pictures using the internal memory when no xD-Picture Card (sold separately) into the camera Do not insert anything other than an xD-Picture Card or the microSD Attachment into place. If...
... opening or closing the battery/card compartment cover. 1 2 Press in the card until it clicks into the camera. 1 Notch Contact area Battery/card compartment cover Insert the card straight in until it clicks and comes out slightly. Insert the battery while sliding the ... has a front side and a back side. Do not touch the contact area directly with your hand. 2 4 This camera can take pictures using the internal memory when no xD-Picture Card (sold separately) into the camera Do not insert anything other than an xD-Picture Card or the microSD Attachment into place. If...

STYLUS-7000 Instruction Manual (English)
Page 12
... Y M D CANCEL MENU SET OK 2008.10.26 12:30 100-0004 IN 00:14 /00:34 / 1 p 4 3 2 o Arrow pad Operation guides displayed at the bottom of the microSD Attachment or microSD card directly with this camera using the microSD Attachment. EXIT MENU SET OK SEL. "Using a microSD Attachment..." (p. 58) 1 Insert the microSD card into the camera. CAMERA MENU Pull the card straight out. IMAGE IN WT SET1 OK 2 3 4 BACK MENU 5 6 OK GO S Operation guide 12 EN Insert the card entirely into the microSD Attachment. 2 Insert the microSD Attachment into the...
... Y M D CANCEL MENU SET OK 2008.10.26 12:30 100-0004 IN 00:14 /00:34 / 1 p 4 3 2 o Arrow pad Operation guides displayed at the bottom of the microSD Attachment or microSD card directly with this camera using the microSD Attachment. EXIT MENU SET OK SEL. "Using a microSD Attachment..." (p. 58) 1 Insert the microSD card into the camera. CAMERA MENU Pull the card straight out. IMAGE IN WT SET1 OK 2 3 4 BACK MENU 5 6 OK GO S Operation guide 12 EN Insert the card entirely into the microSD Attachment. 2 Insert the microSD Attachment into the...

STYLUS-7000 Instruction Manual (English)
Page 13
... change the date and time, adjust the setting from the menu. [X] (Date/time) (p. 40) To check the date and time Press the g button while the camera is displayed when the date and time are not set [M] (month), [D] (day), [TIME] (hours and minutes) and [Y/M/D]. EN 13 For precise time setting, press the... selectable. 1 Press the m button, and press LMNO to select [E] (SETUP). X Changing the display language The language of the menu and error messages displayed on the camera. ● The date and time setting screen is turned off.
... change the date and time, adjust the setting from the menu. [X] (Date/time) (p. 40) To check the date and time Press the g button while the camera is displayed when the date and time are not set [M] (month), [D] (day), [TIME] (hours and minutes) and [Y/M/D]. EN 13 For precise time setting, press the... selectable. 1 Press the m button, and press LMNO to select [E] (SETUP). X Changing the display language The language of the menu and error messages displayed on the camera. ● The date and time setting screen is turned off.

STYLUS-7000 Instruction Manual (English)
Page 14
...value AF target mark "Focusing" (p. 52) 14 EN P Monitor 102M NORM IN 4 Horizontal grip 2 Press the K button to turn on the camera. Shooting, Playback, and Erasing Shooting with your fingers, etc. 4 Press the shutter button halfway down to focus on the subject. ● When ... the exposure is locked (shutter speed and aperture value are displayed), and the AF target mark changes to green. ● The camera was unable to K. 3 Hold the camera, and compose the shot. Monitor (standby mode screen) P 12M NORM IN 4 Number of other shooting menu functions, such as exposure...
...value AF target mark "Focusing" (p. 52) 14 EN P Monitor 102M NORM IN 4 Horizontal grip 2 Press the K button to turn on the camera. Shooting, Playback, and Erasing Shooting with your fingers, etc. 4 Press the shutter button halfway down to focus on the subject. ● When ... the exposure is locked (shutter speed and aperture value are displayed), and the AF target mark changes to green. ● The camera was unable to K. 3 Hold the camera, and compose the shot. Monitor (standby mode screen) P 12M NORM IN 4 Number of other shooting menu functions, such as exposure...
STYLUS-7000 Instruction Manual (English)
Page 15
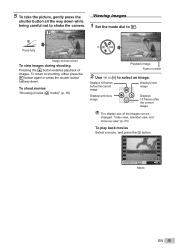
... (p. 23) To play back movies Select a movie, and press the E button. 2009.08.26 12:30 MOVIE PLAY OK IN 4 Movie EN 15 To shoot movies "Shooting movies (A mode)" (p. 18) 2009.08.26 12:30 IN 1 Playback image Frame number 2 Use LMNO to shooting, either press the q button again ...or press the shutter button halfway down while being careful not to q. P Viewing images 1 Set the mode dial to shake the camera. Displays 10 frames before the current image...
... (p. 23) To play back movies Select a movie, and press the E button. 2009.08.26 12:30 MOVIE PLAY OK IN 4 Movie EN 15 To shoot movies "Shooting movies (A mode)" (p. 18) 2009.08.26 12:30 IN 1 Playback image Frame number 2 Use LMNO to shooting, either press the q button again ...or press the shutter button halfway down while being careful not to q. P Viewing images 1 Set the mode dial to shake the camera. Displays 10 frames before the current image...

STYLUS-7000 Instruction Manual (English)
Page 16
... 100-0004 IN 00:12 /00:34 During playback First (last) frame/frame advance: While paused, press L to display the first frame, and press M to resume playback. Pressing N makes the camera play back normally. Each time a button is displayed. Press the E button to display the last... frame. YES NO CANCEL MENU SET OK 2 Press L to select [YES], and press the E button. [K ERASE] (p. 36) 2008.10.26 12:30 100-0004 IN 00:14 ...
... 100-0004 IN 00:12 /00:34 During playback First (last) frame/frame advance: While paused, press L to display the first frame, and press M to resume playback. Pressing N makes the camera play back normally. Each time a button is displayed. Press the E button to display the last... frame. YES NO CANCEL MENU SET OK 2 Press L to select [YES], and press the E button. [K ERASE] (p. 36) 2008.10.26 12:30 100-0004 IN 00:14 ...

STYLUS-7000 Instruction Manual (English)
Page 17
...you to take a picture suited to the icon for the scene, and press the E button. The indicator changes to the scene by the camera. If the camera cannot determine the best shooting mode, the picture will be taken in h mode. 1 Set the mode dial to select the best shooting ...mode. Using the best shooting mode for the scene from [PORTRAIT], [LANDSCAPE], [NIGHT+PORTRAIT], [SPORT] and [MACRO]. Depending on the shooting scene, the camera may not select the intended shooting mode. iAUTO 12M NORM IN 4 ● Press the shutter button halfway down or press the g button to another scene...
...you to take a picture suited to the icon for the scene, and press the E button. The indicator changes to the scene by the camera. If the camera cannot determine the best shooting mode, the picture will be taken in h mode. 1 Set the mode dial to select the best shooting ...mode. Using the best shooting mode for the scene from [PORTRAIT], [LANDSCAPE], [NIGHT+PORTRAIT], [SPORT] and [MACRO]. Depending on the shooting scene, the camera may not select the intended shooting mode. iAUTO 12M NORM IN 4 ● Press the shutter button halfway down or press the g button to another scene...

STYLUS-7000 Instruction Manual (English)
Page 18
...57) 3 Gently press the shutter button all the way down to stop recording. 18 EN Check the frame appearing around the face detected by the camera, and then press the shutter button to take some time to appear for taking the picture. 1 Set the mode dial to I mode indicator Shooting...IMAGE SIZE] of the retouched image is saved. Using the zoom You cannot use the [DIGITAL ZOOM] (p. 27) 2 Press the shutter button halfway down to focus on some subjects. Smoothing out skin tone and texture (I mode) The camera finds a person's face and gives the skin a smooth, translucent look for some...
...57) 3 Gently press the shutter button all the way down to stop recording. 18 EN Check the frame appearing around the face detected by the camera, and then press the shutter button to take some time to appear for taking the picture. 1 Set the mode dial to I mode indicator Shooting...IMAGE SIZE] of the retouched image is saved. Using the zoom You cannot use the [DIGITAL ZOOM] (p. 27) 2 Press the shutter button halfway down to focus on some subjects. Smoothing out skin tone and texture (I mode) The camera finds a person's face and gives the skin a smooth, translucent look for some...

STYLUS-7000 Instruction Manual (English)
Page 20
... NO to select the setting option, and press the E button to the subject. Adjusting the brightness (Exposure compensation) The exposure value automatically set by the camera can be adjusted brighter or darker to the subject. The flash (p. 19) and zoom (p. 19) cannot be brought into focus. *1 When the zoom is...;xed. This enables shooting as 10 cm/3.9 in.*1 (60 cm/23.6 in.*2) to obtain a desired shot. Shooting close-ups (Macro shooting) This function enables the camera to focus and shoot subjects at 70 cm/27.6 in super macro mode. 20 EN
... NO to select the setting option, and press the E button to the subject. Adjusting the brightness (Exposure compensation) The exposure value automatically set by the camera can be adjusted brighter or darker to the subject. The flash (p. 19) and zoom (p. 19) cannot be brought into focus. *1 When the zoom is...;xed. This enables shooting as 10 cm/3.9 in.*1 (60 cm/23.6 in.*2) to obtain a desired shot. Shooting close-ups (Macro shooting) This function enables the camera to focus and shoot subjects at 70 cm/27.6 in super macro mode. 20 EN

STYLUS-7000 Instruction Manual (English)
Page 24
... images Panorama images that were combined together using [COMBINE IN CAMERA 1] or [COMBINE IN CAMERA 2] can be scrolled for viewing. [G PANORAMA] (p. 29) 1 Select a panorama image during playback. Pause: Press the E button. Restart scrolling: Press the E button. "Viewing images" (p. 15) 2009.08.26 12:30 2 Press the E button. NORM 100-0003 2 Current viewing area...
... images Panorama images that were combined together using [COMBINE IN CAMERA 1] or [COMBINE IN CAMERA 2] can be scrolled for viewing. [G PANORAMA] (p. 29) 1 Select a panorama image during playback. Pause: Press the E button. Restart scrolling: Press the E button. "Viewing images" (p. 15) 2009.08.26 12:30 2 Press the E button. NORM 100-0003 2 Current viewing area...
STYLUS-7000 Instruction Manual (English)
Page 26
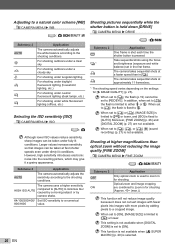
...settings for shooting. This function will not reduce image quality because it a grainy appearance. Submenu 2 Application AUTO The camera automatically adjusts the sensitivity according to zoom in for [A IMAGE QUALITY] (p. 25). When set in [j]. This function...camera uses a higher sensitivity compared to [AUTO] to minimize blur caused by a moving subject or by adding pixels to a cropped image. When set to [j], the flash (p.19) cannot be set to [REDEYE]. In addition, when set to [c], the flash is selected. Moreover, [FINE ZOOM] (p. 26) and [DIGITAL...
...settings for shooting. This function will not reduce image quality because it a grainy appearance. Submenu 2 Application AUTO The camera automatically adjusts the sensitivity according to zoom in for [A IMAGE QUALITY] (p. 25). When set in [j]. This function...camera uses a higher sensitivity compared to [AUTO] to minimize blur caused by a moving subject or by adding pixels to a cropped image. When set to [j], the flash (p.19) cannot be set to [REDEYE]. In addition, when set to [c], the flash is selected. Moreover, [FINE ZOOM] (p. 26) and [DIGITAL...

STYLUS-7000 Instruction Manual (English)
Page 27
The orange target mark indicates that the area other than optical zoom [DIGITAL ZOOM] B CAMERA MENU X DIGITAL ZOOM : K s I A Submenu 2 OFF ON Application Only optical zoom is useful for recording notes or comments about the focusing position. The camera finds the subject to obtain a balanced brightness over the entire screen (Meters the brightness at the...
The orange target mark indicates that the area other than optical zoom [DIGITAL ZOOM] B CAMERA MENU X DIGITAL ZOOM : K s I A Submenu 2 OFF ON Application Only optical zoom is useful for recording notes or comments about the focusing position. The camera finds the subject to obtain a balanced brightness over the entire screen (Meters the brightness at the...

STYLUS-7000 Instruction Manual (English)
Page 28
...mode)" (p. 17) Detecting a smiling face to release the shutter automatically ([N SMILE SHOT] mode) 1 Select [N SMILE SHOT], and aim the camera toward the subject. Shooting with [IMAGE STABILIZER] (still images) set to [ON]. Selecting a scene mode according to the shooting situation [J SCENE ... automatically activated. This is recommended for the scene conditions. *1 When the subject is dark, noise reduction is detected, the camera automatically takes 3 sequential shots. This approximately doubles the shooting time, during which no other stable surface. Pictures can be as...
...mode)" (p. 17) Detecting a smiling face to release the shutter automatically ([N SMILE SHOT] mode) 1 Select [N SMILE SHOT], and aim the camera toward the subject. Shooting with [IMAGE STABILIZER] (still images) set to [ON]. Selecting a scene mode according to the shooting situation [J SCENE ... automatically activated. This is recommended for the scene conditions. *1 When the subject is dark, noise reduction is detected, the camera automatically takes 3 sequential shots. This approximately doubles the shooting time, during which no other stable surface. Pictures can be as...

STYLUS-7000 Instruction Manual (English)
Page 29
Sound is fixed to $ (FLASH OFF) mode. Creating panoramic images [G PANORAMA] G PANORAMA : K s Submenu 2 Application COMBINE IN CAMERA 1*1 Three frames are taken and combined by the camera. The user composes the shots using the OLYMPUS Master 2 COMBINE IN PC software from [30fps] or [15fps]. The flash (p. 19) is not recorded. Select [IMAGE SIZE...
Sound is fixed to $ (FLASH OFF) mode. Creating panoramic images [G PANORAMA] G PANORAMA : K s Submenu 2 Application COMBINE IN CAMERA 1*1 Three frames are taken and combined by the camera. The user composes the shots using the OLYMPUS Master 2 COMBINE IN PC software from [30fps] or [15fps]. The flash (p. 19) is not recorded. Select [IMAGE SIZE...


