
SP-620UZ Instruction Manual (English)
Page 1
Keep this manual in this manual. DIGITAL CAMERA SP-620UZ Instruction Manual ● Thank you take test shots to get accustomed to your new camera, please read these instructions carefully to update or modify information contained in a safe place for future reference. ● We recommend that you for purchasing an Olympus digital camera. Before you start to use your camera before taking important photographs. ● In the interest of continually improving products, Olympus reserves the right to enjoy optimum performance and a longer service life.
Keep this manual in this manual. DIGITAL CAMERA SP-620UZ Instruction Manual ● Thank you take test shots to get accustomed to your new camera, please read these instructions carefully to update or modify information contained in a safe place for future reference. ● We recommend that you for purchasing an Olympus digital camera. Before you start to use your camera before taking important photographs. ● In the interest of continually improving products, Olympus reserves the right to enjoy optimum performance and a longer service life.
SP-620UZ Instruction Manual (English)
Page 2
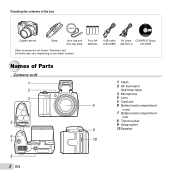
Checking the contents of Parts Camera unit 1 2 3 5 6 7 1 Flash 2 AF illuminator Self-timer lamp 3 Microphone 4 Lens 5 Card slot 4 6 Battery/card compartment cover 7 Battery/card compartment lock 8 Tripod socket 9 Strap eyelet 9 10 Speaker 10 8 2 EN Four AA batteries USB cable AV cable OLYMPUS Setup (CB-USB8) (CB-AVC3) CD-ROM Names of the box Digital camera Strap Lens cap and lens cap strap Other accessories not shown: Warranty card Contents may vary depending on purchase location.
Checking the contents of Parts Camera unit 1 2 3 5 6 7 1 Flash 2 AF illuminator Self-timer lamp 3 Microphone 4 Lens 5 Card slot 4 6 Battery/card compartment cover 7 Battery/card compartment lock 8 Tripod socket 9 Strap eyelet 9 10 Speaker 10 8 2 EN Four AA batteries USB cable AV cable OLYMPUS Setup (CB-USB8) (CB-AVC3) CD-ROM Names of the box Digital camera Strap Lens cap and lens cap strap Other accessories not shown: Warranty card Contents may vary depending on purchase location.

SP-620UZ Instruction Manual (English)
Page 3
3 4 1 5 6 2 7 8 9 10 11 Attaching the camera strap and lens cap 1 2 1 Monitor 2 m button 3 R button (record movies) 4 q button (switching between shooting and playback) 5 A button (OK) 6 Wheel controller INFO button (changing information display) D button (erase) 12 7 E button (menu guide) 13 8 9 Connector cover Multi-connector 14 10 HDMI micro connector 11 Indicator lamp 12 Zoom lever 13 Shutter button 14 n button 3 4 5 • Attach the strap to the other eyelet in the same manner. EN 3 Pull the strap tight so that it does not come loose.
3 4 1 5 6 2 7 8 9 10 11 Attaching the camera strap and lens cap 1 2 1 Monitor 2 m button 3 R button (record movies) 4 q button (switching between shooting and playback) 5 A button (OK) 6 Wheel controller INFO button (changing information display) D button (erase) 12 7 E button (menu guide) 13 8 9 Connector cover Multi-connector 14 10 HDMI micro connector 11 Indicator lamp 12 Zoom lever 13 Shutter button 14 n button 3 4 5 • Attach the strap to the other eyelet in the same manner. EN 3 Pull the strap tight so that it does not come loose.
SP-620UZ Instruction Manual (English)
Page 4
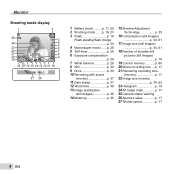
... Movie recording icon ....p. 17 21 Remaining recording time (movies p. 17 22 Image size (movies) p. 34, 62 23 Histogram p. 19 24 AF target mark p. 17 25 Camera shake warning 26 Aperture value p. 17 27 Shutter speed p. 17 4 EN
... Movie recording icon ....p. 17 21 Remaining recording time (movies p. 17 22 Image size (movies) p. 34, 62 23 Histogram p. 19 24 AF target mark p. 17 25 Camera shake warning 26 Aperture value p. 17 27 Shutter speed p. 17 4 EN

SP-620UZ Instruction Manual (English)
Page 6
Camera Settings Using the Buttons Frequently used functions can also be accessed using the buttons. Wheel controller F (up) /INFO button (changing information display) (p. 19, 22) Zoom lever (p. 18, 21) Shutter button (p. 17, 54) R button (shooting movies) (p. 17) q button (switching between shooting and playback) (p. 17, 20, 43) m button (p. 9) E button (menu guide) (p. 22) H (left) I (right) A button G (down) / D button (erase) (p. 21) 6 EN The wheel controller can be used to change the selections.
Camera Settings Using the Buttons Frequently used functions can also be accessed using the buttons. Wheel controller F (up) /INFO button (changing information display) (p. 19, 22) Zoom lever (p. 18, 21) Shutter button (p. 17, 54) R button (shooting movies) (p. 17) q button (switching between shooting and playback) (p. 17, 20, 43) m button (p. 9) E button (menu guide) (p. 22) H (left) I (right) A button G (down) / D button (erase) (p. 21) 6 EN The wheel controller can be used to change the selections.

SP-620UZ Instruction Manual (English)
Page 8
... menu. 8 EN Press the A button to display the function menu. The function menu is used to choose the shooting mode and provides access to change camera settings such as the shooting mode. There may be menus that are unavailable depending on other related settings or the shooting mode (p. 23). Using the...
... menu. 8 EN Press the A button to display the function menu. The function menu is used to choose the shooting mode and provides access to change camera settings such as the shooting mode. There may be menus that are unavailable depending on other related settings or the shooting mode (p. 23). Using the...

SP-620UZ Instruction Manual (English)
Page 9
... On Set OK 5 Press the m button to select the desired submenu 1 and then press the A button. EN 9 The setup menu provides access to a variety of camera settings, including options not listed in the function menu, display options, and the time and date. 1 Press the m button. ● The setup menu is selected...
... On Set OK 5 Press the m button to select the desired submenu 1 and then press the A button. EN 9 The setup menu provides access to a variety of camera settings, including options not listed in the function menu, display options, and the time and date. 1 Press the m button. ● The setup menu is selected...

SP-620UZ Instruction Manual (English)
Page 11
.../card compartment cover. Flashes in loss of batteries that the battery/card compartment cover is securely locked (7). If using the camera, be used, see "Battery Handling Precautions" (p. 65). Preparing the Camera Inserting the battery 1 2 Battery/card compartment lock 3 For the types of image data. 00:34 4 16M Monitor ...= and ensure that can be sure to replace the batteries Replace the batteries when the error message shown below appears. Turn off the camera before opening the battery/card compartment cover. When using rechargeable batteries, charge the batteries.
.../card compartment cover. Flashes in loss of batteries that the battery/card compartment cover is securely locked (7). If using the camera, be used, see "Battery Handling Precautions" (p. 65). Preparing the Camera Inserting the battery 1 2 Battery/card compartment lock 3 For the types of image data. 00:34 4 16M Monitor ...= and ensure that can be sure to replace the batteries Replace the batteries when the error message shown below appears. Turn off the camera before opening the battery/card compartment cover. When using rechargeable batteries, charge the batteries.
SP-620UZ Instruction Manual (English)
Page 12
..." to the computer, the battery may be exhausted. In this case, disconnect the camera, and reconnect after connecting the camera to display the "Setup" dialog. Double-click the CD-ROM (OLYMPUS Setup) icon to install the software. Windows Vista/Windows 7 ● An Autorun dialog will be displayed. If a "User Account Control" dialog is...
..." to the computer, the battery may be exhausted. In this case, disconnect the camera, and reconnect after connecting the camera to display the "Setup" dialog. Double-click the CD-ROM (OLYMPUS Setup) icon to install the software. Windows Vista/Windows 7 ● An Autorun dialog will be displayed. If a "User Account Control" dialog is...
SP-620UZ Instruction Manual (English)
Page 13
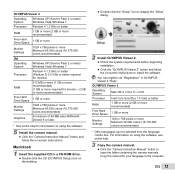
... your language to the computer. For information on using the software. 5 Install the camera manual. ● Click the "Camera Instruction Manual" button and follow the on-screen instructions to install the software. Macintosh 1 Insert the supplied CD in OLYMPUS Viewer 2 "Help". OLYMPUS Viewer 2 Operating System Windows XP (Service Pack 2 or later) / Windows Vista / Windows...
... your language to the computer. For information on using the software. 5 Install the camera manual. ● Click the "Camera Instruction Manual" button and follow the on-screen instructions to install the software. Macintosh 1 Insert the supplied CD in OLYMPUS Viewer 2 "Help". OLYMPUS Viewer 2 Operating System Windows XP (Service Pack 2 or later) / Windows Vista / Windows...

SP-620UZ Instruction Manual (English)
Page 14
X Y M D Time 2012. 01 Y/M/D Cancel MENU 4 As in the monitor. 1 Press the n button to turn daylight saving time ([Summer]) on the camera. ● The date and time setting screen is displayed when the date and time are saved to select the year for the menus and messages ...
X Y M D Time 2012. 01 Y/M/D Cancel MENU 4 As in the monitor. 1 Press the n button to turn daylight saving time ([Summer]) on the camera. ● The date and time setting screen is displayed when the date and time are saved to select the year for the menus and messages ...

SP-620UZ Instruction Manual (English)
Page 15
.... Inserting an SD/SDHC/SDXC memory card or Eye-Fi card (commercially available) Always use SD/SDHC/SDXC memory cards or EyeFi cards with this camera. Do not insert other types of storable pictures (still images)/Continuous recording length (movies) in until it clicks and comes out slightly, then remove the.../SDXC memory card and Eye-Fi card 1 2 Press the card in the internal memory and cards" (p. 61, 62) EN 15 "Using the card" (p. 60) The camera can shoot and store images using its internal memory, without using an SD/SDHC/SDXC memory card or Eye-Fi card. Do not touch the...
.... Inserting an SD/SDHC/SDXC memory card or Eye-Fi card (commercially available) Always use SD/SDHC/SDXC memory cards or EyeFi cards with this camera. Do not insert other types of storable pictures (still images)/Continuous recording length (movies) in until it clicks and comes out slightly, then remove the.../SDXC memory card and Eye-Fi card 1 2 Press the card in the internal memory and cards" (p. 61, 62) EN 15 "Using the card" (p. 60) The camera can shoot and store images using its internal memory, without using an SD/SDHC/SDXC memory card or Eye-Fi card. Do not touch the...

SP-620UZ Instruction Manual (English)
Page 16
P mode indicator P Current shooting mode display Program Auto P 0.0 WB AUTO ISO AUTO 4 16M NORM ESP MENU 3 Hold the camera and compose the shot. Monitor 0.0 WB AUTO ISO AUTO 00:34 4 16M Number of storable still pictures (p. 61) Monitor (standby mode screen..."Using the Menu" (p. 8) Horizontal grip Vertical grip 4 Press the shutter button halfway down to focus on the subject. ● When the camera focuses on the camera. Shooting, Playback, and Erasing Shooting with the optimum aperture value and shutter speed (P mode) In this mode, automatic shooting settings are displayed), and...
P mode indicator P Current shooting mode display Program Auto P 0.0 WB AUTO ISO AUTO 4 16M NORM ESP MENU 3 Hold the camera and compose the shot. Monitor 0.0 WB AUTO ISO AUTO 00:34 4 16M Number of storable still pictures (p. 61) Monitor (standby mode screen..."Using the Menu" (p. 8) Horizontal grip Vertical grip 4 Press the shutter button halfway down to focus on the subject. ● When the camera focuses on the camera. Shooting, Playback, and Erasing Shooting with the optimum aperture value and shutter speed (P mode) In this mode, automatic shooting settings are displayed), and...

SP-620UZ Instruction Manual (English)
Page 17
... press the shutter button halfway down while being careful not to stop recording. Sound will also be used when shooting movies. To turn off the camera Press the n button again. AF target mark P Shooting movies 1 Press the R button to focus if the AF target mark flashes red.... Try focusing again. EN 17 ● The camera was unable to start recording. To view images during shooting Pressing the q button enables playback of the set shooting mode is p, W, s (Beauty) or P (...
... press the shutter button halfway down while being careful not to stop recording. Sound will also be used when shooting movies. To turn off the camera Press the n button again. AF target mark P Shooting movies 1 Press the R button to focus if the AF target mark flashes red.... Try focusing again. EN 17 ● The camera was unable to start recording. To view images during shooting Pressing the q button enables playback of the set shooting mode is p, W, s (Beauty) or P (...

SP-620UZ Instruction Manual (English)
Page 18
...on the image size setting.*1 Digital zoom range *1 If [Image Size] is less than the full resolution, after reaching the maximum optical zoom, the camera will automatically resize and crop the image to the selected [Image Size], then enter the digital zoom range if [Digital Zoom] is [On]. Using... magnification ratio changes depending on the image size setting.*1 To turn off the flash Press the flash down back into the camera. The display differs depending on the options selected for [Digital Zoom] (p. 35) and [Image Size] (p. 34). [Off] selected for [Digital Zoom]: Image ...
...on the image size setting.*1 Digital zoom range *1 If [Image Size] is less than the full resolution, after reaching the maximum optical zoom, the camera will automatically resize and crop the image to the selected [Image Size], then enter the digital zoom range if [Digital Zoom] is [On]. Using... magnification ratio changes depending on the image size setting.*1 To turn off the flash Press the flash down back into the camera. The display differs depending on the options selected for [Digital Zoom] (p. 35) and [Image Size] (p. 34). [Off] selected for [Digital Zoom]: Image ...

SP-620UZ Instruction Manual (English)
Page 22
... displayed image information changes in the setup menu displays a description of the current item. "Using the Menu" (p. 8) Using the camera guide Use the camera guide to display the selected image in single-image view. Search by purpose Search by situation Search by keyword Search from shooting/playback ...scene. Learn about the camera Information is pressed. Search by purpose Functions or operating methods can be performed from the search history. 2 Use FGHI to move...
... displayed image information changes in the setup menu displays a description of the current item. "Using the Menu" (p. 8) Using the camera guide Use the camera guide to display the selected image in single-image view. Search by purpose Search by situation Search by keyword Search from shooting/playback ...scene. Learn about the camera Information is pressed. Search by purpose Functions or operating methods can be performed from the search history. 2 Use FGHI to move...

SP-620UZ Instruction Manual (English)
Page 23
... the A button to the submenu. EN 23 "Using the Menu" (p. 8) Shooting with using the function menu. The icon changes depending on the scene that the camera automatically selects Using the best mode for the scene. Scene Mode 4 16M NORM ESP MENU 2 Press G to go to set. When the... camera cannot identify the optimal mode, P mode will automatically select the optimal shooting mode for the shooting scene (s mode) 1 Set the shooting mode to M. Using Shooting ...
... the A button to the submenu. EN 23 "Using the Menu" (p. 8) Shooting with using the function menu. The icon changes depending on the scene that the camera automatically selects Using the best mode for the scene. Scene Mode 4 16M NORM ESP MENU 2 Press G to go to set. When the... camera cannot identify the optimal mode, P mode will automatically select the optimal shooting mode for the shooting scene (s mode) 1 Set the shooting mode to M. Using Shooting ...

SP-620UZ Instruction Manual (English)
Page 24
... when taking fireworks, noise reduction is set Using V (Beauty) 1 Point the camera toward the subject. Check the frame appearing around the face detected by the camera, and then press the shutter button to take the picture. ● The unedited image...pre-programmed for the scene U Pet Mode - AUTO Option Application 4 16M NORM ESP MENU B Portrait/V Beauty/F Landscape/ G Night Scene*1/M Night+Portrait*1/ The camera C Sport/N Indoor/W Candle*1/ takes a picture R Self Portrait/S Sunset*1/ using the X Fireworks*1/V Cuisine/ optimum settings d Documents/q Beach & Snow/ for ...
... when taking fireworks, noise reduction is set Using V (Beauty) 1 Point the camera toward the subject. Check the frame appearing around the face detected by the camera, and then press the shutter button to take the picture. ● The unedited image...pre-programmed for the scene U Pet Mode - AUTO Option Application 4 16M NORM ESP MENU B Portrait/V Beauty/F Landscape/ G Night Scene*1/M Night+Portrait*1/ The camera C Sport/N Indoor/W Candle*1/ takes a picture R Self Portrait/S Sunset*1/ using the X Fireworks*1/V Cuisine/ optimum settings d Documents/q Beach & Snow/ for ...
SP-620UZ Instruction Manual (English)
Page 25
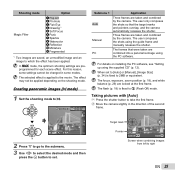
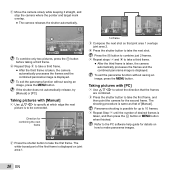
...Submenu 1 Auto Manual PC Application Three frames are taken and combined by the camera. When set . Taking pictures with [Auto] 1 Press the shutter button to take the first frame. 2 Move the camera slightly in some settings cannot be applied depending on installing the PC software, ...see "Setting up using the PC software. Three frames are taken and combined by the camera. The frames that the target marks and pointers overlap, and the camera automatically releases the shutter. AUTO Target mark Pointer Cancel MENU Save OK Screen when combining images from ...
...Submenu 1 Auto Manual PC Application Three frames are taken and combined by the camera. When set . Taking pictures with [Auto] 1 Press the shutter button to take the first frame. 2 Move the camera slightly in some settings cannot be applied depending on installing the PC software, ...see "Setting up using the PC software. Three frames are taken and combined by the camera. The frames that the target marks and pointers overlap, and the camera automatically releases the shutter. AUTO Target mark Pointer Cancel MENU Save OK Screen when combining images from ...
SP-620UZ Instruction Manual (English)
Page 26
...Taking pictures with [Manual] 1 Use FGHI to specify at which edge the next picture is to take the first frame, and then point the camera for combining the next frame MANUAL MANUAL 1 MANUAL 2 1st frame Cancel MENU Save OK 3 Compose the next shot so that the frames are combined.... make panorama images. Refer to the PC software help guide for up to take a third frame. ● After the third frame is taken, the camera automatically processes the frames and the combined panorama image is taken, and then press the A button or m button when finished. AUTO Cancel MENU...
...Taking pictures with [Manual] 1 Use FGHI to specify at which edge the next picture is to take the first frame, and then point the camera for combining the next frame MANUAL MANUAL 1 MANUAL 2 1st frame Cancel MENU Save OK 3 Compose the next shot so that the frames are combined.... make panorama images. Refer to the PC software help guide for up to take a third frame. ● After the third frame is taken, the camera automatically processes the frames and the combined panorama image is taken, and then press the A button or m button when finished. AUTO Cancel MENU...


