Reference Manual
Page 3
...on the computer 40 2. Inserting a card 25 3. Disconnecting the MAUSB-10 29 How to uninstall the device driver ...30 Macintosh OS 8.6~9.2 How to install 1. Turn on the computer 7 2. Disconnecting the MAUSB-10 47 Troubleshooting ...48 Specifications ...50 Glossary of parts ...4 Before ... Install the device driver 18 Operating the MAUSB-10 1. Install the device driver 33 Operating the MAUSB-10 1. Connecting to install 1. Turn on the computer 32 2. Load the CD-ROM 32 3. Disconnecting the MAUSB-10 15 How to uninstall the device driver ...16 Windows 2000/...
...on the computer 40 2. Inserting a card 25 3. Disconnecting the MAUSB-10 29 How to uninstall the device driver ...30 Macintosh OS 8.6~9.2 How to install 1. Turn on the computer 7 2. Disconnecting the MAUSB-10 47 Troubleshooting ...48 Specifications ...50 Glossary of parts ...4 Before ... Install the device driver 18 Operating the MAUSB-10 1. Install the device driver 33 Operating the MAUSB-10 1. Connecting to install 1. Turn on the computer 32 2. Load the CD-ROM 32 3. Disconnecting the MAUSB-10 15 How to uninstall the device driver ...16 Windows 2000/...
Reference Manual
Page 4
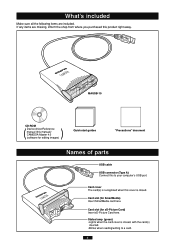
MAUSB-10 CD-ROM ( Device driver/Reference manual (this manual)/ CAMEDIA Master 4.0 ) (software for editing images) Quick start guides "Precautions" document Names of parts USB cable USB connector (Type A) Connect this ...
MAUSB-10 CD-ROM ( Device driver/Reference manual (this manual)/ CAMEDIA Master 4.0 ) (software for editing images) Quick start guides "Precautions" document Names of parts USB cable USB connector (Type A) Connect this ...
Reference Manual
Page 5
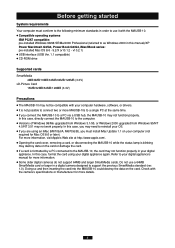
...AT compatible: pre-installed Windows 98/98 SE/Me/2000 Professional (referred to a PC via a USB hub, the MAUSB-10 may not function properly in this case, directly connect the MAUSB-10 to the computer. ● Versions of Windows 98/Me upgraded from Windows 3.1/95, or Windows 2000 upgraded from ... the same time. ● If you connect the MAUSB-10 to as Windows 2000 in your digital appliance. In this case, format the card using an iMac (M6709J/A, M6709J/B), you may not work properly. Check with your computer hardware, software, or drivers. ● It is formatted by a PC connected...
...AT compatible: pre-installed Windows 98/98 SE/Me/2000 Professional (referred to a PC via a USB hub, the MAUSB-10 may not function properly in this case, directly connect the MAUSB-10 to the computer. ● Versions of Windows 98/Me upgraded from Windows 3.1/95, or Windows 2000 upgraded from ... the same time. ● If you connect the MAUSB-10 to as Windows 2000 in your digital appliance. In this case, format the card using an iMac (M6709J/A, M6709J/B), you may not work properly. Check with your computer hardware, software, or drivers. ● It is formatted by a PC connected...
Reference Manual
Page 6
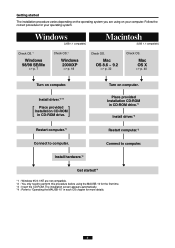
... this procedure before using on your operating system. Getting started !*4 *1 : Windows 95/3.1/NT are using the MAUSB-10 for the first time. *3 : Insert the CD-ROM. Connect to computer. Follow the correct procedure for more details. 6 Install driver.*2 *3 [ ] Place provided Installation CD-ROM in each OS chapter for your computer. Turn on computer.
... this procedure before using on your operating system. Getting started !*4 *1 : Windows 95/3.1/NT are using the MAUSB-10 for the first time. *3 : Insert the CD-ROM. Connect to computer. Follow the correct procedure for more details. 6 Install driver.*2 *3 [ ] Place provided Installation CD-ROM in each OS chapter for your computer. Turn on computer.
Reference Manual
Page 7
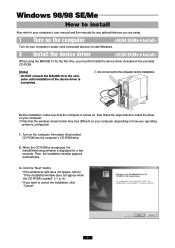
... appear when the CD-ROM is loaded" (੬ p. 9). * If you must first install the device driver included on the provided CD-ROM. [Note] • Do NOT connect the MAUSB-10 to the computer until installation of the device driver is completed. Then, the installation window appears automatically. 3. Windows 98/98 SE/Me How to...
... appear when the CD-ROM is loaded" (੬ p. 9). * If you must first install the device driver included on the provided CD-ROM. [Note] • Do NOT connect the MAUSB-10 to the computer until installation of the device driver is completed. Then, the installation window appears automatically. 3. Windows 98/98 SE/Me How to...

Reference Manual
Page 8
... at right appears. Once the driver has been installed, the MAUSB-10 will be recognized automatically whenever it is now installed. When the driver installation is complete, the window at right appears. if you are ready, then click "Finish". * The computer restarts. Click the "Finish" button. 6. The device driver is plugged into the computer. (Remove...
... at right appears. Once the driver has been installed, the MAUSB-10 will be recognized automatically whenever it is now installed. When the driver installation is complete, the window at right appears. if you are ready, then click "Finish". * The computer restarts. Click the "Finish" button. 6. The device driver is plugged into the computer. (Remove...
Reference Manual
Page 9
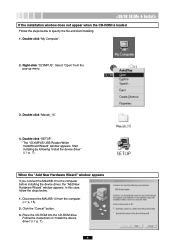
... drive. Select "Open" from the computer (੬ p. 15). 2. Follow the instructions in "Install the device driver" (੬ p. 7). 9 Right-click "OLYMPUS". Double-click "My Computer". 2. When the "Add New Hardware Wizard" window appears If you connect the MAUSB-10 to specify the file and start installing. 1. Click the "Cancel" button. 3. In this case, follow the...
... drive. Select "Open" from the computer (੬ p. 15). 2. Follow the instructions in "Install the device driver" (੬ p. 7). 9 Right-click "OLYMPUS". Double-click "My Computer". 2. When the "Add New Hardware Wizard" window appears If you connect the MAUSB-10 to specify the file and start installing. 1. Click the "Cancel" button. 3. In this case, follow the...
Reference Manual
Page 10
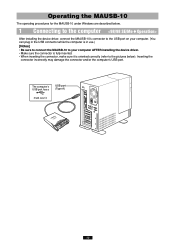
...has a USB port (Type A) mark over it is oriented correctly (refer to the pictures below . 1 Connecting to the computer After installing the device driver, connect the MAUSB-10's connector to the USB port on your computer. (You can plug in the USB connector while the computer is in use.) [Notes] • Be... sure to connect the MAUSB-10 to your computer AFTER installing the device driver. • Make sure the connector is fully inserted. • When inserting the connector, make sure it...
...has a USB port (Type A) mark over it is oriented correctly (refer to the pictures below . 1 Connecting to the computer After installing the device driver, connect the MAUSB-10's connector to the USB port on your computer. (You can plug in the USB connector while the computer is in use.) [Notes] • Be... sure to connect the MAUSB-10 to your computer AFTER installing the device driver. • Make sure the connector is fully inserted. • When inserting the connector, make sure it...
Reference Manual
Page 16
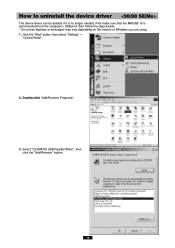
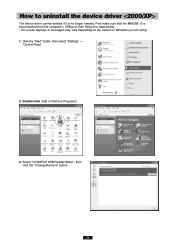
Click the "Start" button, then select "Settings" - First make sure that the MAUSB-10 is no longer needed. Double-click "Add/Remove Programs". 3. Select "OLYMPUS USB Reader/Writer", then click the "Add/Remove" button. 16 "Control Panel". 2. How to uninstall the device driver The device driver can be deleted if it is disconnected from the computer's USB port, then follow the steps below. * On-screen displays or messages may vary depending on the version of Windows you are using. 1.
Click the "Start" button, then select "Settings" - First make sure that the MAUSB-10 is no longer needed. Double-click "Add/Remove Programs". 3. Select "OLYMPUS USB Reader/Writer", then click the "Add/Remove" button. 16 "Control Panel". 2. How to uninstall the device driver The device driver can be deleted if it is disconnected from the computer's USB port, then follow the steps below. * On-screen displays or messages may vary depending on the version of Windows you are using. 1.

Reference Manual
Page 17
The window at right appears. if you are ready, then click "Finish". * The computer restarts. The device driver is no longer installed. 17 A confirmation window appears. The "InstallShield Wizard" window appears. 6. How to restart my computer now." The window at right appears. Click "OK". 5. Select "Yes, I want to uninstall the device driver (Cont.) 4. Click the "Finish" button. 7.
The window at right appears. if you are ready, then click "Finish". * The computer restarts. The device driver is no longer installed. 17 A confirmation window appears. The "InstallShield Wizard" window appears. 6. How to restart my computer now." The window at right appears. Click "OK". 5. Select "Yes, I want to uninstall the device driver (Cont.) 4. Click the "Finish" button. 7.
Reference Manual
Page 18
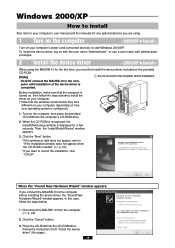
Turn on the computer, then place the provided CD-ROM into the CD-ROM drive. Disconnect the MAUSB-10 from "Install the device driver" (this case, follow the steps below to install the driver on your computer. (* Note that the windows shown below . 1. When the "Found New Hardware ...Wizard" window appears If you connect the MAUSB-10 to the computer before installation. • Do NOT connect the MAUSB-10 to the computer until installation of the device driver is configured.) 1. In this page). 18 Place the CD-ROM into the computer's...
Turn on the computer, then place the provided CD-ROM into the CD-ROM drive. Disconnect the MAUSB-10 from "Install the device driver" (this case, follow the steps below to install the driver on your computer. (* Note that the windows shown below . 1. When the "Found New Hardware ...Wizard" window appears If you connect the MAUSB-10 to the computer before installation. • Do NOT connect the MAUSB-10 to the computer until installation of the device driver is configured.) 1. In this page). 18 Place the CD-ROM into the computer's...

Reference Manual
Page 19
if you are ready, then click "Finish". * The computer restarts. When installation of the device driver is now installed. (Remove the CD-ROM from the CD-ROM drive and store it in a safe place.) 19 Select "Yes, I want to restart my computer now." 4. Click the "Finish" button. 6. The window at right appears. The device driver is complete, the window at right appears. During installation, the window at right appears. * The installation time may vary, depending on your computer. 5.
if you are ready, then click "Finish". * The computer restarts. When installation of the device driver is now installed. (Remove the CD-ROM from the CD-ROM drive and store it in a safe place.) 19 Select "Yes, I want to restart my computer now." 4. Click the "Finish" button. 6. The window at right appears. The device driver is complete, the window at right appears. During installation, the window at right appears. * The installation time may vary, depending on your computer. 5.
Reference Manual
Page 20
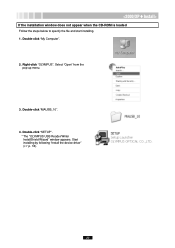
Right-click "OLYMPUS". Double-click "MAUSB_10". 4. Double-click "My Computer". 2. Start installing by following "Install the device driver" (੬ p. 18). 20 If the installation window does not appear when the CD-ROM is loaded Follow the steps below to specify the file and start installing. 1. Select "Open" from the pop-up menu. 3. Double-click "SETUP". * The "OLYMPUS USB Reader/Writer InstallShield Wizard" window appears.
Right-click "OLYMPUS". Double-click "MAUSB_10". 4. Double-click "My Computer". 2. Start installing by following "Install the device driver" (੬ p. 18). 20 If the installation window does not appear when the CD-ROM is loaded Follow the steps below to specify the file and start installing. 1. Select "Open" from the pop-up menu. 3. Double-click "SETUP". * The "OLYMPUS USB Reader/Writer InstallShield Wizard" window appears.

Reference Manual
Page 21
... New Hardware Wizard" window appears. Log on with the user name "Administrator", or if you cannot install the driver. Installing the new hardware The first time the MAUSB-10 is installed, you only need to perform step 6 on the next page. [For Windows 2000] If you ...mark over it is oriented correctly (refer to the pictures below . 1 Connecting to the computer After installing the device driver, connect the MAUSB-10's connector to your computer AFTER installing the device driver. • Make sure the connector is fully inserted. • When inserting the connector, make sure it . ...
... New Hardware Wizard" window appears. Log on with the user name "Administrator", or if you cannot install the driver. Installing the new hardware The first time the MAUSB-10 is installed, you only need to perform step 6 on the next page. [For Windows 2000] If you ...mark over it is oriented correctly (refer to the pictures below . 1 Connecting to the computer After installing the device driver, connect the MAUSB-10's connector to your computer AFTER installing the device driver. • Make sure the connector is fully inserted. • When inserting the connector, make sure it . ...

Reference Manual
Page 23
Click the "Finish" button. 6. When the driver installation is complete, the window at right appears. 5. Confirm that two "Removable Disk" icons have been added by your computer may differ depending on your computer and/or connected optional devices (੬ p. 24). 23 "D:", "E:", etc.) used by your computer may differ depending on your computer and/or connected optional devices. * The icons used by opening "My Computer" from the desktop. * The drive letters (e.g.
Click the "Finish" button. 6. When the driver installation is complete, the window at right appears. 5. Confirm that two "Removable Disk" icons have been added by your computer may differ depending on your computer and/or connected optional devices (੬ p. 24). 23 "D:", "E:", etc.) used by your computer may differ depending on your computer and/or connected optional devices. * The icons used by opening "My Computer" from the desktop. * The drive letters (e.g.
Reference Manual
Page 29
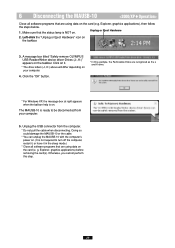
...to be disconnected from the computer. * Do not pull the cable when disconnecting. Doing so could damage the MAUSB-10 or the cable. * You can unplug the MAUSB-10 with the computer's power on. (It is ready to turn off the computer, restart it, or have it...differ depending on your computer. 5. 6 Disconnecting the MAUSB-10 Close all software programs that are using data on the taskbar. Explorer, graphics applications), then follow the steps below. 1. A message box titled "Safely remove OLYMPUS USB Reader/Writer device driver-Drives (J:, K:)" appears on the card (e.g. Explorer, ...
...to be disconnected from the computer. * Do not pull the cable when disconnecting. Doing so could damage the MAUSB-10 or the cable. * You can unplug the MAUSB-10 with the computer's power on. (It is ready to turn off the computer, restart it, or have it...differ depending on your computer. 5. 6 Disconnecting the MAUSB-10 Close all software programs that are using data on the taskbar. Explorer, graphics applications), then follow the steps below. 1. A message box titled "Safely remove OLYMPUS USB Reader/Writer device driver-Drives (J:, K:)" appears on the card (e.g. Explorer, ...
Reference Manual
Page 30
Click the "Start" button, then select "Settings" - "Control Panel". 2. Double-click "Add or Remove Programs". 3. How to uninstall the device driver The device driver can be deleted if it is disconnected from the computer's USB port, then follow the steps below. * On-screen displays or messages may vary depending on the version of Windows you are using. 1. Select "OLYMPUS USB Reader/Writer", then click the "Change/Remove" button. 30 First make sure that the MAUSB-10 is no longer needed.
Click the "Start" button, then select "Settings" - "Control Panel". 2. Double-click "Add or Remove Programs". 3. How to uninstall the device driver The device driver can be deleted if it is disconnected from the computer's USB port, then follow the steps below. * On-screen displays or messages may vary depending on the version of Windows you are using. 1. Select "OLYMPUS USB Reader/Writer", then click the "Change/Remove" button. 30 First make sure that the MAUSB-10 is no longer needed.

Reference Manual
Page 31
Select "Yes, I want to uninstall the device driver (Cont.) 4. The device driver is no longer installed. 31 The window at right appears. Click "OK". 5. A confirmation window appears. The "InstallShield Wizard" window appears. 6. The window at right appears. if you are ready, then click "Finish". * The computer restarts. Click the "Finish" button. 7. How to restart my computer now."
Select "Yes, I want to uninstall the device driver (Cont.) 4. The device driver is no longer installed. 31 The window at right appears. Click "OK". 5. A confirmation window appears. The "InstallShield Wizard" window appears. 6. The window at right appears. if you are ready, then click "Finish". * The computer restarts. Click the "Finish" button. 7. How to restart my computer now."
Reference Manual
Page 32
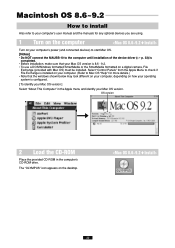
The "OLYMPUS" icon appears on the desktop. 32 Select "Control Panels" from the Apple Menu to check if File Exchange is installed on your computer. (Refer to the computer until installation of the device driver (੬ p. 33) is completed. • Before installation, make sure that the windows shown below ... using. 1 Turn on the computer Turn on your computer's power (and connected devices) to start Mac OS. [Notes] • Do NOT connect the MAUSB-10 to Mac OS "Help" for more details.) • Note that your Mac OS version is configured. [ To identify your Mac OS version ] Select "...
The "OLYMPUS" icon appears on the desktop. 32 Select "Control Panels" from the Apple Menu to check if File Exchange is installed on your computer. (Refer to the computer until installation of the device driver (੬ p. 33) is completed. • Before installation, make sure that the windows shown below ... using. 1 Turn on the computer Turn on your computer's power (and connected devices) to start Mac OS. [Notes] • Do NOT connect the MAUSB-10 to Mac OS "Help" for more details.) • Note that your Mac OS version is configured. [ To identify your Mac OS version ] Select "...

Reference Manual
Page 33
...click "USB Reader_Writer". 33 Double-click the "Mac OS 9" folder. 4. 3 Install the device driver When using the MAUSB-10 for the first time, you must first install the device driver included on how your operating system is configured.) 1. Before installation, make sure that the windows shown ...below to install the driver on your computer. (*Note that : • Your computer is turned on. • The provided CD-ROM is loaded properly. • All applications are closed. • The MAUSB-10 is NOT connected to the computer's USB port. ...
...click "USB Reader_Writer". 33 Double-click the "Mac OS 9" folder. 4. 3 Install the device driver When using the MAUSB-10 for the first time, you must first install the device driver included on how your operating system is configured.) 1. Before installation, make sure that the windows shown ...below to install the driver on your computer. (*Note that : • Your computer is turned on. • The provided CD-ROM is loaded properly. • All applications are closed. • The MAUSB-10 is NOT connected to the computer's USB port. ...
