FE-360 Instruction Manual (English)
Page 10
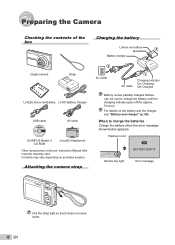
...use, be sure to charge the batteries Charge the battery when the error message shown below appears. Attaching the camera strap 2 AC outlet AC cable 1 Charging indicator On: Charging Off: Charged Battery comes partially charged. When to charge the battery until the ...EN For details on purchase location. Preparing the Camera Checking the contents of the box Charging the battery Lithium ion battery 3 ▼ Battery charger Digital camera Strap LI-42B Lithium Ion Battery LI-40C Battery Charger USB cable AV cable OLYMPUS Master 2 CD-ROM microSD Attachment Other accessories...
...use, be sure to charge the batteries Charge the battery when the error message shown below appears. Attaching the camera strap 2 AC outlet AC cable 1 Charging indicator On: Charging Off: Charged Battery comes partially charged. When to charge the battery until the ...EN For details on purchase location. Preparing the Camera Checking the contents of the box Charging the battery Lithium ion battery 3 ▼ Battery charger Digital camera Strap LI-42B Lithium Ion Battery LI-40C Battery Charger USB cable AV cable OLYMPUS Master 2 CD-ROM microSD Attachment Other accessories...
FE-360 Instruction Manual (English)
Page 34
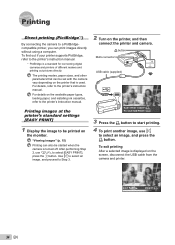
... directly without using a computer. "Viewing images" (p. 15) Printing can also be set with the camera vary depending on the printer, and then connect the printer and camera. < button Multi-connector USB cable (supplied) EASY PRINT START PC / CUSTOM PRINT OK 3 Press the < button to start printing.... The printing modes, paper sizes, and other parameters that is used. To exit printing After a selected image is a standard for connecting digital cameras and printers of different makers and printing out pictures directly. For details, refer to select [EASY PRINT], press the B button. EXIT...
... directly without using a computer. "Viewing images" (p. 15) Printing can also be set with the camera vary depending on the printer, and then connect the printer and camera. < button Multi-connector USB cable (supplied) EASY PRINT START PC / CUSTOM PRINT OK 3 Press the < button to start printing.... The printing modes, paper sizes, and other parameters that is used. To exit printing After a selected image is a standard for connecting digital cameras and printers of different makers and printing out pictures directly. For details, refer to select [EASY PRINT], press the B button. EXIT...
FE-360 Instruction Manual (English)
Page 36
Submenu Submenu 5 6 Application
Submenu Submenu 5 6 Application
FE-360 Instruction Manual (English)
Page 39
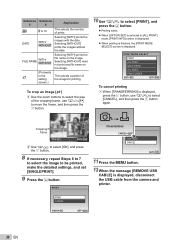
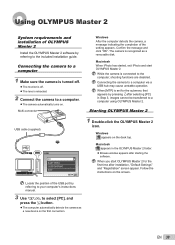
... window appears after installation, "Default Settings" and "Registration" screen appear. When you start OLYMPUS Master 2. While the camera is retracted. 2 Connect the camera to select [PC], and press the B button. ● The computer automatically detects the camera as a removable disk. Starting OLYMPUS Master 2 USB cable (supplied) USB PC EASY PRINT CUSTOM PRINT EXIT SET OK 1 Double-click the...
... window appears after installation, "Default Settings" and "Registration" screen appear. When you start OLYMPUS Master 2. While the camera is retracted. 2 Connect the camera to select [PC], and press the B button. ● The computer automatically detects the camera as a removable disk. Starting OLYMPUS Master 2 USB cable (supplied) USB PC EASY PRINT CUSTOM PRINT EXIT SET OK 1 Double-click the...
FE-360 Instruction Manual (English)
Page 48
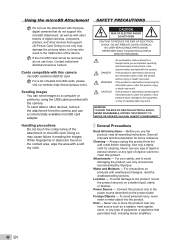
...card cannot be removed, do not support this microSD Attachment, as well as a radiator, heat register, stove, or any type of digital cameras, computers, printers, and other devices, remove the attachment from the wall outlet before cleaning. If the product is used without observing the ... Do not use the attachment with Olympus digital cameras that do not use or store this product near any heat source such as with the camera. Always unplug this product from the camera and use only accessories recommended by using the USB cable provided with other brands of equipment ...
...card cannot be removed, do not support this microSD Attachment, as well as a radiator, heat register, stove, or any type of digital cameras, computers, printers, and other devices, remove the attachment from the wall outlet before cleaning. If the product is used without observing the ... Do not use the attachment with Olympus digital cameras that do not use or store this product near any heat source such as with the camera. Always unplug this product from the camera and use only accessories recommended by using the USB cable provided with other brands of equipment ...
FE-360 Instruction Manual (English)
Page 52
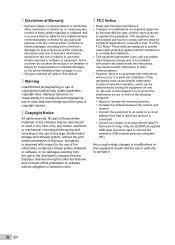
...experienced radio/TV technician for help. Only the OLYMPUS-supplied USB cable should be used in any form or by the manufacturer may not apply to you. • Olympus reserves all rights to this equipment would void the... following measures: • Adjust or relocate the receiving antenna. • Increase the distance between the camera and receiver. • Connect the equipment to an outlet on a circuit different from that to which... allow the exclusion or limitation of copyright owners. Olympus assumes no responsibility for a Class B digital device, pursuant to operate it. 52 EN
...experienced radio/TV technician for help. Only the OLYMPUS-supplied USB cable should be used in any form or by the manufacturer may not apply to you. • Olympus reserves all rights to this equipment would void the... following measures: • Adjust or relocate the receiving antenna. • Increase the distance between the camera and receiver. • Connect the equipment to an outlet on a circuit different from that to which... allow the exclusion or limitation of copyright owners. Olympus assumes no responsibility for a Class B digital device, pursuant to operate it. 52 EN
FE-360 Instruction Manual (English)
Page 60
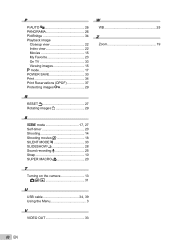
P P/AUTO C 26 PANORAMA 26 PictBridge 34 Playback image Closeup view 22 Index view 22 Movies 15 My Favorite 23 On TV 33 Viewing images 15 P mode 17 POWER SAVE 33 Print 34 Print Reservations (DPOF 37 Protecting images 0 29 W WB 25 Z Zoom 19 R RESET R 27 Rotating images y 29 S f mode 17, 27 Self-timer 20 Shooting 14 Shooting movies n 18 SILENT MODE j 33 SLIDESHOW y 28 Sound recording R 25 Strap 10 SUPER MACRO 20 T Turning on the camera 13 K n/q 31 U USB cable 34, 39 Using the Menu 3 V VIDEO OUT 33 60 EN
P P/AUTO C 26 PANORAMA 26 PictBridge 34 Playback image Closeup view 22 Index view 22 Movies 15 My Favorite 23 On TV 33 Viewing images 15 P mode 17 POWER SAVE 33 Print 34 Print Reservations (DPOF 37 Protecting images 0 29 W WB 25 Z Zoom 19 R RESET R 27 Rotating images y 29 S f mode 17, 27 Self-timer 20 Shooting 14 Shooting movies n 18 SILENT MODE j 33 SLIDESHOW y 28 Sound recording R 25 Strap 10 SUPER MACRO 20 T Turning on the camera 13 K n/q 31 U USB cable 34, 39 Using the Menu 3 V VIDEO OUT 33 60 EN


