
FE-110 Advanced Manual (English)
Page 1
... or modify information contained in this manual. The images of the LCD screen and illustrations of your camera before taking important photographs. DIGITAL CAMERA FE-110/X-705 FE-100/X-710 Advanced Manual Detailed explanations of all of continually improving products, Olympus reserves the right to enjoy optimum performance and a longer service life. Basic Operation Shooting Playing Back...
... or modify information contained in this manual. The images of the LCD screen and illustrations of your camera before taking important photographs. DIGITAL CAMERA FE-110/X-705 FE-100/X-710 Advanced Manual Detailed explanations of all of continually improving products, Olympus reserves the right to enjoy optimum performance and a longer service life. Basic Operation Shooting Playing Back...
FE-110 Advanced Manual (English)
Page 2
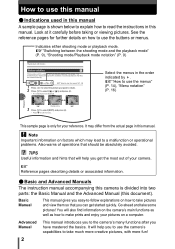
...and the playback mode" (P. 9), "Shooting mode/Playback mode notation" (P. 9) Playing back still pictures Picture rotation Pictures taken with more creative pictures, with the camera held vertically are oriented correctly. [y] i g"How to use the menus" (P. 14) 1 Press ^] to select the picture you can get the most out... or menus. This function lets you rotate such pictures 90° clockwise or counterclockwise so that will also find information on the camera's main functions as well as how to make prints and enjoy your reference. Basic Manual This manual gives you easy-to-follow ...
...and the playback mode" (P. 9), "Shooting mode/Playback mode notation" (P. 9) Playing back still pictures Picture rotation Pictures taken with more creative pictures, with the camera held vertically are oriented correctly. [y] i g"How to use the menus" (P. 14) 1 Press ^] to select the picture you can get the most out... or menus. This function lets you rotate such pictures 90° clockwise or counterclockwise so that will also find information on the camera's main functions as well as how to make prints and enjoy your reference. Basic Manual This manual gives you easy-to-follow ...
FE-110 Advanced Manual (English)
Page 3
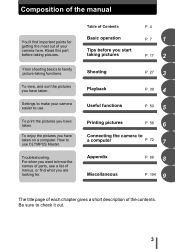
... start taking pictures P. 4 P. 7 1 P. 17 2 Shooting P. 27 3 Playback P. 39 4 Useful functions P. 50 5 Printing pictures P. 56 6 Connecting the camera to use OLYMPUS Master. From shooting basics to know the names of parts, see a list of menus, or find important points for . To print the pictures you... want to handy picture-taking functions. Composition of the manual You'll find what you are looking for getting the most out of your camera easier to a computer P. 72 7 Appendix P. 88 8 Miscellaneous P. 104 9 The title page of each chapter gives a short description...
... start taking pictures P. 4 P. 7 1 P. 17 2 Shooting P. 27 3 Playback P. 39 4 Useful functions P. 50 5 Printing pictures P. 56 6 Connecting the camera to use OLYMPUS Master. From shooting basics to know the names of parts, see a list of menus, or find important points for . To print the pictures you... want to handy picture-taking functions. Composition of the manual You'll find what you are looking for getting the most out of your camera easier to a computer P. 72 7 Appendix P. 88 8 Miscellaneous P. 104 9 The title page of each chapter gives a short description...
FE-110 Advanced Manual (English)
Page 5
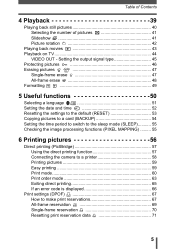
... (SLEEP 55 Checking the image processing functions (PIXEL MAPPING) ......... 55 6 Printing pictures 56 Direct printing (PictBridge 57 Using the direct printing function 57 Connecting the camera to a printer 58 Printing pictures 59 Easy printing 59 Print mode 60 Print order mode 63 Exiting direct printing 65 If an error code is...
... (SLEEP 55 Checking the image processing functions (PIXEL MAPPING) ......... 55 6 Printing pictures 56 Direct printing (PictBridge 57 Using the direct printing function 57 Connecting the camera to a printer 58 Printing pictures 59 Easy printing 59 Print mode 60 Print order mode 63 Exiting direct printing 65 If an error code is...
FE-110 Advanced Manual (English)
Page 6
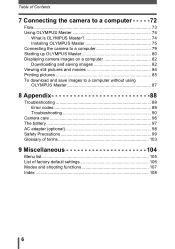
Table of Contents 7 Connecting the camera to a computer - - - - - 72 Flow 73 Using OLYMPUS Master 74 What is OLYMPUS Master 74 Installing OLYMPUS Master 75 Connecting the camera to a computer 79 Starting up OLYMPUS Master 80 Displaying camera images on a computer 82 Downloading and saving images 82 Viewing ...and movies 84 Printing pictures 85 To download and save images to a computer without using OLYMPUS Master 87 8 Appendix 88 Troubleshooting 89 Error codes 89 Troubleshooting 90 Camera care 96 The battery 97 AC adapter (optional 98 Safety Precautions 99 Glossary of terms ...
Table of Contents 7 Connecting the camera to a computer - - - - - 72 Flow 73 Using OLYMPUS Master 74 What is OLYMPUS Master 74 Installing OLYMPUS Master 75 Connecting the camera to a computer 79 Starting up OLYMPUS Master 80 Displaying camera images on a computer 82 Downloading and saving images 82 Viewing ...and movies 84 Printing pictures 85 To download and save images to a computer without using OLYMPUS Master 87 8 Appendix 88 Troubleshooting 89 Error codes 89 Troubleshooting 90 Camera care 96 The battery 97 AC adapter (optional 98 Safety Precautions 99 Glossary of terms ...
FE-110 Advanced Manual (English)
Page 7
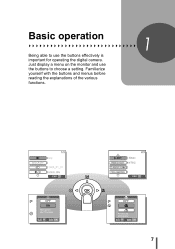
Just display a menu on the monitor and use the buttons to use the buttons effectively is important for operating the digital camera. 1 Basic operation Basic operation Being able to choose a setting. Familiarize yourself with the buttons and menus before reading the explanations of the various functions. 1 7
Just display a menu on the monitor and use the buttons to use the buttons effectively is important for operating the digital camera. 1 Basic operation Basic operation Being able to choose a setting. Familiarize yourself with the buttons and menus before reading the explanations of the various functions. 1 7
FE-110 Advanced Manual (English)
Page 8
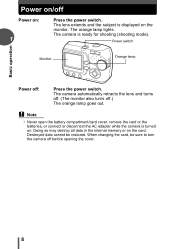
... retracts the lens and turns off. (The monitor also turns off before opening the cover. 8 Destroyed data cannot be sure to turn the camera off .) The orange lamp goes out. When changing the card, be restored. Power switch Monitor Orange lamp Power off Power on: 1 Press the power switch. ... lights. Note • Never open the battery compartment/card cover, remove the card or the batteries, or connect or disconnect the AC adapter while the camera is ready for shooting (shooting mode).
... retracts the lens and turns off. (The monitor also turns off before opening the cover. 8 Destroyed data cannot be sure to turn the camera off .) The orange lamp goes out. When changing the card, be restored. Power switch Monitor Orange lamp Power off Power on: 1 Press the power switch. ... lights. Note • Never open the battery compartment/card cover, remove the card or the batteries, or connect or disconnect the AC adapter while the camera is ready for shooting (shooting mode).
FE-110 Advanced Manual (English)
Page 9
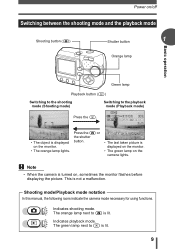
This is lit. 9 Shooting mode/Playback mode notation In this manual, the following icons indicate the camera mode necessary for using functions. The green lamp next to k is not a malfunction. Note • When the camera is lit. Indicates playback mode. The orange lamp next to l is turned on, sometimes the monitor flashes before... the playback mode (Playback mode) Press the k. 2560 1920 256902 1920 • The object is displayed on the monitor. • The green lamp on the camera lights. Indicates shooting mode.
This is lit. 9 Shooting mode/Playback mode notation In this manual, the following icons indicate the camera mode necessary for using functions. The green lamp next to k is not a malfunction. Note • When the camera is lit. Indicates playback mode. The orange lamp next to l is turned on, sometimes the monitor flashes before... the playback mode (Playback mode) Press the k. 2560 1920 256902 1920 • The object is displayed on the monitor. • The green lamp on the camera lights. Indicates shooting mode.
FE-110 Advanced Manual (English)
Page 10
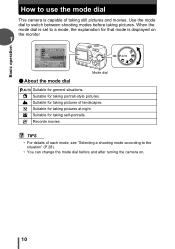
... the mode dial is set to a mode, the explanation for that mode is capable of landscapes. Basic operation How to use the mode dial This camera is displayed on . 10 i Suitable for general situations. n Records movies. Use the mode dial to switch between shooting modes before and after turning the...
... the mode dial is set to a mode, the explanation for that mode is capable of landscapes. Basic operation How to use the mode dial This camera is displayed on . 10 i Suitable for general situations. n Records movies. Use the mode dial to switch between shooting modes before and after turning the...
FE-110 Advanced Manual (English)
Page 11
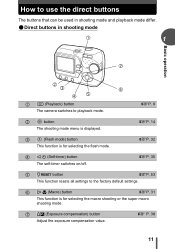
... The buttons that can be used in shooting mode and playback mode differ. (Direct buttons in shooting mode c 1 Basic operation i de h fg c k (Playback) button The camera switches to the factory default settings. gP. 32 f m (Self-timer) button The self-timer switches on/off. i [F (Exposure compensation) button Adjust the exposure compensation value...
... The buttons that can be used in shooting mode and playback mode differ. (Direct buttons in shooting mode c 1 Basic operation i de h fg c k (Playback) button The camera switches to the factory default settings. gP. 32 f m (Self-timer) button The self-timer switches on/off. i [F (Exposure compensation) button Adjust the exposure compensation value...
FE-110 Advanced Manual (English)
Page 12
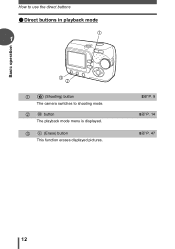
e (Erase) button This function erases displayed pictures. gP. 9 gP. 14 gP. 47 12 d button The playback mode menu is displayed. Basic operation How to use the direct buttons (Direct buttons in playback mode c 1 ed c l (Shooting) button The camera switches to shooting mode.
e (Erase) button This function erases displayed pictures. gP. 9 gP. 14 gP. 47 12 d button The playback mode menu is displayed. Basic operation How to use the direct buttons (Direct buttons in playback mode c 1 ed c l (Shooting) button The camera switches to shooting mode.
FE-110 Advanced Manual (English)
Page 13
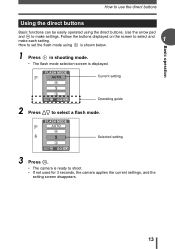
... select a flash mode. Current setting Operating guide 2 Press [\ to shoot. • If not used for 3 seconds, the camera applies the current settings, and the setting screen disappears. 13 Selected setting 3 Press i. • The camera is displayed. Use the arrow pad and i to make each setting. 1 How to set the flash mode using...
... select a flash mode. Current setting Operating guide 2 Press [\ to shoot. • If not used for 3 seconds, the camera applies the current settings, and the setting screen disappears. 13 Selected setting 3 Press i. • The camera is displayed. Use the arrow pad and i to make each setting. 1 How to set the flash mode using...
FE-110 Advanced Manual (English)
Page 14
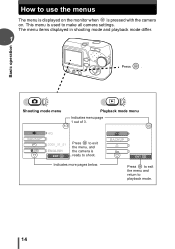
The menu items displayed in shooting mode and playback mode differ. 1 Press . Press to exit the menu, and the camera is ready to make all camera settings. Shooting mode menu Playback mode menu Indicates menu page 1 out of 3. This menu is pressed with the camera on. EXIT Press to exit the menu and return to use the menus The menu is displayed on the monitor when is used to shoot. Indicates more pages below. Basic operation How to playback mode. 14
The menu items displayed in shooting mode and playback mode differ. 1 Press . Press to exit the menu, and the camera is ready to make all camera settings. Shooting mode menu Playback mode menu Indicates menu page 1 out of 3. This menu is pressed with the camera on. EXIT Press to exit the menu and return to use the menus The menu is displayed on the monitor when is used to shoot. Indicates more pages below. Basic operation How to playback mode. 14

FE-110 Advanced Manual (English)
Page 16
Basic operation How to use the menus 4 Press . • The menu closes, and the camera is ready to shoot. 1 TIPS • Settings made from either mode. Menu notation In this manual, procedures for using the menus are saved even if the camera is turned off. • Menu items common to both shooting mode and playback mode apply to the same setting, and the setting can be made in the menu are expressed as follows. • Ex: Steps 1 and 2 of setting the [SLEEP] function [SLEEP] i 16
Basic operation How to use the menus 4 Press . • The menu closes, and the camera is ready to shoot. 1 TIPS • Settings made from either mode. Menu notation In this manual, procedures for using the menus are saved even if the camera is turned off. • Menu items common to both shooting mode and playback mode apply to the same setting, and the setting can be made in the menu are expressed as follows. • Ex: Steps 1 and 2 of setting the [SLEEP] function [SLEEP] i 16
FE-110 Advanced Manual (English)
Page 18
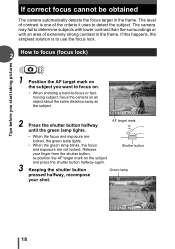
... finger from the shutter button, re-position the AF target mark on the subject you start taking pictures If correct focus cannot be obtained The camera automatically detects the focus target in the frame. Tips before you want to focus on. • When shooting a hard-to-focus or fastmoving subject, focus... an object about the same distance away as the subject. 2560 1920 2 Press the shutter button halfway until the green lamp lights. The camera may fail to determine subjects with lower contrast than the surroundings or with an area of contrast is to use the focus lock. 2 How to ...
... finger from the shutter button, re-position the AF target mark on the subject you start taking pictures If correct focus cannot be obtained The camera automatically detects the focus target in the frame. Tips before you want to focus on. • When shooting a hard-to-focus or fastmoving subject, focus... an object about the same distance away as the subject. 2560 1920 2 Press the shutter button halfway until the green lamp lights. The camera may fail to determine subjects with lower contrast than the surroundings or with an area of contrast is to use the focus lock. 2 How to ...

FE-110 Advanced Manual (English)
Page 19
... the subject cannot be brought into focus. If the subject has no vertical lines, hold the camera vertically and focus the camera using the focus lock function by pressing the shutter button halfway, then return the camera to focus on an object with an extremely bright area in the center of conditions, the...
... the subject cannot be brought into focus. If the subject has no vertical lines, hold the camera vertically and focus the camera using the focus lock function by pressing the shutter button halfway, then return the camera to focus on an object with an extremely bright area in the center of conditions, the...

FE-110 Advanced Manual (English)
Page 23
...You can copy all the image data stored in the internal memory to store pictures. The internal memory cannot be replaced or removed from the camera. Tips before you have taken. 2 Pictures recorded and stored in the internal memory can easily be erased, overwritten, and/or edited on ... • The internal memory and the card cannot be used for shooting and displaying images. g"Copying pictures to the film of a normal camera for recording pictures you start taking pictures Recording pictures Pictures taken are traveling and you want to take a lot of pictures. (Internal memory basics...
...You can copy all the image data stored in the internal memory to store pictures. The internal memory cannot be replaced or removed from the camera. Tips before you have taken. 2 Pictures recorded and stored in the internal memory can easily be erased, overwritten, and/or edited on ... • The internal memory and the card cannot be used for shooting and displaying images. g"Copying pictures to the film of a normal camera for recording pictures you start taking pictures Recording pictures Pictures taken are traveling and you want to take a lot of pictures. (Internal memory basics...
FE-110 Advanced Manual (English)
Page 24
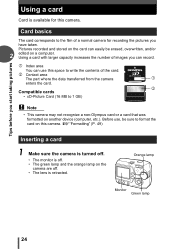
... the card. d Contact area The part where the data transferred from the camera c enters the card. c Index area You can easily be sure to 1 GB) Note • This camera may not recognize a non-Olympus card or a card that was formatted on this camera. d Compatible cards • xD-Picture Card (16 MB to format the...
... the card. d Contact area The part where the data transferred from the camera c enters the card. c Index area You can easily be sure to 1 GB) Note • This camera may not recognize a non-Olympus card or a card that was formatted on this camera. d Compatible cards • xD-Picture Card (16 MB to format the...

FE-110 Advanced Manual (English)
Page 27
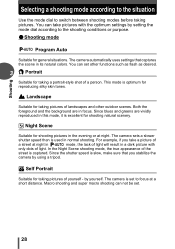
...PORTRAIT Take picture of film according to the subject. All you have to do is choose a scene mode according to it - Your camera will set the best exposure and coloration. There's nothing to whether you are taking a landscape, a night scene, a portrait-style image ...or whatever, and the camera will adjust the settings for you don't need to learn how to make difficult settings. With a digital camera, you ! 3 Shooting Shooting A professional photographer adjusts the exposure to the optimal setting, chooses the ...
...PORTRAIT Take picture of film according to the subject. All you have to do is choose a scene mode according to it - Your camera will set the best exposure and coloration. There's nothing to whether you are taking a landscape, a night scene, a portrait-style image ...or whatever, and the camera will adjust the settings for you don't need to learn how to make difficult settings. With a digital camera, you ! 3 Shooting Shooting A professional photographer adjusts the exposure to the optimal setting, chooses the ...
FE-110 Advanced Manual (English)
Page 28
...scene in focus. by using a tripod. m Night Scene Suitable for shooting natural scenery. For example, if you stabilize the camera by yourself. Macro shooting and super macro shooting can not be set to switch between shooting modes before taking a portrait-style ... for taking pictures. o Self Portrait Suitable for reproducing silky skin tones. l Landscape Suitable for taking pictures of light. The camera automatically uses settings that you take pictures with only dots of yourself - Both the foreground and the background are vividly reproduced in...
...scene in focus. by using a tripod. m Night Scene Suitable for shooting natural scenery. For example, if you stabilize the camera by yourself. Macro shooting and super macro shooting can not be set to switch between shooting modes before taking a portrait-style ... for taking pictures. o Self Portrait Suitable for reproducing silky skin tones. l Landscape Suitable for taking pictures of light. The camera automatically uses settings that you take pictures with only dots of yourself - Both the foreground and the background are vividly reproduced in...


