
E-P2 Instruction Manual (English)
Page 1
... new camera, please read these instructions carefully to use your camera before taking important photographs. If there are based on firmware version 1.0 for the camera, the contents will differ. Before you start to enjoy optimum performance and a longer service life. DIGITAL CAMERA INSTRUCTION MANUAL Basic guide P.2 Review the camera part names, the basic steps for purchasing an Olympus digital camera.
... new camera, please read these instructions carefully to use your camera before taking important photographs. If there are based on firmware version 1.0 for the camera, the contents will differ. Before you start to enjoy optimum performance and a longer service life. DIGITAL CAMERA INSTRUCTION MANUAL Basic guide P.2 Review the camera part names, the basic steps for purchasing an Olympus digital camera.

E-P2 Instruction Manual (English)
Page 7
... PICTURE MODE GRADATION j NORM IMAGE ASPECT 4:3 BACK SET 2 Use fg to exit 7 EN s j±0 k±0 REC VIEW 5SEC cMENU DISPLAY OFF FIRMWARE BACK SET 8 Press the MENU button to select [d], then press i W ENG. Setting the date/time Basic guide Preparations for shooting Date and time information... name is recorded on the card together with the date and time information. Be sure to set the correct date and time before using the camera. 1 Press the MENU button • The menu screen is displayed in the 24-hour format. 6 Use fg to select the date format Y...
... PICTURE MODE GRADATION j NORM IMAGE ASPECT 4:3 BACK SET 2 Use fg to exit 7 EN s j±0 k±0 REC VIEW 5SEC cMENU DISPLAY OFF FIRMWARE BACK SET 8 Press the MENU button to select [d], then press i W ENG. Setting the date/time Basic guide Preparations for shooting Date and time information... name is recorded on the card together with the date and time information. Be sure to set the correct date and time before using the camera. 1 Press the MENU button • The menu screen is displayed in the 24-hour format. 6 Use fg to select the date format Y...

E-P2 Instruction Manual (English)
Page 21
...ON]. s j±0 k±0 REC VIEW 5SEC cMENU DISPLAY ON FIRMWARE BACK SET The [c] tab is performed from the "Custom Menu" menu. The Custom Menu is added when [c MENU DISPLAY] in the Setup Menu is more than adequate for customizing the camera to select the [d] tab, then press i W '09.11....01 14:01 ENG. s j±0 k±0 REC VIEW 5SEC cMENU DISPLAY OFF FIRMWARE BACK SET 3 Use fg to select [c MENU DISPLAY], then press i 4 Use fg...
...ON]. s j±0 k±0 REC VIEW 5SEC cMENU DISPLAY ON FIRMWARE BACK SET The [c] tab is performed from the "Custom Menu" menu. The Custom Menu is added when [c MENU DISPLAY] in the Setup Menu is more than adequate for customizing the camera to select the [d] tab, then press i W '09.11....01 14:01 ENG. s j±0 k±0 REC VIEW 5SEC cMENU DISPLAY OFF FIRMWARE BACK SET 3 Use fg to select [c MENU DISPLAY], then press i 4 Use fg...

E-P2 Instruction Manual (English)
Page 28
Setup Menu ...90 X (Date/time setting 90 W (Changing the display language 90 s (Monitor brightness adjustment 90 REC VIEW 91 cMENU DISPLAY 91 FIRMWARE 91 Resetting the camera settings 92 28 EN 4 Recording Movies 74 Describes movie recording method and functions. Single-frame/Close-up playback 77 Index display/Calendar display 78 Information ... 76 Recording Audio when Recording Movie 76 Taking still picture automatically when movie recording ends 76 5 Playback functions 77 Describes the functions for using the camera.
Setup Menu ...90 X (Date/time setting 90 W (Changing the display language 90 s (Monitor brightness adjustment 90 REC VIEW 91 cMENU DISPLAY 91 FIRMWARE 91 Resetting the camera settings 92 28 EN 4 Recording Movies 74 Describes movie recording method and functions. Single-frame/Close-up playback 77 Index display/Calendar display 78 Information ... 76 Recording Audio when Recording Movie 76 Taking still picture automatically when movie recording ends 76 5 Playback functions 77 Describes the functions for using the camera.

E-P2 Instruction Manual (English)
Page 90
... function, then press i. BACK -5 +2 SET 90 EN For details on this date and time information. s j±0 k±0 REC VIEW 5SEC cMENU DISPLAY ON FIRMWARE BACK SET Use fg to select [d], then press i. i W '09.11.01 14:01 ENG. The date and time is saved with each image to set... the basic camera functions. Color temperature adjustment will affect only the LCD monitor display during playback. X (Date/time setting) gP. 7 Set the date and time. Use ...
... function, then press i. BACK -5 +2 SET 90 EN For details on this date and time information. s j±0 k±0 REC VIEW 5SEC cMENU DISPLAY ON FIRMWARE BACK SET Use fg to select [d], then press i. i W '09.11.01 14:01 ENG. The date and time is saved with each image to set... the basic camera functions. Color temperature adjustment will affect only the LCD monitor display during playback. X (Date/time setting) gP. 7 Set the date and time. Use ...

E-P2 Instruction Manual (English)
Page 91
... checking it is being recorded, and then switches to download software, you will be set to state which version of each picture. FIRMWARE Your productís firmware version will need to [ON], a custom menu is not displayed. cMENU DISPLAY gP. 21 When this item is set in units...Pressing the shutter button halfway while checking the picture lets you resume shooting immediately. [1SEC]-[20SEC] Selects the number of seconds to your camera or accessories or when you want to playback mode. When you make inquiries about your particular liking. This is useful for making a...
... checking it is being recorded, and then switches to download software, you will be set to state which version of each picture. FIRMWARE Your productís firmware version will need to [ON], a custom menu is not displayed. cMENU DISPLAY gP. 21 When this item is set in units...Pressing the shutter button halfway while checking the picture lets you resume shooting immediately. [1SEC]-[20SEC] Selects the number of seconds to your camera or accessories or when you want to playback mode. When you make inquiries about your particular liking. This is useful for making a...
E-P2 Instruction Manual (English)
Page 116
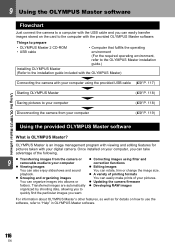
... removable media to your computer (gP. 118) Disconnecting the camera from your digital camera. Transferred images are automatically z Developing RAW images organized by shooting date, allowing you to quickly find the particular images you can take advantage of your pictures. For information about OLYMPUS Master's other features, as well as for pictures taken with...
... removable media to your computer (gP. 118) Disconnecting the camera from your digital camera. Transferred images are automatically z Developing RAW images organized by shooting date, allowing you to quickly find the particular images you can take advantage of your pictures. For information about OLYMPUS Master's other features, as well as for pictures taken with...

E-P2 Instruction Manual (English)
Page 138
... 9 9 jY* 9 9 Flash mode 9 9 PICTURE MODE 9 9 GRADATION 9 9 STILL K PICTURE 9 9 MOVIE k 9 IMAGE ASPECT 9 9 w 9 9 AE BKT 9 9 WB BKT 9 9 FL BKT 9 9 ISO BKT 9 9 MULTIPLE EXPOSURE k k 8 k 9 X k k W k k s k k REC VIEW k 9 c MENU DISPLAY k k FIRMWARE k k STILL AF PICTURE 9 9 MODE MOVIE k 9 AF AREA 9 9 FOCUS RING k 9 DIAL FUNCTION k 9 DIAL DIRECTION k 9 AEL/AFL k 9 AEL/AFL MEMO k 9 ; NOISE FILTER WB > ALL > COLOR SPACE SHADING...
... 9 9 jY* 9 9 Flash mode 9 9 PICTURE MODE 9 9 GRADATION 9 9 STILL K PICTURE 9 9 MOVIE k 9 IMAGE ASPECT 9 9 w 9 9 AE BKT 9 9 WB BKT 9 9 FL BKT 9 9 ISO BKT 9 9 MULTIPLE EXPOSURE k k 8 k 9 X k k W k k s k k REC VIEW k 9 c MENU DISPLAY k k FIRMWARE k k STILL AF PICTURE 9 9 MODE MOVIE k 9 AF AREA 9 9 FOCUS RING k 9 DIAL FUNCTION k 9 DIAL DIRECTION k 9 AEL/AFL k 9 AEL/AFL MEMO k 9 ; NOISE FILTER WB > ALL > COLOR SPACE SHADING...

E-P2 Instruction Manual (English)
Page 140
Playback Menu Tab q m Function y EDIT < RESET PROTECT * Factory default setting Setup Menu Setting START BGM SLIDE MELANCHOLY*/NOSTALGIC/ LOVE/JOY/COOL/OFF ALL*/STILL PICTURE/MOVIE SLIDE INTERVAL MOVIE INTERVAL OFF/ON* 2 SEC - 10 SEC (3 SEC*) FULL/SHORT* SEL. IMAGE RAW DATA EDIT JPEG EDIT SHADOW ADJ/REDEYE FIX/P/ ASPECT/BLACK & WHITE/SEPIA/ SATURATION/Q/e-PORTRAIT R NO/R START/YES IMAGE OVERLAY
Playback Menu Tab q m Function y EDIT < RESET PROTECT * Factory default setting Setup Menu Setting START BGM SLIDE MELANCHOLY*/NOSTALGIC/ LOVE/JOY/COOL/OFF ALL*/STILL PICTURE/MOVIE SLIDE INTERVAL MOVIE INTERVAL OFF/ON* 2 SEC - 10 SEC (3 SEC*) FULL/SHORT* SEL. IMAGE RAW DATA EDIT JPEG EDIT SHADOW ADJ/REDEYE FIX/P/ ASPECT/BLACK & WHITE/SEPIA/ SATURATION/Q/e-PORTRAIT R NO/R START/YES IMAGE OVERLAY

E-P2 Instruction Manual (English)
Page 155
... FIRMWARE 91 FL BKT 64 Flash bracketing 64 Flash intensity control w 63 FLASH MODE 62 Flash off 63 Fn FACE DETECT 55 FOCUS RING 94 FORMAT 127 Four Thirds system... X (Middle 65 M.ZUIKO DIGITAL interchangeable lens .... 129 MACRO J 11 Manual focus (MF 50 Manual shooting M 40 METERING 42, 98 MF 97 MF (manual focus 50 MF ASSIST 94 Micro Four Thirds system lenses 129 Monitor brightness adjustment...11 NIGHT+PORTRAIT U 11 NOISE FILTER 105 NOISE REDUCT 104 NTSC 100 Number of pixels 65 O OLYMPUS Master 116 One-touch white balance V 70, 97 P PAL 100 PALE&LIGHT COLOR l 11 PANORAMA...
... FIRMWARE 91 FL BKT 64 Flash bracketing 64 Flash intensity control w 63 FLASH MODE 62 Flash off 63 Fn FACE DETECT 55 FOCUS RING 94 FORMAT 127 Four Thirds system... X (Middle 65 M.ZUIKO DIGITAL interchangeable lens .... 129 MACRO J 11 Manual focus (MF 50 Manual shooting M 40 METERING 42, 98 MF 97 MF (manual focus 50 MF ASSIST 94 Micro Four Thirds system lenses 129 Monitor brightness adjustment...11 NIGHT+PORTRAIT U 11 NOISE FILTER 105 NOISE REDUCT 104 NTSC 100 Number of pixels 65 O OLYMPUS Master 116 One-touch white balance V 70, 97 P PAL 100 PALE&LIGHT COLOR l 11 PANORAMA...