
E-600 Instruction Manual (English)
Page 1
... modification of Contents P. 24 z Thank you for the camera, the contents will differ. Table of functions due to firmware update for purchasing an Olympus digital camera. z The screen and camera illustrations shown in this camera. z We recommend that you start to enjoy optimum performance and a longer ... read these instructions carefully to use your camera before taking important photographs. For the latest information, please visit the Olympus website. DIGITAL CAMERA INSTRUCTION MANUAL Basic guide P. 2 Review the camera part names, the basic steps for future reference.
... modification of Contents P. 24 z Thank you for the camera, the contents will differ. Table of functions due to firmware update for purchasing an Olympus digital camera. z The screen and camera illustrations shown in this camera. z We recommend that you start to enjoy optimum performance and a longer ... read these instructions carefully to use your camera before taking important photographs. For the latest information, please visit the Olympus website. DIGITAL CAMERA INSTRUCTION MANUAL Basic guide P. 2 Review the camera part names, the basic steps for future reference.
E-600 Instruction Manual (English)
Page 2
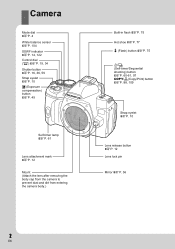
Camera Mode dial gP. 4 White balance sensor gP. 104 SSWF indicator gP. 14, 122 Control dial (j) gP. 19, 34 Shutter button gP. 16, 36, 59 Strap eyelet gP. 10 F (Exposure compensation) button gP. 49 Self-timer lamp gP. 61 Lens attachment mark gP. 12 Mount (Attach the lens after removing the body cap from the camera to prevent dust and dirt from entering the camera body.) Built-in flash gP. 75 Hot shoe gP. 77 # (Flash) button gP. 75 Y/j (Self-timer/Sequential shooting) button gP. 60-61, 97 COPY/< (Copy/Print) button gP. 88, 109 Strap eyelet gP. 10 Lens release button gP. 12 Lens lock pin Mirror ...
Camera Mode dial gP. 4 White balance sensor gP. 104 SSWF indicator gP. 14, 122 Control dial (j) gP. 19, 34 Shutter button gP. 16, 36, 59 Strap eyelet gP. 10 F (Exposure compensation) button gP. 49 Self-timer lamp gP. 61 Lens attachment mark gP. 12 Mount (Attach the lens after removing the body cap from the camera to prevent dust and dirt from entering the camera body.) Built-in flash gP. 75 Hot shoe gP. 77 # (Flash) button gP. 75 Y/j (Self-timer/Sequential shooting) button gP. 60-61, 97 COPY/< (Copy/Print) button gP. 88, 109 Strap eyelet gP. 10 Lens release button gP. 12 Lens lock pin Mirror ...

E-600 Instruction Manual (English)
Page 3
Basic guide AEL/AFL button gP. 36, 50, 95 0 (Protect) button gP. 89 Eyecup gP. 61 Viewfinder gP. 6 INFO (Information display) button gP. 21, 40, 83 MENU button gP. 22 LCD monitor gP. 8, 9, 37 Tripod socket D (Erase) button gP. 90 q (Playback) button gP. 18, 80 Diopter adjustment dial gP. 14 Battery Battery compartment cover compartment lock gP. 11 gP. 11 ON/OFF switch gP. 14 < button gP. 95 P (AF target) button gP. 56 u (Live view) button gP. 35 Arrow pad gP. 20, 22 i button gP. 21, 22 o (Image stabilizer) button gP. 62 Card cover gP. 13 Names of parts and functions Connector cover ...
Basic guide AEL/AFL button gP. 36, 50, 95 0 (Protect) button gP. 89 Eyecup gP. 61 Viewfinder gP. 6 INFO (Information display) button gP. 21, 40, 83 MENU button gP. 22 LCD monitor gP. 8, 9, 37 Tripod socket D (Erase) button gP. 90 q (Playback) button gP. 18, 80 Diopter adjustment dial gP. 14 Battery Battery compartment cover compartment lock gP. 11 gP. 11 ON/OFF switch gP. 14 < button gP. 95 P (AF target) button gP. 56 u (Live view) button gP. 35 Arrow pad gP. 20, 22 i button gP. 21, 22 o (Image stabilizer) button gP. 62 Card cover gP. 13 Names of parts and functions Connector cover ...
E-600 Instruction Manual (English)
Page 4
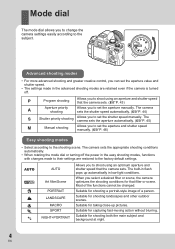
The camera sets the aperture automatically. (gP. 45) M Manual shooting Allows you select a desired filter or scene, the camera optimizes the shooting conditions for shooting a portrait-style image of the functions cannot be changed. The camera sets the appropriate shooting conditions automatically. • When rotating the mode dial or turning off . Suitable for shooting both the main subject and background at night. 4 EN Suitable for shooting landscapes and other outdoor scenes. When you to set the aperture and shutter speed manually. (gP. 46) Easy shooting modes • ...
The camera sets the aperture automatically. (gP. 45) M Manual shooting Allows you select a desired filter or scene, the camera optimizes the shooting conditions for shooting a portrait-style image of the functions cannot be changed. The camera sets the appropriate shooting conditions automatically. • When rotating the mode dial or turning off . Suitable for shooting both the main subject and background at night. 4 EN Suitable for shooting landscapes and other outdoor scenes. When you to set the aperture and shutter speed manually. (gP. 46) Easy shooting modes • ...

E-600 Instruction Manual (English)
Page 5
Types of art filters Icon j k l Art filter POP ART SOFT FOCUS PIN HOLE Types of scene modes Icon G H I q r & * Mode CHILDREN HIGH KEY LOW KEY DIS MODE NATURE MACRO CANDLE SUNSET Icon @ s ( g I H Mode DOCUMENTS PANORAMA FIREWORKS BEACH & SNOW UNDERWATER WIDE UNDERWATER MACRO • Art filters are not applied to RAW images. • If the record mode is set to [YN+RAW]. • The grainy appearance of the picture may be emphasized depending on the type of parts and functions 5 EN Names of art filter. Press i to display the scene menu. 1 POP ART 1 CHILDREN i h SET SET 2...
Types of art filters Icon j k l Art filter POP ART SOFT FOCUS PIN HOLE Types of scene modes Icon G H I q r & * Mode CHILDREN HIGH KEY LOW KEY DIS MODE NATURE MACRO CANDLE SUNSET Icon @ s ( g I H Mode DOCUMENTS PANORAMA FIREWORKS BEACH & SNOW UNDERWATER WIDE UNDERWATER MACRO • Art filters are not applied to RAW images. • If the record mode is set to [YN+RAW]. • The grainy appearance of the picture may be emphasized depending on the type of parts and functions 5 EN Names of art filter. Press i to display the scene menu. 1 POP ART 1 CHILDREN i h SET SET 2...
E-600 Instruction Manual (English)
Page 6
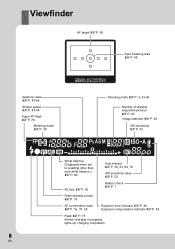
Viewfinder AF target gP. 56 Spot metering area gP. 48 Aperture value gP. 43-46 Shutter speed gP. 43-46 Super FP flash gP. 78 Metering mode gP. 48 Shooting mode gP. 4, 43-46 Number of storable sequential pictures gP. 60 Image stabilizer gP. 62 ISO sensitivity gP. 52 White balance (Displayed when set to a setting other than auto white balance.) gP. 66 Auto bracket gP. 50, 53, 69, 76 ISO sensitivity value gP. 52 AE lock gP. 50 Battery check gP. 7 Flash intensity control gP. 75 AF confirmation mark gP. 16, 37, 59 Exposure level indicator gP. 46 Exposure compensation indicator gP. 49 ...
Viewfinder AF target gP. 56 Spot metering area gP. 48 Aperture value gP. 43-46 Shutter speed gP. 43-46 Super FP flash gP. 78 Metering mode gP. 48 Shooting mode gP. 4, 43-46 Number of storable sequential pictures gP. 60 Image stabilizer gP. 62 ISO sensitivity gP. 52 White balance (Displayed when set to a setting other than auto white balance.) gP. 66 Auto bracket gP. 50, 53, 69, 76 ISO sensitivity value gP. 52 AE lock gP. 50 Battery check gP. 7 Flash intensity control gP. 75 AF confirmation mark gP. 16, 37, 59 Exposure level indicator gP. 46 Exposure compensation indicator gP. 49 ...
E-600 Instruction Manual (English)
Page 7
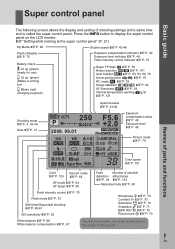
Super control panel Basic guide The following screen allows the display and setting of shooting settings at the super control panel" (P. 21) My Mode gP. 96 Shutter speed gP. 43-46 Flash charging gP. 75 Battery check Lit up (green) (ready for use) Lit up (green) (Battery is called the super control panel. Press the INFO button to display the super control panel on the super control panel. 7 EN g"Setting while looking at the same time and is running low) Blinks (red) (charging required) Exposure compensation indicator gP. 49 Exposure level indicator gP. 46 Flash intensity control...
Super control panel Basic guide The following screen allows the display and setting of shooting settings at the super control panel" (P. 21) My Mode gP. 96 Shutter speed gP. 43-46 Flash charging gP. 75 Battery check Lit up (green) (ready for use) Lit up (green) (Battery is called the super control panel. Press the INFO button to display the super control panel on the super control panel. 7 EN g"Setting while looking at the same time and is running low) Blinks (red) (charging required) Exposure compensation indicator gP. 49 Exposure level indicator gP. 46 Flash intensity control...
E-600 Instruction Manual (English)
Page 8
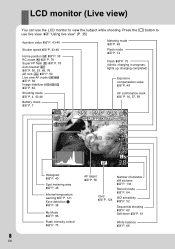
g"Using live view. LCD monitor (Live view) You can use live view" (P. 35) Aperture value gP. 43-46 Shutter speed gP. 43-46 Home position p gP. 58 RC mode q gP. 78 Super FP flash s gP. 78 Auto bracket t gP. 50, 53, 69, 76 AE lock u gP. 50 Live view AF mode po gP. 36 Image stabilizer vws gP. 62 Shooting mode gP. 4, 43-46 Battery check gP. 7 Metering mode gP. 48 Flash mode gP. 72 Flash gP. 75 (blinks: charging in progress, lights up: charging completed) Exposure compensation value gP. 49 AF confirmation mark gP. 16, 37, 59 250 F5.6 +2.0 HP RC FP BKT AEL H-AF IS 2 WB AUTO ISO AUTO LN 38...
g"Using live view. LCD monitor (Live view) You can use live view" (P. 35) Aperture value gP. 43-46 Shutter speed gP. 43-46 Home position p gP. 58 RC mode q gP. 78 Super FP flash s gP. 78 Auto bracket t gP. 50, 53, 69, 76 AE lock u gP. 50 Live view AF mode po gP. 36 Image stabilizer vws gP. 62 Shooting mode gP. 4, 43-46 Battery check gP. 7 Metering mode gP. 48 Flash mode gP. 72 Flash gP. 75 (blinks: charging in progress, lights up: charging completed) Exposure compensation value gP. 49 AF confirmation mark gP. 16, 37, 59 250 F5.6 +2.0 HP RC FP BKT AEL H-AF IS 2 WB AUTO ISO AUTO LN 38...
E-600 Instruction Manual (English)
Page 9
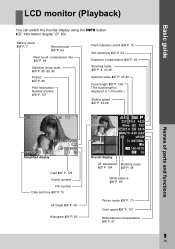
LCD monitor (Playback) Basic guide You can switch the monitor display using the INFO button. g"Information display" (P. 83) Battery check gP. 7 Record mode gP. 64 Pixel count, compression rate gP. 64 Selection check mark gP. 88, 89, 90 Protect gP. 89 Print reservation Number of prints gP. 107 Flash intensity control gP. 75 ISO sensitivity gP. 52 Exposure compensation gP. 49 Shooting mode gP. 4, 43-46 Aperture value gP. 43-46 Focal length gP. 126 (The focal length is displayed in 1 mm units.) Shutter speed gP. 43-46 Names of parts and functions x10 [4032x3024,1/8] LN 100-0015 ...
LCD monitor (Playback) Basic guide You can switch the monitor display using the INFO button. g"Information display" (P. 83) Battery check gP. 7 Record mode gP. 64 Pixel count, compression rate gP. 64 Selection check mark gP. 88, 89, 90 Protect gP. 89 Print reservation Number of prints gP. 107 Flash intensity control gP. 75 ISO sensitivity gP. 52 Exposure compensation gP. 49 Shooting mode gP. 4, 43-46 Aperture value gP. 43-46 Focal length gP. 126 (The focal length is displayed in 1 mm units.) Shutter speed gP. 43-46 Names of parts and functions x10 [4032x3024,1/8] LN 100-0015 ...
E-600 Instruction Manual (English)
Page 10
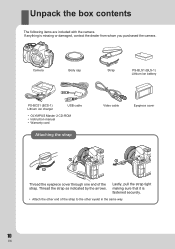
... items are included with the camera. Camera Body cap Strap PS-BLS1 (BLS-1) Lithium ion battery PS-BCS1 (BCS-1) Lithium ion charger USB cable • OLYMPUS Master 2 CD-ROM • Instruction manual • Warranty card Attaching the strap Video cable Eyepiece cover 2 3 4 1 Thread the eyepiece cover through one end of the...
... items are included with the camera. Camera Body cap Strap PS-BLS1 (BLS-1) Lithium ion battery PS-BCS1 (BCS-1) Lithium ion charger USB cable • OLYMPUS Master 2 CD-ROM • Instruction manual • Warranty card Attaching the strap Video cable Eyepiece cover 2 3 4 1 Thread the eyepiece cover through one end of the...
E-600 Instruction Manual (English)
Page 11
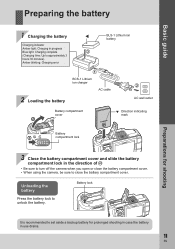
Battery lock Preparations for prolonged shooting in case the battery in the direction of E • Be sure to turn off the camera when you open or close the battery compartment cover. Preparing the battery Basic guide 1 Charging the battery W BLS-1 Lithium ion battery Charging indicator Amber light: Charging in progress Blue light: Charging complete 3 (Charging time: Up to set aside a backup battery for shooting It is recommended to approximately 3 hours 30 minutes). Unloading the battery Press the battery lock to close the battery compartment cover. • When ...
Battery lock Preparations for prolonged shooting in case the battery in the direction of E • Be sure to turn off the camera when you open or close the battery compartment cover. Preparing the battery Basic guide 1 Charging the battery W BLS-1 Lithium ion battery Charging indicator Amber light: Charging in progress Blue light: Charging complete 3 (Charging time: Up to set aside a backup battery for shooting It is recommended to approximately 3 hours 30 minutes). Unloading the battery Press the battery lock to close the battery compartment cover. • When ...
E-600 Instruction Manual (English)
Page 12
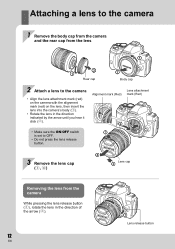
Attaching a lens to OFF. • Do not press the lens release button. Alignment mark (Red) 2 3 Lens attachment mark (Red) 1 3 Remove the lens cap (3, 4) 4 Lens cap 3 Removing the lens from the lens 1 2 1 Rear cap 2 Body cap 2 Attach a lens to the camera • Align the lens attachment mark (red) on the camera with the alignment mark (red) on the lens, then insert the lens into the camera's body (1). • Rotate the lens in the direction indicated by the arrow until you hear it click (2). • Make sure the ON/OFF switch is set to the camera 1 Remove the body cap from the ...
Attaching a lens to OFF. • Do not press the lens release button. Alignment mark (Red) 2 3 Lens attachment mark (Red) 1 3 Remove the lens cap (3, 4) 4 Lens cap 3 Removing the lens from the lens 1 2 1 Rear cap 2 Body cap 2 Attach a lens to the camera • Align the lens attachment mark (red) on the camera with the alignment mark (red) on the lens, then insert the lens into the camera's body (1). • Rotate the lens in the direction indicated by the arrow until you hear it click (2). • Make sure the ON/OFF switch is set to the camera 1 Remove the body cap from the ...

E-600 Instruction Manual (English)
Page 13
Basic guide Loading the card CompactFlash/Microdrive Open the card cover (1, 2). Insert the card's contact area into place (3). 1 1 2 Card access lamp CF card slot 3 W mark 2 3 xD-Picture Card slot Removing the card Never open the card cover while the card access lamp is blinking. Preparations for shooting Eject button 13 EN Card cover Connector xD-Picture Card Open the card cover (1, 2). CompactFlash/Microdrive • Press the eject button all the way in to eject the card. • Pull out the card. Press the eject button again all the way in to make it pop ...
Basic guide Loading the card CompactFlash/Microdrive Open the card cover (1, 2). Insert the card's contact area into place (3). 1 1 2 Card access lamp CF card slot 3 W mark 2 3 xD-Picture Card slot Removing the card Never open the card cover while the card access lamp is blinking. Preparations for shooting Eject button 13 EN Card cover Connector xD-Picture Card Open the card cover (1, 2). CompactFlash/Microdrive • Press the eject button all the way in to eject the card. • Pull out the card. Press the eject button again all the way in to make it pop ...
E-600 Instruction Manual (English)
Page 14
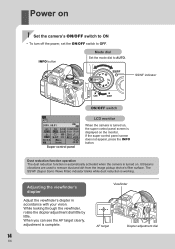
Dust reduction function operation The dust reduction function is automatically activated when the camera is displayed on the monitor. When you can see the AF target clearly, adjustment is working. Ultrasonic vibrations are used to AUTO. Viewfinder AF target Diopter adjustment dial 14 EN Adjusting the viewfinder's diopter Adjust the viewfinder's diopter in accordance with your vision. Power on . INFO button Mode dial Set the mode dial to remove dust and dirt from the image pickup device's filter surface. If the super control panel screen does not appear, press the ...
Dust reduction function operation The dust reduction function is automatically activated when the camera is displayed on the monitor. When you can see the AF target clearly, adjustment is working. Ultrasonic vibrations are used to AUTO. Viewfinder AF target Diopter adjustment dial 14 EN Adjusting the viewfinder's diopter Adjust the viewfinder's diopter in accordance with your vision. Power on . INFO button Mode dial Set the mode dial to remove dust and dirt from the image pickup device's filter surface. If the super control panel screen does not appear, press the ...
E-600 Instruction Manual (English)
Page 15
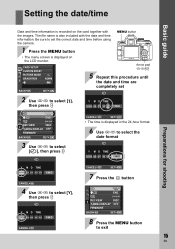
CARD SETUP CUSTOM RESET PICTURE MODE GRADATION NORM N BACK SET Arrow pad fghi 5 Repeat this procedure until the date and time are completely set the correct date and time before using the camera. s j±0 k±0 REC VIEW 5SEC cMENU DISPLAY OFF FIRMWARE BACK SET 3 Use fg to select [X], then press i CANCEL SET • The time is recorded on the LCD monitor. The file name is displayed on the card together with the date and time information. MENU button 1 Press the MENU button • The menu screen is also included with the images. s j±0 k±0 REC ...
CARD SETUP CUSTOM RESET PICTURE MODE GRADATION NORM N BACK SET Arrow pad fghi 5 Repeat this procedure until the date and time are completely set the correct date and time before using the camera. s j±0 k±0 REC VIEW 5SEC cMENU DISPLAY OFF FIRMWARE BACK SET 3 Use fg to select [X], then press i CANCEL SET • The time is recorded on the LCD monitor. The file name is displayed on the card together with the date and time information. MENU button 1 Press the MENU button • The menu screen is also included with the images. s j±0 k±0 REC ...
E-600 Instruction Manual (English)
Page 16
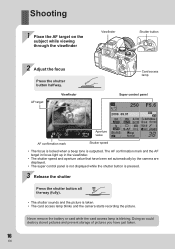
Doing so could destroy stored pictures and prevent storage of pictures you have been set automatically by the camera are displayed. • The super control panel is not displayed while the shutter button is pressed. 3 Release the shutter Press the shutter button all the way (fully). • The shutter sounds and the picture is taken. • The card access lamp blinks and the camera starts recording the picture. Never remove the battery or card while the card access lamp is outputted. The AF confirmation mark and the AF target in focus light up in the viewfinder. • The ...
Doing so could destroy stored pictures and prevent storage of pictures you have been set automatically by the camera are displayed. • The super control panel is not displayed while the shutter button is pressed. 3 Release the shutter Press the shutter button all the way (fully). • The shutter sounds and the picture is taken. • The card access lamp blinks and the camera starts recording the picture. Never remove the battery or card while the card access lamp is outputted. The AF confirmation mark and the AF target in focus light up in the viewfinder. • The ...

E-600 Instruction Manual (English)
Page 17
If no operations are performed for approximately 8 seconds while the camera is on, the monitor backlight turns off to save battery power (when the super control panel is possible to use the LCD monitor as a viewfinder and check the subject's composition, or shoot while viewing an enlarged display on the LCD monitor. The camera activates again when you touch any button (the shutter button, q button, etc.). When the camera stops operating If no operations are performed for approximately one minute thereafter, the camera enters the sleep mode (stand-by) and stops operating. Basic ...
If no operations are performed for approximately 8 seconds while the camera is on, the monitor backlight turns off to save battery power (when the super control panel is possible to use the LCD monitor as a viewfinder and check the subject's composition, or shoot while viewing an enlarged display on the LCD monitor. The camera activates again when you touch any button (the shutter button, q button, etc.). When the camera stops operating If no operations are performed for approximately one minute thereafter, the camera enters the sleep mode (stand-by) and stops operating. Basic ...

E-600 Instruction Manual (English)
Page 18
Use fg to select [YES] and press the i button to 14×. Playback/Erasing Playing back images Close-up playback Pressing the q button displays the last picture taken. ERASE D button BACK YES NO SET 18 EN q button Displays the frame that is stored 10 frames back Displays the previous frame Displays the next frame Arrow pad Displays the frame that is stored 10 frames ahead Each time you want to erase and press the D button. Control dial Erasing images Play back the image you turn the control dial towards U, the image is incrementally enlarged from 2× to erase.
Use fg to select [YES] and press the i button to 14×. Playback/Erasing Playing back images Close-up playback Pressing the q button displays the last picture taken. ERASE D button BACK YES NO SET 18 EN q button Displays the frame that is stored 10 frames back Displays the previous frame Displays the next frame Arrow pad Displays the frame that is stored 10 frames ahead Each time you want to erase and press the D button. Control dial Erasing images Play back the image you turn the control dial towards U, the image is incrementally enlarged from 2× to erase.
E-600 Instruction Manual (English)
Page 19
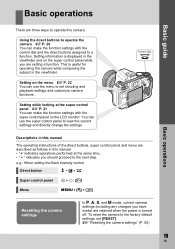
Setting information is displayed in the viewfinder and on the LCD monitor. Setting while looking at the same time. • " " indicates you should proceed to the next step. This is turned off. g"Resetting the camera settings" (P. 92) 19 EN Basic operations Basic guide There are three ways to operate this manual. • "+" indicates operations performed at the super control panel gP. 21 You can make the function settings with the super control panel on the super control panel while you are setting a function. You can make the function settings with the control dial and ...
Setting information is displayed in the viewfinder and on the LCD monitor. Setting while looking at the same time. • " " indicates you should proceed to the next step. This is turned off. g"Resetting the camera settings" (P. 92) 19 EN Basic operations Basic guide There are three ways to operate this manual. • "+" indicates operations performed at the super control panel gP. 21 You can make the function settings with the super control panel on the super control panel while you are setting a function. You can make the function settings with the control dial and ...
E-600 Instruction Manual (English)
Page 20
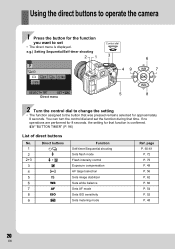
Direct buttons 1 Y/j 2 # 2+3 # + F 3 F 4 P 5 o 6 WB 7 AF 8 ISO 9 d Function Self-timer/Sequential shooting Sets flash mode Flash intensity control Exposure compensation AF target selection Sets image stabilizer Sets white balance Sets AF mode Sets ISO sensitivity Sets metering mode Ref. e.g.) Setting Sequential/Self-timer shooting 21 Control dial j 3 49 6 7 SELECT SET Direct menu 5 8 2 Turn the control dial to change the setting • The function assigned to set the function during that time. If no operations are performed for 8 seconds, the setting for ...
Direct buttons 1 Y/j 2 # 2+3 # + F 3 F 4 P 5 o 6 WB 7 AF 8 ISO 9 d Function Self-timer/Sequential shooting Sets flash mode Flash intensity control Exposure compensation AF target selection Sets image stabilizer Sets white balance Sets AF mode Sets ISO sensitivity Sets metering mode Ref. e.g.) Setting Sequential/Self-timer shooting 21 Control dial j 3 49 6 7 SELECT SET Direct menu 5 8 2 Turn the control dial to change the setting • The function assigned to set the function during that time. If no operations are performed for 8 seconds, the setting for ...
