
E-600 Instruction Manual (English)
Page 1
... basic operations. If there are based on firmware version 1.0 for future reference. Keep this manual in this camera. DIGITAL CAMERA INSTRUCTION MANUAL Basic guide P. 2 Review the camera part names, the basic steps for purchasing an Olympus digital camera. z The contents in this manual are addition and/or modification of Contents P. 24 z Thank you start to...
... basic operations. If there are based on firmware version 1.0 for future reference. Keep this manual in this camera. DIGITAL CAMERA INSTRUCTION MANUAL Basic guide P. 2 Review the camera part names, the basic steps for purchasing an Olympus digital camera. z The contents in this manual are addition and/or modification of Contents P. 24 z Thank you start to...
E-600 Instruction Manual (English)
Page 2
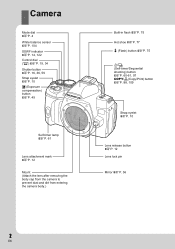
Camera Mode dial gP. 4 White balance sensor gP. 104 SSWF indicator gP. 14, 122 Control dial (j) gP. 19, 34 Shutter button gP. 16, 36, 59 Strap ... Self-timer lamp gP. 61 Lens attachment mark gP. 12 Mount (Attach the lens after removing the body cap from the camera to prevent dust and dirt from entering the camera body.) Built-in flash gP. 75 Hot shoe gP. 77 # (Flash) button gP. 75 Y/j (Self-timer/Sequential shooting) button gP. 60...
Camera Mode dial gP. 4 White balance sensor gP. 104 SSWF indicator gP. 14, 122 Control dial (j) gP. 19, 34 Shutter button gP. 16, 36, 59 Strap ... Self-timer lamp gP. 61 Lens attachment mark gP. 12 Mount (Attach the lens after removing the body cap from the camera to prevent dust and dirt from entering the camera body.) Built-in flash gP. 75 Hot shoe gP. 77 # (Flash) button gP. 75 Y/j (Self-timer/Sequential shooting) button gP. 60...
E-600 Instruction Manual (English)
Page 4
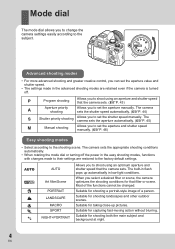
...-moving action without blurring. Advanced shooting modes • For more advanced shooting and greater creative control, you select a desired filter or scene, the camera optimizes the shooting conditions for shooting landscapes and other outdoor scenes. AUTO g i l & j / AUTO Art filter/Scene PORTRAIT LANDSCAPE MACRO SPORT...4 EN The built-in low-light conditions. Mode dial The mode dial allows you to shoot using an aperture and shutter speed that the camera sets. (gP. 43) A Aperture priority shooting Allows you to set the aperture and shutter speed manually. (gP. 46) Easy shooting ...
...-moving action without blurring. Advanced shooting modes • For more advanced shooting and greater creative control, you select a desired filter or scene, the camera optimizes the shooting conditions for shooting landscapes and other outdoor scenes. AUTO g i l & j / AUTO Art filter/Scene PORTRAIT LANDSCAPE MACRO SPORT...4 EN The built-in low-light conditions. Mode dial The mode dial allows you to shoot using an aperture and shutter speed that the camera sets. (gP. 43) A Aperture priority shooting Allows you to set the aperture and shutter speed manually. (gP. 46) Easy shooting ...
E-600 Instruction Manual (English)
Page 10
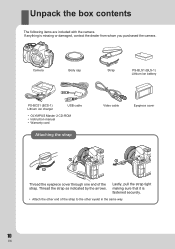
Unpack the box contents The following items are included with the camera. Thread the strap as indicated by the arrows. Camera Body cap Strap PS-BLS1 (BLS-1) Lithium ion battery PS-BCS1 (BCS-1) Lithium ion charger USB cable • OLYMPUS Master 2 CD-ROM • Instruction manual • Warranty card Attaching the strap Video cable... same way. 10 EN Lastly, pull the strap tight making sure that it is missing or damaged, contact the dealer from whom you purchased the camera. If anything is fastened securely. • Attach the other end of the strap.
Unpack the box contents The following items are included with the camera. Thread the strap as indicated by the arrows. Camera Body cap Strap PS-BLS1 (BLS-1) Lithium ion battery PS-BCS1 (BCS-1) Lithium ion charger USB cable • OLYMPUS Master 2 CD-ROM • Instruction manual • Warranty card Attaching the strap Video cable... same way. 10 EN Lastly, pull the strap tight making sure that it is missing or damaged, contact the dealer from whom you purchased the camera. If anything is fastened securely. • Attach the other end of the strap.
E-600 Instruction Manual (English)
Page 11
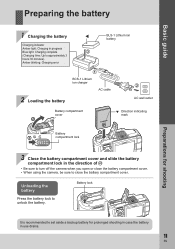
... battery for prolonged shooting in case the battery in the direction of E • Be sure to turn off the camera when you open or close the battery compartment cover. • When using the camera, be sure to close the battery compartment cover. Preparing the battery Basic guide 1 Charging the battery W BLS-1 Lithium...
... battery for prolonged shooting in case the battery in the direction of E • Be sure to turn off the camera when you open or close the battery compartment cover. • When using the camera, be sure to close the battery compartment cover. Preparing the battery Basic guide 1 Charging the battery W BLS-1 Lithium...
E-600 Instruction Manual (English)
Page 12
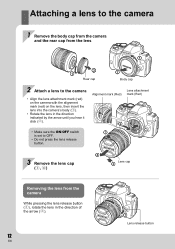
...cap 2 Body cap 2 Attach a lens to OFF. • Do not press the lens release button. Attaching a lens to the camera 1 Remove the body cap from the camera and the rear cap from the camera While pressing the lens release button (1), rotate the lens in the direction indicated by the arrow until you hear... it click (2). • Make sure the ON/OFF switch is set to the camera • Align the lens attachment mark (red) on the camera with the alignment mark (red) on the lens, then insert the lens into the camera's body (1). • Rotate the lens in the direction of the arrow (2). 12 EN...
...cap 2 Body cap 2 Attach a lens to OFF. • Do not press the lens release button. Attaching a lens to the camera 1 Remove the body cap from the camera and the rear cap from the camera While pressing the lens release button (1), rotate the lens in the direction indicated by the arrow until you hear... it click (2). • Make sure the ON/OFF switch is set to the camera • Align the lens attachment mark (red) on the camera with the alignment mark (red) on the lens, then insert the lens into the camera's body (1). • Rotate the lens in the direction of the arrow (2). 12 EN...
E-600 Instruction Manual (English)
Page 14
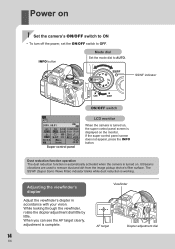
... working. If the super control panel screen does not appear, press the INFO button. Power on 1 Set the camera's ON/OFF switch to ON • To turn off the power, set the ON/OFF switch to AUTO. Viewfinder AF target Diopter adjustment dial 14 ...'s filter surface. SSWF SSWF indicator ON OFF ON/OFF switch AUTO 2009. 09.01 AF OFF arge Normal Super control panel LCD monitor When the camera is turned on the monitor. When you can see the AF target clearly, adjustment is displayed on , the super control panel screen is complete. Adjusting...
... working. If the super control panel screen does not appear, press the INFO button. Power on 1 Set the camera's ON/OFF switch to ON • To turn off the power, set the ON/OFF switch to AUTO. Viewfinder AF target Diopter adjustment dial 14 ...'s filter surface. SSWF SSWF indicator ON OFF ON/OFF switch AUTO 2009. 09.01 AF OFF arge Normal Super control panel LCD monitor When the camera is turned on the monitor. When you can see the AF target clearly, adjustment is displayed on , the super control panel screen is complete. Adjusting...
E-600 Instruction Manual (English)
Page 15
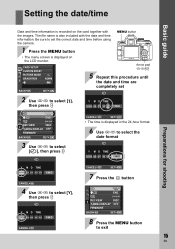
... NORM N BACK SET Arrow pad fghi 5 Repeat this procedure until the date and time are completely set the correct date and time before using the camera. s j±0 k±0 REC VIEW 5SEC cMENU DISPLAY OFF FIRMWARE BACK SET 8 Press the MENU button to select [d], then press i Y M D TIME 2009 09 01 14 00...
... NORM N BACK SET Arrow pad fghi 5 Repeat this procedure until the date and time are completely set the correct date and time before using the camera. s j±0 k±0 REC VIEW 5SEC cMENU DISPLAY OFF FIRMWARE BACK SET 8 Press the MENU button to select [d], then press i Y M D TIME 2009 09 01 14 00...
E-600 Instruction Manual (English)
Page 16
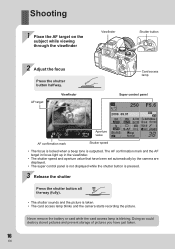
...value that have just taken. 16 EN Doing so could destroy stored pictures and prevent storage of pictures you have been set automatically by the camera are displayed. • The super control panel is not displayed while the shutter button is pressed. 3 Release the shutter Press the shutter button...AF confirmation mark Shutter speed • The focus is locked when a beep tone is taken. • The card access lamp blinks and the camera starts recording the picture. Never remove the battery or card while the card access lamp is blinking. Shooting 1 Place the AF target on the ...
...value that have just taken. 16 EN Doing so could destroy stored pictures and prevent storage of pictures you have been set automatically by the camera are displayed. • The super control panel is not displayed while the shutter button is pressed. 3 Release the shutter Press the shutter button...AF confirmation mark Shutter speed • The focus is locked when a beep tone is taken. • The card access lamp blinks and the camera starts recording the picture. Never remove the battery or card while the card access lamp is blinking. Shooting 1 Place the AF target on the ...

E-600 Instruction Manual (English)
Page 17
... and check the subject's composition, or shoot while viewing an enlarged display on the LCD monitor. If no operations are performed for shooting Holding the camera Keep your fingers and the strap away from the lens, flash, and the white balance sensor. g"Using live view" (P. 35) 1 Press the...to live view • The subject is possible to save battery power (when the super control panel is taken with the focus adjusted. The camera activates again when you touch any button (the shutter button, q button, etc.). Horizontal grip Vertical grip Taking a picture while viewing the ...
... and check the subject's composition, or shoot while viewing an enlarged display on the LCD monitor. If no operations are performed for shooting Holding the camera Keep your fingers and the strap away from the lens, flash, and the white balance sensor. g"Using live view" (P. 35) 1 Press the...to live view • The subject is possible to save battery power (when the super control panel is taken with the focus adjusted. The camera activates again when you touch any button (the shutter button, q button, etc.). Horizontal grip Vertical grip Taking a picture while viewing the ...
E-600 Instruction Manual (English)
Page 19
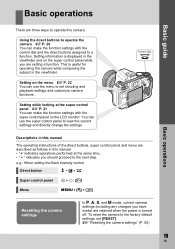
...while you should proceed to the factory default settings, set shooting and playback settings and customize camera functions. Setting information is turned off. Using the direct buttons to operate the camera gP. 20 You can make the function settings with the control dial and the direct ...buttons assigned to set [RESET]. Setting on the LCD monitor. To reset the camera to the next step. This is useful for operating the camera while composing the subject in this manual. • "+" indicates operations performed at the super control panel gP....
...while you should proceed to the factory default settings, set shooting and playback settings and customize camera functions. Setting information is turned off. Using the direct buttons to operate the camera gP. 20 You can make the function settings with the control dial and the direct ...buttons assigned to set [RESET]. Setting on the LCD monitor. To reset the camera to the next step. This is useful for operating the camera while composing the subject in this manual. • "+" indicates operations performed at the super control panel gP....
E-600 Instruction Manual (English)
Page 20
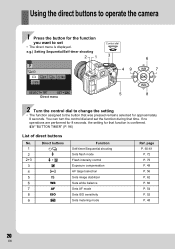
... target selection Sets image stabilizer Sets white balance Sets AF mode Sets ISO sensitivity Sets metering mode Ref. Using the direct buttons to operate the camera 1 Press the button for the function you want to the button that was pressed remains selected for approximately 8 seconds. e.g.) Setting Sequential/Self-timer shooting 21...
... target selection Sets image stabilizer Sets white balance Sets AF mode Sets ISO sensitivity Sets metering mode Ref. Using the direct buttons to operate the camera 1 Press the button for the function you want to the button that was pressed remains selected for approximately 8 seconds. e.g.) Setting Sequential/Self-timer shooting 21...
E-600 Instruction Manual (English)
Page 22
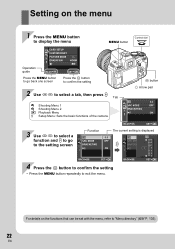
... set with the menu, refer to select a tab, then press i Tab W Shooting Menu 1 X Shooting Menu 2 q Playback Menu d Setup Menu: Sets the basic functions of the camera. For details on the menu 1 Press the MENU button to display the menu MENU button Control dial j Operation guide CARD SETUP CUSTOM RESET PICTURE MODE...
... set with the menu, refer to select a tab, then press i Tab W Shooting Menu 1 X Shooting Menu 2 q Playback Menu d Setup Menu: Sets the basic functions of the camera. For details on the menu 1 Press the MENU button to display the menu MENU button Control dial j Operation guide CARD SETUP CUSTOM RESET PICTURE MODE...
E-600 Instruction Manual (English)
Page 23
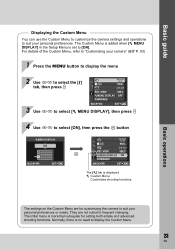
... personal preferences or needs. s j±0 k±0 REC VIEW 5SEC cMENU DISPLAY ON FIRMWARE BACK SET The [c] tab is more than adequate for customizing the camera to suit your camera" (gP. 93) 1 Press the MENU button to display the menu 2 Use fg to [ON]. Basic operations The settings on the Custom Menu are...
... personal preferences or needs. s j±0 k±0 REC VIEW 5SEC cMENU DISPLAY ON FIRMWARE BACK SET The [c] tab is more than adequate for customizing the camera to suit your camera" (gP. 93) 1 Press the MENU button to display the menu 2 Use fg to [ON]. Basic operations The settings on the Custom Menu are...
E-600 Instruction Manual (English)
Page 24
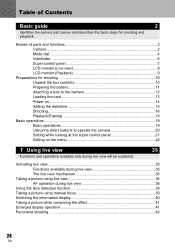
... names and describes the basic steps for shooting 10 Unpack the box contents 10 Preparing the battery 11 Attaching a lens to the camera 12 Loading the card 13 Power on ...14 Setting the date/time 15 Shooting ...16 Playback/Erasing 18 Basic operations ...19 Basic operations 19 ...Using the direct buttons to operate the camera 20 Setting while looking at the super control panel 21 Setting on the menu 22 1 Using live view 35 Functions and operations available only during...
... names and describes the basic steps for shooting 10 Unpack the box contents 10 Preparing the battery 11 Attaching a lens to the camera 12 Loading the card 13 Power on ...14 Setting the date/time 15 Shooting ...16 Playback/Erasing 18 Basic operations ...19 Basic operations 19 ...Using the direct buttons to operate the camera 20 Setting while looking at the super control panel 21 Setting on the menu 22 1 Using live view 35 Functions and operations available only during...
E-600 Instruction Manual (English)
Page 25
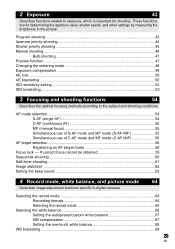
... lock ...50 AE bracketing ...50 ISO sensitivity setting 52 ISO bracketing ...53 3 Focusing and shooting functions 54 Describes the optimal focusing methods according to digital cameras.
... lock ...50 AE bracketing ...50 ISO sensitivity setting 52 ISO bracketing ...53 3 Focusing and shooting functions 54 Describes the optimal focusing methods according to digital cameras.

E-600 Instruction Manual (English)
Page 26
...language 91 s (Monitor brightness adjustment 91 REC VIEW 91 c MENU DISPLAY 91 FIRMWARE 92 Resetting the camera settings 92 8 Customizing your camera 93 Describes how to shoot with the Olympus wireless RC flash system 78 Using commercially available flashes 79 6 Playback functions 80 Describes the functions for... using the camera. R AF/MF ...93 LIVE VIEW AF MODE 93 26 AF ILLUMINAT 93 EN Flash mode setting ......
...language 91 s (Monitor brightness adjustment 91 REC VIEW 91 c MENU DISPLAY 91 FIRMWARE 92 Resetting the camera settings 92 8 Customizing your camera 93 Describes how to shoot with the Olympus wireless RC flash system 78 Using commercially available flashes 79 6 Playback functions 80 Describes the functions for... using the camera. R AF/MF ...93 LIVE VIEW AF MODE 93 26 AF ILLUMINAT 93 EN Flash mode setting ......
E-600 Instruction Manual (English)
Page 28
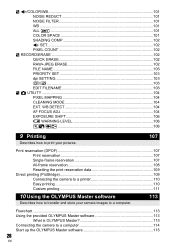
Flowchart ...113 Using the provided OLYMPUS Master software 113 What is OLYMPUS Master 113 Connecting the camera to a computer. X K/COLOR/WB...101 NOISE REDUCT 101 NOISE FILTER 101 WB ...101 ALL 101 COLOR SPACE 101 SHADING COMP 102 K SET...102 PIXEL COUNT... (DPOF 107 Print reservation 107 Single-frame reservation 107 All-frame reservation 108 Resetting the print reservation data 109 Direct printing (PictBridge 109 Connecting the camera to a printer 110 Easy printing 110 Custom printing 111 10 Using the OLYMPUS Master software 113 Describes how to transfer and store your...
Flowchart ...113 Using the provided OLYMPUS Master software 113 What is OLYMPUS Master 113 Connecting the camera to a computer. X K/COLOR/WB...101 NOISE REDUCT 101 NOISE FILTER 101 WB ...101 ALL 101 COLOR SPACE 101 SHADING COMP 102 K SET...102 PIXEL COUNT... (DPOF 107 Print reservation 107 Single-frame reservation 107 All-frame reservation 108 Resetting the print reservation data 109 Direct printing (PictBridge 109 Connecting the camera to a printer 110 Easy printing 110 Custom printing 111 10 Using the OLYMPUS Master software 113 Describes how to transfer and store your...
E-600 Instruction Manual (English)
Page 29
... on a computer 115 Downloading and saving images 115 Disconnecting the camera from your computer 115 Viewing still images 116 Transferring images to your charger abroad 125 Interchangeable lenses 126 ZUIKO DIGITAL interchangeable ...Battery and charger 125 Using your computer without using OLYMPUS Master 117 11 Shooting tips and maintenance Refer to this section for troubleshooting and camera maintenance information. 118 Shooting tips and information 118 Error codes ...120 Camera maintenance 122 Cleaning and storing the camera 122 Cleaning mode k Removing dust 123 Pixel mapping...
... on a computer 115 Downloading and saving images 115 Disconnecting the camera from your computer 115 Viewing still images 116 Transferring images to your charger abroad 125 Interchangeable lenses 126 ZUIKO DIGITAL interchangeable ...Battery and charger 125 Using your computer without using OLYMPUS Master 117 11 Shooting tips and maintenance Refer to this section for troubleshooting and camera maintenance information. 118 Shooting tips and information 118 Error codes ...120 Camera maintenance 122 Cleaning and storing the camera 122 Cleaning mode k Removing dust 123 Pixel mapping...
E-600 Instruction Manual (English)
Page 30
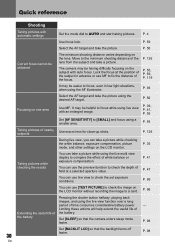
... Taking pictures while checking the results You can use MF to check the image on the lens. k P. 98 Set [BACKLIT LCD] so that the camera enters sleep mode faster. Move to check the depth of field at the position of the focus. P. 93 Taking pictures of the battery. P. 56 Correct... a picture while using the live multi view display to [SMALL] and focus using the live view to AUTO and start taking pictures. The camera may be obtained The minimum shooting distance varies depending on the LCD monitor without recording the image to focus while using the AF illuminator. P. ...
... Taking pictures while checking the results You can use MF to check the image on the lens. k P. 98 Set [BACKLIT LCD] so that the camera enters sleep mode faster. Move to check the depth of field at the position of the focus. P. 93 Taking pictures of the battery. P. 56 Correct... a picture while using the live multi view display to [SMALL] and focus using the live view to AUTO and start taking pictures. The camera may be obtained The minimum shooting distance varies depending on the LCD monitor without recording the image to focus while using the AF illuminator. P. ...

