
Camedia Master 4.1 Instruction Manual (4.9MB)
Page 47
...; Date and time of original data generation • Date and time of digital data generation • Exposure bias • Maximum lens aperture • Metering mode • Light source • Flash • Lens focal length • User comments • Supported Flashpix version • Color space information • Custom image processing • Exposure mode...
...; Date and time of original data generation • Date and time of digital data generation • Exposure bias • Maximum lens aperture • Metering mode • Light source • Flash • Lens focal length • User comments • Supported Flashpix version • Color space information • Custom image processing • Exposure mode...

Camedia Master 4.1 Instruction Manual (4.9MB)
Page 110
... edit an image Select the image you have taken shots extending in two directions (e.g. 2 by 2 images). • Perspective Use this to create a flat wide-angle lens perspective when you want to edit in the preview display area, and click the tool button [Edit] to open the image editing window. To delete...
... edit an image Select the image you have taken shots extending in two directions (e.g. 2 by 2 images). • Perspective Use this to create a flat wide-angle lens perspective when you want to edit in the preview display area, and click the tool button [Edit] to open the image editing window. To delete...
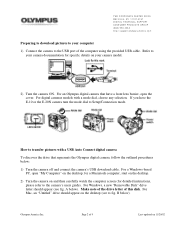
Auto-Connect USB Instructions for E-10 (English)
Page 2
...9 Last updated on the desktop (see fig. For a Windows-based PC, open the cover. Olympus America Inc. Page 2 of this disk. For an Olympus digital camera that represents the Olympus digital camera, follow the outlined procedures below: 1) Turn the camera off and connect the camera's USB... drive should appear (see to Setup/Connection mode. For Windows, a new "Removable Disk" drive letter should appear on 11/20/02 B below ). If you have a front lens barrier, open "My Computer" on your computer 1) Connect the camera to your camera model. 2) Turn the camera ON. ...
...9 Last updated on the desktop (see fig. For a Windows-based PC, open the cover. Olympus America Inc. Page 2 of this disk. For an Olympus digital camera that represents the Olympus digital camera, follow the outlined procedures below: 1) Turn the camera off and connect the camera's USB... drive should appear (see to Setup/Connection mode. For Windows, a new "Removable Disk" drive letter should appear on 11/20/02 B below ). If you have a front lens barrier, open "My Computer" on your computer 1) Connect the camera to your camera model. 2) Turn the camera ON. ...

E-20N Quick Start Guide (English)
Page 1
... OK button a Menu button i b Monitor button c Shutter button d Remote control receiver/self-timer lamp h e Strap eyelet f Battery compartment g Tripod socket h Lens i Quick reference (one memory card is installed in the camera, the card is restored. 5 Delete a picture. • With the frame that you want to...the menu button (a). S Shutter priority mode Camera sets the correct aperture for detailed descriptions of all the exciting features that the Olympus E-20 packs into the thinner slot closest to the back of the camera. On the arrow pad, press or to move the ...
... OK button a Menu button i b Monitor button c Shutter button d Remote control receiver/self-timer lamp h e Strap eyelet f Battery compartment g Tripod socket h Lens i Quick reference (one memory card is installed in the camera, the card is restored. 5 Delete a picture. • With the frame that you want to...the menu button (a). S Shutter priority mode Camera sets the correct aperture for detailed descriptions of all the exciting features that the Olympus E-20 packs into the thinner slot closest to the back of the camera. On the arrow pad, press or to move the ...
E-20N Quick Start Guide (English)
Page 2
... Menu has only 1 page. The Setup/Connection Mode Menu has only 2 pages. 1/2 Determines whether conversion lens is selected when marcro button is required. (Photoshop requires the Olympus RAW data plug-in the Instructions. When shooting in the Instructions. If you are not explained here or ... Important Points to Remember • If the camera is displayed. -or• If you are experimenting with the highlight at : http://olympus.com/digital/ OLYMPUS OPTICAL CO. (EUROPA) GMBH. Storage capacity of a 16MB and 32MB memory card The numbers of images per Card (Reference value) 16...
... Menu has only 1 page. The Setup/Connection Mode Menu has only 2 pages. 1/2 Determines whether conversion lens is selected when marcro button is required. (Photoshop requires the Olympus RAW data plug-in the Instructions. When shooting in the Instructions. If you are not explained here or ... Important Points to Remember • If the camera is displayed. -or• If you are experimenting with the highlight at : http://olympus.com/digital/ OLYMPUS OPTICAL CO. (EUROPA) GMBH. Storage capacity of a 16MB and 32MB memory card The numbers of images per Card (Reference value) 16...
E-20N Reference Manual (English)
Page 4
...and adjustments. • Viewfinder with a focusing screen which allows you can zoom on an area up to 20 cm (8 inches) from the lens of the camera. • Dual Scan Mode: Interlaced scan IS mode for highest pixel resolution, and Progressive scan PS mode for faster shutter speeds... of beautiful, natural color. • Highly acclaimed balance achieved with digital ESP metering, spot metering, and center weighted averaging metering, and a dual autofocusing system to cover low light and low contrast situations. • Noise Reduction mode allows to reduce noises on the shutter button. *2 The...
...and adjustments. • Viewfinder with a focusing screen which allows you can zoom on an area up to 20 cm (8 inches) from the lens of the camera. • Dual Scan Mode: Interlaced scan IS mode for highest pixel resolution, and Progressive scan PS mode for faster shutter speeds... of beautiful, natural color. • Highly acclaimed balance achieved with digital ESP metering, spot metering, and center weighted averaging metering, and a dual autofocusing system to cover low light and low contrast situations. • Noise Reduction mode allows to reduce noises on the shutter button. *2 The...

E-20N Reference Manual (English)
Page 6
...foreign matter difficult to remove with a blow brush, use a cleaning cloth, or lens tissue, intended only for use with camera lenses to prevent scratching the lens. • When the camera is not in use, cover the lens with the lens cap to its factory default. Monitor • Use a cleaning cloth or tissue ... with the movements of mold, excessive dust, etc. Avoid using the camera in areas exposed to clean the monitor. Caring for Your Camera Lens • Purchase a standard camera lens blow brush and use it to keep the camera stored in a case or bag when it is not in use.
...foreign matter difficult to remove with a blow brush, use a cleaning cloth, or lens tissue, intended only for use with camera lenses to prevent scratching the lens. • When the camera is not in use, cover the lens with the lens cap to its factory default. Monitor • Use a cleaning cloth or tissue ... with the movements of mold, excessive dust, etc. Avoid using the camera in areas exposed to clean the monitor. Caring for Your Camera Lens • Purchase a standard camera lens blow brush and use it to keep the camera stored in a case or bag when it is not in use.
E-20N Reference Manual (English)
Page 7
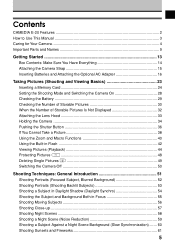
Contents CAMEDIA E-20 Features 2 How to Use This Manual ...3 Caring for Your Camera ...4 Important Parts and Names 9 Getting Started 13 Box Contents: Make Sure You Have Everything 14 ... On 28 Checking the Battery 29 Checking the Number of Storable Pictures 30 When the Number of Storable Pictures Is Not Displayed 32 Attaching the Lens Hood 33 Holding the Camera 34 Pushing the Shutter Button 36 If You Cannot Take a Picture 38 Using the Zoom and Macro Functions 40 Using...
Contents CAMEDIA E-20 Features 2 How to Use This Manual ...3 Caring for Your Camera ...4 Important Parts and Names 9 Getting Started 13 Box Contents: Make Sure You Have Everything 14 ... On 28 Checking the Battery 29 Checking the Number of Storable Pictures 30 When the Number of Storable Pictures Is Not Displayed 32 Attaching the Lens Hood 33 Holding the Camera 34 Pushing the Shutter Button 36 If You Cannot Take a Picture 38 Using the Zoom and Macro Functions 40 Using...

E-20N Reference Manual (English)
Page 9
...the Date and Time 134 Setting the Idle Time for the Sleep Mode 136 Restoring All Default Settings 138 Using an Optional Conversion Lens 139 Pixel Mapping ...142 Playing Back Images for Viewing 145 Displaying Image Information 146 Automatic Playback (Slide Show 148 Displaying Images ... Pictures on a Card for Printing 166 Setting Up Index Printing 168 Selecting Pictures for Date or Time Stamping 170 Printing with Olympus Printers 172 Transferring Pictures to a Computer 173 Transferring Images between the Camera and Computer via a Direct Connection ...174 Optional Devices for...
...the Date and Time 134 Setting the Idle Time for the Sleep Mode 136 Restoring All Default Settings 138 Using an Optional Conversion Lens 139 Pixel Mapping ...142 Playing Back Images for Viewing 145 Displaying Image Information 146 Automatic Playback (Slide Show 148 Displaying Images ... Pictures on a Card for Printing 166 Setting Up Index Printing 168 Selecting Pictures for Date or Time Stamping 170 Printing with Olympus Printers 172 Transferring Pictures to a Computer 173 Transferring Images between the Camera and Computer via a Direct Connection ...174 Optional Devices for...

E-20N Reference Manual (English)
Page 12
... control receiver/ self-timer lamp ➝ 121, 123 Strap eyelet ➝ 15 AF port ➝ 64 Quick reference (one touch) white balance button ➝ 105 Lens Battery compartment ➝ 17 Speaker Tripod socket 10 Note • To prevent damage or the loss of view. Erase button ➝ 49 Protect button ➝...
... control receiver/ self-timer lamp ➝ 121, 123 Strap eyelet ➝ 15 AF port ➝ 64 Quick reference (one touch) white balance button ➝ 105 Lens Battery compartment ➝ 17 Speaker Tripod socket 10 Note • To prevent damage or the loss of view. Erase button ➝ 49 Protect button ➝...
E-20N Reference Manual (English)
Page 13
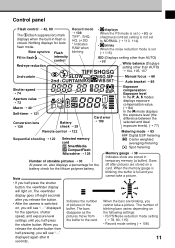
...-curtain Manual focus ➝ 68 Auto bracket ➝ 86 Shutter speed ➝ 74 Aperture value ➝ 72 Macro ➝ 40 Self-timer ➝ 121 Conversion lens ➝ 139 Battery check ➝ 29 Card error ➝ 199 Exposure compensation/ Exposure level In the P, A, S modes displays exposure compensation value. (➝ 84) In the...
...-curtain Manual focus ➝ 68 Auto bracket ➝ 86 Shutter speed ➝ 74 Aperture value ➝ 72 Macro ➝ 40 Self-timer ➝ 121 Conversion lens ➝ 139 Battery check ➝ 29 Card error ➝ 199 Exposure compensation/ Exposure level In the P, A, S modes displays exposure compensation value. (➝ 84) In the...

E-20N Reference Manual (English)
Page 16
... File Import Plug-in some regions) Reference Manual (Not provided in some regions) • Olympus RAW File Import Plug-in Installation Guide • Software CD The following are included: - Windows 98/98SE USB driver - Box Contents: Make Sure You Have ...Everything As you remove each item from the box, check it against the items described below to make sure that you purchased the camera. Lens cap Strap Camera Lens hood Video cable RM-1 remote control Lithium battery packs (CR-V3) USB cable • Customer registration card (Not provided in some regions) •...
... File Import Plug-in some regions) Reference Manual (Not provided in some regions) • Olympus RAW File Import Plug-in Installation Guide • Software CD The following are included: - Windows 98/98SE USB driver - Box Contents: Make Sure You Have ...Everything As you remove each item from the box, check it against the items described below to make sure that you purchased the camera. Lens cap Strap Camera Lens hood Video cable RM-1 remote control Lithium battery packs (CR-V3) USB cable • Customer registration card (Not provided in some regions) •...

E-20N Reference Manual (English)
Page 30
... for about 8 seconds. 28 LIGHT button (Lights the control panel) Setting the Shooting Mode and Switching the Camera On Switch the camera on. 1 If the lens cap is switched on the power switch is at the ON position. Press the latches inward and pull the cap off. 1 2 Turn the mode dial...
... for about 8 seconds. 28 LIGHT button (Lights the control panel) Setting the Shooting Mode and Switching the Camera On Switch the camera on. 1 If the lens cap is switched on the power switch is at the ON position. Press the latches inward and pull the cap off. 1 2 Turn the mode dial...

E-20N Reference Manual (English)
Page 35
... to the camera to the camera when the camera is Not Used White dot White arrow mark White dot White arrow mark Lens hood Align the white arrow on the lens hood with the white dot on the camera and then turn clockwise in the direction of the arrow until it stops... and you hear a click. Align the arrow on the lens hood with the white dot on the camera and then turn clockwise in the direction of the arrow until it stops and you hear a click...
... to the camera to the camera when the camera is Not Used White dot White arrow mark White dot White arrow mark Lens hood Align the white arrow on the lens hood with the white dot on the camera and then turn clockwise in the direction of the arrow until it stops... and you hear a click. Align the arrow on the lens hood with the white dot on the camera and then turn clockwise in the direction of the arrow until it stops and you hear a click...

E-20N Reference Manual (English)
Page 36
... own eyesight. If the AF target mark is blurry or otherwise difficult to physical shocks. Finger blocking AF port Finger blocking flash Finger blocking the lens 34 1 Adjust the viewfinder display for your sides. If the power is at the AF target mark in the ON position, the camera may have... will learn how to hold the camera when shooting pictures. Note • Do not subject the lens to see through the viewfinder? • Make sure that your fingers or the strap do not block the lens, built-in flash, or AF port. 3 Compose the picture in the illustration until the AF ...
... own eyesight. If the AF target mark is blurry or otherwise difficult to physical shocks. Finger blocking AF port Finger blocking flash Finger blocking the lens 34 1 Adjust the viewfinder display for your sides. If the power is at the AF target mark in the ON position, the camera may have... will learn how to hold the camera when shooting pictures. Note • Do not subject the lens to see through the viewfinder? • Make sure that your fingers or the strap do not block the lens, built-in flash, or AF port. 3 Compose the picture in the illustration until the AF ...

E-20N Reference Manual (English)
Page 37
...camera may have powered itself off. The picture that you take a picture at the OFF position, move to ON again. • Make sure that the lens cap has been removed. • After the camera is at Step 3 for a specified length of the monitor projects about 1 cm (0.3 in.) from ...OPEN Eyepiece shutter lever 3 OPEN 4 5 6 1 Press the monitor button . 2 You can also take will enter the sleep mode. Hold the camera carefully without blocking the lens, flash, or AF port with the monitor, lower the eyepiece shutter lever. The upper part of time, it to ON. If the power switch is...
...camera may have powered itself off. The picture that you take a picture at the OFF position, move to ON again. • Make sure that the lens cap has been removed. • After the camera is at Step 3 for a specified length of the monitor projects about 1 cm (0.3 in.) from ...OPEN Eyepiece shutter lever 3 OPEN 4 5 6 1 Press the monitor button . 2 You can also take will enter the sleep mode. Hold the camera carefully without blocking the lens, flash, or AF port with the monitor, lower the eyepiece shutter lever. The upper part of time, it to ON. If the power switch is...

E-20N Reference Manual (English)
Page 42
Zoom ring Zoom up (TELE) Zoom down (WIDE) Shooting close-ups of the subject (Macro) You can take close-up shots between 20 cm and 60 cm (approximately 8 in .) from the camera. While pressing the macro button , turn it to the right to enlarge the size of the ... a subject in the range ∞ 60 cm (approx. ∞ - 23.5 in . Autofocus can focus a subject in the range approx. 60 cm - 20 cm (approx. 23.5 in. - 8 in .) from the lens. 40 Twist the zoom ring to the left to reduce the size of the subject (W: wide-angle). and 23.5 in .) from the...
Zoom ring Zoom up (TELE) Zoom down (WIDE) Shooting close-ups of the subject (Macro) You can take close-up shots between 20 cm and 60 cm (approximately 8 in .) from the camera. While pressing the macro button , turn it to the right to enlarge the size of the ... a subject in the range ∞ 60 cm (approx. ∞ - 23.5 in . Autofocus can focus a subject in the range approx. 60 cm - 20 cm (approx. 23.5 in. - 8 in .) from the lens. 40 Twist the zoom ring to the left to reduce the size of the subject (W: wide-angle). and 23.5 in .) from the...

E-20N Reference Manual (English)
Page 43
... the zoom ring or focus ring while the card access lamp is set for wide angle, distortion could increase as you can approach up to 20 cm (approx. 8 in.) and shoot a subject about the size of a business card (approx. 76 x 57 mm) (3 x 2.3 in.) 2 Zoom Shooting Range Shooting Area Width x Height ... 629 x 465 mm (25 x 18.6 in.) 234 x 172 mm (9.4 x 6.9 in.) TELE Limit 60 cm (23.5 in.) 20 cm (8 in.) 176 x 132 mm (7 x 5.3 in.) 76 x 57 mm (3 x 2.3 in.) Note • If you use the Macro Extension Lens Pro (MCON-35), you bring the camera closer to 12 cm (approx. 4.8 in.). Shooting distance and...
... the zoom ring or focus ring while the card access lamp is set for wide angle, distortion could increase as you can approach up to 20 cm (approx. 8 in.) and shoot a subject about the size of a business card (approx. 76 x 57 mm) (3 x 2.3 in.) 2 Zoom Shooting Range Shooting Area Width x Height ... 629 x 465 mm (25 x 18.6 in.) 234 x 172 mm (9.4 x 6.9 in.) TELE Limit 60 cm (23.5 in.) 20 cm (8 in.) 176 x 132 mm (7 x 5.3 in.) 76 x 57 mm (3 x 2.3 in.) Note • If you use the Macro Extension Lens Pro (MCON-35), you bring the camera closer to 12 cm (approx. 4.8 in.). Shooting distance and...

E-20N Reference Manual (English)
Page 52
Switching the Camera Off Always switch the camera off . Press inward on the cap's latches, fit the cap over the lens, and then release the latches. (To remove the cap: Press on the latches and pull the cap off.) 2 Caution While the card access lamp is .... OFF ON 1 1 Move the power switch to reset all operation mode settings (date, time, etc.), could damage images already stored on the card. 2 Attach the lens cap.
Switching the Camera Off Always switch the camera off . Press inward on the cap's latches, fit the cap over the lens, and then release the latches. (To remove the cap: Press on the latches and pull the cap off.) 2 Caution While the card access lamp is .... OFF ON 1 1 Move the power switch to reset all operation mode settings (date, time, etc.), could damage images already stored on the card. 2 Attach the lens cap.

E-20N Reference Manual (English)
Page 53
By lighting a subject from the lens for detailed nature shots. 3 Night scenes. Subject against a night background, you can use slow shutter speeds in combination with lower ISO settings to experiment with .... By adjusting white balance and using a camera. Portraits (Backlit subjects). Subject in focus. Moving subjects. Sunsets and fireworks. You can shoot subjects as close as 20 cm from behind with a flash against a night scene background. Even with shooting night scenes or other dark subjects. After setting the camera in the macro...
By lighting a subject from the lens for detailed nature shots. 3 Night scenes. Subject against a night background, you can use slow shutter speeds in combination with lower ISO settings to experiment with .... By adjusting white balance and using a camera. Portraits (Backlit subjects). Subject in focus. Moving subjects. Sunsets and fireworks. You can shoot subjects as close as 20 cm from behind with a flash against a night scene background. Even with shooting night scenes or other dark subjects. After setting the camera in the macro...