
Camedia Master 4.1 Instruction Manual (4.9MB)
Page 2
... version 4.1 16 Main menu for Pro version 18 Changing the Background Color 20 Changing the My Album location 21 Quick Reference 22 Transferring Images 23 Transferring Images from a Camera 23 Connecting the camera to the computer (Windows 23 Connecting the camera to the computer (Macintosh 24 Transferring images 25 Transferring Images from Media 26...
... version 4.1 16 Main menu for Pro version 18 Changing the Background Color 20 Changing the My Album location 21 Quick Reference 22 Transferring Images 23 Transferring Images from a Camera 23 Connecting the camera to the computer (Windows 23 Connecting the camera to the computer (Macintosh 24 Transferring images 25 Transferring Images from Media 26...
Camedia Master 4.1 Instruction Manual (4.9MB)
Page 142
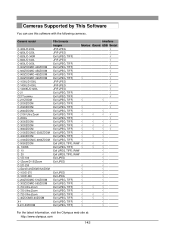
... This Software You can use this software with the following cameras. Camera model C-420L/D-220L C-820L/D-320L C-830L/D-340R C-840L/D-340L C-...2040ZOOM C-2100 Ultra Zoom C-2500L C-3000ZOOM C-3030ZOOM C-3040ZOOM C-3100ZOOM/C-3020ZOOM C-4040ZOOM C-4100ZOOM/C-4000ZOOM C-5050ZOOM E- 100RS E- 10 E- 20 C-1/D-100 C-1Zoom/D-150Zoom C-2/D-230 C-2Zoom/D-220ZOOM/D-520ZOOM C-100/D-370 C-120/D-380 C-200ZOOM/D-510ZOOM C-300ZOOM/D-550ZOOM C-700 Ultra Zoom C-720...; √ √ √ √ √ √ √ √ √ For the latest information, visit the Olympus web site at: http://www...
... This Software You can use this software with the following cameras. Camera model C-420L/D-220L C-820L/D-320L C-830L/D-340R C-840L/D-340L C-...2040ZOOM C-2100 Ultra Zoom C-2500L C-3000ZOOM C-3030ZOOM C-3040ZOOM C-3100ZOOM/C-3020ZOOM C-4040ZOOM C-4100ZOOM/C-4000ZOOM C-5050ZOOM E- 100RS E- 10 E- 20 C-1/D-100 C-1Zoom/D-150Zoom C-2/D-230 C-2Zoom/D-220ZOOM/D-520ZOOM C-100/D-370 C-120/D-380 C-200ZOOM/D-510ZOOM C-300ZOOM/D-550ZOOM C-700 Ultra Zoom C-720...; √ √ √ √ √ √ √ √ √ For the latest information, visit the Olympus web site at: http://www...
Camedia Master 4.1 Instruction Manual (4.9MB)
Page 143
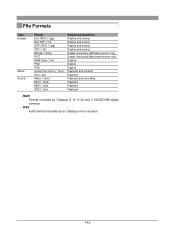
... only) Display and saving (Macintosh version only) Display Display Display Playback and creation Playback Playback and recording Playback Playback Playback • RAW Format recorded by Olympus E-10, E-20 and C-5050ZOOM digital cameras • DSS Audio format recorded by an...
... only) Display and saving (Macintosh version only) Display Display Display Playback and creation Playback Playback and recording Playback Playback Playback • RAW Format recorded by Olympus E-10, E-20 and C-5050ZOOM digital cameras • DSS Audio format recorded by an...

Camedia Master 4.1 Instruction Manual (4.9MB)
Page 146
...Album 52 saving images 27 Album display 35 Album window 31 Appendixes 141 Automatic panorama function 107 Automatic starting 15 B Background color, changing 20 Backing-up images 112 Basic operations 117 Blur 130 Brightness 130 Browse mode 34 Browsing images 31 C Calendar creating and printing 76 saving images... with the calendar 28 Cameras supported by this software 142 Closing the software 15 Connections Macintosh 24 serial cable 23, 24 USB cable 23, 24 Windows 23 Contact ...
...Album 52 saving images 27 Album display 35 Album window 31 Appendixes 141 Automatic panorama function 107 Automatic starting 15 B Background color, changing 20 Backing-up images 112 Basic operations 117 Blur 130 Brightness 130 Browse mode 34 Browsing images 31 C Calendar creating and printing 76 saving images... with the calendar 28 Cameras supported by this software 142 Closing the software 15 Connections Macintosh 24 serial cable 23, 24 USB cable 23, 24 Windows 23 Contact ...
Auto-Connect USB Instructions for E-10 (English)
Page 1
...to your computer. Type in d:\setup.exe where d: is a feature that allows an Olympus digital camera to emulate a disk drive when connected to the Software Installation Guide document included with the camera package. This feature makes it simple to copy the pictures to text box. For ...5) Choose OK to reboot the computer. Double-click on 11/20/02 com DOCUMENT NUMBER 2739 HOW TO DOWNLOAD PICTURES USING AN OLYMPUS USB AUTO CONNECT CAMERA Introduction USB Auto Connect is your CD-ROM drive. For camera software installation procedures, please refer to a computer. If you ...
...to your computer. Type in d:\setup.exe where d: is a feature that allows an Olympus digital camera to emulate a disk drive when connected to the Software Installation Guide document included with the camera package. This feature makes it simple to copy the pictures to text box. For ...5) Choose OK to reboot the computer. Double-click on 11/20/02 com DOCUMENT NUMBER 2739 HOW TO DOWNLOAD PICTURES USING AN OLYMPUS USB AUTO CONNECT CAMERA Introduction USB Auto Connect is your CD-ROM drive. For camera software installation procedures, please refer to a computer. If you ...
Auto-Connect USB Instructions for E-10 (English)
Page 2
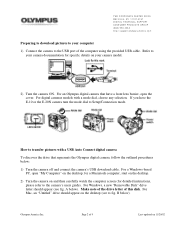
If you have a front lens barrier, open "My Computer" on the desktop (see fig. Olympus America Inc. For an Olympus digital camera that represents the Olympus digital camera, follow the outlined procedures below ). For Windows, a new "Removable Disk" drive letter should appear on the desktop; ...Connection mode. B below). for a Macintosh computer, start on the desktop. 2) Turn the camera on and then carefully watch the computer screen (for specific details on 11/20/02 TWO CORPORATE CENTER DRIVE MELVILLE, NY 11747-3157 DIGITAL TECHNICAL SUPPORT CONSUMER PRODUCTS GROUP (888...
If you have a front lens barrier, open "My Computer" on the desktop (see fig. Olympus America Inc. For an Olympus digital camera that represents the Olympus digital camera, follow the outlined procedures below ). For Windows, a new "Removable Disk" drive letter should appear on the desktop; ...Connection mode. B below). for a Macintosh computer, start on the desktop. 2) Turn the camera on and then carefully watch the computer screen (for specific details on 11/20/02 TWO CORPORATE CENTER DRIVE MELVILLE, NY 11747-3157 DIGITAL TECHNICAL SUPPORT CONSUMER PRODUCTS GROUP (888...
Auto-Connect USB Instructions for E-10 (English)
Page 3
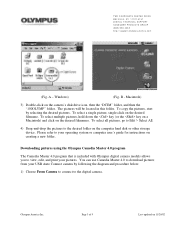
...key on a Macintosh) and click on 11/20/02 Page 3 of 9 Last updated on the desired filenames. B - To copy the pictures, start by following the diagram and procedure below: 1) Choose From Camera to connect to the digital camera. A - Please refer to view, edit, ..."DCIM" folder, and then the "100OLYMP" folder. Downloading pictures using the Olympus Camedia Master 4.0 program The Camedia Master 4.0 program that is included with Olympus digital camera models allows you to your pictures. Olympus America Inc. Macintosh) 3) Double-click on the desired filename. The pictures ...
...key on a Macintosh) and click on 11/20/02 Page 3 of 9 Last updated on the desired filenames. B - To copy the pictures, start by following the diagram and procedure below: 1) Choose From Camera to connect to the digital camera. A - Please refer to view, edit, ..."DCIM" folder, and then the "100OLYMP" folder. Downloading pictures using the Olympus Camedia Master 4.0 program The Camedia Master 4.0 program that is included with Olympus digital camera models allows you to your pictures. Olympus America Inc. Macintosh) 3) Double-click on the desired filename. The pictures ...
Auto-Connect USB Instructions for E-10 (English)
Page 7
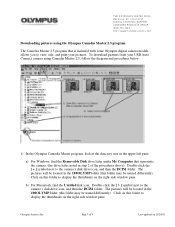
... letter under My Computer that is included with some Olympus digital camera models allows you to view, edit, and print your USB Auto Connect camera using the Olympus Camedia Master 2.5 program The Camedia Master 2.5 program that represents the camera. (the drive letter noted in the 100OLYMP folder ...(this folder to display the thumbnails on the right-side window pane. Olympus America Inc. To download pictures from your pictures. The pictures will be located in step 2 of 9 Last updated on 11/20/02 Click...
... letter under My Computer that is included with some Olympus digital camera models allows you to view, edit, and print your USB Auto Connect camera using the Olympus Camedia Master 2.5 program The Camedia Master 2.5 program that represents the camera. (the drive letter noted in the 100OLYMP folder ...(this folder to display the thumbnails on the right-side window pane. Olympus America Inc. To download pictures from your pictures. The pictures will be located in step 2 of 9 Last updated on 11/20/02 Click...
Auto-Connect USB Instructions for E-10 (English)
Page 8
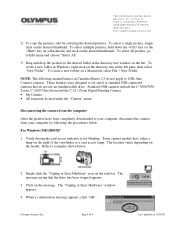
... select "New Folder". To create a new folder in Windows, right-click on 11/20/02 Verify that the drive has been stopped appears. 3. The message saying that media ...card access indicator is not blinking. Click on the task bar. Olympus America Inc. com 2) To copy the pictures, start by following menus/features in the ... were designed to examples shown below : For Windows ME/2000/XP 1. Some camera models have been completely downloaded to USB Auto Connect cameras. When a confirmation message appears, click "OK". NOTE: The following the procedures...
... select "New Folder". To create a new folder in Windows, right-click on 11/20/02 Verify that the drive has been stopped appears. 3. The message saying that media ...card access indicator is not blinking. Click on the task bar. Olympus America Inc. com 2) To copy the pictures, start by following menus/features in the ... were designed to examples shown below : For Windows ME/2000/XP 1. Some camera models have been completely downloaded to USB Auto Connect cameras. When a confirmation message appears, click "OK". NOTE: The following the procedures...

Auto-Connect USB Instructions for E-10 (English)
Page 9
...is not usually necessary. For Macintosh 1) Verify that media card access indicator is not usually necessary. Some camera models have either a lamp on the right of 9 Last updated on 11/20/02 The location varies depending on the desktop to "Trash". 3) Remove the USB cable from the... camera. You may also remove the USB cable from your computer, but this is not blinking. Page 9 of the viewfinder or a card access lamp. Refer to examples shown below. 2) Drag the "untitled" icon on the model. Remove the USB cable from the camera. Olympus America Inc. com...
...is not usually necessary. For Macintosh 1) Verify that media card access indicator is not usually necessary. Some camera models have either a lamp on the right of 9 Last updated on 11/20/02 The location varies depending on the desktop to "Trash". 3) Remove the USB cable from the... camera. You may also remove the USB cable from your computer, but this is not blinking. Page 9 of the viewfinder or a card access lamp. Refer to examples shown below. 2) Drag the "untitled" icon on the model. Remove the USB cable from the camera. Olympus America Inc. com...

E-20N Quick Start Guide (English)
Page 1
...viewfinder display. • If the AF target mark in the card until you want to take a few more pictures. 4 View the pictures that the Olympus E-20 packs into its notched corner down lightly on the card can be seen and points into the slot, then insert it with the... of all the exciting features that you have to playback . Press the button again to increase or decrease the 2digit number. A Aperture priority mode Camera sets the correct shutter speed for storing pictures. CompactFlash/Microdrive memory card selected. • If you which card is not sharp, turn the diopter ...
...viewfinder display. • If the AF target mark in the card until you want to take a few more pictures. 4 View the pictures that the Olympus E-20 packs into its notched corner down lightly on the card can be seen and points into the slot, then insert it with the... of all the exciting features that you have to playback . Press the button again to increase or decrease the 2digit number. A Aperture priority mode Camera sets the correct shutter speed for storing pictures. CompactFlash/Microdrive memory card selected. • If you which card is not sharp, turn the diopter ...

E-20N Reference Manual (English)
Page 2
... in Canada This Class B digital apparatus meets all requirements of their respective owners. • The standards for camera file systems referred to comply with FCC standards FOR HOME OR OFFICE USE This device complies with the European requirements for... is a registered trademark of International Business Machines Corporation. • Microsoft and Windows are registered trademarks of Conformity Model Number : E-20 Trade Name : OLYMPUS Responsible party : Olympus America Inc. "CE" mark cameras are the "Design Rule for safety, health, environment and customer protection.
... in Canada This Class B digital apparatus meets all requirements of their respective owners. • The standards for camera file systems referred to comply with FCC standards FOR HOME OR OFFICE USE This device complies with the European requirements for... is a registered trademark of International Business Machines Corporation. • Microsoft and Windows are registered trademarks of Conformity Model Number : E-20 Trade Name : OLYMPUS Responsible party : Olympus America Inc. "CE" mark cameras are the "Design Rule for safety, health, environment and customer protection.
E-20N Reference Manual (English)
Page 4
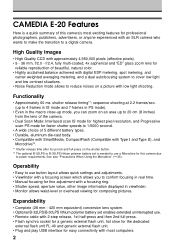
... See also "Precautions When Using the Microdirve" (© 26). sequence shooting at 2.2 frames/sec. (up to 20 cm (8 inches) from the lens of the camera. • Dual Scan Mode: Interlaced scan IS mode for highest pixel resolution, and Progressive scan PS mode for faster shutter speeds to ...1/5000 second. • A wide choice of this camera due to a digital camera. CAMEDIA E-20 Features Here is needed to use ....
... See also "Precautions When Using the Microdirve" (© 26). sequence shooting at 2.2 frames/sec. (up to 20 cm (8 inches) from the lens of the camera. • Dual Scan Mode: Interlaced scan IS mode for highest pixel resolution, and Progressive scan PS mode for faster shutter speeds to ...1/5000 second. • A wide choice of this camera due to a digital camera. CAMEDIA E-20 Features Here is needed to use ....
E-20N Reference Manual (English)
Page 7
Contents CAMEDIA E-20 Features 2 How to Use This Manual ...3 Caring for Your Camera ...4 Important Parts and Names 9 Getting Started 13 Box Contents: Make Sure You Have Everything 14 Attaching the Camera Strap 15 Inserting Batteries and Attaching the Optional AC Adapter 16 Taking ... 40 Using the Built-in Flash 42 Viewing Pictures (Playback 44 Protecting Pictures 48 Deleting Single Pictures 49 Switching the Camera Off 50 Shooting Techniques: General Introduction 51 Shooting Portraits (Focused Subject, Blurred Background 52 Shooting Portraits (Shooting Backlit Subjects...
Contents CAMEDIA E-20 Features 2 How to Use This Manual ...3 Caring for Your Camera ...4 Important Parts and Names 9 Getting Started 13 Box Contents: Make Sure You Have Everything 14 Attaching the Camera Strap 15 Inserting Batteries and Attaching the Optional AC Adapter 16 Taking ... 40 Using the Built-in Flash 42 Viewing Pictures (Playback 44 Protecting Pictures 48 Deleting Single Pictures 49 Switching the Camera Off 50 Shooting Techniques: General Introduction 51 Shooting Portraits (Focused Subject, Blurred Background 52 Shooting Portraits (Shooting Backlit Subjects...
E-20N Reference Manual (English)
Page 22
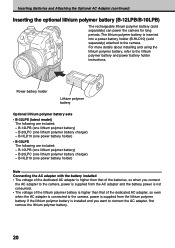
...(sold separately) attached to connect the AC adapter, first remove the lithium polymer battery. 20 For more details about installing and using the lithium polymer battery, refer to the camera, power is supplied from the AC adapter and the battery power is not consumed. &#...(one lithium polymer battery charger) - If the lithium polymer battery is inserted into a power battery holder (B-HLD10) (sold separately) can power the camera for long periods. B-10LPB (one lithium polymer battery) - B-12LPB (one lithium polymer battery) - The lithium polymer battery is installed and you ...
...(sold separately) attached to connect the AC adapter, first remove the lithium polymer battery. 20 For more details about installing and using the lithium polymer battery, refer to the camera, power is supplied from the AC adapter and the battery power is not consumed. &#...(one lithium polymer battery charger) - If the lithium polymer battery is inserted into a power battery holder (B-HLD10) (sold separately) can power the camera for long periods. B-10LPB (one lithium polymer battery) - B-12LPB (one lithium polymer battery) - The lithium polymer battery is installed and you ...

E-20N Reference Manual (English)
Page 42
... mark in the control panel or the viewfinder. Autofocus can focus a subject in the range ∞ 60 cm (approx. ∞ - 23.5 in .) from the camera. While pressing the macro button , turn it to the right to enlarge the size of the subject (T: telephoto), or turn the main dial or sub... wide-angle). Control panel not displayed displayed Macro button Main dial Autofocus can focus a subject in the range approx. 60 cm - 20 cm (approx. 23.5 in. - 8 in .) from the camera. and 23.5 in the viewfinder. Twist the zoom ring to the left to reduce the size of the subject in .) from the...
... mark in the control panel or the viewfinder. Autofocus can focus a subject in the range ∞ 60 cm (approx. ∞ - 23.5 in .) from the camera. While pressing the macro button , turn it to the right to enlarge the size of the subject (T: telephoto), or turn the main dial or sub... wide-angle). Control panel not displayed displayed Macro button Main dial Autofocus can focus a subject in the range approx. 60 cm - 20 cm (approx. 23.5 in. - 8 in .) from the camera. and 23.5 in the viewfinder. Twist the zoom ring to the left to reduce the size of the subject in .) from the...

E-20N Reference Manual (English)
Page 43
...distortion could increase as you can shoot a picture 49 (W) x 37 (H) mm (approx. 2 (W) x 1.5 (H) in .). At this distance, when the camera is set for the TELE limit, you can approach up to 20 cm (approx. 8 in.) and shoot a subject about the size of a business card (approx. 76 x 57 mm) (3 x 2.3 in.) 2 Zoom ....) 234 x 172 mm (9.4 x 6.9 in.) TELE Limit 60 cm (23.5 in.) 20 cm (8 in.) 176 x 132 mm (7 x 5.3 in.) 76 x 57 mm (3 x 2.3 in.) Note • If you use the Macro Extension Lens Pro (MCON-35), you bring the camera closer to 12 cm (approx. 4.8 in .). • If you turn the zoom ring...
...distortion could increase as you can shoot a picture 49 (W) x 37 (H) mm (approx. 2 (W) x 1.5 (H) in .). At this distance, when the camera is set for the TELE limit, you can approach up to 20 cm (approx. 8 in.) and shoot a subject about the size of a business card (approx. 76 x 57 mm) (3 x 2.3 in.) 2 Zoom ....) 234 x 172 mm (9.4 x 6.9 in.) TELE Limit 60 cm (23.5 in.) 20 cm (8 in.) 176 x 132 mm (7 x 5.3 in.) 76 x 57 mm (3 x 2.3 in.) Note • If you use the Macro Extension Lens Pro (MCON-35), you bring the camera closer to 12 cm (approx. 4.8 in .). • If you turn the zoom ring...

E-20N Reference Manual (English)
Page 45
TELE (TELE Limit) AUTO 0.6 (2 ft.) - 8.9 m (29.4 ft.) 0.5 (1.7 ft.) - 7.4 m (24.4 ft.) 80 0.6 (2 ft.) - 6.3 m (20.8 ft.) 0.5 (1.7 ft.) - 5.2 m (17.2 ft.) 2 160 0.9*1 (3 ft.) - 8.9 m (29.4 ft.) 0.7*2 (2.3 ft.) - 7.4 m (24.4 ft.) 320 1.3*1 (4.3 ft.) - 12.5 m (41.3 ft.) 1.0*2 (3.3 ft.) - 10.4 m (34.3 ft.) *1 Range ...Priority) mode and stop the aperture size down to 6.3 or higher. *2 Range starts at any shutter speed. These attachments will be set the camera to the A (Aperture Priority) mode and stop the aperture size down to appear grainy. WIDE (WIDE Limit) Max. You may be too ...
TELE (TELE Limit) AUTO 0.6 (2 ft.) - 8.9 m (29.4 ft.) 0.5 (1.7 ft.) - 7.4 m (24.4 ft.) 80 0.6 (2 ft.) - 6.3 m (20.8 ft.) 0.5 (1.7 ft.) - 5.2 m (17.2 ft.) 2 160 0.9*1 (3 ft.) - 8.9 m (29.4 ft.) 0.7*2 (2.3 ft.) - 7.4 m (24.4 ft.) 320 1.3*1 (4.3 ft.) - 12.5 m (41.3 ft.) 1.0*2 (3.3 ft.) - 10.4 m (34.3 ft.) *1 Range ...Priority) mode and stop the aperture size down to 6.3 or higher. *2 Range starts at any shutter speed. These attachments will be set the camera to the A (Aperture Priority) mode and stop the aperture size down to appear grainy. WIDE (WIDE Limit) Max. You may be too ...

E-20N Reference Manual (English)
Page 53
...of creativity in your color pictures. Portraits (Backlit subjects). Subject and background both in the macro mode, you can shoot subjects as close as 20 cm from behind with shooting night scenes or other dark subjects. Night scenes (Noise Reduction). Subject against a night background, you can use ... a fast shutter speed to capture fast moving subjects sharply frozen in time, or set the camera in the noise reduction mode to reduce noise and achieve a more attractive image. After setting the camera in focus. When you need to increase the exposure time, set a slow shutter speed and...
...of creativity in your color pictures. Portraits (Backlit subjects). Subject and background both in the macro mode, you can shoot subjects as close as 20 cm from behind with shooting night scenes or other dark subjects. Night scenes (Noise Reduction). Subject against a night background, you can use ... a fast shutter speed to capture fast moving subjects sharply frozen in time, or set the camera in the noise reduction mode to reduce noise and achieve a more attractive image. After setting the camera in focus. When you need to increase the exposure time, set a slow shutter speed and...
E-20N Reference Manual (English)
Page 59
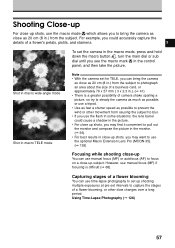
... the macro mode, press and hold down the macro button , turn the main dial or sub dial until you to bring the camera as close as 20 cm (8 in.) from the subject. Using Time-Lapse Photography (© 126) 57 Shooting Close-up For close-up shots, use the macro mode which allows..., and then take the picture. Shot in macro wide-angle mode Shot in macro TELE mode Note • With the camera set for TELE, you can bring the camera as close as 20 cm (8 in.) from the subject to blur. • If you use manual focus (MF) if focusing is difficult (© 68...
... the macro mode, press and hold down the macro button , turn the main dial or sub dial until you to bring the camera as close as 20 cm (8 in.) from the subject. Using Time-Lapse Photography (© 126) 57 Shooting Close-up For close-up shots, use the macro mode which allows..., and then take the picture. Shot in macro wide-angle mode Shot in macro TELE mode Note • With the camera set for TELE, you can bring the camera as close as 20 cm (8 in.) from the subject to blur. • If you use manual focus (MF) if focusing is difficult (© 68...
