
Auto-Connect USB Instructions for E-10 (English)
Page 1
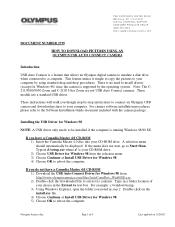
...AutoConnDriv_Win98SE.exe. 2) Double-click the downloaded file to reboot the computer. Note: The C211/3000/3030 Zoom and C-2100 Ultra Zoom are not USB Auto Connect cameras. Olympus America Inc. This feature makes it simple to copy the pictures to be displayed. For camera software ...Choose Continue at Install USB Driver for Windows 98. 4) Choose OK to extract its contents. If you though step-by-step instructions to connect an Olympus USB camera and download pictures to a computer. Installing the USB Driver for Windows 98 from the selection menu. 3) Choose Continue...
...AutoConnDriv_Win98SE.exe. 2) Double-click the downloaded file to reboot the computer. Note: The C211/3000/3030 Zoom and C-2100 Ultra Zoom are not USB Auto Connect cameras. Olympus America Inc. This feature makes it simple to copy the pictures to be displayed. For camera software ...Choose Continue at Install USB Driver for Windows 98. 4) Choose OK to extract its contents. If you though step-by-step instructions to connect an Olympus USB camera and download pictures to a computer. Installing the USB Driver for Windows 98 from the selection menu. 3) Choose Continue...
Auto-Connect USB Instructions for E-10 (English)
Page 2
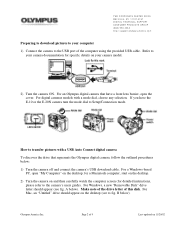
... B below ). For Mac, an "Untitled" drive should appear (see to the camera's users guide). Refer to your camera documentation for detailed instructions, please refer to fig. for a Macintosh computer, start on the desktop. 2) Turn the camera on and then carefully watch the computer screen ...'s USB download cable. If you have a front lens barrier, open "My Computer" on your computer 1) Connect the camera to Setup/Connection mode. Olympus America Inc. Page 2 of 9 Last updated on the desktop (see fig. A below ). TWO CORPORATE CENTER DRIVE MELVILLE, NY 11747-3157 DIGITAL...
... B below ). For Mac, an "Untitled" drive should appear (see to the camera's users guide). Refer to your camera documentation for detailed instructions, please refer to fig. for a Macintosh computer, start on the desktop. 2) Turn the camera on and then carefully watch the computer screen ...'s USB download cable. If you have a front lens barrier, open "My Computer" on your computer 1) Connect the camera to Setup/Connection mode. Olympus America Inc. Page 2 of 9 Last updated on the desktop (see fig. A below ). TWO CORPORATE CENTER DRIVE MELVILLE, NY 11747-3157 DIGITAL...
Auto-Connect USB Instructions for E-10 (English)
Page 3
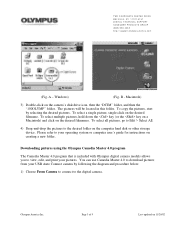
...Please refer to download pictures from your pictures. You can use Camedia Master 4.0 to your operating system or computer user's guide for instructions on the desired filename. Windows) (Fig. To copy the pictures, start by following the diagram and procedure below: 1) Choose From...on the desired filenames. Macintosh) 3) Double-click on 11/20/02 Olympus America Inc. B - Downloading pictures using the Olympus Camedia Master 4.0 program The Camedia Master 4.0 program that is included with Olympus digital camera models allows you to view, edit, and print your USB...
...Please refer to download pictures from your pictures. You can use Camedia Master 4.0 to your operating system or computer user's guide for instructions on the desired filename. Windows) (Fig. To copy the pictures, start by following the diagram and procedure below: 1) Choose From...on the desired filenames. Macintosh) 3) Double-click on 11/20/02 Olympus America Inc. B - Downloading pictures using the Olympus Camedia Master 4.0 program The Camedia Master 4.0 program that is included with Olympus digital camera models allows you to view, edit, and print your USB...

D-510 Zoom Instruction Manual
Page 21
... the Card Card Basics What is the type of the card. 11 Getting Started Compatible SmartMedia cards • Provided 8 MB standard card. 1 • Optional Olympus 4 MB/8 MB/16 MB/ 32 MB/64 MB/128 MB cards • Market-available 3V (3.3V) card 4 MB/8 MB/16 MB/32 MB/64...anti-electrostatic case for storage or transportation. • Do not bend, drop, or apply any physical shock to the card. • Read the provided SmartMedia instruction manual carefully. • Do not touch the contact area of memory card this camera uses. Storing temperature: -20°C to 65°C (-4°F ...
... the Card Card Basics What is the type of the card. 11 Getting Started Compatible SmartMedia cards • Provided 8 MB standard card. 1 • Optional Olympus 4 MB/8 MB/16 MB/ 32 MB/64 MB/128 MB cards • Market-available 3V (3.3V) card 4 MB/8 MB/16 MB/32 MB/64...anti-electrostatic case for storage or transportation. • Do not bend, drop, or apply any physical shock to the card. • Read the provided SmartMedia instruction manual carefully. • Do not touch the contact area of memory card this camera uses. Storing temperature: -20°C to 65°C (-4°F ...

D-510 Zoom Instruction Manual
Page 45
Chapter 3 explains how to check all of the pictures you have taken together once you want to use. 35 3 Playing Images Back The previous chapter explained how to your television set for convenient playback. Once you've taken a few shots with the camera according to the instructions in Chapter 2, read the following section "Getting Started", then refer to the appropriate pages to start learning about the playback functions you are finished shooting, as well functions like connecting the camera to take still pictures and check them immediately.
Chapter 3 explains how to check all of the pictures you have taken together once you want to use. 35 3 Playing Images Back The previous chapter explained how to your television set for convenient playback. Once you've taken a few shots with the camera according to the instructions in Chapter 2, read the following section "Getting Started", then refer to the appropriate pages to start learning about the playback functions you are finished shooting, as well functions like connecting the camera to take still pictures and check them immediately.

D-510 Zoom Instruction Manual
Page 52
... the other end into the video IN jack on the television. 3 Turn on the television, and set 4 to "video input." • Refer to your television instructions manual for further 3 information. 4 Press the monitor button ( ) on the camera. • Power turns on in playback mode, and the last image taken is displayed...
... the other end into the video IN jack on the television. 3 Turn on the television, and set 4 to "video input." • Refer to your television instructions manual for further 3 information. 4 Press the monitor button ( ) on the camera. • Power turns on in playback mode, and the last image taken is displayed...

D-510 Zoom Instruction Manual
Page 53
... as the power source for the camera. 3 • Pictures that have been taken with the camera held vertically can be saved to your TV/VCR instruction manual for easier viewing (p.112). center on the television screen. • Your television may produce a black frame around the picture, which may appear off- Playing...
... as the power source for the camera. 3 • Pictures that have been taken with the camera held vertically can be saved to your TV/VCR instruction manual for easier viewing (p.112). center on the television screen. • Your television may produce a black frame around the picture, which may appear off- Playing...

D-510 Zoom Instruction Manual
Page 84
... area. SPOT (Spot metering): Adjust the light metering at the center only. The center will make the subject appear too dark. For operating instructions see "Using the Shooting Menu" (p.72). The CANCEL Settings: SET ESP SPOT CANCEL Monitor SET OK HQ ESP (Digital ESP metering): This ...setting when the power is turned on an average of the image area. Shooting Group Menu Items: CAM [ ESP ] [ 0.0 ] ISO [ AUTO ] DIGITAL ZOOM [ OFF ] PANORAMA Press ୴ to highlight " setting screen will be calculated based on . ". Exposure will be biased to spot metering makes the spot ...
... area. SPOT (Spot metering): Adjust the light metering at the center only. The center will make the subject appear too dark. For operating instructions see "Using the Shooting Menu" (p.72). The CANCEL Settings: SET ESP SPOT CANCEL Monitor SET OK HQ ESP (Digital ESP metering): This ...setting when the power is turned on an average of the image area. Shooting Group Menu Items: CAM [ ESP ] [ 0.0 ] ISO [ AUTO ] DIGITAL ZOOM [ OFF ] PANORAMA Press ୴ to highlight " setting screen will be calculated based on . ". Exposure will be biased to spot metering makes the spot ...
D-510 Zoom Instruction Manual
Page 86
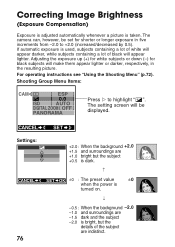
Shooting Group Menu Items: CAM [ ESP ] [ 0.0 ] ISO [ AUTO ] DIGITAL ZOOM [ OFF ] PANORAMA Press ୴ to +2.0 (increased/decreased by 0.5). Correcting Image Brightness (Exposure Compensation) Exposure is adjusted automatically whenever a picture is...the exposure up (+) for white subjects or down (-) for shorter or longer exposure in the resulting picture. The camera can, however, be displayed. For operating instructions see "Using the Shooting Menu" (p.72). If automatic exposure is taken. CANCEL SET Settings: 0 +2.0 : When the background +2.0 +1.5 and surroundings are +1.0...
Shooting Group Menu Items: CAM [ ESP ] [ 0.0 ] ISO [ AUTO ] DIGITAL ZOOM [ OFF ] PANORAMA Press ୴ to +2.0 (increased/decreased by 0.5). Correcting Image Brightness (Exposure Compensation) Exposure is adjusted automatically whenever a picture is...the exposure up (+) for white subjects or down (-) for shorter or longer exposure in the resulting picture. The camera can, however, be displayed. For operating instructions see "Using the Shooting Menu" (p.72). If automatic exposure is taken. CANCEL SET Settings: 0 +2.0 : When the background +2.0 +1.5 and surroundings are +1.0...

D-510 Zoom Instruction Manual
Page 88
Shooting Group Menu Items: CAM [ ESP ] [ 0.0 ] ISO [ AUTO ] DIGITAL ZOOM [ OFF ] PANORAMA Press ୴ to set . High sensitivity: This setting is ideal for 400 fast-moving subjects and low light conditions, but the resulting images ... setting is the best choice, always check the recorded image by playing it back on the brightness of pictures it is turned on. For operating instructions see "Using the Shooting Menu" (p.72).
Shooting Group Menu Items: CAM [ ESP ] [ 0.0 ] ISO [ AUTO ] DIGITAL ZOOM [ OFF ] PANORAMA Press ୴ to set . High sensitivity: This setting is ideal for 400 fast-moving subjects and low light conditions, but the resulting images ... setting is the best choice, always check the recorded image by playing it back on the brightness of pictures it is turned on. For operating instructions see "Using the Shooting Menu" (p.72).

D-510 Zoom Instruction Manual
Page 90
... provide enough magnification, use the digital zoom function to increase magnification to up to highlight "DIGITAL ZOOM". Within the digital zoom range (3x - 9x), image quality becomes grainy. For operating instructions see "Using the Shooting Menu" (p.72). The setting screen will illuminate. ON: 3x zoom uses optical zoom only, with zooms 3x to "ON", the monitor will...
... provide enough magnification, use the digital zoom function to increase magnification to up to highlight "DIGITAL ZOOM". Within the digital zoom range (3x - 9x), image quality becomes grainy. For operating instructions see "Using the Shooting Menu" (p.72). The setting screen will illuminate. ON: 3x zoom uses optical zoom only, with zooms 3x to "ON", the monitor will...

D-510 Zoom Instruction Manual
Page 92
Shooting Group Menu Items: CAM [ ESP ] [ 0.0 ] ISO [ AUTO ] DIGITAL ZOOM [ OFF ] PANORAMA CANCEL GO Highlight "PANORAMA" and press ୴. The direction in the panorama will be displayed. Take the current shot, then move camera to .... 2 Use the arrow pad to set the panorama arrow to point toward the next panorama stitch. ୴: Connect to shoot panoramic shots easily. For operating instructions see "Using the Shooting Menu" (p.72). Taking Panoramic shots Select "PANORAMA", then press ୴. With multiple images in which the frames will be displayed on...
Shooting Group Menu Items: CAM [ ESP ] [ 0.0 ] ISO [ AUTO ] DIGITAL ZOOM [ OFF ] PANORAMA CANCEL GO Highlight "PANORAMA" and press ୴. The direction in the panorama will be displayed. Take the current shot, then move camera to .... 2 Use the arrow pad to set the panorama arrow to point toward the next panorama stitch. ୴: Connect to shoot panoramic shots easily. For operating instructions see "Using the Shooting Menu" (p.72). Taking Panoramic shots Select "PANORAMA", then press ୴. With multiple images in which the frames will be displayed on...

D-510 Zoom Instruction Manual
Page 95
... it back on the monitor. 85 Adjusting the Color Tone (White Balance) This camera uses auto white balance to lighting or weather conditions. For operation instructions see "Using the Shooting Menu" (p.72). In such cases, change the white balance settings.
... it back on the monitor. 85 Adjusting the Color Tone (White Balance) This camera uses auto white balance to lighting or weather conditions. For operation instructions see "Using the Shooting Menu" (p.72). In such cases, change the white balance settings.

D-510 Zoom Instruction Manual
Page 97
... of pictures that can be selected depending on whether you to "HQ". 87 Selecting higher image resolutions will result in the camera (p.21). For operating instructions see "Using the Shooting Menu" (p.72). Image Group Menu Items: PIC WB [ AUTO ] [ HQ ] Press ୴ to play back the picture. Also, the higher the...
... of pictures that can be selected depending on whether you to "HQ". 87 Selecting higher image resolutions will result in the camera (p.21). For operating instructions see "Using the Shooting Menu" (p.72). Image Group Menu Items: PIC WB [ AUTO ] [ HQ ] Press ୴ to play back the picture. Also, the higher the...
D-510 Zoom Instruction Manual
Page 100
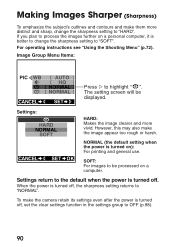
... settings function in the settings group to "NORMAL". To make the image appear too rough or harsh. SOFT: For images to be displayed. For operating instructions see "Using the Shooting Menu" (p.72).
... settings function in the settings group to "NORMAL". To make the image appear too rough or harsh. SOFT: For images to be displayed. For operating instructions see "Using the Shooting Menu" (p.72).

D-510 Zoom Instruction Manual
Page 101
... be processed further using a personal computer. 91 Image Group Menu Items: PIC WB [ AUTO ] [ HQ ] [ NORMAL ] [ NORMAL ] Press ୴ to become too black. For operating instructions see "Using the Shooting Menu" (p.72). CANCEL SET OK NORMAL (the default mode when the power is better to set the camera's contrast to "HIGH".
... be processed further using a personal computer. 91 Image Group Menu Items: PIC WB [ AUTO ] [ HQ ] [ NORMAL ] [ NORMAL ] Press ୴ to become too black. For operating instructions see "Using the Shooting Menu" (p.72). CANCEL SET OK NORMAL (the default mode when the power is better to set the camera's contrast to "HIGH".

D-510 Zoom Instruction Manual
Page 103
... CANCEL SET Settings: REC VIEW OFF ON OFF (default setting): When the monitor is on, it is being seen through the camera's lens. For operating instructions see "Using the Shooting Menu" (p.72). The setting screen [ RESET ] will go off again. 93 Image Group Menu Items: REC VIEW [ OFF ] Press ୴ to...
... CANCEL SET Settings: REC VIEW OFF ON OFF (default setting): When the monitor is on, it is being seen through the camera's lens. For operating instructions see "Using the Shooting Menu" (p.72). The setting screen [ RESET ] will go off again. 93 Image Group Menu Items: REC VIEW [ OFF ] Press ୴ to...

D-510 Zoom Instruction Manual
Page 105
For operating instructions see "Using the Shooting Menu" (p.72). Advanced Shooting Techniques 95 It is possible to 0001 for the next file, a new folder with the letters A, B and C, ...
For operating instructions see "Using the Shooting Menu" (p.72). Advanced Shooting Techniques 95 It is possible to 0001 for the next file, a new folder with the letters A, B and C, ...

D-510 Zoom Instruction Manual
Page 108
Those items marked with a ̅ can be set by the Playback Menu. For operating instructions see "Using the Shooting Menu" (p.72). The setting screen will cause all settings marked with ć hold the last setting used. 98 RESET (default setting): ...
Those items marked with a ̅ can be set by the Playback Menu. For operating instructions see "Using the Shooting Menu" (p.72). The setting screen will cause all settings marked with ć hold the last setting used. 98 RESET (default setting): ...

D-510 Zoom Instruction Manual
Page 109
CANCEL SET OK 99 For operating instructions see "Using the Shooting Menu" (p.72). ON: Depending on the operation, the warning beep will be set to highlight " ". 5 The setting screen will sound. This ...
CANCEL SET OK 99 For operating instructions see "Using the Shooting Menu" (p.72). ON: Depending on the operation, the warning beep will be set to highlight " ". 5 The setting screen will sound. This ...

