

Users Guide
Page 2
... to change without OKI's express permission is operated in accordance with the Federal Noise Interference Standard, this manual. © Copyright 2007 Oki Data Corporation. Reproduction of any part of this manual in any errors in accordance with the instruction manual, may cause harmful interference to Part 15 of this manual are designed to printers marketed in Canada. CE Manufacturer's Declaration of Conformity EC Council Directive...
... to change without OKI's express permission is operated in accordance with the Federal Noise Interference Standard, this manual. © Copyright 2007 Oki Data Corporation. Reproduction of any part of this manual in any errors in accordance with the instruction manual, may cause harmful interference to Part 15 of this manual are designed to printers marketed in Canada. CE Manufacturer's Declaration of Conformity EC Council Directive...
Users Guide
Page 3
... Printer 5 3-3. Turning Power On...10 3-6. Consumable Parts and AC Adapter...20 5-1. Full-Face Thermal Label Paper Roll 22 5-3. AC adapter (option)...27 6. Self-Printing...30 7. Removing Paper Jam...33 9. Cleaning the Paper Holder and the Surrounding Area 34 10. Black mark specifications...39 11. Connecting the Cable to the PC...4 3-2. Control Panel...28 6-2. Specifications...35 10-1. Reliability Specifications...38 10-7. Connecting the Optional AC Adapter 9 3-5. Loading the Paper Roll...12 4. Switch Blind Installation...19 5. Control Panel...
... Printer 5 3-3. Turning Power On...10 3-6. Consumable Parts and AC Adapter...20 5-1. Full-Face Thermal Label Paper Roll 22 5-3. AC adapter (option)...27 6. Self-Printing...30 7. Removing Paper Jam...33 9. Cleaning the Paper Holder and the Surrounding Area 34 10. Black mark specifications...39 11. Connecting the Cable to the PC...4 3-2. Control Panel...28 6-2. Specifications...35 10-1. Reliability Specifications...38 10-7. Connecting the Optional AC Adapter 9 3-5. Loading the Paper Roll...12 4. Switch Blind Installation...19 5. Control Panel...
Users Guide
Page 7
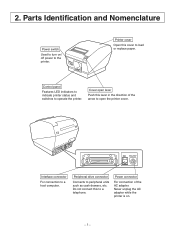
... indicate printer status and switches to peripheral units such as cash drawers, etc. 2. Cover open the printer cover. Peripheral drive connector Connects to operate the printer. Never unplug the AC adapter while the printer is on / off power to open lever Push this lever in the direction of the AC adapter. Do not connect this cover to a telephone. Power connector For connection of the arrow to the printer. Printer cover Open this to load or replace paper...
... indicate printer status and switches to peripheral units such as cash drawers, etc. 2. Cover open the printer cover. Peripheral drive connector Connects to operate the printer. Never unplug the AC adapter while the printer is on / off power to open lever Push this lever in the direction of the AC adapter. Do not connect this cover to a telephone. Power connector For connection of the arrow to the printer. Printer cover Open this to load or replace paper...
Users Guide
Page 16
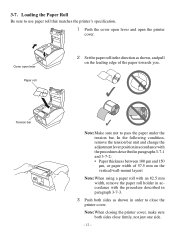
Tension bar Note: Make sure not to use paper roll that matches the printer's specification. 1 Push the cover open lever and open lever Paper roll 2 Set the paper roll in the direction as shown in paragraph 3-7-3. 3 Push both sides close the printer cover. In the following condition, remove the tension bar unit and change the adjustment lever position in accordance with the procedures described in paragraphs 3-7-1 and 3-7-2: • Paper thickness between...
Tension bar Note: Make sure not to use paper roll that matches the printer's specification. 1 Push the cover open lever and open lever Paper roll 2 Set the paper roll in the direction as shown in paragraph 3-7-3. 3 Push both sides close the printer cover. In the following condition, remove the tension bar unit and change the adjustment lever position in accordance with the procedures described in paragraphs 3-7-1 and 3-7-2: • Paper thickness between...
Users Guide
Page 18
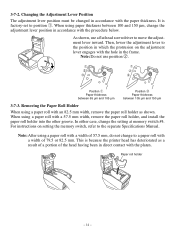
...;m 3-7-3. 3-7-2. Changing the Adjustment Lever Position The adjustment lever position must be changed in accordance with the paper thickness. It is because the printer head has deteriorated as shown. When using a paper roll with a width of the head having been in direct contact with the hole in which the protrusion on setting the memory switch, refer to position ①. This is factory-set to the separate Specifications Manual. For instructions...
...;m 3-7-3. 3-7-2. Changing the Adjustment Lever Position The adjustment lever position must be changed in accordance with the paper thickness. It is because the printer head has deteriorated as shown. When using a paper roll with a width of the head having been in direct contact with the hole in which the protrusion on setting the memory switch, refer to position ①. This is factory-set to the separate Specifications Manual. For instructions...
Users Guide
Page 19
... printing head, rubber roller, and cutter wear differently according to grasp it by being touched with its cover open and holding it at the printer. - 15 - Never directly touch the IC. 7) The printing quality and working life of paper that fall freely. 10) Do not change the paper width during use a stacker that stores the pieces of the thermal head. CAUTION 1) Do not operate the cover open...
... printing head, rubber roller, and cutter wear differently according to grasp it by being touched with its cover open and holding it at the printer. - 15 - Never directly touch the IC. 7) The printing quality and working life of paper that fall freely. 10) Do not change the paper width during use a stacker that stores the pieces of the thermal head. CAUTION 1) Do not operate the cover open...
Users Guide
Page 22
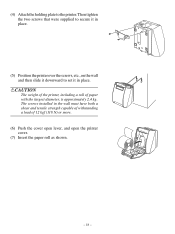
CAUTION The weight of the printer, including a roll of 12 kgf (118 N) or more. (6) Push the cover open lever, and open the printer cover. (7) Insert the paper roll as shown. - 18 - The screws installed in place. Then tighten the two screws that were supplied to secure it in place. (5) Position the printer over the screws, etc., on the wall and then slide it downward to the printer. (4) Attach the holding plate to set it in the wall must have both a shear and tensile strength capable of withstanding a load of paper with the largest diameter, is approximately 2.4 kg.
CAUTION The weight of the printer, including a roll of 12 kgf (118 N) or more. (6) Push the cover open lever, and open the printer cover. (7) Insert the paper roll as shown. - 18 - The screws installed in place. Then tighten the two screws that were supplied to secure it in place. (5) Position the printer over the screws, etc., on the wall and then slide it downward to the printer. (4) Attach the holding plate to set it in the wall must have both a shear and tensile strength capable of withstanding a load of paper with the largest diameter, is approximately 2.4 kg.
Users Guide
Page 25
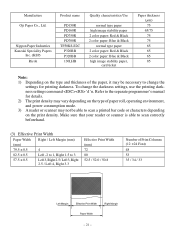
... characteristics/Use normal type paper high image stability paper 2 color paper: Red & Black 2 color paper: Blue & Black normal type paper 2 color paper: Red & Black 2 color paper: Blue & Black high image stability paper, card ticket Paper thickness (µm) 75 65/75 75 75 65 65 65 85 Note: 1) Depending on the type and thickness of the paper, it may not be able to scan a printed bar code or characters depending on the type of paper roll, operating environment, and power consumption mode. 3) A reader or scanner...
... characteristics/Use normal type paper high image stability paper 2 color paper: Red & Black 2 color paper: Blue & Black normal type paper 2 color paper: Red & Black 2 color paper: Blue & Black high image stability paper, card ticket Paper thickness (µm) 75 65/75 75 75 65 65 65 85 Note: 1) Depending on the type and thickness of the paper, it may not be able to scan a printed bar code or characters depending on the type of paper roll, operating environment, and power consumption mode. 3) A reader or scanner...
Users Guide
Page 26
... not use paste or glue to change the darkness settings, use the printing darkness settings command 'd'n. Adhesion type High adhesion High adhesion High adhesion Note: 1) Depending on the print density. 5-2. Make sure that your reader or scanner is able to scan a printed bar code or characters depending on the type and thickness of paper roll, operating environment, and power consumption mode. 3) A reader or scanner may be able to scan correctly...
... not use paste or glue to change the darkness settings, use the printing darkness settings command 'd'n. Adhesion type High adhesion High adhesion High adhesion Note: 1) Depending on the print density. 5-2. Make sure that your reader or scanner is able to scan a printed bar code or characters depending on the type and thickness of paper roll, operating environment, and power consumption mode. 3) A reader or scanner may be able to scan correctly...

Users Guide
Page 28
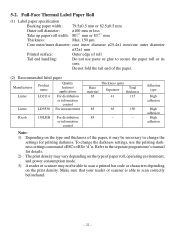
... programmer's manual for printing darkness. Make sure that your reader or scanner is able to scan correctly beforehand. (3) Effective Print Width Paper Width (mm) Right / Left Margin (mm) 76 ± 0.5 3 79 ± 0.5 3 Effective Print Width (mm) 70 73 Number of paper roll, operating environment, and power consumption mode. 3) A reader or scanner may not be able to change the darkness settings, use the printing darkness settings command 'd'n. Adhesion type High adhesion...
... programmer's manual for printing darkness. Make sure that your reader or scanner is able to scan correctly beforehand. (3) Effective Print Width Paper Width (mm) Right / Left Margin (mm) 76 ± 0.5 3 79 ± 0.5 3 Effective Print Width (mm) 70 73 Number of paper roll, operating environment, and power consumption mode. 3) A reader or scanner may not be able to change the darkness settings, use the printing darkness settings command 'd'n. Adhesion type High adhesion...

Users Guide
Page 32
... POWER lamp. ③ FEED button Press the FEED button to the home position or doesn't perform the initial movement, it cannot be recovered. 2) If the paper is jammed, turn the power off, clear the jammed paper, then turn the power ON. - 28 - Recovered by closing the printer cover. Errors 1) Recoverable errors Error Description Head high temperature detection Cover open error POWER Lamp Flashes at 0.5-second intervals ON Paper out error ON Paper near end ON Black mark paper size ON error Paper cut error...
... POWER lamp. ③ FEED button Press the FEED button to the home position or doesn't perform the initial movement, it cannot be recovered. 2) If the paper is jammed, turn the power off, clear the jammed paper, then turn the power ON. - 28 - Recovered by closing the printer cover. Errors 1) Recoverable errors Error Description Head high temperature detection Cover open error POWER Lamp Flashes at 0.5-second intervals ON Paper out error ON Paper near end ON Black mark paper size ON error Paper cut error...
Users Guide
Page 34
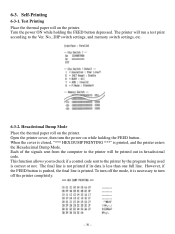
... a control code sent to turn off the printer completely. - 30 - 6-3. Test Printing Place the thermal paper roll on the printer. No., DIP switch settings, and memory switch settings, etc. 6-3-2. When the cover is closed, "*** HEX DUMP PRINTING ***" is printed. The final line is not printed if its data is correct or not. The printer will be printed out in hexadecimal code. Self-Printing 6-3-1. Hexadecimal Dump Mode Place the thermal paper roll on the printer. Open the printer cover, then turn...
... a control code sent to turn off the printer completely. - 30 - 6-3. Test Printing Place the thermal paper roll on the printer. No., DIP switch settings, and memory switch settings, etc. 6-3-2. When the cover is closed, "*** HEX DUMP PRINTING ***" is printed. The final line is not printed if its data is correct or not. The printer will be printed out in hexadecimal code. Self-Printing 6-3-1. Hexadecimal Dump Mode Place the thermal paper roll on the printer. Open the printer cover, then turn...
Users Guide
Page 36
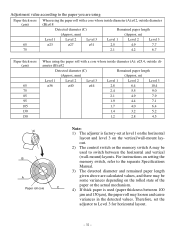
...setting the memory switch, refer to the separate Specifications Manual. 3) The detected diameter and remained paper length A given above are using Paper thick-ness When using the paper roll with a core whose inside diameter (A):ø12, outside diameter (B):ø32 Detected diameter (C) Remained paper length (Approx. mm) Remained paper length (Approx. m) Level 1 Level 2 Level 3 Level 1 Level 2 Level 3 ø36 ø40 ø44 2.8 6.4 10.4 2.4 5.5 9.0 2.1 4.9 7.9 1.9 4.4 7.1 1.7 4.0 6.4 1.4 3.2 5.2 1.2 2.8 4.5 C Note: 1) The adjuster is used...
...setting the memory switch, refer to the separate Specifications Manual. 3) The detected diameter and remained paper length A given above are using Paper thick-ness When using the paper roll with a core whose inside diameter (A):ø12, outside diameter (B):ø32 Detected diameter (C) Remained paper length (Approx. mm) Remained paper length (Approx. m) Level 1 Level 2 Level 3 Level 1 Level 2 Level 3 ø36 ø40 ø44 2.8 6.4 10.4 2.4 5.5 9.0 2.1 4.9 7.9 1.9 4.4 7.1 1.7 4.0 6.4 1.4 3.2 5.2 1.2 2.8 4.5 C Note: 1) The adjuster is used...
Users Guide
Page 38
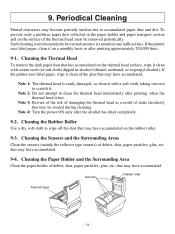
... of static electricity that may be removed periodically. If the printer uses label paper, clean it . Cleaning the Rubber Roller Use a dry, soft cloth to clean the thermal head immediately after printing, when the thermal head is recommended to accumulated paper dust and dirt. Cleaning the Sensors and the Surrounding Areas Clean the sensors (mainly the reflector type sensors) of debris, dust, paper particles, glue, etc. Periodical Cleaning Printed characters...
... of static electricity that may be removed periodically. If the printer uses label paper, clean it . Cleaning the Rubber Roller Use a dry, soft cloth to clean the thermal head immediately after printing, when the thermal head is recommended to accumulated paper dust and dirt. Cleaning the Sensors and the Surrounding Areas Clean the sensors (mainly the reflector type sensors) of debris, dust, paper particles, glue, etc. Periodical Cleaning Printed characters...
Users Guide
Page 44
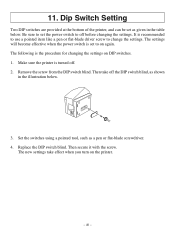
... is set the power switch to off before changing the settings. Make sure the printer is the procedure for changing the settings on DIP switches. 1. The new settings take off . 2. Remove the screw from the DIP switch blind. The settings will become effective when the power switch is recommended to use a pointed item like a pen or flat-blade driver screw to on the printer. - 40 - Then take effect when you turn...
... is set the power switch to off before changing the settings. Make sure the printer is the procedure for changing the settings on DIP switches. 1. The new settings take off . 2. Remove the screw from the DIP switch blind. The settings will become effective when the power switch is recommended to use a pointed item like a pen or flat-blade driver screw to on the printer. - 40 - Then take effect when you turn...
Users Guide
Page 45
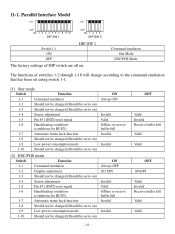
... factory settings of switches 1-2 through 1-10 will change according to the command emulation that has been set using switch 1-1. (1) Star mode Switch Function 1-1 Command emulation 1-2 Should not be changed (Should be set to on) 1-3 Should not be changed (Should be set to on) 1-4 Sensor adjustment 1-5 Pin #31 (INIT) reset signal 1-6 Handshaking conditions (conditions for BUSY) 1-7 Automatic status back function 1-8 Should not be changed (Should be set to on) 1-9 Low-power...
... factory settings of switches 1-2 through 1-10 will change according to the command emulation that has been set using switch 1-1. (1) Star mode Switch Function 1-1 Command emulation 1-2 Should not be changed (Should be set to on) 1-3 Should not be changed (Should be set to on) 1-4 Sensor adjustment 1-5 Pin #31 (INIT) reset signal 1-6 Handshaking conditions (conditions for BUSY) 1-7 Automatic status back function 1-8 Should not be changed (Should be set to on) 1-9 Low-power...
Users Guide
Page 47
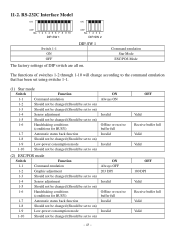
... been set using switche 1-1. (1) Star mode Switch Function 1-1 Command emulation 1-2 Should not be changed (Should be set to on) 1-3 Should not be changed (Should be set to on) 1-4 Sensor adjustment 1-5 Should not be changed (Should be set to on) 1-6 Handshaking conditions (conditions for BUSY) 1-7 Automatic status back function 1-8 Should not be changed (Should be set to on) 1-9 Low-power consumption mode 1-10 Should not be changed (Should be set to...
... been set using switche 1-1. (1) Star mode Switch Function 1-1 Command emulation 1-2 Should not be changed (Should be set to on) 1-3 Should not be changed (Should be set to on) 1-4 Sensor adjustment 1-5 Should not be changed (Should be set to on) 1-6 Handshaking conditions (conditions for BUSY) 1-7 Automatic status back function 1-8 Should not be changed (Should be set to on) 1-9 Low-power consumption mode 1-10 Should not be changed (Should be set to...
Users Guide
Page 50
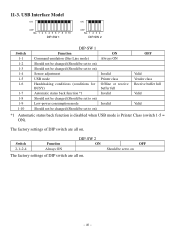
... adjustment USB mode Handshaking conditions (conditions for BUSY) Automatic status back function *1 Should not be changed (Should be set to on) Low-power consumption mode Should not be changed (Should be set to on ) ON Always ON Invalid Printer class Offline or receive buffer full Invalid Invalid OFF Valid Vendor class Receive buffer full Valid Valid *1 Automatic status back function is disabled when USB mode is Printer Class (switch...
... adjustment USB mode Handshaking conditions (conditions for BUSY) Automatic status back function *1 Should not be changed (Should be set to on) Low-power consumption mode Should not be changed (Should be set to on ) ON Always ON Invalid Printer class Offline or receive buffer full Invalid Invalid OFF Valid Vendor class Receive buffer full Valid Valid *1 Automatic status back function is disabled when USB mode is Printer Class (switch...
Users Guide
Page 51
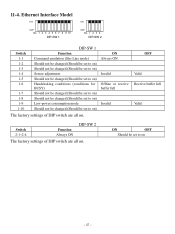
... 2 Switch 1-1 1-2 1-3 1-4 1-5 1-6 1-7 1-8 1-9 1-10 DIP-SW 1 Function Command emulation (Ster Line mode) Should not be changed (Should be set to on) Should not be changed (Should be set to on) Sensor adjustment Should not be changed (Should be set to on) Handshaking conditions (conditions for BUSY) Should not be changed (Should be set to on) Should not be changed (Should be set to on) Low-power consumption mode Should...
... 2 Switch 1-1 1-2 1-3 1-4 1-5 1-6 1-7 1-8 1-9 1-10 DIP-SW 1 Function Command emulation (Ster Line mode) Should not be changed (Should be set to on) Should not be changed (Should be set to on) Sensor adjustment Should not be changed (Should be set to on) Handshaking conditions (conditions for BUSY) Should not be changed (Should be set to on) Should not be changed (Should be set to on) Low-power consumption mode Should...
Users Guide
Page 52
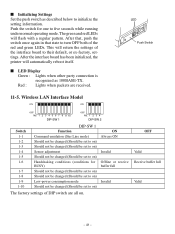
... set to on) Should not be changed (Should be set to on) Low-power consumption mode Should not be changed (Should be set to initialize the setting information. After the interface board has been initialized, the printer will return the settings of the red and green LEDs. LED Push Switch 11-5. This will automatically reboot itself. ■ LED Display Green : Lights when other party connection...
... set to on) Should not be changed (Should be set to on) Low-power consumption mode Should not be changed (Should be set to initialize the setting information. After the interface board has been initialized, the printer will return the settings of the red and green LEDs. LED Push Switch 11-5. This will automatically reboot itself. ■ LED Display Green : Lights when other party connection...


