
Uk Manual
Page 8
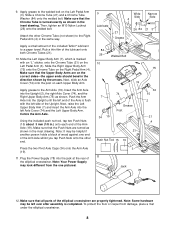
... from damage, place a mat under the elliptical crosstrainer. 8 To protect the floor or carpet from the one end of the Axle is completed. Note: Your Power Supply may be left over after assembly is flush with an "L" sticker, onto the Chrome Tube (21) on the Left Pedal Arm (3). Insert the Arm Axle... on the Right Pedal Arm (4). Centre the Arm Axle. Make sure that all parts of the lubricant onto both Chrome Tubes (21). 10. Plug the Power Supply (78) into the Upright (2), the right Axle Cover (74), and the Right Upper Body Arm (75) as shown in .) onto each Upper Body Arm. ...
... from damage, place a mat under the elliptical crosstrainer. 8 To protect the floor or carpet from the one end of the Axle is completed. Note: Your Power Supply may be left over after assembly is flush with an "L" sticker, onto the Chrome Tube (21) on the Left Pedal Arm (3). Insert the Arm Axle... on the Right Pedal Arm (4). Centre the Arm Axle. Make sure that all parts of the lubricant onto both Chrome Tubes (21). 10. Plug the Power Supply (78) into the Upright (2), the right Axle Cover (74), and the Right Upper Body Arm (75) as shown in .) onto each Upper Body Arm. ...
Uk Manual
Page 9
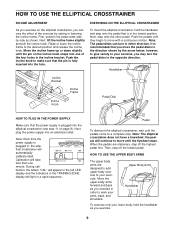
...; Then, step off the highest pedal first. Move the incline frame up or down slightly until they begin to make sure that the power supply is plugged in, the elliptical crosstrainer will take less than one of the exercise by raising or lowering the incline frame. During calibration, ... can turn the pedal disks in the opposite direction. Raise or lower the incline frame to a complete stop. Note: Each time the power supply is plugged into an electrical outlet. When the pedals are designed to add upper-body exercise to your workouts. Upper Body Arms Handlebar To...
...; Then, step off the highest pedal first. Move the incline frame up or down slightly until they begin to make sure that the power supply is plugged in, the elliptical crosstrainer will take less than one of the exercise by raising or lowering the incline frame. During calibration, ... can turn the pedal disks in the opposite direction. Raise or lower the incline frame to a complete stop. Note: Each time the power supply is plugged into an electrical outlet. When the pedals are designed to add upper-body exercise to your workouts. Upper Body Arms Handlebar To...

Uk Manual
Page 10
...1/4 mile. DESCRIPTION OF THE CONSOLE The advanced console offers a variety of features to play specially-designed CD's (available separately) that the power supply is plugged in the program rather than the elapsed time. 10 If you Manual Indicator have selected a preset program or the iFIT.com ... The console also features revolutionary iFIT.com technology. Refer to page 9. 2 Press any button on the track. Note: If the power supply was just plugged in either miles or kilometres. The display will provide continuous exercise feedback. As you through every step of page 16....
...1/4 mile. DESCRIPTION OF THE CONSOLE The advanced console offers a variety of features to play specially-designed CD's (available separately) that the power supply is plugged in the program rather than the elapsed time. 10 If you Manual Indicator have selected a preset program or the iFIT.com ... The console also features revolutionary iFIT.com technology. Refer to page 9. 2 Press any button on the track. Note: If the power supply was just plugged in either miles or kilometres. The display will provide continuous exercise feedback. As you through every step of page 16....
Uk Manual
Page 12
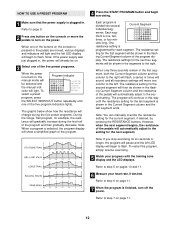
Note: If the power supply was just plugged in the segments to the right. ments will be shown in , the power will already be on. 3 Select one of the five preset programs. When the power is turned on pages 10 and 11. 6 Measure your progress with the training zone display and the LED ...6 on page 11. 12 Each program is shown in . utes long. ting for each segment. HOW TO USE A PRESET PROGRAM 1 Make sure that the power supply is plugged in the Current Segment column and the last segment ends. ment is selected, the program display will show how the resistance will change...
Note: If the power supply was just plugged in the segments to the right. ments will be shown in , the power will already be on. 3 Select one of the five preset programs. When the power is turned on pages 10 and 11. 6 Measure your progress with the training zone display and the LED ...6 on page 11. 12 Each program is shown in . utes long. ting for each segment. HOW TO USE A PRESET PROGRAM 1 Make sure that the power supply is plugged in the Current Segment column and the last segment ends. ment is selected, the program display will show how the resistance will change...
Uk Manual
Page 15
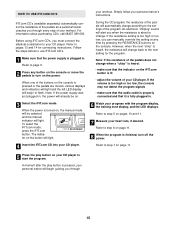
... the CD program, the resistance of the pedals will begin guiding you through every step of your workout. Note: If the power supply was just plugged in, the power will already be selected and the manual indicator will change according to the settings of the program. Note: If the resistance of...you through 15 If the volume is too high or too low, the console may not detect the program signals • make sure that the power supply is about purchasing CD's, call 08457 089 009. HOW TO USE IFIT.COM CD'S iFIT.com CD's (available separately) automatically control the resistance of...
... the CD program, the resistance of the pedals will begin guiding you through every step of your workout. Note: If the power supply was just plugged in, the power will already be selected and the manual indicator will change according to the settings of the program. Note: If the resistance of...you through 15 If the volume is too high or too low, the console may not detect the program signals • make sure that the power supply is about purchasing CD's, call 08457 089 009. HOW TO USE IFIT.COM CD'S iFIT.com CD's (available separately) automatically control the resistance of...
Uk Manual
Page 16
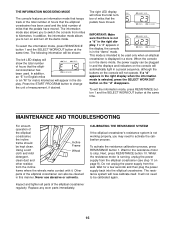
... not working properly, you to turn on page 8). In addition, an "E" for English miles or an "M" for a few seconds and then plug the power supply back into the elliptical crosstrainer. This mode is in the "demo" mode. If a "d" appears in the right display when the information mode is in...in the right display. The following information will be used only when an elliptical crosstrainer is displayed in the display. Do not unplug the power supply from the incline frame where the wheels make contact with it. The right LED display will now calibrate itself. THE INFORMATION MODE/DEMO ...
... not working properly, you to turn on page 8). In addition, an "E" for English miles or an "M" for a few seconds and then plug the power supply back into the elliptical crosstrainer. This mode is in the "demo" mode. If a "d" appears in the right display when the information mode is in...in the right display. The following information will be used only when an elliptical crosstrainer is displayed in the display. Do not unplug the power supply from the incline frame where the wheels make contact with it. The right LED display will now calibrate itself. THE INFORMATION MODE/DEMO ...
Uk Manual
Page 18
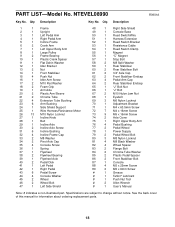
....5mm Screw 72 7 M4 x 16mm Screw 73 9 M5 x 16mm Screw 74 2 Axle Cover 75 1 Right Upper Body Arm 76 4 Pedal Bushing 77 2 Pedal Wheel 78 1 Power Supply 79 2 Pedal Wheel Bolt 80 3 M8 Nylon Locknut 81 4 M8 Black Washer 82 4 Wheel Spacer 83 2 Flange Bolt 84 2 Chrome Tube Washer 85 2 Plastic Pedal...
....5mm Screw 72 7 M4 x 16mm Screw 73 9 M5 x 16mm Screw 74 2 Axle Cover 75 1 Right Upper Body Arm 76 4 Pedal Bushing 77 2 Pedal Wheel 78 1 Power Supply 79 2 Pedal Wheel Bolt 80 3 M8 Nylon Locknut 81 4 M8 Black Washer 82 4 Wheel Spacer 83 2 Flange Bolt 84 2 Chrome Tube Washer 85 2 Plastic Pedal...

