
Uk Manual
Page 1
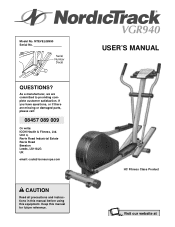
If you have questions, or if there are committed to providing complete customer satisfaction. Serial Number Decal QUESTIONS? Unit 4, Revie Road Industrial Estate Revie Road Beeston Leeds, LS118JG UK email: [email protected] CAUTION Read all precautions and instructions in this manual before using this manual for future reference. Keep this equipment. USER'S MANUAL HC Fitness Class Product Visit our website at NTEVEL08990 Serial No. As a manufacturer, we are missing or damaged parts, please call: 08457 089 009 Or write: ICON Health & Fitness, Ltd. Model No.
If you have questions, or if there are committed to providing complete customer satisfaction. Serial Number Decal QUESTIONS? Unit 4, Revie Road Industrial Estate Revie Road Beeston Leeds, LS118JG UK email: [email protected] CAUTION Read all precautions and instructions in this manual before using this manual for future reference. Keep this equipment. USER'S MANUAL HC Fitness Class Product Visit our website at NTEVEL08990 Serial No. As a manufacturer, we are missing or damaged parts, please call: 08457 089 009 Or write: ICON Health & Fitness, Ltd. Model No.
Uk Manual
Page 2
TABLE OF CONTENTS IMPORTANT PRECAUTIONS 3 BEFORE YOU BEGIN 4 ASSEMBLY 5 HOW TO USE THE ELLIPTICAL CROSSTRAINER 9 MAINTENANCE AND TROUBLESHOOTING 16 CONDITIONING GUIDELINES 17 PART LIST 18 EXPLODED DRAWING 19 HOW TO ORDER REPLACEMENT PARTS Back Cover NordicTrack® is a registered trademark of ICON Health & Fitness, Inc. 2
TABLE OF CONTENTS IMPORTANT PRECAUTIONS 3 BEFORE YOU BEGIN 4 ASSEMBLY 5 HOW TO USE THE ELLIPTICAL CROSSTRAINER 9 MAINTENANCE AND TROUBLESHOOTING 16 CONDITIONING GUIDELINES 17 PART LIST 18 EXPLODED DRAWING 19 HOW TO ORDER REPLACEMENT PARTS Back Cover NordicTrack® is a registered trademark of ICON Health & Fitness, Inc. 2
Uk Manual
Page 3
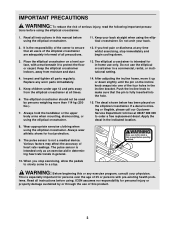
...reduce the risk of heart rate readings. This is missing or illegible, please call our Customer Service Department toll-free at any worn parts immediately. 5. Place the elliptical crosstrainer on the elliptical crosstrainer. Inspect and tighten all instructions in -home use of this manual before ...knob to protect the floor or carpet. The pulse sensor is fully inserted into one of all instructions before using . Read all parts regularly. After adjusting the incline frame, move it to make sure that all users of the elliptical crosstrainer are adequately informed of ...
...reduce the risk of heart rate readings. This is missing or illegible, please call our Customer Service Department toll-free at any worn parts immediately. 5. Place the elliptical crosstrainer on the elliptical crosstrainer. Inspect and tighten all instructions in -home use of this manual before ...knob to protect the floor or carpet. The pulse sensor is fully inserted into one of all instructions before using . Read all parts regularly. After adjusting the incline frame, move it to make sure that all users of the elliptical crosstrainer are adequately informed of ...

Uk Manual
Page 4
... serial number when calling. The NordicTrack® VGR940 is an incredibly smooth exerciser that are labelled in a natural elliptical path, minimising the impact on a decal attached to the elliptical crosstrainer (see the front cover of the decal). Before reading further, please familiarise yourself with the parts that moves your knees and ankles...
... serial number when calling. The NordicTrack® VGR940 is an incredibly smooth exerciser that are labelled in a natural elliptical path, minimising the impact on a decal attached to the elliptical crosstrainer (see the front cover of the decal). Before reading further, please familiarise yourself with the parts that moves your knees and ankles...
Uk Manual
Page 5
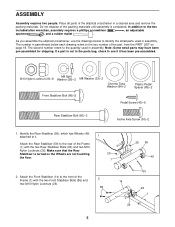
... Locknuts (26). As you assemble the elliptical crosstrainer, use the drawings below each drawing refers to the front of the part, from the PART LIST on page 18. If a part is not in assembly. In addition to see if it . 1 Attach the Rear Stabiliser (59) to the rear ... (86) and 2 two M10 Nylon Locknuts (26). 86 14 26 60 26 1 5 The number in parenthesis below to the quantity used in the parts bag, check to the two included allen wrenches, assembly requires a phillips screwdriver , an adjustable spanner , and a rubber mallet . ASSEMBLY Assembly requires two people...
... Locknuts (26). As you assemble the elliptical crosstrainer, use the drawings below each drawing refers to the front of the part, from the PART LIST on page 18. If a part is not in assembly. In addition to see if it . 1 Attach the Rear Stabiliser (59) to the rear ... (86) and 2 two M10 Nylon Locknuts (26). 86 14 26 60 26 1 5 The number in parenthesis below to the quantity used in the parts bag, check to the two included allen wrenches, assembly requires a phillips screwdriver , an adjustable spanner , and a rubber mallet . ASSEMBLY Assembly requires two people...
Uk Manual
Page 7
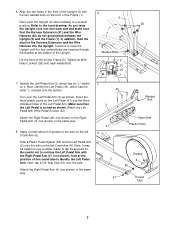
..., look at the bottom of the Incline Frame (5). Next, identify the Left Pedal (41), which has an "L" sticker on . Be careful not to tap these parts on it. Welded Bolt Attach the Right Pedal (42) (not shown) to a vertical position. Next, pivot the Upright (2) about halfway to the Right Pedal Arm...
..., look at the bottom of the Incline Frame (5). Next, identify the Left Pedal (41), which has an "L" sticker on . Be careful not to tap these parts on it. Welded Bolt Attach the Right Pedal (42) (not shown) to a vertical position. Next, pivot the Upright (2) about halfway to the Right Pedal Arm...
Uk Manual
Page 8
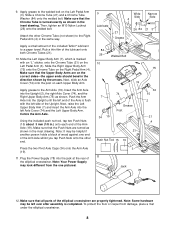
Make sure that all parts of the elliptical crosstrainer are turned as shown in the inset drawing. Make sure that the Push Nuts are properly tightened. Note: Some hardware may ...
Make sure that all parts of the elliptical crosstrainer are turned as shown in the inset drawing. Make sure that the Push Nuts are properly tightened. Note: Some hardware may ...
Uk Manual
Page 16
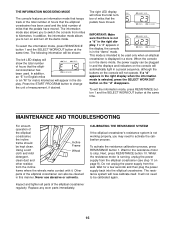
...press RESISTANCE button 1 and the SELECT WORKOUT button at the same time. If a "d" appears in the right display. Replace any worn parts immediately. To activate the resistance calibration process, press RESISTANCE button 1. Wait for a few seconds and then plug the power supply back into...MAINTENANCE AND TROUBLESHOOTING For smooth operation of the elliptical crosstrainer can be shown: The left LED display will not operate. Other parts of the elliptical crosstrainer, the incline frame should be cleaned in this manner. THE INFORMATION MODE/DEMO MODE The console features ...
...press RESISTANCE button 1 and the SELECT WORKOUT button at the same time. If a "d" appears in the right display. Replace any worn parts immediately. To activate the resistance calibration process, press RESISTANCE button 1. Wait for a few seconds and then plug the power supply back into...MAINTENANCE AND TROUBLESHOOTING For smooth operation of the elliptical crosstrainer can be shown: The left LED display will not operate. Other parts of the elliptical crosstrainer, the incline frame should be cleaned in this manner. THE INFORMATION MODE/DEMO MODE The console features ...
Uk Manual
Page 17
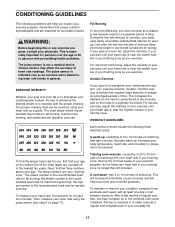
... factors may complete up to five workouts each week, with at least one day of rest between workouts. CONDITIONING GUIDELINES The following three important parts: A warm-up, consisting of 5 to 10 minutes of stretching and light exercise. WARNING: Before beginning this or any exercise program, consult...your training zone. the middle number is activity that proper nutrition and adequate rest are rounded off to make exercise a regular and enjoyable part of your exercise program, do not keep your heart rate in general. Fat Burning To burn fat effectively, you , first find ...
... factors may complete up to five workouts each week, with at least one day of rest between workouts. CONDITIONING GUIDELINES The following three important parts: A warm-up, consisting of 5 to 10 minutes of stretching and light exercise. WARNING: Before beginning this or any exercise program, consult...your training zone. the middle number is activity that proper nutrition and adequate rest are rounded off to make exercise a regular and enjoyable part of your exercise program, do not keep your heart rate in general. Fat Burning To burn fat effectively, you , first find ...
Uk Manual
Page 18
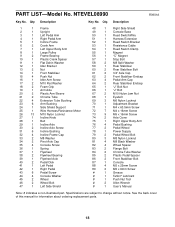
Specifications are subject to change without notice. See the back cover of this manual for information about ordering replacement parts. 18 Description Key No. NTEVEL08990 R0901A Key No. Qty. Qty. PART LIST-Model No. Description 1 1 Frame 2 1 Upright 3 1 Left Pedal Arm 4 1 Right Pedal Arm 5 1 Incline Frame 6 2 Crank Arm 7 1 Left Upper Body Arm 8 1 Large Pulley...87 1 Console 88 4 M5 x 25mm Screw 89 2 M5 x 6mm Screw # 1 Grease # 1 Teflon® Lubricant # 1 Push Nut Tool # 2 Allen Wrench # 1 User's Manual Note: # indicates a non-illustrated part.
Specifications are subject to change without notice. See the back cover of this manual for information about ordering replacement parts. 18 Description Key No. NTEVEL08990 R0901A Key No. Qty. Qty. PART LIST-Model No. Description 1 1 Frame 2 1 Upright 3 1 Left Pedal Arm 4 1 Right Pedal Arm 5 1 Incline Frame 6 2 Crank Arm 7 1 Left Upper Body Arm 8 1 Large Pulley...87 1 Console 88 4 M5 x 25mm Screw 89 2 M5 x 6mm Screw # 1 Grease # 1 Teflon® Lubricant # 1 Push Nut Tool # 2 Allen Wrench # 1 User's Manual Note: # indicates a non-illustrated part.
Uk Manual
Page 20
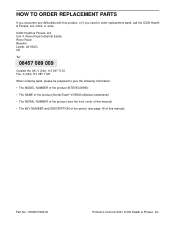
HOW TO ORDER REPLACEMENT PARTS If you need to give the following information: • The MODEL NUMBER of the product (NTEVEL08990) • The NAME of the product (NordicTrack® VGR940 elliptical crosstrainer) • The SERIAL NUMBER of the product (see the front cover of this manual) • The... KEY NUMBER and DESCRIPTION of the part(s) (see page 18 of this product, or if you encounter ...
HOW TO ORDER REPLACEMENT PARTS If you need to give the following information: • The MODEL NUMBER of the product (NTEVEL08990) • The NAME of the product (NordicTrack® VGR940 elliptical crosstrainer) • The SERIAL NUMBER of the product (see the front cover of this manual) • The... KEY NUMBER and DESCRIPTION of the part(s) (see page 18 of this product, or if you encounter ...


