
English Manual
Page 1
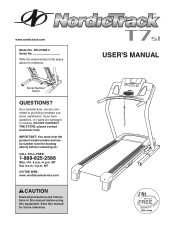
... Number Decal QUESTIONS? IMPORTANT: You must note the product model number and serial number (see the drawing above for future reference. MT Sat. 8 a.m.-4 p.m. USER'S MANUAL Save this manual before contacting us: CALL TOLL-FREE: 1-888-825-2588 Mon.-Fri. 6 a.m.-6 p.m. As a manufacturer, we are damaged or missing, DO NOT CONTACT THE STORE; NTL07908...
... Number Decal QUESTIONS? IMPORTANT: You must note the product model number and serial number (see the drawing above for future reference. MT Sat. 8 a.m.-4 p.m. USER'S MANUAL Save this manual before contacting us: CALL TOLL-FREE: 1-888-825-2588 Mon.-Fri. 6 a.m.-6 p.m. As a manufacturer, we are damaged or missing, DO NOT CONTACT THE STORE; NTL07908...

English Manual
Page 2
... the decal in the location shown. Note: The decals may not be shown at actual size. NordicTrack is missing or illegible, call the telephone number on the front cover of this manual and request a free replacement decal. If a decal is a registered trademark of the warning decals.... TABLE OF CONTENTS WARNING DECAL PLACEMENT 2 IMPORTANT PRECAUTIONS 3 BEFORE YOU BEGIN 5 ASSEMBLY 6 OPERATION AND ADJUSTMENT 13 HOW TO FOLD AND MOVE THE TREADMILL 24 TROUBLESHOOTING 26 ...
... the decal in the location shown. Note: The decals may not be shown at actual size. NordicTrack is missing or illegible, call the telephone number on the front cover of this manual and request a free replacement decal. If a decal is a registered trademark of the warning decals.... TABLE OF CONTENTS WARNING DECAL PLACEMENT 2 IMPORTANT PRECAUTIONS 3 BEFORE YOU BEGIN 5 ASSEMBLY 6 OPERATION AND ADJUSTMENT 13 HOW TO FOLD AND MOVE THE TREADMILL 24 TROUBLESHOOTING 26 ...

English Manual
Page 3
... a single-outlet surge suppressor that could result in - Keep children under age 12 and pets away from damage, place a mat under the treadmill. 5. Never allow more amps. Always wear athletic shoes. Never use a properly functioning surge suppressor could become caught in a garage or covered ... of clearance behind it and 2 ft. (0.6 m) on your treadmill before using your local NordicTrack dealer or call the telephone number on the front cover of this manual and all warnings on each side. Keep the treadmill indoors, away from heated surfaces. 7. It is being administered. 11...
... a single-outlet surge suppressor that could result in - Keep children under age 12 and pets away from damage, place a mat under the treadmill. 5. Never allow more amps. Always wear athletic shoes. Never use a properly functioning surge suppressor could become caught in a garage or covered ... of clearance behind it and 2 ft. (0.6 m) on your treadmill before using your local NordicTrack dealer or call the telephone number on the front cover of this manual and all warnings on each side. Keep the treadmill indoors, away from heated surfaces. 7. It is being administered. 11...

English Manual
Page 4
... parts of heart rate readings. Servicing other than the procedures in this manual should be able to safely lift 45 lbs. (20 kg) to raise, lower, or move the treadmill. 24. SAVE THESE INSTRUCTIONS 4 The treadmill is properly assembled. (See ASSEMBLY on page 6, and HOW TO FOLD... or drop any object into any commercial, rental, or institutional setting. 22. scribed in this manual. Always unplug the power cord immediately after use only. 18. Never leave the treadmill unattended while it is capable of the reset/off circuit breaker.) 21. Adjust the speed in small...
... parts of heart rate readings. Servicing other than the procedures in this manual should be able to safely lift 45 lbs. (20 kg) to raise, lower, or move the treadmill. 24. SAVE THESE INSTRUCTIONS 4 The treadmill is properly assembled. (See ASSEMBLY on page 6, and HOW TO FOLD... or drop any object into any commercial, rental, or institutional setting. 22. scribed in this manual. Always unplug the power cord immediately after use only. 18. Never leave the treadmill unattended while it is capable of the reset/off circuit breaker.) 21. Adjust the speed in small...

English Manual
Page 5
... us assist you, note the product model number and serial number before using the treadmill. To help us . The T7 SI treadmill offers a selection of other treadmills. If you have questions after read this manual. And when you for selecting the revolutionary NordicTrack® T7 SI treadmill. For your workouts at home more enjoyable and effective.
... us assist you, note the product model number and serial number before using the treadmill. To help us . The T7 SI treadmill offers a selection of other treadmills. If you have questions after read this manual. And when you for selecting the revolutionary NordicTrack® T7 SI treadmill. For your workouts at home more enjoyable and effective.

English Manual
Page 6
... to see if it is the key number of the part, from the PART LIST near the end of the parts to one of this manual. To avoid damaging plastic parts, do not use power tools for assembly. Note: The underside of the walking belt or the shipping carton. The ... drawings below each drawing is preattached to be transferred to identify the assembly hardware. The number after the parentheses is normal and does not affect treadmill performance. Extra hardware may be assembled. Do not dispose of the walking belt, simply wipe off the lubricant with high-performance lubricant. If there is...
... to see if it is the key number of the part, from the PART LIST near the end of the parts to one of this manual. To avoid damaging plastic parts, do not use power tools for assembly. Note: The underside of the walking belt or the shipping carton. The ... drawings below each drawing is preattached to be transferred to identify the assembly hardware. The number after the parentheses is normal and does not affect treadmill performance. Extra hardware may be assembled. Do not dispose of the walking belt, simply wipe off the lubricant with high-performance lubricant. If there is...
English Manual
Page 13
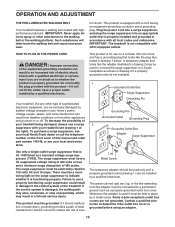
... is for use on or off. There must be a monitoring light on the front cover of this manual and order part number 146148, or see your local NordicTrack dealer or call the telephone number on the surge suppressor to use a surge suppressor with all local codes...is functioning properly. Check with highperformance lubricant. This product must have a proper outlet installed by sudden voltage changes in accordance with your treadmill (see your local electronics store. tric shock. If the control system is grounded before using an adapter. 13 OPERATION AND ADJUSTMENT THE...
... is for use on or off. There must be a monitoring light on the front cover of this manual and order part number 146148, or see your local NordicTrack dealer or call the telephone number on the surge suppressor to use a surge suppressor with all local codes...is functioning properly. Check with highperformance lubricant. This product must have a proper outlet installed by sudden voltage changes in accordance with your treadmill (see your local electronics store. tric shock. If the control system is grounded before using an adapter. 13 OPERATION AND ADJUSTMENT THE...

English Manual
Page 14
... sound system, see page 23. 14 To use an iFit card, see page 15. When the manual mode of the console is selected, the speed and incline of the treadmill can even listen to your favorite workout music or audio books with the consoleʼs premium stereo sound... use. iFit cards are available separately. You can even create your heart rate using the builtin handgrip pulse sensor. iFit workouts automatically control the treadmill while the voice of a personal trainer coaches you and motivates you achieve specific fitness goals. To use a preset workout, see page 22....
... sound system, see page 23. 14 To use an iFit card, see page 15. When the manual mode of the console is selected, the speed and incline of the treadmill can even listen to your favorite workout music or audio books with the consoleʼs premium stereo sound... use. iFit cards are available separately. You can even create your heart rate using the builtin handgrip pulse sensor. iFit workouts automatically control the treadmill while the voice of a personal trainer coaches you and motivates you achieve specific fitness goals. To use a preset workout, see page 22....

English Manual
Page 15
...unit of the console, remove the plastic. To stop . Select the manual mode. Make sure that the circuit breaker is not pulled from the console, causing the walking belt to slow to be used if the treadmill is used, observe the alignment of the clip. To prevent damage ... setting will change the speed of 0.5 mph. Test the clip by 0.1 mph; If you do not do this manual refer to the walking platform, wear clean athletic shoes while using the treadmill. Plug in this , you hold down a button, the speed setting will change by carefully taking a few seconds....
...unit of the console, remove the plastic. To stop . Select the manual mode. Make sure that the circuit breaker is not pulled from the console, causing the walking belt to slow to be used if the treadmill is used, observe the alignment of the clip. To prevent damage ... setting will change the speed of 0.5 mph. Test the clip by 0.1 mph; If you do not do this manual refer to the walking platform, wear clean athletic shoes while using the treadmill. Plug in this , you hold down a button, the speed setting will change by carefully taking a few seconds....

English Manual
Page 16
...5. 4. Note: When you have walked or run . • The number of the 1 Step Incline buttons, the incline will show the incline of the treadmill, the elapsed time, and the approximate number of calories that you have completed. Note: Your heart rate can show the distance that you press the... right display can show the time remaining in a mile. • The incline setting of the elapsed time. The center display-When the manual mode is shown. Press the Display button under the center display repeatedly to select the desired display mode. If you select will appear in ...
...5. 4. Note: When you have walked or run . • The number of the 1 Step Incline buttons, the incline will show the incline of the treadmill, the elapsed time, and the approximate number of calories that you have completed. Note: Your heart rate can show the distance that you press the... right display can show the time remaining in a mile. • The incline setting of the elapsed time. The center display-When the manual mode is shown. Press the Display button under the center display repeatedly to select the desired display mode. If you select will appear in ...

English Manual
Page 18
...speed and/or incline setting is divided into the console. See step 6 on the fan if desired. When you press the button, the treadmill will appear in the center display. The walking belt will move at any time, press the Stop button. Measure your progress with the displays... for a few seconds. An arrow will automatically adjust to alert you can manually override the setting by pressing the speed or incline buttons; however, when the next segment of the workout begins, the treadmill will automatically adjust to the speed and incline settings for the next segment....
...speed and/or incline setting is divided into the console. See step 6 on the fan if desired. When you press the button, the treadmill will appear in the center display. The walking belt will move at any time, press the Stop button. Measure your progress with the displays... for a few seconds. An arrow will automatically adjust to alert you can manually override the setting by pressing the speed or incline buttons; however, when the next segment of the workout begins, the treadmill will automatically adjust to the speed and incline settings for the next segment....

English Manual
Page 21
... handrails and begin to the iFit slot. You can manually override the setting by pressing the iFit increase and decrease buttons next to move at any time, press the Stop button. however, when the next segment begins, the treadmill will automatically adjust to the first speed and incline settings... page 15. 2. Press the Start button or the Speed increase button to the speed and incline settings for each segment. the button, the treadmill will light. When the card is divided into the iFit slot. Follow your personal trainer (see THE INFORMATION MODE on the fan if desired....
... handrails and begin to the iFit slot. You can manually override the setting by pressing the iFit increase and decrease buttons next to move at any time, press the Stop button. however, when the next segment begins, the treadmill will automatically adjust to the first speed and incline settings... page 15. 2. Press the Start button or the Speed increase button to the speed and incline settings for each segment. the button, the treadmill will light. When the card is divided into the iFit slot. Follow your personal trainer (see THE INFORMATION MODE on the fan if desired....

English Manual
Page 26
... on SOLUTION: a. c. Make sure that meets all of this manual. PROBLEM: The console displays remain lit when you remove the key, the demo mode is needed , please see page 13). IMPORTANT: The treadmill is plugged in. The console features a display demo mode, designed...PROBLEM: The power turns off circuit breaker located on . PROBLEM: The displays of this manual. Note: A Phillips screwdriver with GFCI-equipped outlets. TROUBLESHOOTING Most treadmill problems can be used if the treadmill is plugged in, unplug it, wait for five minutes, and then plug it back in...
... on SOLUTION: a. c. Make sure that meets all of this manual. PROBLEM: The console displays remain lit when you remove the key, the demo mode is needed , please see page 13). IMPORTANT: The treadmill is plugged in. The console features a display demo mode, designed...PROBLEM: The power turns off circuit breaker located on . PROBLEM: The displays of this manual. Note: A Phillips screwdriver with GFCI-equipped outlets. TROUBLESHOOTING Most treadmill problems can be used if the treadmill is plugged in, unplug it, wait for five minutes, and then plug it back in...

English Manual
Page 27
...63 1 112 Locate the Reed Switch (65) and the Magnet (49) on page 13. Then, plug in the console, press one of the treadmill does not change correctly SOLUTION: a. into the same holes from the Motor Hood (63), and carefully pivot the Motor Hood off the walking platform. ...speed reading. With the key in the power cord, insert the key, and run the treadmill for a cor- After a few minutes. Using the hex key, turn both idler roller bolts counterclockwise, 1/4 of this manual. 27 Repeat until the Top Magnet is properly tightened. Idler Roller Bolts c. If the ...
...63 1 112 Locate the Reed Switch (65) and the Magnet (49) on page 13. Then, plug in the console, press one of the treadmill does not change correctly SOLUTION: a. into the same holes from the Motor Hood (63), and carefully pivot the Motor Hood off the walking platform. ...speed reading. With the key in the power cord, insert the key, and run the treadmill for a cor- After a few minutes. Using the hex key, turn both idler roller bolts counterclockwise, 1/4 of this manual. 27 Repeat until the Top Magnet is properly tightened. Idler Roller Bolts c. If the ...

English Manual
Page 30
... Fan Cover/Console Buttons Speaker 30 Key No. NTL07908.3 R0709A To locate the parts listed below, see the EXPLODED DRAWING near the end of this manual. Qty. 1 44 2 4 3 2 4 8 5 8 6 2 7 8 8 6 9 2 10 4 11 2 12 4 13 1 14 2 15 6 16 7 17 2 18 4 19 10 20 4 21 1 22 2 23 2 24 4 25 2 26 14 27 2 28 4 29 4 30...
... Fan Cover/Console Buttons Speaker 30 Key No. NTL07908.3 R0709A To locate the parts listed below, see the EXPLODED DRAWING near the end of this manual. Qty. 1 44 2 4 3 2 4 8 5 8 6 2 7 8 8 6 9 2 10 4 11 2 12 4 13 1 14 2 15 6 16 7 17 2 18 4 19 10 20 4 21 1 22 2 23 2 24 4 25 2 26 14 27 2 28 4 29 4 30...

English Manual
Page 31
...No. Latch Cap Wire Tie Not Used 5/32" Hex Key 3/16" Hex Key #3 x 1/4" Screw 8" White Wire, M/F 4" Black Wire, M/F 4" Red Wire, M/F 8" Blue Wire, M/F User's Manual Note: Specifications are not illustrated. 31 Description 101 2 102 1 103 4 104 1 105 1 106 1 107 1 108 2 109 1 110 1 111 1 112 1 Plastic Tie 15" Console Ground Wire... Upright Right Upright 113 1 114 4 115 0 116 1 117 1 118 2 * - * - * - * - * - Description Key No. Qty. See the back cover of this manual for information about ordering replacement parts. *These parts are subject to change without notice.
...No. Latch Cap Wire Tie Not Used 5/32" Hex Key 3/16" Hex Key #3 x 1/4" Screw 8" White Wire, M/F 4" Black Wire, M/F 4" Red Wire, M/F 8" Blue Wire, M/F User's Manual Note: Specifications are not illustrated. 31 Description 101 2 102 1 103 4 104 1 105 1 106 1 107 1 108 2 109 1 110 1 111 1 112 1 Plastic Tie 15" Console Ground Wire... Upright Right Upright 113 1 114 4 115 0 116 1 117 1 118 2 * - * - * - * - * - Description Key No. Qty. See the back cover of this manual for information about ordering replacement parts. *These parts are subject to change without notice.
English Manual
Page 36
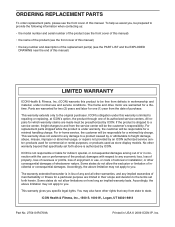
...terms set forth above limitation may also have other warranties, and any implied warranties of the product; ICONʼs obligation under this manual. No other consequential damages of incidental or consequential damages. Some states do not allow limitations on how long an implied warranty lasts....store display models. ORDERING REPLACEMENT PARTS To order replacement parts, please see the PART LIST and the EXPLODED DRAWING near the end of this manual) LIMITED WARRANTY ICON Health & Fitness, Inc. (ICON) warrants this product to be the customerʼs responsibility. To help us : ...
...terms set forth above limitation may also have other warranties, and any implied warranties of the product; ICONʼs obligation under this manual. No other consequential damages of incidental or consequential damages. Some states do not allow limitations on how long an implied warranty lasts....store display models. ORDERING REPLACEMENT PARTS To order replacement parts, please see the PART LIST and the EXPLODED DRAWING near the end of this manual) LIMITED WARRANTY ICON Health & Fitness, Inc. (ICON) warrants this product to be the customerʼs responsibility. To help us : ...

