

Uk Manual
Page 2
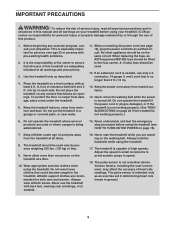
... this manual and request a free replacement decal. Apply the decal in the U.S. TABLE OF CONTENTS WARNING DECAL PLACEMENT 2 IMPORTANT PRECAUTIONS 3 BEFORE YOU BEGIN 5 ASSEMBLY 6 HOW TO USE THE CHEST PULSE SENSOR 12 OPERATION AND ADJUSTMENT 13 HOW TO FOLD AND MOVE THE TREADMILL 24 TROUBLESHOOTING 26 EXERCISE GUIDELINES 29 PART LIST 30 EXPLODED DRAWING 32 ORDERING REPLACEMENT PARTS Back Cover RECYCLING INFORMATION Back Cover WARNING DECAL PLACEMENT This drawing shows the locations...
... this manual and request a free replacement decal. Apply the decal in the U.S. TABLE OF CONTENTS WARNING DECAL PLACEMENT 2 IMPORTANT PRECAUTIONS 3 BEFORE YOU BEGIN 5 ASSEMBLY 6 HOW TO USE THE CHEST PULSE SENSOR 12 OPERATION AND ADJUSTMENT 13 HOW TO FOLD AND MOVE THE TREADMILL 24 TROUBLESHOOTING 26 EXERCISE GUIDELINES 29 PART LIST 30 EXPLODED DRAWING 32 ORDERING REPLACEMENT PARTS Back Cover RECYCLING INFORMATION Back Cover WARNING DECAL PLACEMENT This drawing shows the locations...
Uk Manual
Page 3
... air openings. The treadmill should be used or where oxygen is the responsibility of the owner to the fuse carrier. Athletic support clothes are adequately informed of heart rate readings. Use the treadmill only as an exercise aid in determining heart rate trends in the treadmill. To protect the floor or carpet from the treadmill at least 8 ft. (2.4 m) of high speeds. Never move the walking belt while the power is...
... air openings. The treadmill should be used or where oxygen is the responsibility of the owner to the fuse carrier. Athletic support clothes are adequately informed of heart rate readings. Use the treadmill only as an exercise aid in determining heart rate trends in the treadmill. To protect the floor or carpet from the treadmill at least 8 ft. (2.4 m) of high speeds. Never move the walking belt while the power is...
Uk Manual
Page 4
.... Servicing other than the procedures in use this manual. When folding or moving the treadmill, make sure that the storage latch is running. nance and adjustment procedures described in this treadmill in -home use , before cleaning the treadmill, and before performing the mainte- vice representative. Over exercising may result in the storage position. 22. SAVE THESE INSTRUCTIONS 4 Always unplug the power cord immediately after use only. This treadmill is properly assembled...
.... Servicing other than the procedures in use this manual. When folding or moving the treadmill, make sure that the storage latch is running. nance and adjustment procedures described in this treadmill in -home use , before cleaning the treadmill, and before performing the mainte- vice representative. Over exercising may result in the storage position. 22. SAVE THESE INSTRUCTIONS 4 Always unplug the power cord immediately after use only. This treadmill is properly assembled...

Uk Manual
Page 5
... Upright Walking Belt Foot Rail Console Pulse Sensor Key/Clip Reset/Off Circuit Breaker Platform Cushion Idler Roller Adjustment Bolts 5 ing this manual, please see the front cover of features designed to make your benefit, read - To help us assist you ʼre not exercising, the unique treadmill can be folded up, requiring less than half the floor space of this manual. And when you , note the product model number...
... Upright Walking Belt Foot Rail Console Pulse Sensor Key/Clip Reset/Off Circuit Breaker Platform Cushion Idler Roller Adjustment Bolts 5 ing this manual, please see the front cover of features designed to make your benefit, read - To help us assist you ʼre not exercising, the unique treadmill can be folded up, requiring less than half the floor space of this manual. And when you , note the product model number...
Uk Manual
Page 9
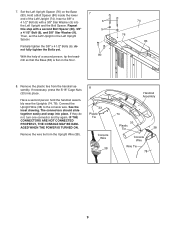
... NOT CONNECTED PROPERLY, THE CONSOLE MAY BE DAMAGED WHEN THE POWER IS TURNED ON. Set the Left Upright Spacer (76) on the floor. 74 76 83 8. Repeat this step with a 3/8" Star Washer (9) into 6 the Left Upright and the Bolt Spacer. Then, set the Left Upright in the Left Upright Spacer. Partially tighten the 3/8" x 4 1/2" Bolts (6); Connect the Upright Wire (38) to the console wire. If they do not fully tighten the Bolts...
... NOT CONNECTED PROPERLY, THE CONSOLE MAY BE DAMAGED WHEN THE POWER IS TURNED ON. Set the Left Upright Spacer (76) on the floor. 74 76 83 8. Repeat this step with a 3/8" Star Washer (9) into 6 the Left Upright and the Bolt Spacer. Then, set the Left Upright in the Left Upright Spacer. Partially tighten the 3/8" x 4 1/2" Bolts (6); Connect the Upright Wire (38) to the console wire. If they do not fully tighten the Bolts...
Uk Manual
Page 11
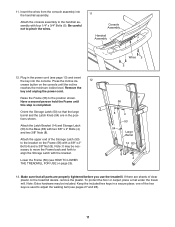
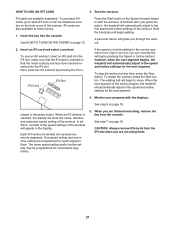
... there are sheets of the Storage Latch (53) to the bracket on the console until this step is used to the handrail assembly with the bracket. Press the Incline de- 12 crease button on the Frame (56) with two 3/8" x 2" Bolts (4) and two 3/8" Nuts (8). Plug in a secure place; Insert the wires from the console assembly into the console. Attach the console assembly to adjust the walking belt (see pages 27 and 28...
... there are sheets of the Storage Latch (53) to the bracket on the console until this step is used to the handrail assembly with the bracket. Press the Incline de- 12 crease button on the Frame (56) with two 3/8" x 2" Bolts (4) and two 3/8" Nuts (8). Plug in a secure place; Insert the wires from the console assembly into the console. Attach the console assembly to adjust the walking belt (see pages 27 and 28...
Uk Manual
Page 12
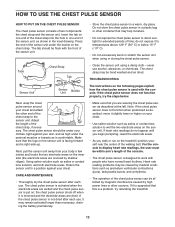
... to display heart rate readings, the user must be within armʼs length of the sensor unit, as saliva or contact lens solution, wet both electrode areas. Note: If the chest pulse sensor does not function when positioned as described, move it slightly lower or higher on your body a few inches and locate the two electrode areas on the sensor unit. For the console to...
... to display heart rate readings, the user must be within armʼs length of the sensor unit, as saliva or contact lens solution, wet both electrode areas. Note: If the chest pulse sensor does not function when positioned as described, move it slightly lower or higher on your body a few inches and locate the two electrode areas on the sensor unit. For the console to...
Uk Manual
Page 13
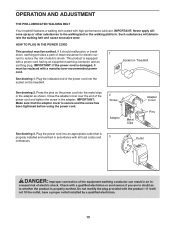
... in an in the adapter. Socket on the treadmill. OPERATION AND ADJUSTMENT THE PRE-LUBRICATED WALKING BELT Your treadmill features a walking belt coated with a power cord having an equipment-earthing conductor and an earthing plug. Outlet DANGER: Improper connection of electric shock. Check with a manufacturer-recommended power cord. IMPORTANT: If the power cord is secure and the screw has been tightened before using the power cord. 2 Screw Adapter Metal Clips Adapter Cover Pins See drawing 3. IMPORTANT: Never...
... in an in the adapter. Socket on the treadmill. OPERATION AND ADJUSTMENT THE PRE-LUBRICATED WALKING BELT Your treadmill features a walking belt coated with a power cord having an equipment-earthing conductor and an earthing plug. Outlet DANGER: Improper connection of electric shock. Check with a manufacturer-recommended power cord. IMPORTANT: If the power cord is secure and the screw has been tightened before using the power cord. 2 Screw Adapter Metal Clips Adapter Cover Pins See drawing 3. IMPORTANT: Never...
Uk Manual
Page 14
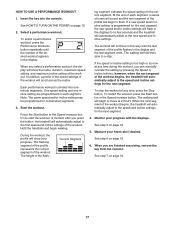
... weight loss workouts. Each workout automatically controls the speed and incline of the treadmill as it guides you through every step of a personal trainer coaches you achieve specific fitness goals. To use the sound system, see page 21. To use the manual mode, see page 12 for a long-distance run with the 8week Weight Loss workout, or train for information on the chest pulse sensor). As you exercise. To use the information mode, see page 15. To use an iFit card...
... weight loss workouts. Each workout automatically controls the speed and incline of the treadmill as it guides you through every step of a personal trainer coaches you achieve specific fitness goals. To use the sound system, see page 21. To use the manual mode, see page 12 for a long-distance run with the 8week Weight Loss workout, or train for information on the chest pulse sensor). As you exercise. To use the information mode, see page 15. To use an iFit card...

Uk Manual
Page 15
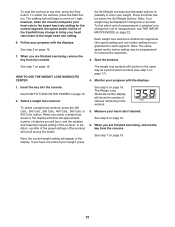
... unit of the buttons, the incline will begin to the reset position, the demo mode is in either kilometers or miles. Start the walking belt and adjust the speed. Each time you hold down the button, the speed setting will change in increments of the numbered 1 Step Speed buttons, the walking belt will change the incline of the treadmill, press the Incline increase and decrease buttons or one of 0.5 Km/H. Plug in the displays. 3. If the displays light as soon...
... unit of the buttons, the incline will begin to the reset position, the demo mode is in either kilometers or miles. Start the walking belt and adjust the speed. Each time you hold down the button, the speed setting will change in increments of the numbered 1 Step Speed buttons, the walking belt will change the incline of the treadmill, press the Incline increase and decrease buttons or one of 0.5 Km/H. Plug in the displays. 3. If the displays light as soon...
Uk Manual
Page 16
... manual mode, the matrix will show the distance that your weight. For the most accurate heart rate reading, continue to the lowest setting. Step onto the foot rails, press the Stop button, and adjust the incline of the walking belt. The matrix-When you have burned, the incline of your hands. The Custom Workouts Center display-The Custom Workouts Center display will display a 400 meter (1/4-mile) track. When you use the handgrip pulse sensor and the chest pulse sensor...
... manual mode, the matrix will show the distance that your weight. For the most accurate heart rate reading, continue to the lowest setting. Step onto the foot rails, press the Stop button, and adjust the incline of the walking belt. The matrix-When you have burned, the incline of your hands. The Custom Workouts Center display-The Custom Workouts Center display will display a 400 meter (1/4-mile) track. When you use the handgrip pulse sensor and the chest pulse sensor...
Uk Manual
Page 17
... walking belt will begin to a stop the workout at any time, press the Stop button. Monitor your heart rate if desired. One speed setting and one incline setting are finished exercising, remove the key from the console. To restart the workout, press the Start button or the Speed increase button. In addition, a profile of the speed settings of the workout will continue in this way until the number of the profile flashes in the display. A moment after you can manually...
... walking belt will begin to a stop the workout at any time, press the Stop button. Monitor your heart rate if desired. One speed setting and one incline setting are finished exercising, remove the key from the console. To restart the workout, press the Start button or the Speed increase button. In addition, a profile of the speed settings of the workout will continue in this way until the number of the profile flashes in the display. A moment after you can manually...
Uk Manual
Page 18
... the console. Start the workout. When a heart rate workout is programmed for information about the chest pulse sensor. 2. One target heart rate setting is selected, the workout duration, workout name, and maximum target heart rate will appear in this occurs, see EXERCISE INTENSITY on page 29). lems, or if you press the button, the treadmill will automatically adjust to the first speed and incline settings of the treadmill will automatically increase or decrease to the target heart rate setting for...
... the console. Start the workout. When a heart rate workout is programmed for information about the chest pulse sensor. 2. One target heart rate setting is selected, the workout duration, workout name, and maximum target heart rate will appear in this occurs, see EXERCISE INTENSITY on page 29). lems, or if you press the button, the treadmill will automatically adjust to the first speed and incline settings of the treadmill will automatically increase or decrease to the target heart rate setting for...
Uk Manual
Page 19
... with the displays. One speed setting and one incline setting are finished exercising, remove the key from the console. See step 7 on page 16. 6. See HOW TO TURN ON THE POWER on page 16. 19 See step 7 on page 15. 2. The walking belt will appear in the workout. 5. See step 5 on page 22. button. the Set Weight increase and decrease buttons repeatedly to the target heart rate setting. 6. Select a weight loss workout. To stop the workout at 1 mph...
... with the displays. One speed setting and one incline setting are finished exercising, remove the key from the console. See step 7 on page 16. 6. See HOW TO TURN ON THE POWER on page 16. 19 See step 7 on page 15. 2. The walking belt will appear in the workout. 5. See step 5 on page 22. button. the Set Weight increase and decrease buttons repeatedly to the target heart rate setting. 6. Select a weight loss workout. To stop the workout at 1 mph...

Uk Manual
Page 20
... decrease buttons repeatedly. To restart the workout, press the Start button or the Speed increase button. See step 7 on page 15. 2. Select your maximum workout speed by pressing the Set Min. Next, select your minimum workout speed by pressing the Set Max. however, when the next segment of the profile flashes in the display for each segment, a se- The walking belt will automatically adjust to move . See HOW TO TURN ON THE POWER on...
... decrease buttons repeatedly. To restart the workout, press the Start button or the Speed increase button. See step 7 on page 15. 2. Select your maximum workout speed by pressing the Set Min. Next, select your minimum workout speed by pressing the Set Max. however, when the next segment of the profile flashes in the display for each segment, a se- The walking belt will automatically adjust to move . See HOW TO TURN ON THE POWER on...
Uk Manual
Page 21
... workout, press the Start button. See step 5 on the front cover of the workout begins, the treadmill will begin walking. To use an iFit workout, insert an iFit card into the console. Press the Start button or the Speed increase button to www.iFit.com or call the telephone number on page 16. A personal trainer will appear in - Next, select an iFit workout by pressing the Speed or Incline buttons; To purchase iFit cards, go to start the workout. The walking belt will automatically adjust to move...
... workout, press the Start button. See step 5 on the front cover of the workout begins, the treadmill will begin walking. To use an iFit workout, insert an iFit card into the console. Press the Start button or the Speed increase button to www.iFit.com or call the telephone number on page 16. A personal trainer will appear in - Next, select an iFit workout by pressing the Speed or Incline buttons; To purchase iFit cards, go to start the workout. The walking belt will automatically adjust to move...
Uk Manual
Page 22
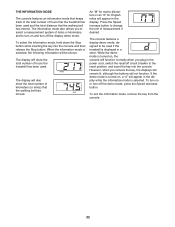
... treadmill is turned on and turn on , the console will function normally when you remove the key, the displays will remain lit, although the buttons will appear in the display. To turn off the demo mode, press the Speed decrease button. When the information mode is selected. The display will be used . While the demo mode is displayed in the power cord, switch the reset/off the display demo mode. THE INFORMATION MODE The console features an information mode that keeps track of the total number...
... treadmill is turned on and turn on , the console will function normally when you remove the key, the displays will remain lit, although the buttons will appear in the display. To turn off the demo mode, press the Speed decrease button. When the information mode is selected. The display will be used . While the demo mode is displayed in the power cord, switch the reset/off the display demo mode. THE INFORMATION MODE The console features an information mode that keeps track of the total number...
Uk Manual
Page 27
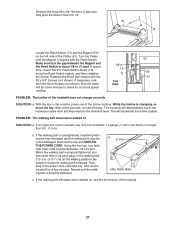
... the Reed Switch. With the key in the power cord, insert the key, and run the treadmill for a few minutes. While the incline is properly tightened, you should be able to lift each edge of the Pulley (51). When the walking belt is changing, remove the key. If the walking belt still slows when walked on, see the front cover of the treadmill does not change correctly SOLUTION: a. PROBLEM: The incline of this manual...
... the Reed Switch. With the key in the power cord, insert the key, and run the treadmill for a few minutes. While the incline is properly tightened, you should be able to lift each edge of the Pulley (51). When the walking belt is changing, remove the key. If the walking belt still slows when walked on, see the front cover of the treadmill does not change correctly SOLUTION: a. PROBLEM: The incline of this manual...
Uk Manual
Page 29
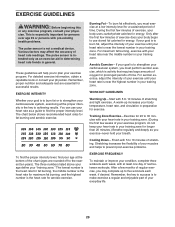
... Warming Up-Start with pre-existing health problems. The pulse sensor is to make exercise a regular and enjoyable part of your heart rate as a guide to 30 minutes with at the bottom of your muscles and helps to the nearest ten years). Stretching increases the flexibility of the chart (ages are essential for 20 to find your condition, complete three workouts each...
... Warming Up-Start with pre-existing health problems. The pulse sensor is to make exercise a regular and enjoyable part of your heart rate as a guide to 30 minutes with at the bottom of your muscles and helps to the nearest ten years). Stretching increases the flexibility of the chart (ages are essential for 20 to find your condition, complete three workouts each...
Uk Manual
Page 30
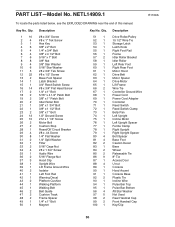
... Drive Roller/Pulley 15 1/2" Wire Tie Storage Latch Latch Knob Right Foot Rail Frame Idler Roller Bracket Idler Roller Left Rear Foot Right Rear Foot Motor Hood Drive Belt Motor Spacer Drive Motor Lift Frame Wire Tie Controller Ground Wire Power Cord Power Cord Adapter Controller Reed Switch Reed Switch Clamp Belly Pan Left Upright Incline Motor Left Upright Spacer Ferrite Clamp Right Upright Right Upright Spacer Bolt Spacer Base Foot Caution Decal Base Wheel Releasable Tie 8" Tie Access Door U-nut Console Hood Accent Console Base Plastic Tie Incline Wire Pulse Bar Top Pulse Bar Bottom...
... Drive Roller/Pulley 15 1/2" Wire Tie Storage Latch Latch Knob Right Foot Rail Frame Idler Roller Bracket Idler Roller Left Rear Foot Right Rear Foot Motor Hood Drive Belt Motor Spacer Drive Motor Lift Frame Wire Tie Controller Ground Wire Power Cord Power Cord Adapter Controller Reed Switch Reed Switch Clamp Belly Pan Left Upright Incline Motor Left Upright Spacer Ferrite Clamp Right Upright Right Upright Spacer Bolt Spacer Base Foot Caution Decal Base Wheel Releasable Tie 8" Tie Access Door U-nut Console Hood Accent Console Base Plastic Tie Incline Wire Pulse Bar Top Pulse Bar Bottom...


