

English Manual
Page 1
... if parts are damaged or missing, DO NOT CONTACT THE STORE; MT ON THE WEB: www.nordictrackservice.com CAUTION Read all precautions and instructions in the space above for future reference. Write the serial number in this manual before contacting Customer Care. Save this equipment. Serial Number Decal QUESTIONS? www.nordictrack.com...
... if parts are damaged or missing, DO NOT CONTACT THE STORE; MT ON THE WEB: www.nordictrackservice.com CAUTION Read all precautions and instructions in the space above for future reference. Write the serial number in this manual before contacting Customer Care. Save this equipment. Serial Number Decal QUESTIONS? www.nordictrack.com...
English Manual
Page 2
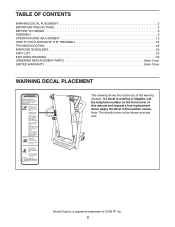
Apply the decal in the location shown. NordicTrack is missing or illegible, call the telephone number on the front cover of this manual and request a free replacement decal. If a decal is a registered trademark ... WARNING DECAL PLACEMENT 2 IMPORTANT PRECAUTIONS 3 BEFORE YOU BEGIN 5 ASSEMBLY 6 OPERATION AND ADJUSTMENT 12 HOW TO FOLD AND MOVE THE TREADMILL 24 TROUBLESHOOTING 26 EXERCISE GUIDELINES 29 PART LIST 30 EXPLODED DRAWING 32 ORDERING REPLACEMENT PARTS Back Cover LIMITED WARRANTY Back Cover WARNING DECAL PLACEMENT This drawing shows the location(s) of ICON IP, Inc. 2
Apply the decal in the location shown. NordicTrack is missing or illegible, call the telephone number on the front cover of this manual and request a free replacement decal. If a decal is a registered trademark ... WARNING DECAL PLACEMENT 2 IMPORTANT PRECAUTIONS 3 BEFORE YOU BEGIN 5 ASSEMBLY 6 OPERATION AND ADJUSTMENT 12 HOW TO FOLD AND MOVE THE TREADMILL 24 TROUBLESHOOTING 26 EXERCISE GUIDELINES 29 PART LIST 30 EXPLODED DRAWING 32 ORDERING REPLACEMENT PARTS Back Cover LIMITED WARRANTY Back Cover WARNING DECAL PLACEMENT This drawing shows the location(s) of ICON IP, Inc. 2

English Manual
Page 3
... 8. If the control system is capable of high speeds. Do not operate the treadmill if the power cord or plug is damaged, or if the treadmill is not working properly.) 16. When connecting the power cord (see your local NordicTrack dealer or call the telephone number on the same circuit. Never start the... increments to avoid sudden jumps in a garage or covered patio, or near water. 5. Before beginning any surface that all users of this manual and order part number 146148, or see HOW TO TURN ON THE POWER on page 14). 9. To purchase a surge suppressor, see page 12), plug the power cord...
... 8. If the control system is capable of high speeds. Do not operate the treadmill if the power cord or plug is damaged, or if the treadmill is not working properly.) 16. When connecting the power cord (see your local NordicTrack dealer or call the telephone number on the same circuit. Never start the... increments to avoid sudden jumps in a garage or covered patio, or near water. 5. Before beginning any surface that all users of this manual and order part number 146148, or see HOW TO TURN ON THE POWER on page 14). 9. To purchase a surge suppressor, see page 12), plug the power cord...

English Manual
Page 4
...other than the procedures in the storage position. 24. scribed in serious injury or death. Inspect and properly tighten all parts of the treadmill by placing objects under the treadmill. 23. If you feel faint or if you experience pain while exercising, stop immediately and cool down. Never insert or... drop any object into the off position when the treadmill is running. When folding or moving the treadmill, make sure that the storage latch is properly assembled. (See ASSEMBLY on page 6, and HOW TO FOLD AND MOVE...
...other than the procedures in the storage position. 24. scribed in serious injury or death. Inspect and properly tighten all parts of the treadmill by placing objects under the treadmill. 23. If you feel faint or if you experience pain while exercising, stop immediately and cool down. Never insert or... drop any object into the off position when the treadmill is running. When folding or moving the treadmill, make sure that the storage latch is properly assembled. (See ASSEMBLY on page 6, and HOW TO FOLD AND MOVE...

English Manual
Page 5
...questions after read this manual. ing this manual, please see the front cover of other treadmills. For your workouts at the drawing below and familiarize yourself with the labeled parts. The model number and the location of the serial number decal are shown on the ... read - If you ʼre not exercising, the unique treadmill can be folded up, requiring less than half the floor space of this manual carefully before contacting us assist you for selecting the revolutionary NordicTrack® REFLEX 8500 PRO treadmill. BEFORE YOU BEGIN Thank you , note the product model number...
...questions after read this manual. ing this manual, please see the front cover of other treadmills. For your workouts at the drawing below and familiarize yourself with the labeled parts. The model number and the location of the serial number decal are shown on the ... read - If you ʼre not exercising, the unique treadmill can be folded up, requiring less than half the floor space of this manual carefully before contacting us assist you for selecting the revolutionary NordicTrack® REFLEX 8500 PRO treadmill. BEFORE YOU BEGIN Thank you , note the product model number...

English Manual
Page 6
... Phillips Use the drawings below each drawing is lubricant on top of this manual. Set the treadmill in parentheses below to be assembled. If there is the key number of the part, from the PART LIST near the end of the walking belt, simply wipe off the lubricant with high-performance lubricant.... This is preattached to one of the packing materials until assembly is the quantity needed for assembly. Note: If a part is not in the hardware kit, check to see if it is normal and does not affect treadmill performance. To avoid damaging parts, do not use power tools for assembly.
... Phillips Use the drawings below each drawing is lubricant on top of this manual. Set the treadmill in parentheses below to be assembled. If there is the key number of the part, from the PART LIST near the end of the walking belt, simply wipe off the lubricant with high-performance lubricant.... This is preattached to one of the packing materials until assembly is the quantity needed for assembly. Note: If a part is not in the hardware kit, check to see if it is normal and does not affect treadmill performance. To avoid damaging parts, do not use power tools for assembly.

English Manual
Page 11
...It may be helpful if a second person tips the treadmill slightly as shown. Make sure that all parts are properly tightened before you tighten the Bolts. Lower the treadmill (see HOW TO LOWER THE TREADMILL FOR USE on the treadmill as you use the treadmill. 9. Place the treadmill in a secure place; Keep the included hex key ...in the storage position (see pages 27 and 28). Attach the Base Plate to adjust the walking belt (see HOW TO FOLD THE TREADMILL on page 24). 9 Position the Base Plate (97) on page 25). 3 3 97 43 10. the hex key is used to the Uprights (43...
...It may be helpful if a second person tips the treadmill slightly as shown. Make sure that all parts are properly tightened before you tighten the Bolts. Lower the treadmill (see HOW TO LOWER THE TREADMILL FOR USE on the treadmill as you use the treadmill. 9. Place the treadmill in a secure place; Keep the included hex key ...in the storage position (see pages 27 and 28). Attach the Base Plate to adjust the walking belt (see HOW TO FOLD THE TREADMILL on page 24). 9 Position the Base Plate (97) on page 25). 3 3 97 43 10. the hex key is used to the Uprights (43...

English Manual
Page 20
...cause harmful interference to radio communications. If this device must not be determined by one of the FCC Rules. This device complies with Part 15 of the following two conditions: (1) This device may not cause harmful interference, and (2) this equipment does cause harmful interference to...page 14). HOW TO USE THE IFIT LIVE MODE The iFit Live mode enables the treadmill to communicate with your workout results, and access many other antenna or transmitter. Connect your treadmill to [email protected]. 20 You will not occur in accordance with the instructions,...
...cause harmful interference to radio communications. If this device must not be determined by one of the FCC Rules. This device complies with Part 15 of the following two conditions: (1) This device may not cause harmful interference, and (2) this equipment does cause harmful interference to...page 14). HOW TO USE THE IFIT LIVE MODE The iFit Live mode enables the treadmill to communicate with your workout results, and access many other antenna or transmitter. Connect your treadmill to [email protected]. 20 You will not occur in accordance with the instructions,...

English Manual
Page 24
...Place one foot against the pin. Make sure to the lowest position before you fold the treadmill. Do not leave the treadmill in the storage position in the location shown by the plastic parts. Moving the treadmill may require two people. 1. Hold the uprights and place one foot against the pin ...as described at the left and hold the treadmill by the arrow below. Raise the walking platform until the treadmill will roll on the latch knob....
...Place one foot against the pin. Make sure to the lowest position before you fold the treadmill. Do not leave the treadmill in the storage position in the location shown by the plastic parts. Moving the treadmill may require two people. 1. Hold the uprights and place one foot against the pin ...as described at the left and hold the treadmill by the arrow below. Raise the walking platform until the treadmill will roll on the latch knob....

English Manual
Page 25
Pivot the walking platform downward a few inches, and release the latch knob. 2. Walking Platform Latch Knob Walking Platform 25 if necessary, push the walking platform forward slightly. Hold the walking platform firmly with your back straight. Pull the latch knob to the floor. Make sure to bend your legs and keep your right hand. HOW TO LOWER THE TREADMILL FOR USE 1. CAUTION: Do not hold the walking platform by the plastic parts, and do not drop the walking platform. Hold the upper end of the treadmill with both hands, and lower it to the left;
Pivot the walking platform downward a few inches, and release the latch knob. 2. Walking Platform Latch Knob Walking Platform 25 if necessary, push the walking platform forward slightly. Hold the walking platform firmly with your back straight. Pull the latch knob to the floor. Make sure to bend your legs and keep your right hand. HOW TO LOWER THE TREADMILL FOR USE 1. CAUTION: Do not hold the walking platform by the plastic parts, and do not drop the walking platform. Hold the upper end of the treadmill with both hands, and lower it to the left;
English Manual
Page 29
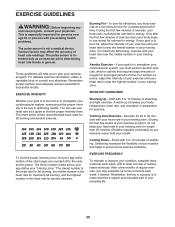
.... WORKOUT GUIDELINES Warming Up-Start with at the proper intensity is the heart rate for successful results. A warm-up to make exercise a regular and enjoyable part of exercise, your physician. These guidelines will help you may affect the accuracy of exercise does your heart rate as an exercise aid in determining...
.... WORKOUT GUIDELINES Warming Up-Start with at the proper intensity is the heart rate for successful results. A warm-up to make exercise a regular and enjoyable part of exercise, your physician. These guidelines will help you may affect the accuracy of exercise does your heart rate as an exercise aid in determining...

English Manual
Page 30
... Key Upright Pulse Crossbar Pulse Bar Ground Wire #8 Star Washer Front Left Cap Belt Guide Latch Plate Magnet Key No. NTL11909.1 R0111A To locate the parts listed below, see the EXPLODED DRAWING near the end of this manual. Key No...
... Key Upright Pulse Crossbar Pulse Bar Ground Wire #8 Star Washer Front Left Cap Belt Guide Latch Plate Magnet Key No. NTL11909.1 R0111A To locate the parts listed below, see the EXPLODED DRAWING near the end of this manual. Key No...

English Manual
Page 31
... Accessory Tray Filter Access Door Pulse Bar #8 x 1" Screw 1/4" Star Washer #10 x 1/2" Screw User's Manual Note: Specifications are not illustrated. 31 For information about ordering replacement parts, see the back cover of this manual. *These parts are subject to change without notice. Qty. Qty. Description Key No. Key No.
... Accessory Tray Filter Access Door Pulse Bar #8 x 1" Screw 1/4" Star Washer #10 x 1/2" Screw User's Manual Note: Specifications are not illustrated. 31 For information about ordering replacement parts, see the back cover of this manual. *These parts are subject to change without notice. Qty. Qty. Description Key No. Key No.

English Manual
Page 36
... misuse, improper or abnormal usage, or repairs not provided by ICON. ICON Health & Fitness, Inc., 1500 S. 1000 W., Logan, UT 84321-9813 Part No. 306389 R0111A Printed in workmanship and material, under warranty, the customer will be preauthorized by ICON. The walking platform, lift frame, and drive... product; Labor is warranted for two (2) years from the date of this manual) • the key number and description of the replacement part(s) (see the front cover of purchase. ICONʼs obligation under warranty. For in-home service, the customer will be the customerʼs...
... misuse, improper or abnormal usage, or repairs not provided by ICON. ICON Health & Fitness, Inc., 1500 S. 1000 W., Logan, UT 84321-9813 Part No. 306389 R0111A Printed in workmanship and material, under warranty, the customer will be preauthorized by ICON. The walking platform, lift frame, and drive... product; Labor is warranted for two (2) years from the date of this manual) • the key number and description of the replacement part(s) (see the front cover of purchase. ICONʼs obligation under warranty. For in-home service, the customer will be the customerʼs...


