

Uk Manual
Page 1
c/o HI Group PLC, Express Way Whitwood, West Yorkshire WF10 5QJ UK CAUTION Read all precautions and instructions in the space above for future reference. If you have questions, or if there are missing parts, please contact us: Call: 08457 089 009 From Ireland: 053 92 36102 Email: Visit www.iconsupport.eu Write: ICON Health & Fitness, Ltd. Keep this equipment. Serial Number Decal QUESTIONS? Model No. NTEVEX75010.0 Serial No. USERʼS MANUAL www.iconeurope.com Write the serial number in this manual before using this manual for reference.
c/o HI Group PLC, Express Way Whitwood, West Yorkshire WF10 5QJ UK CAUTION Read all precautions and instructions in the space above for future reference. If you have questions, or if there are missing parts, please contact us: Call: 08457 089 009 From Ireland: 053 92 36102 Email: Visit www.iconsupport.eu Write: ICON Health & Fitness, Ltd. Keep this equipment. Serial Number Decal QUESTIONS? Model No. NTEVEX75010.0 Serial No. USERʼS MANUAL www.iconeurope.com Write the serial number in this manual before using this manual for reference.

Uk Manual
Page 2
Note: The decal(s) may not be shown at actual size. TABLE OF CONTENTS WARNING DECAL PLACEMENT 2 IMPORTANT PRECAUTIONS 3 BEFORE YOU BEGIN 4 ASSEMBLY 5 HOW TO USE THE EXERCISE BIKE 8 EXERCISE GUIDELINES 9 PART LIST 10 EXPLODED DRAWING 11 ORDERING REPLACEMENT PARTS Back Cover WARNING DECAL PLACEMENT This drawing shows the location(s) of ICON IP, Inc. 2 NordicTrack is missing or illegible, see the front cover of this manual and request a free replacement decal. Apply the decal in the location shown. If a decal is a registered trademark of the warning decal(s).
Note: The decal(s) may not be shown at actual size. TABLE OF CONTENTS WARNING DECAL PLACEMENT 2 IMPORTANT PRECAUTIONS 3 BEFORE YOU BEGIN 4 ASSEMBLY 5 HOW TO USE THE EXERCISE BIKE 8 EXERCISE GUIDELINES 9 PART LIST 10 EXPLODED DRAWING 11 ORDERING REPLACEMENT PARTS Back Cover WARNING DECAL PLACEMENT This drawing shows the location(s) of ICON IP, Inc. 2 NordicTrack is missing or illegible, see the front cover of this manual and request a free replacement decal. Apply the decal in the location shown. If a decal is a registered trademark of the warning decal(s).

Uk Manual
Page 3
...2. Keep the exercise bike indoors, away from the exercise bike at least 2 ft. (0.6 m) of clearance around the exercise bike. 6. Make sure that all users of the exercise bike are adequately informed of all precautions. 9. Inspect and properly tighten all parts regularly. Reduce your ...back. 4. Do not use only. The exercise bike should not be used by or through the use of this product. 1. Before beginning any worn parts immediately. 11. Replace any exercise program, consult your exercise bike. The exercise bike does not have a freewheel; To stop immediately...
...2. Keep the exercise bike indoors, away from the exercise bike at least 2 ft. (0.6 m) of clearance around the exercise bike. 6. Make sure that all users of the exercise bike are adequately informed of all precautions. 9. Inspect and properly tighten all parts regularly. Reduce your ...back. 4. Do not use only. The exercise bike should not be used by or through the use of this product. 1. Before beginning any worn parts immediately. 11. Replace any exercise program, consult your exercise bike. The exercise bike does not have a freewheel; To stop immediately...

Uk Manual
Page 4
...the exercise bike. Before reading further, please familiarize yourself with the parts that are shown on the front cover of the serial number decal are labeled in the drawing below. The model number and the location of this manual. The GX2 SPORT exercise bike provides a...for increasing cardiovascular fitness, building endurance, and toning the body. Cycling is an effective exercise for selecting the new NordicTrack® GX2 SPORT exercise bike. For your workouts at home more effective and enjoyable. Seat Resistance Knob Brake Lever Handlebar Adjustment Knobs Water Bottle ...
...the exercise bike. Before reading further, please familiarize yourself with the parts that are shown on the front cover of the serial number decal are labeled in the drawing below. The model number and the location of this manual. The GX2 SPORT exercise bike provides a...for increasing cardiovascular fitness, building endurance, and toning the body. Cycling is an effective exercise for selecting the new NordicTrack® GX2 SPORT exercise bike. For your workouts at home more effective and enjoyable. Seat Resistance Knob Brake Lever Handlebar Adjustment Knobs Water Bottle ...
Uk Manual
Page 5
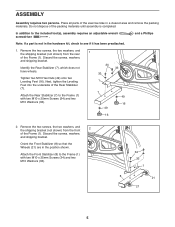
Place all parts of the exercise bike in the hardware kit, check to the included tool(s), assembly requires an adjustable wrench screwdriver . and a Phillips Note: If a part is completed. Attach the Rear Stabilizer (7) to the Frame (1) with two M10 x 25mm Screws (34) and two M10 Washers (33). 1 34 33 33 1 7 49 16 ...
Place all parts of the exercise bike in the hardware kit, check to the included tool(s), assembly requires an adjustable wrench screwdriver . and a Phillips Note: If a part is completed. Attach the Rear Stabilizer (7) to the Frame (1) with two M10 x 25mm Screws (34) and two M10 Washers (33). 1 34 33 33 1 7 49 16 ...

Uk Manual
Page 7
...Seat Post (2). Attach the Seat (22) to protect the floor. 7 Loosen the Adjustment Knob and pull it outward. Place a mat beneath the exercise bike to the Seat Carriage (3) with two M8 Hex Nuts (66). Locate the Adjustment Knob (23) on the rear of the Seat is completed, some... of the Frame (1). Note: After assembly is pointing straight ahead before you tighten the Hex Nuts. Make sure that all parts are properly tightened before you use the exercise bike. Orient the Seat Post (2) as shown. 7 See the inset drawing. Loosen the Adjustment Knob and pull it downward. ...
...Seat Post (2). Attach the Seat (22) to protect the floor. 7 Loosen the Adjustment Knob and pull it outward. Place a mat beneath the exercise bike to the Seat Carriage (3) with two M8 Hex Nuts (66). Locate the Adjustment Knob (23) on the rear of the Seat is completed, some... of the Frame (1). Note: After assembly is pointing straight ahead before you tighten the Hex Nuts. Make sure that all parts are properly tightened before you use the exercise bike. Orient the Seat Post (2) as shown. 7 See the inset drawing. Loosen the Adjustment Knob and pull it downward. ...
Uk Manual
Page 8
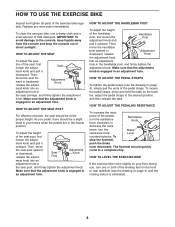
... during use a damp cloth and a small amount of the pedals, turn the Brake resistance knob Lever counterclockwise. Replace any worn parts immediately. To clean the exercise bike, use , turn one or both of the leveling feet on the front or rear stabilizer (see the drawing on the buckles,... the seat, first loosen the adjust- HOW TO ADJUST THE PEDALING RESISTANCE To increase the resis- HOW TO USE THE EXERCISE BIKE Inspect and tighten all parts of the handlebar post, first loosen the adjustment knob and Handlebar Post pull it outward. Seat ment knob and pull it outward...
... during use a damp cloth and a small amount of the pedals, turn the Brake resistance knob Lever counterclockwise. Replace any worn parts immediately. To clean the exercise bike, use , turn one or both of the leveling feet on the front or rear stabilizer (see the drawing on the buckles,... the seat, first loosen the adjust- HOW TO ADJUST THE PEDALING RESISTANCE To increase the resis- HOW TO USE THE EXERCISE BIKE Inspect and tighten all parts of the handlebar post, first loosen the adjustment knob and Handlebar Post pull it outward. Seat ment knob and pull it outward...

Uk Manual
Page 9
... are essential for energy. If your goal is to find your exercise program. Aerobic Exercise-If your goal is to make exercise a regular and enjoyable part of your exercise program, do not keep your heart rate in general. Cooling Down-Finish with your heart rate near the highest number in your...
... are essential for energy. If your goal is to find your exercise program. Aerobic Exercise-If your goal is to make exercise a regular and enjoyable part of your exercise program, do not keep your heart rate in general. Cooling Down-Finish with your heart rate near the highest number in your...

Uk Manual
Page 10
PART LIST-Model No. Qty. 36 1 37 1 38 2 39 1 40 2 41 2 42 1 43 1 44 2 45 2 46 4 47 1 48 2 49 4 50 3 51 1 52 4 53 2 54 2 55 3 56 1 ... Hex Nut Handlebar Post Bushing Assembly Tool Userʼs Manual Note: Specifications are not illustrated. 10 For information about ordering replacement parts, see the back cover of this manual. *These parts are subject to change without notice. NTEVEX75010.0 R0510A Key No. Qty. 1 1 2 1 3 1 4 1 5 1 6 2 7 1 8 1 9 1 10 1 11 1 12 1 13 7 14 1 15 1 16 4 17 2 18 4 19...
PART LIST-Model No. Qty. 36 1 37 1 38 2 39 1 40 2 41 2 42 1 43 1 44 2 45 2 46 4 47 1 48 2 49 4 50 3 51 1 52 4 53 2 54 2 55 3 56 1 ... Hex Nut Handlebar Post Bushing Assembly Tool Userʼs Manual Note: Specifications are not illustrated. 10 For information about ordering replacement parts, see the back cover of this manual. *These parts are subject to change without notice. NTEVEX75010.0 R0510A Key No. Qty. 1 1 2 1 3 1 4 1 5 1 6 2 7 1 8 1 9 1 10 1 11 1 12 1 13 7 14 1 15 1 16 4 17 2 18 4 19...

Uk Manual
Page 12
ORDERING REPLACEMENT PARTS To order replacement parts, please see the PART LIST and the EXPLODED DRAWING near the end of this manual) Part No. 300025 R0510A Printed in China © 2010 ICON IP, Inc. To help us assist you, be prepared to provide the following information when contacting us: • the model number and serial number of the product (see the front cover of this manual) • the name of the product (see the front cover of this manual) • the key number and description of the replacement part(s) (see the front cover of this manual.
ORDERING REPLACEMENT PARTS To order replacement parts, please see the PART LIST and the EXPLODED DRAWING near the end of this manual) Part No. 300025 R0510A Printed in China © 2010 ICON IP, Inc. To help us assist you, be prepared to provide the following information when contacting us: • the model number and serial number of the product (see the front cover of this manual) • the name of the product (see the front cover of this manual) • the key number and description of the replacement part(s) (see the front cover of this manual.


