
English Manual
Page 1
... product (see the limited warranty on the back cover of this manual) before using this equipment. MT ON THE WEB: www.nordictrackservice.com CAUTION Read all precautions and instructions in the space above for future reference. Keep this manual before contacting Customer Care. USER’'S MANUAL Write the serial number in this manual for reference. MT Sat. 8 a.m.–-4 p.m. www.nordictrack.com Model No. If you...
... product (see the limited warranty on the back cover of this manual) before using this equipment. MT ON THE WEB: www.nordictrackservice.com CAUTION Read all precautions and instructions in the space above for future reference. Keep this manual before contacting Customer Care. USER’'S MANUAL Write the serial number in this manual for reference. MT Sat. 8 a.m.–-4 p.m. www.nordictrack.com Model No. If you...
English Manual
Page 2
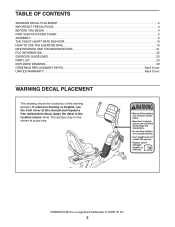
... size. NORDICTRACK is missing or illegible, see the front cover of this manual and request a free replacement decal. TABLE OF CONTENTS WARNING DECAL PLACEMENT 2 IMPORTANT PRECAUTIONS 3 BEFORE YOU BEGIN 4 PART IDENTIFICATION CHART 5 ASSEMBLY 6 THE CHEST HEART RATE MONITOR 13 HOW TO USE THE EXERCISE BIKE 14 MAINTENANCE AND TROUBLESHOOTING 21 FCC INFORMATION 22 EXERCISE GUIDELINES 23 PART LIST 24 EXPLODED DRAWING 26 ORDERING REPLACEMENT PARTS Back Cover LIMITED WARRANTY Back Cover WARNING DECAL PLACEMENT This drawing shows the location...
... size. NORDICTRACK is missing or illegible, see the front cover of this manual and request a free replacement decal. TABLE OF CONTENTS WARNING DECAL PLACEMENT 2 IMPORTANT PRECAUTIONS 3 BEFORE YOU BEGIN 4 PART IDENTIFICATION CHART 5 ASSEMBLY 6 THE CHEST HEART RATE MONITOR 13 HOW TO USE THE EXERCISE BIKE 14 MAINTENANCE AND TROUBLESHOOTING 21 FCC INFORMATION 22 EXERCISE GUIDELINES 23 PART LIST 24 EXPLODED DRAWING 26 ORDERING REPLACEMENT PARTS Back Cover LIMITED WARRANTY Back Cover WARNING DECAL PLACEMENT This drawing shows the location...

English Manual
Page 3
... or if you experience pain while exercising, stop immediately and cool down. 7. Do not use the exercise bike in a garage or covered patio, or near water. 6. The heart rate monitor is especially important for foot protection. 3. IMPORTANT PRECAUTIONS WARNING: To reduce the risk of serious injury, read all important precautions and instructions in this manual and all precautions. 10. Before beginning...
... or if you experience pain while exercising, stop immediately and cool down. 7. Do not use the exercise bike in a garage or covered patio, or near water. 6. The heart rate monitor is especially important for foot protection. 3. IMPORTANT PRECAUTIONS WARNING: To reduce the risk of serious injury, read all important precautions and instructions in this manual and all precautions. 10. Before beginning...
English Manual
Page 4
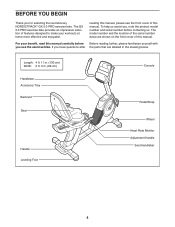
... Seat Handle Leveling Foot Console Pedal/Strap Wheel Heart Rate Monitor Adjustment Handle Seat Handlebar 4 The GX 5.0 PRO exercise bike provides an impressive selection of this manual. To help us assist you for selecting the revolutionary NORDICTRACK® GX 5.0 PRO exercise bike. Length: 4 ft. 11 in. (150 cm) Width: 2 ft. 3 in the drawing below. For your workouts at home more effective and enjoyable. reading this manual, please see the front cover of this manual...
... Seat Handle Leveling Foot Console Pedal/Strap Wheel Heart Rate Monitor Adjustment Handle Seat Handlebar 4 The GX 5.0 PRO exercise bike provides an impressive selection of this manual. To help us assist you for selecting the revolutionary NORDICTRACK® GX 5.0 PRO exercise bike. Length: 4 ft. 11 in. (150 cm) Width: 2 ft. 3 in the drawing below. For your workouts at home more effective and enjoyable. reading this manual, please see the front cover of this manual...
English Manual
Page 6
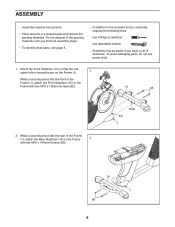
... the rear of the Frame (1), attach the Rear Stabilizer (16) to the included tool(s), assembly requires the following tools: one Phillips screwdriver one adjustable wrench Assembly may be easier if you have a set of the packing materials until you nish all parts in a cleared area and remove the packing materials. Pin 1 Hole 16 1 65 6 To avoid damaging parts, do not use power...
... the rear of the Frame (1), attach the Rear Stabilizer (16) to the included tool(s), assembly requires the following tools: one Phillips screwdriver one adjustable wrench Assembly may be easier if you have a set of the packing materials until you nish all parts in a cleared area and remove the packing materials. Pin 1 Hole 16 1 65 6 To avoid damaging parts, do not use power...
English Manual
Page 12
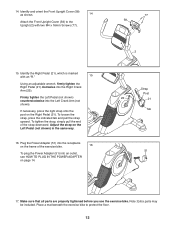
... included. Make sure that all parts are properly tightened before you use the exercise bike. Identify and orient the Front Upright Cover (58) as shown. 14 Attach the Front Upright Cover (58) to protect the floor. 12 To tighten the strap, simply pull the end of the exercise bike. 16 To plug the Power Adapter (51) into the Left Crank Arm (not shown). Adjust the strap on page 14. 77 58...
... included. Make sure that all parts are properly tightened before you use the exercise bike. Identify and orient the Front Upright Cover (58) as shown. 14 Attach the Front Upright Cover (58) to protect the floor. 12 To tighten the strap, simply pull the end of the exercise bike. 16 To plug the Power Adapter (51) into the Left Crank Arm (not shown). Adjust the strap on page 14. 77 58...
English Manual
Page 13
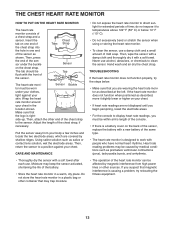
.... •• For the console to display heart rate readings, you suspect that may trap moisture. •• The operation of the heart rate monitor can be within arm’'s length of the console. •• If there is a battery cover on one end of the sensor. THE CHEST HEART RATE MONITOR HOW TO PUT ON THE HEART RATE MONITOR The heart rate monitor consists of the chest strap, if necessary. Insert the tab...
.... •• For the console to display heart rate readings, you suspect that may trap moisture. •• The operation of the heart rate monitor can be within arm’'s length of the console. •• If there is a battery cover on one end of the sensor. THE CHEST HEART RATE MONITOR HOW TO PUT ON THE HEART RATE MONITOR The heart rate monitor consists of the chest strap, if necessary. Insert the tab...
English Manual
Page 14
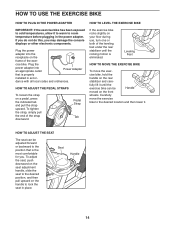
... handle to lock the seat in the power adapter. Carefully move the exer- Pedal Strap Tab If the exercise bike rocks slightly on the rear stabilizer and care- HOW TO ADJUST THE SEAT The seat can be adjusted forward or backward to the desired location and then lower it until the rocking motion is the most comfortable for you may damage the console displays or other electronic...
... handle to lock the seat in the power adapter. Carefully move the exer- Pedal Strap Tab If the exercise bike rocks slightly on the rear stabilizer and care- HOW TO ADJUST THE SEAT The seat can be adjusted forward or backward to the desired location and then lower it until the rocking motion is the most comfortable for you may damage the console displays or other electronic...
English Manual
Page 15
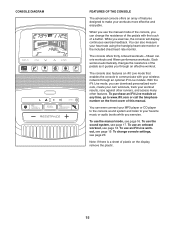
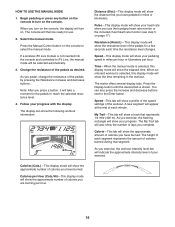
... console, you through an optional iFit Live module. The console also features an iFit Live mode that enables the console to make your heart rate using the handgrip heart rate monitor or the included chest heart rate monitor. To use the sound system, see page 16. The console offers thirty onboard workouts—-fifteen calorie workouts and fifteen performance workouts. You can change console settings, see page 19. Each workout automatically changes the resistance of a button. To use the manual mode...
... console, you through an optional iFit Live module. The console also features an iFit Live mode that enables the console to make your heart rate using the handgrip heart rate monitor or the included chest heart rate monitor. To use the sound system, see page 16. The console offers thirty onboard workouts—-fifteen calorie workouts and fifteen performance workouts. You can change console settings, see page 19. Each workout automatically changes the resistance of a button. To use the manual mode...
English Manual
Page 16
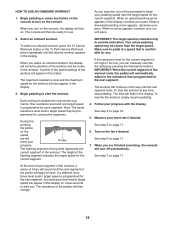
... pedals for use the handgrip heart rate monitor or the included chest heart rate monitor (see step 5 on the console to the Enter button. As you exercise, the workout intensity level bar will then be selected automatically. 3. Calories per hour. Begin pedaling or press any button on . Select the manual mode. As you exercise, the flashing rectangle will show the approximate number of the pedals by pressing the Resistance increase and decrease buttons. As you pedal, change the resistance...
... pedals for use the handgrip heart rate monitor or the included chest heart rate monitor (see step 5 on the console to the Enter button. As you exercise, the workout intensity level bar will then be selected automatically. 3. Calories per hour. Begin pedaling or press any button on . Select the manual mode. As you exercise, the flashing rectangle will show the approximate number of the pedals by pressing the Resistance increase and decrease buttons. As you pedal, change the resistance...
English Manual
Page 17
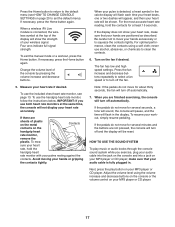
... fan will turn off and the display will be reset. Adjust the volume level using a soft cloth; To exit the manual mode or a workout, press the Home button. When your pulse is detected, a heart symbol in . never use both heart rate monitors at the same time, the console will not display your hands are not pressed, the console will turn off automatically. Next, press the play music or audio books through the console sound system...
... fan will turn off and the display will be reset. Adjust the volume level using a soft cloth; To exit the manual mode or a workout, press the Home button. When your pulse is detected, a heart symbol in . never use both heart rate monitors at the same time, the console will not display your hands are not pressed, the console will turn off automatically. Next, press the play music or audio books through the console sound system...
English Manual
Page 18
... segment is programmed for you are finished exercising, the console will then change. 18 If a different resistance level and/or target speed is too high or too low, you turn on the console, the display will appear in the display, increase your pedaling speed near the target speed for the current segment. The resistance of the workout. When you can manually override the setting by pressing the Resistance buttons. When...
... segment is programmed for you are finished exercising, the console will then change. 18 If a different resistance level and/or target speed is too high or too low, you turn on the console, the display will appear in the display, increase your pedaling speed near the target speed for the current segment. The resistance of the workout. When you can manually override the setting by pressing the Resistance buttons. When...

English Manual
Page 19
... enabled (hidden networks are finished exercising, the console will then be near or connected to your workout. See step 4 on the fan if desired. Turn on page 16. During some workouts will turn off automatically. See step 7 on . Press the My Trainer button, the My Maps button, the World Tour button, or the Event Training button to www.iFit.com or see www.iFit.com. To purchase an...
... enabled (hidden networks are finished exercising, the console will then be near or connected to your workout. See step 4 on the fan if desired. Turn on page 16. During some workouts will turn off automatically. See step 7 on . Press the My Trainer button, the My Maps button, the World Tour button, or the Event Training button to www.iFit.com or see www.iFit.com. To purchase an...
English Manual
Page 20
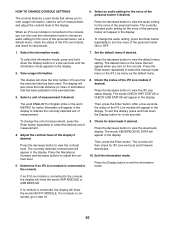
... exit the information mode. The currently selected audio setting for the voice of measurement. To change the audio setting, press the Enter button repeatedly to indicate the currently selected unit of the personal trainer if desired. The currently selected contrast level will appear in the display to turn on the exercise bike. 3. Check for iFit Live workouts and firmware downloads. 10. If an iFit Live module is connected, the display will...
... exit the information mode. The currently selected audio setting for the voice of measurement. To change the audio setting, press the Enter button repeatedly to indicate the currently selected unit of the personal trainer if desired. The currently selected contrast level will appear in the display to turn on the exercise bike. 3. Check for iFit Live workouts and firmware downloads. 10. If an iFit Live module is connected, the display will...
English Manual
Page 21
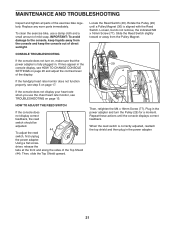
..., the reed switch should be adjusted. 44 To adjust the reed switch, first unplug the power adapter. Using a flat screwdriver, release the tabs at the front and along the sides of the exercise bike regularly. When the reed switch is correctly adjusted, reattach the top shield and then plug in the console display, see HOW TO CHANGE CONSOLE SETTINGS on , make sure that the power adapter is aligned with the Reed Switch. Locate the Reed Switch (46...
..., the reed switch should be adjusted. 44 To adjust the reed switch, first unplug the power adapter. Using a flat screwdriver, release the tabs at the front and along the sides of the exercise bike regularly. When the reed switch is correctly adjusted, reattach the top shield and then plug in the console display, see HOW TO CHANGE CONSOLE SETTINGS on , make sure that the power adapter is aligned with the Reed Switch. Locate the Reed Switch (46...
English Manual
Page 22
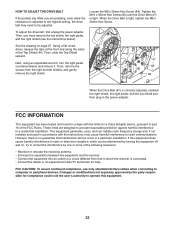
... equipment generates, uses, and can be adjusted. Loosen the M6 x 20mm Hex Screw (84). To adjust the drive belt, first unplug the power adapter. These limits are pedaling, even while the resistance is correctly adjusted, reattach the right shield, the right pedal, and the top shield and then plug in accordance with the limits for compliance could void the user’'s authority to part 15 of the...
... equipment generates, uses, and can be adjusted. Loosen the M6 x 20mm Hex Screw (84). To adjust the drive belt, first unplug the power adapter. These limits are pedaling, even while the resistance is correctly adjusted, reattach the right shield, the right pedal, and the top shield and then plug in accordance with the limits for compliance could void the user’'s authority to part 15 of the...
English Manual
Page 23
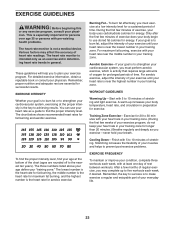
... your training zone. For aerobic exercise, adjust the intensity of the chart (ages are essential for energy. WORKOUT GUIDELINES Warming Up—-Start with at a low intensity level for prolonged periods of heart rate readings. The chart below shows recommended heart rates for energy. A warm-up to strengthen your cardiovascular system, exercising at the bottom of your exercise until your heart rate is the heart rate for...
... your training zone. For aerobic exercise, adjust the intensity of the chart (ages are essential for energy. WORKOUT GUIDELINES Warming Up—-Start with at a low intensity level for prolonged periods of heart rate readings. The chart below shows recommended heart rates for energy. A warm-up to strengthen your cardiovascular system, exercising at the bottom of your exercise until your heart rate is the heart rate for...
English Manual
Page 24
... Set Seat Handlebar Brake Block Left Front Shield Right Front Shield Front Stabilizer Rear Stabilizer Wheel Brake Leveling Foot Right Handlebar Right Pedal/Strap Left Pedal/Strap Right Crank Arm Left Crank Arm M6 x 38mm Screw Adjustment Bar Handle Handle Bracket Large Snap Ring Pulley Pulley Magnet Crank Brake Axle Crank Bearing Flywheel Flywheel Axle Resistance Magnet Resistance Motor Motor Bracket Idler Accessory Tray/Receiver Wire Seat Carriage Frame Pulse Wire/Receptacle Main Wire Top Shield Clamp Reed Switch/Wire Model...
... Set Seat Handlebar Brake Block Left Front Shield Right Front Shield Front Stabilizer Rear Stabilizer Wheel Brake Leveling Foot Right Handlebar Right Pedal/Strap Left Pedal/Strap Right Crank Arm Left Crank Arm M6 x 38mm Screw Adjustment Bar Handle Handle Bracket Large Snap Ring Pulley Pulley Magnet Crank Brake Axle Crank Bearing Flywheel Flywheel Axle Resistance Magnet Resistance Motor Motor Bracket Idler Accessory Tray/Receiver Wire Seat Carriage Frame Pulse Wire/Receptacle Main Wire Top Shield Clamp Reed Switch/Wire Model...

English Manual
Page 25
Description 93 2 M6 Bright Locknut 94 1 M5 Washer 95 1 Steel Washer 96 5 M6 Split Washer 97 1 Right Rear Shield 98 1 Left Rear Shield 99 2 Tree Fastener 100 4 101 2 102 1 103 1 104 1 * –- * –- Qty. Qty. M10 Split Washer M10 Locknut Chest Strap Backrest Cover Heart Rate Monitor Assembly Tool User’'s Manual Note: Specications are not illustrated. 25 Key No. For information about ordering replacement parts, see the back cover of this manual. *These parts are subject to change without notice. Description Key No.
Description 93 2 M6 Bright Locknut 94 1 M5 Washer 95 1 Steel Washer 96 5 M6 Split Washer 97 1 Right Rear Shield 98 1 Left Rear Shield 99 2 Tree Fastener 100 4 101 2 102 1 103 1 104 1 * –- * –- Qty. Qty. M10 Split Washer M10 Locknut Chest Strap Backrest Cover Heart Rate Monitor Assembly Tool User’'s Manual Note: Specications are not illustrated. 25 Key No. For information about ordering replacement parts, see the back cover of this manual. *These parts are subject to change without notice. Description Key No.

English Manual
Page 28
... cover of this manual) •• the key number and description of the replacement part(s) (see the front cover of this manual. Some states do not allow limitations on how long an implied warranty lasts. All repairs for indirect, special, or consequential damages arising out of or in China © 2012 ICON IP, Inc. ICON is under warranty. ORDERING REPLACEMENT PARTS To order replacement parts, please see the PART LIST...
... cover of this manual) •• the key number and description of the replacement part(s) (see the front cover of this manual. Some states do not allow limitations on how long an implied warranty lasts. All repairs for indirect, special, or consequential damages arising out of or in China © 2012 ICON IP, Inc. ICON is under warranty. ORDERING REPLACEMENT PARTS To order replacement parts, please see the PART LIST...


