
English Manual
Page 1
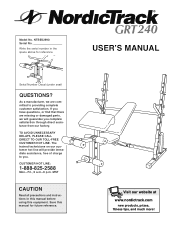
... damaged parts, we will provide immediate assistance, free of charge to providing complete customer satisfaction. Visit our website at www.nordictrack.com new products, prizes, fitness tips, and much more! TO AVOID UNNECESSARY DELAYS, PLEASE CALL DIRECT TO OUR TOLL-FREE CUSTOMER HOT LINE. Write the serial number in this manual before using this manual for reference. ® USER'S MANUAL Serial Number Decal (under seat) QUESTIONS? Model...
... damaged parts, we will provide immediate assistance, free of charge to providing complete customer satisfaction. Visit our website at www.nordictrack.com new products, prizes, fitness tips, and much more! TO AVOID UNNECESSARY DELAYS, PLEASE CALL DIRECT TO OUR TOLL-FREE CUSTOMER HOT LINE. Write the serial number in this manual before using this manual for reference. ® USER'S MANUAL Serial Number Decal (under seat) QUESTIONS? Model...

English Manual
Page 2
... is not legible, please call our Customer Service Department toll-free at the right has been applied to order a free replacement decal. NordicTrack® is a registered trademark of ICON Health & Fitness, Inc. 2 Table of Contents Warning Decal Placement 2 Important Precautions 3 Before You Begin 4 Part Identification Chart 5 Assembly 6 Adjusting the Weight Bench 11 Exercise Guidelines 14 Ordering Replacement Parts Back Cover Limited Warranty Back Cover Note: A Part List/Exploded Drawing is attached in the location shown.
... is not legible, please call our Customer Service Department toll-free at the right has been applied to order a free replacement decal. NordicTrack® is a registered trademark of ICON Health & Fitness, Inc. 2 Table of Contents Warning Decal Placement 2 Important Precautions 3 Before You Begin 4 Part Identification Chart 5 Assembly 6 Adjusting the Weight Bench 11 Exercise Guidelines 14 Ordering Replacement Parts Back Cover Limited Warranty Back Cover Note: A Part List/Exploded Drawing is attached in the location shown.
English Manual
Page 3
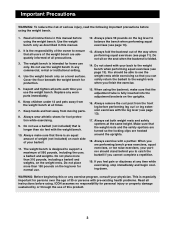
... are turned so the locking clips are adequately informed of all times. 7. Replace any time while exercising, stop immediately and begin cooling down. The weight bench is an equal amount of this or any commercial, rental or institutional setting. 4. If you use only. The weight bench is folded. 14. Do not stand with a partner. Always wear athletic shoes for protection. 13. Use the weight bench...
... are turned so the locking clips are adequately informed of all times. 7. Replace any time while exercising, stop immediately and begin cooling down. The weight bench is an equal amount of this or any commercial, rental or institutional setting. 4. If you use only. The weight bench is folded. 14. Do not stand with a partner. Always wear athletic shoes for protection. 13. Use the weight bench...
English Manual
Page 4
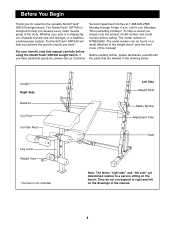
... you for selecting the versatile NordicTrack® GRT240 weight bench. until 6 p.m. Upright Right Side Backrest Curl Pad Curl Bar Rest* Leg Lever Weight Tube *Curl bar is a shapely figure, dramatic muscle size and strength, or a healthier cardiovascular system, the NordicTrack® GRT240 will help you achieve the specific results you , please note the product model number and serial number before using the NordicTrack® GRT240 weight bench. The model number is designed to a person...
... you for selecting the versatile NordicTrack® GRT240 weight bench. until 6 p.m. Upright Right Side Backrest Curl Pad Curl Bar Rest* Leg Lever Weight Tube *Curl bar is a shapely figure, dramatic muscle size and strength, or a healthier cardiovascular system, the NordicTrack® GRT240 will help you achieve the specific results you , please note the product model number and serial number before using the NordicTrack® GRT240 weight bench. The model number is designed to a person...
English Manual
Page 6
... that it is completed. • Tighten all parts as you understand the information in a cleared area and remove the packing materials. Insert the Carriage Bolts from this product, make sure you assemble them, unless instructed to make sure all parts in the box above. Attach the Upright with four M10 Nylon Locknuts (11). This manual is an indentation around each end...
... that it is completed. • Tighten all parts as you understand the information in a cleared area and remove the packing materials. Insert the Carriage Bolts from this product, make sure you assemble them, unless instructed to make sure all parts in the box above. Attach the Upright with four M10 Nylon Locknuts (11). This manual is an indentation around each end...
English Manual
Page 7
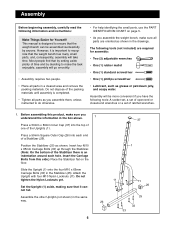
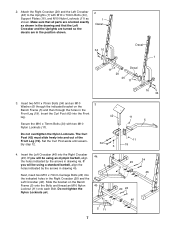
...shown. Set the Curl Post aside until assembly step 12. 34 6 11 5 11 19 4. Do not tighten the Nylon Locknuts yet. 24 20 11 46 20 24 46 5 11 7 Next, insert two M10 x 70mm Carriage Bolts (24) into the Front leg. 42 Secure the M10 x 70mm Bolts (34) with M10 x 70mm Bolts (34), Support Plates...46). 2. Do not overtighten the Nylon Locknuts. If you will be using an olympic barbell, align 4a the holes indicated by the arrows in drawing 4a. Attach the Right Crossbar (20) and the Left Crossbar (46) to the Uprights (1) with two M10 Nylon Locknuts (11). If you will be...
...shown. Set the Curl Post aside until assembly step 12. 34 6 11 5 11 19 4. Do not tighten the Nylon Locknuts yet. 24 20 11 46 20 24 46 5 11 7 Next, insert two M10 x 70mm Carriage Bolts (24) into the Front leg. 42 Secure the M10 x 70mm Bolts (34) with M10 x 70mm Bolts (34), Support Plates...46). 2. Do not overtighten the Nylon Locknuts. If you will be using an olympic barbell, align 4a the holes indicated by the arrows in drawing 4a. Attach the Right Crossbar (20) and the Left Crossbar (46) to the Uprights (1) with two M10 Nylon Locknuts (11). If you will be...

English Manual
Page 8
... the locking clip into the Leg Lever (18). Press 25.4 Square Inner Caps (28) into each end of 7 the Adjustment Tube (29). Press the Angle Cap (47) onto the indicated end of the Nylon Locknuts used in place around the Upright. Attach the Backrest Tubes (27) ...Press a 38mm Round Inner Cap (45) into the ends of the Weight Tube. When moving the Adjustment Tube (29), always make sure the lock- To mount the Adjustment Tube (29), insert the end 1 without the locking clip through the left Upright (1) from the inside. Tighten all of the Weight Tube (39). Attach the Leg...
... the locking clip into the Leg Lever (18). Press 25.4 Square Inner Caps (28) into each end of 7 the Adjustment Tube (29). Press the Angle Cap (47) onto the indicated end of the Nylon Locknuts used in place around the Upright. Attach the Backrest Tubes (27) ...Press a 38mm Round Inner Cap (45) into the ends of the Weight Tube. When moving the Adjustment Tube (29), always make sure the lock- To mount the Adjustment Tube (29), insert the end 1 without the locking clip through the left Upright (1) from the inside. Tighten all of the Weight Tube (39). Attach the Leg...
English Manual
Page 9
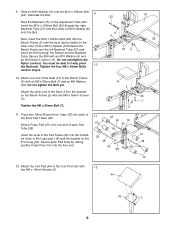
... Bolt with 12 two M6 x 16mm Screws (3). 44 42 3 9 Tighten the four M6 x 40mm Bolts used in the Leg Lever (18) and the bracket on the Bench Frame (5) with an M6 x 65mm Bolt (7) and an M6 Washer (30). Tighten the M6 x 65mm Bolt (7). 14 5 30 7 3 11. Attach the Curl Pad (44) to freely pivot 10 the Backrest. Insert the M10 x 165mm Bolt...
... Bolt with 12 two M6 x 16mm Screws (3). 44 42 3 9 Tighten the four M6 x 40mm Bolts used in the Leg Lever (18) and the bracket on the Bench Frame (5) with an M6 x 65mm Bolt (7) and an M6 Washer (30). Tighten the M6 x 65mm Bolt (7). 14 5 30 7 3 11. Attach the Curl Pad (44) to freely pivot 10 the Backrest. Insert the M10 x 165mm Bolt...
English Manual
Page 10
...the locking clips are properly tightened before you use of all parts are hooked around the Uprights. Insert the Weight Rests (21, 40) into the Weight 13 Rests (21, 40) and the Safety Spotters (9, 48). The Safety Spotters must be explained in ADJUSTING THE WEIGHT BENCH, beginning on the next ...page. 10 Make sure that the Safety Spotters are at the same height and that the locking clips are hooked around the Uprights. Press 25.4mm Round Inner Caps (12) into the Uprights (1). Next, insert the Safety...
...the locking clips are properly tightened before you use of all parts are hooked around the Uprights. Insert the Weight Rests (21, 40) into the Weight 13 Rests (21, 40) and the Safety Spotters (9, 48). The Safety Spotters must be explained in ADJUSTING THE WEIGHT BENCH, beginning on the next ...page. 10 Make sure that the Safety Spotters are at the same height and that the locking clips are hooked around the Uprights. Press 25.4mm Round Inner Caps (12) into the Uprights (1). Next, insert the Safety...
English Manual
Page 11
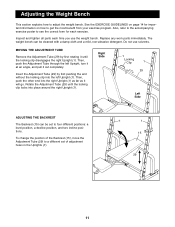
... completely. Adjusting the Weight Bench This section explains how to get the most benefit from your exercise program. See the EXERCISE GUIDELINES on page 14 for each time you use solvents. Replace any worn parts immediately. Then, push the Adjustment Tube through the left Upright (1). Also, refer to the accompanying exercise poster to see the correct form for important information on how to adjust the weight bench.
... completely. Adjusting the Weight Bench This section explains how to get the most benefit from your exercise program. See the EXERCISE GUIDELINES on page 14 for each time you use solvents. Replace any worn parts immediately. Then, push the Adjustment Tube through the left Upright (1). Also, refer to the accompanying exercise poster to see the correct form for important information on how to adjust the weight bench.

English Manual
Page 12
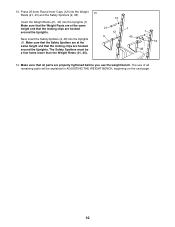
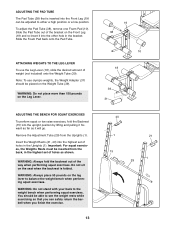
... injury to the weight bench. ATTACHING THE CURL POST For some exercises, store the Curl Post away from the weight bench so it will not interfere with heavy weights. Align the holes in the Front Leg (19). For some exercises, the Curl Post...Service Department (see the front cover of injury if the barbell is dropped during the exercise. If you fully tighten the Adjustment Knob. Secure the Curl Post with the Adjustment Knob (36). Important: The Safety Spotters (9, 48) are hooked around the Uprights. The selected holes should be attached to the user. WARNING: Always set both weight...
... injury to the weight bench. ATTACHING THE CURL POST For some exercises, store the Curl Post away from the weight bench so it will not interfere with heavy weights. Align the holes in the Front Leg (19). For some exercises, the Curl Post...Service Department (see the front cover of injury if the barbell is dropped during the exercise. If you fully tighten the Adjustment Knob. Secure the Curl Post with the Adjustment Knob (36). Important: The Safety Spotters (9, 48) are hooked around the Uprights. The selected holes should be attached to the user. WARNING: Always set both weight...
English Manual
Page 13
... the weight bench when performing squat exercises. WARNING: Always fold the backrest out of weight (not included) onto the Weight Tube (39). WARNING: Always place 50 pounds on the Front Leg (19) and re-insert it will go. ATTACHING WEIGHTS TO THE LEG LEVER To use olympic weights, the Weight Adapter (31) should be able to either a high position or a low position. Remove the Adjustment Tube...
... the weight bench when performing squat exercises. WARNING: Always fold the backrest out of weight (not included) onto the Weight Tube (39). WARNING: Always place 50 pounds on the Front Leg (19) and re-insert it will go. ATTACHING WEIGHTS TO THE LEG LEVER To use olympic weights, the Weight Adapter (31) should be able to either a high position or a low position. Remove the Adjustment Tube...

English Manual
Page 14
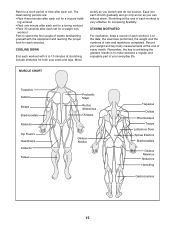
... up. Cross Training Many people desire a complete and well-balanced fitness program, and cross training is important. Warming up . This requires moving only the appropriate parts of the body. Refer to the muscle chart on Tuesday and Thursday. • Rest from exercising by pushing them close to their capacity. Proper breathing is a very efficient way to accomplish this manual, you can complete 3 sets of...
... up. Cross Training Many people desire a complete and well-balanced fitness program, and cross training is important. Warming up . This requires moving only the appropriate parts of the body. Refer to the muscle chart on Tuesday and Thursday. • Rest from exercising by pushing them close to their capacity. Proper breathing is a very efficient way to accomplish this manual, you can complete 3 sets of...
English Manual
Page 15
...; Rest one minute after each set for a weight loss workout Plan to make exercise a regular and enjoyable part of your everyday life. Record your arms and legs. Remember, the key to achieving the greatest results is very effective for increasing flexibility. Include stretches for both your weight and key body measurements at the end of each workout. STAYING MOTIVATED For motivation, keep...
...; Rest one minute after each set for a weight loss workout Plan to make exercise a regular and enjoyable part of your everyday life. Record your arms and legs. Remember, the key to achieving the greatest results is very effective for increasing flexibility. Include stretches for both your weight and key body measurements at the end of each workout. STAYING MOTIVATED For motivation, keep...

English Manual
Page 16
... Right Safety Spotter Foam Pad M10 Nylon Locknut 25.4mm Round Inner Cap M8 Nylon Locknut Seat Backrest Support Plate 50mm Square Inner Cap Leg Lever Front Leg Right Crossbar Right Weight Rest M10 x 165mm Bolt M8 Washer M10 x 70mm Carriage Bolt Stabilizer 50mm Square Outer Cap Key No. Specifications are subject to change without notice. Part List-Model No. NTBE02990 R1299A Key No.
... Right Safety Spotter Foam Pad M10 Nylon Locknut 25.4mm Round Inner Cap M8 Nylon Locknut Seat Backrest Support Plate 50mm Square Inner Cap Leg Lever Front Leg Right Crossbar Right Weight Rest M10 x 165mm Bolt M8 Washer M10 x 70mm Carriage Bolt Stabilizer 50mm Square Outer Cap Key No. Specifications are subject to change without notice. Part List-Model No. NTBE02990 R1299A Key No.
English Manual
Page 17
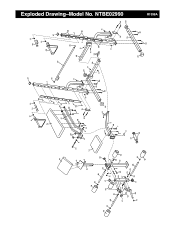
NTBE02990 37 12 9 12 21 12 40 50 12 15 1 48 45 50 37 29 44 28 27 50 30 2 28 50 45 3 22 10 32 3 42 14 10 32 38 38 32 10 17 11 6 36 6 32 17 10 39 12 23 13 41 17 34 6 18 34 47 49 19 10 23 43 38 32 32 6 8 6 11 4 50 30 4 16 34 11 5 30 7 3 11 31 35 11 26 11 1 11 46 11 2 50 26 11 11 11 20 24 25 33 11 50 11 33 11 11 16 34 26 25 26 33 10 33 R1299A Exploded Drawing-Model No.
NTBE02990 37 12 9 12 21 12 40 50 12 15 1 48 45 50 37 29 44 28 27 50 30 2 28 50 45 3 22 10 32 3 42 14 10 32 38 38 32 10 17 11 6 36 6 32 17 10 39 12 23 13 41 17 34 6 18 34 47 49 19 10 23 43 38 32 32 6 8 6 11 4 50 30 4 16 34 11 5 30 7 3 11 31 35 11 26 11 1 11 46 11 2 50 26 11 11 11 20 24 25 33 11 50 11 33 11 11 16 34 26 25 26 33 10 33 R1299A Exploded Drawing-Model No.
English Manual
Page 18
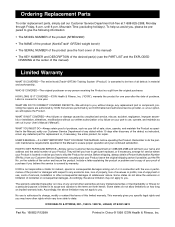
... product (NordicTrack® GRT240 weight bench) • The SERIAL NUMBER of the product (see the front cover of this manual) • The KEY NUMBER and DESCRIPTION of purchase, such as set forth herein. ICON HEALTH & FITNESS, INC., 1500 S. 1000 W., LOGAN, UT 84321-9813 Part No. 160852 R1299A Printed in the Manual; To help us assist you, please be free of all other warranties and any defected part for replacement or...
... product (NordicTrack® GRT240 weight bench) • The SERIAL NUMBER of the product (see the front cover of this manual) • The KEY NUMBER and DESCRIPTION of purchase, such as set forth herein. ICON HEALTH & FITNESS, INC., 1500 S. 1000 W., LOGAN, UT 84321-9813 Part No. 160852 R1299A Printed in the Manual; To help us assist you, please be free of all other warranties and any defected part for replacement or...


