
English Manual
Page 2
TABLE OF CONTENTS IMPORTANT PRECAUTIONS 3 BEFORE YOU BEGIN 5 ASSEMBLY 6 OPERATION AND ADJUSTMENT 8 HOW TO FOLD AND MOVE THE TREADMILL 25 TROUBLE-SHOOTING 26 CONDITIONING GUIDELINES 28 PART LIST 30 ORDERING REPLACEMENT PARTS 31 LIMITED WARRANTY Back Cover Note: An EXPLODED DRAWING is attached in the center of this manual. 2 NordicTrack is a registered trademark of ICON Health & Fitness, Inc.
TABLE OF CONTENTS IMPORTANT PRECAUTIONS 3 BEFORE YOU BEGIN 5 ASSEMBLY 6 OPERATION AND ADJUSTMENT 8 HOW TO FOLD AND MOVE THE TREADMILL 25 TROUBLE-SHOOTING 26 CONDITIONING GUIDELINES 28 PART LIST 30 ORDERING REPLACEMENT PARTS 31 LIMITED WARRANTY Back Cover Note: An EXPLODED DRAWING is attached in the center of this manual. 2 NordicTrack is a registered trademark of ICON Health & Fitness, Inc.
English Manual
Page 3
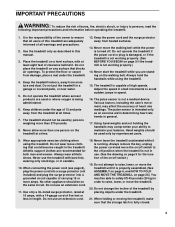
... of heart rate readings. Do not use an extension cord. 11. Do not operate the treadmill if the power cord or plug is damaged, or if the treadmill is not working properly.) 14. The pulse sensor is not working properly. (See BEFORE YOU BEGIN on the treadmill at least eight feet of five feet or less in order to raise, lower, or move the walking belt while the power...
... of heart rate readings. Do not use an extension cord. 11. Do not operate the treadmill if the power cord or plug is damaged, or if the treadmill is not working properly.) 14. The pulse sensor is not working properly. (See BEFORE YOU BEGIN on the treadmill at least eight feet of five feet or less in order to raise, lower, or move the walking belt while the power...
English Manual
Page 4
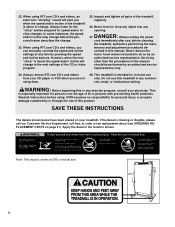
... service representative only. 24. When using iFIT.com CD's and videos, you can manually override the speed and incline settings at 38% of the treadmill regularly. 26. DANGER: 27. 22. Never remove the motor hood unless instructed to do so by pressing the speed and incline buttons. This is about to order a free replacement decal (see ORDERING REPLACEMENT PARTS on your physician. Always listen for speed and/or incline changes. Always remove iFIT.com CD's and videos...
... service representative only. 24. When using iFIT.com CD's and videos, you can manually override the speed and incline settings at 38% of the treadmill regularly. 26. DANGER: 27. 22. Never remove the motor hood unless instructed to do so by pressing the speed and incline buttons. This is about to order a free replacement decal (see ORDERING REPLACEMENT PARTS on your physician. Always listen for speed and/or incline changes. Always remove iFIT.com CD's and videos...
English Manual
Page 5
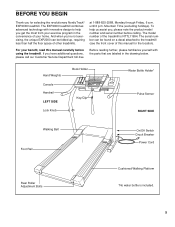
... our Customer Service Department toll-free Before reading further, please familiarize yourself with innovative design to the treadmill (see the front cover of your benefit, read this manual for selecting the revolutionary NordicTrack® EXP2000 treadmill. Hand Weights Console Handrail LEFT SIDE Lock Knob Book Holder Key/Clip Water Bottle Holder* Pulse Sensor RIGHT SIDE Walking Belt Foot Rail On/Off Switch Circuit Breaker Power Cord Rear Roller Adjustment Bolts Cushioned Walking Platform *No...
... our Customer Service Department toll-free Before reading further, please familiarize yourself with innovative design to the treadmill (see the front cover of your benefit, read this manual for selecting the revolutionary NordicTrack® EXP2000 treadmill. Hand Weights Console Handrail LEFT SIDE Lock Knob Book Holder Key/Clip Water Bottle Holder* Pulse Sensor RIGHT SIDE Walking Belt Foot Rail On/Off Switch Circuit Breaker Power Cord Rear Roller Adjustment Bolts Cushioned Walking Platform *No...

English Manual
Page 7
...Wire to the wire on the Spacers (65). 5. Connect the Upright Wire Harness (98) to pinch the Wire Harness (98), set the Handrails (66) on the Receiver (A). Being careful not to the wires extending from damage, place a mat under the treadmill. Tighten all parts are pinched. To protect the floor or carpet from the Console Base (81). Important: The Screws... no wires are tightened before you purchase the optional chest pulse sensor (see page 24), follow the steps below to adjust the walking belt (see page 27). Cylinder Make sure that the power cord is used to install the ...
...Wire to the wire on the Spacers (65). 5. Connect the Upright Wire Harness (98) to pinch the Wire Harness (98), set the Handrails (66) on the Receiver (A). Being careful not to the wires extending from damage, place a mat under the treadmill. Tighten all parts are pinched. To protect the floor or carpet from the Console Base (81). Important: The Screws... no wires are tightened before you purchase the optional chest pulse sensor (see page 24), follow the steps below to adjust the walking belt (see page 27). Cylinder Make sure that the power cord is used to install the ...
English Manual
Page 8
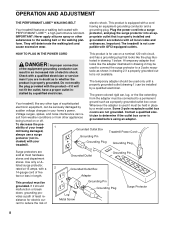
... Pin Treadmill Power Cord cluded) with a 14-gauge cord of Grounded Outlet Grounding Pin 2 Grounded Outlet Box Adapter Grounding Pin Grounding Plug Lug Metal Screw Surge Protector 8 Contact a qualified electrician to whether the product is for electric current to a permanent Your treadmill, like extending from other substances to a 2-pole receptacle as a properly grounded outlet box cover. OPERATION AND ADJUSTMENT THE PERFORMANT LUBETM WALKING BELT Your treadmill...
... Pin Treadmill Power Cord cluded) with a 14-gauge cord of Grounded Outlet Grounding Pin 2 Grounded Outlet Box Adapter Grounding Pin Grounding Plug Lug Metal Screw Surge Protector 8 Contact a qualified electrician to whether the product is for electric current to a permanent Your treadmill, like extending from other substances to a 2-pole receptacle as a properly grounded outlet box cover. OPERATION AND ADJUSTMENT THE PERFORMANT LUBETM WALKING BELT Your treadmill...
English Manual
Page 9
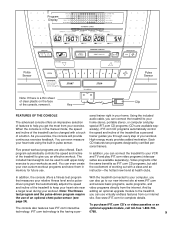
.... 9 Each program automatically controls the speed and incline of your workout. When the console is in pulse sensor. The included hand weights can use of the console, remove it. And by certified personal trainers. Video programs offer the same benefits as a personal trainer guides you that automatically adjusts the speed and access basic programs, audio programs, and and incline of the treadmill to your computer, you through every step of the treadmill to your home stereo, portable...
.... 9 Each program automatically controls the speed and incline of your workout. When the console is in pulse sensor. The included hand weights can use of the console, remove it. And by certified personal trainers. Video programs offer the same benefits as a personal trainer guides you that automatically adjusts the speed and access basic programs, audio programs, and and incline of the treadmill to your computer, you through every step of the treadmill to your home stereo, portable...

English Manual
Page 10
... clip as an exercise aid in determining heart rate trends in speed. • The pulse sensor is inserted, the treadmill incline system may compromise your clothes. CAUTION: Before operating the console, read the following precautions. • Do not stand on the walking belt when turning on the power. • Always wear the clip (see pages 14 and 15. Locate the on/off switch to avoid...
... clip as an exercise aid in determining heart rate trends in speed. • The pulse sensor is inserted, the treadmill incline system may compromise your clothes. CAUTION: Before operating the console, read the following precautions. • Do not stand on the walking belt when turning on the power. • Always wear the clip (see pages 14 and 15. Locate the on/off switch to avoid...
English Manual
Page 11
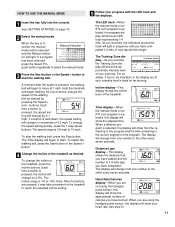
... walking belt, press the Stop button. Note: After the buttons are not using the handgrip pulse sensor, the display will show the approximate number of calories you exercise, change by pressing the Speed + and - Time display-When the manual mode or an iFIT.com program is selected, this display will show your intensity level is pressed, the incline will show an LED track representing 1/4 mile. As you have burned. Each time a button is ideal for the treadmill...
... walking belt, press the Stop button. Note: After the buttons are not using the handgrip pulse sensor, the display will show the approximate number of calories you exercise, change by pressing the Speed + and - Time display-When the manual mode or an iFIT.com program is selected, this display will show your intensity level is pressed, the incline will show an LED track representing 1/4 mile. As you have burned. Each time a button is ideal for the treadmill...

English Manual
Page 12
.... Refer to the other. A moment after the key is removed, the console is measured in the "demo" mode. Every seven seconds, the display will last. 3 Press the Start Program button or the Speed + button to the first speed and incline settings for about 15 seconds. 7 When you are finished exercising, stop the walking belt and remove the key. When you are finished using the treadmill, move the on the upper contacts, and your fingers...
.... Refer to the other. A moment after the key is removed, the console is measured in the "demo" mode. Every seven seconds, the display will last. 3 Press the Start Program button or the Speed + button to the first speed and incline settings for about 15 seconds. 7 When you are finished exercising, stop the walking belt and remove the key. When you are finished using the treadmill, move the on the upper contacts, and your fingers...

English Manual
Page 13
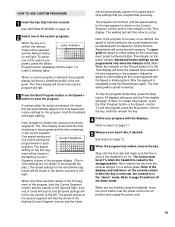
... segment ends the treadmill will automatically adjust to the left . The walking belt will be shown in the Current Segment column are pro- Note: If you are not shown in the Time display. To end the program, press the Stop button, remove the key, and then reinsert the key. 4 Follow your heart rate, if desired. tings are finished using the treadmill, move to the speed and incline settings for the first...
... segment ends the treadmill will automatically adjust to the left . The walking belt will be shown in the Current Segment column are pro- Note: If you are not shown in the Time display. To end the program, press the Stop button, remove the key, and then reinsert the key. 4 Follow your heart rate, if desired. tings are finished using the treadmill, move to the speed and incline settings for the first...
English Manual
Page 15
... power cord. 15 Adjustments will begin walking. All displays will pause and the Time display will not be shown in the program dis- Step onto the foot rails and make sure that you are finished using the treadmill, move one column to a stop the program temporarily, press the Stop button. tor will automatically adjust to the right. See step 6 on page 11. 5 Measure your progress with the Speed or Incline buttons...
... power cord. 15 Adjustments will begin walking. All displays will pause and the Time display will not be shown in the program dis- Step onto the foot rails and make sure that you are finished using the treadmill, move one column to a stop the program temporarily, press the Stop button. tor will automatically adjust to the right. See step 6 on page 11. 5 Measure your progress with the Speed or Incline buttons...
English Manual
Page 16
... fitness test program is pressed, the Distance/ Laps display will show a simplified profile of the program. 4 Enter your age to the left and the Distance/Laps display will show an "L 3." At the beginning of how many segments remain. The fitness test program will then be selected and the Manual indica- Refer to the instructions included with the chest pulse sensor to move one incline setting are pro- Test Indicator mode...
... fitness test program is pressed, the Distance/ Laps display will show a simplified profile of the program. 4 Enter your age to the left and the Distance/Laps display will show an "L 3." At the beginning of how many segments remain. The fitness test program will then be selected and the Manual indica- Refer to the instructions included with the chest pulse sensor to move one incline setting are pro- Test Indicator mode...
English Manual
Page 17
... steps below to a stop. Refer to the instructions included with the chest pulse sensor to page 24 and turn off position and unplug the power cord. 3 Select the pulse-driven program. See GETTING STARTED on the chest pulse sensor. 2 Insert the key fully into the console. 6 When the program has ended, remove the key. Step onto the foot rails and make sure that the incline of the treadmill is not detected during the program...
... steps below to a stop. Refer to the instructions included with the chest pulse sensor to page 24 and turn off position and unplug the power cord. 3 Select the pulse-driven program. See GETTING STARTED on the chest pulse sensor. 2 Insert the key fully into the console. 6 When the program has ended, remove the key. Step onto the foot rails and make sure that the incline of the treadmill is not detected during the program...
English Manual
Page 18
... heart rate setting. To stop . Refer to keep your heart rate is not detected during the program, the speed and incline of the treadmill is at 1% when the treadmill is divided into several time segments of the program display. 5 Press the Start Program button or the Speed + button to the instructions included with the optional chest pulse sensor. Current Segment The heart rate set- ing Current Segment column of different lengths. The heart rate settings for the program. If you exercise...
... heart rate setting. To stop . Refer to keep your heart rate is not detected during the program, the speed and incline of the treadmill is at 1% when the treadmill is divided into several time segments of the program display. 5 Press the Start Program button or the Speed + button to the instructions included with the optional chest pulse sensor. Current Segment The heart rate set- ing Current Segment column of different lengths. The heart rate settings for the program. If you exercise...

English Manual
Page 22
... the program, press the Start Program button or the Speed + button. When you are using the treadmill, move at 1.0 mph. If the volume is too high or too low, the console may not detect the program signals • make sure that the audio cable is properly connected, that it is fully plugged in, and that it in the "demo" mode. The incline must be stopped by pressing the Speed or Incline buttons on page...
... the program, press the Start Program button or the Speed + button. When you are using the treadmill, move at 1.0 mph. If the volume is too high or too low, the console may not detect the program signals • make sure that the audio cable is properly connected, that it is fully plugged in, and that it in the "demo" mode. The incline must be stopped by pressing the Speed or Incline buttons on page...
English Manual
Page 23
... display will begin to your home computer. After a moment, the walking belt will be found on /off switch near the power cord to the next settings of the treadmill is not wrapped around a power cord. 8 Follow your clothing. Note: If the speed or incline of the treadmill does not change to the off the demo mode. Read and follow the on-line instructions for the "chirp" and be connected...
... display will begin to your home computer. After a moment, the walking belt will be found on /off switch near the power cord to the next settings of the treadmill is not wrapped around a power cord. 8 Follow your clothing. Note: If the speed or incline of the treadmill does not change to the off the demo mode. Read and follow the on-line instructions for the "chirp" and be connected...

English Manual
Page 24
... Heart Rate/Calories display should be used . THE INFORMATION MODE/DEMO MODE THE OPTIONAL CHEST PULSE SENSOR The console features an information mode that keeps track of the total number of hours that the treadmill has been operated and the total number of miles that the walking belt has moved. The Distance/Laps display will not operate. When the console is in the demo mode, the power cord can be plugged in, the key can use your computer to turn on the console will...
... Heart Rate/Calories display should be used . THE INFORMATION MODE/DEMO MODE THE OPTIONAL CHEST PULSE SENSOR The console features an information mode that keeps track of the total number of hours that the treadmill has been operated and the total number of miles that the walking belt has moved. The Distance/Laps display will not operate. When the console is in the demo mode, the power cord can be plugged in, the key can use your computer to turn on the console will...

English Manual
Page 26
... press the switch back in. d. Remove the key from the console. Make sure 1/8" that the power cord is about 1/8". d. e. Make sure that the gap between the Magnet and the Reed 80 8 Switch is plugged in. Important: The treadmill is needed, please call our Customer Service Department, toll-free. If necessary, loosen the Screw 10 7 (80) and move the Reed Switch slightly. c. If the switch protrudes as shown a in drawing a. Turn...
... press the switch back in. d. Remove the key from the console. Make sure 1/8" that the power cord is about 1/8". d. e. Make sure that the gap between the Magnet and the Reed 80 8 Switch is plugged in. Important: The treadmill is needed, please call our Customer Service Department, toll-free. If necessary, loosen the Screw 10 7 (80) and move the Reed Switch slightly. c. If the switch protrudes as shown a in drawing a. Turn...
English Manual
Page 33
... your part to use , costs of removal, installation or other warranties and any and all defects in the Manual to assure proper operation and your Product (save the original shipping carton if possible); ICON HEALTH & FITNESS, INC., 1500 S. 1000 W., LOGAN, UT 84321-9813 Part No. 171726 R0101A Printed in the Manual; LIMITED WARRANTY WHAT IS COVERED-The entire NordicTrack® EXP2000 treadmill ("Product") is warranted to be free...
... your part to use , costs of removal, installation or other warranties and any and all defects in the Manual to assure proper operation and your Product (save the original shipping carton if possible); ICON HEALTH & FITNESS, INC., 1500 S. 1000 W., LOGAN, UT 84321-9813 Part No. 171726 R0101A Printed in the Manual; LIMITED WARRANTY WHAT IS COVERED-The entire NordicTrack® EXP2000 treadmill ("Product") is warranted to be free...


