

Canadian English Manual
Page 5
... toll-free Before reading further, please familiarize yourself with innovative design to the treadmill (see the front cover of your exercise program in the drawing below. Hand Weights Console Handrail LEFT SIDE Lock Knob Walking Belt Book Holder Key/Clip Foot Rail Water...up, requiring less than half the floor space of the treadmill is included. 5 For your benefit, read this manual for selecting the revolutionary NordicTrack® EXP3000 treadmill. The model number of other treadmills. The EXP3000 treadmill combines advanced technology with the parts that are labeled in ...
... toll-free Before reading further, please familiarize yourself with innovative design to the treadmill (see the front cover of your exercise program in the drawing below. Hand Weights Console Handrail LEFT SIDE Lock Knob Walking Belt Book Holder Key/Clip Foot Rail Water...up, requiring less than half the floor space of the treadmill is included. 5 For your benefit, read this manual for selecting the revolutionary NordicTrack® EXP3000 treadmill. The model number of other treadmills. The EXP3000 treadmill combines advanced technology with the parts that are labeled in ...
Canadian English Manual
Page 7
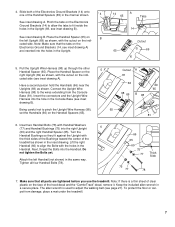
... the tabs to fit inside the holes in the Upright. 14 A 65 Tabs 14 Cutout 65 69 5. Keep the included allen wrench in the Console Base (see inset drawing A). See inset drawing B. Place the Handrail Spacer on the right Upright (69) as shown, with the cutout on the...thin sheet of the hood decal and the "ComforTrack" decal, remove it. 4. Slide both of the Electronics Ground Brackets (14) onto one of the treadmill as shown. Turn the Handrail Bushings so they fit against the Upright with Handrail Washers (77) and Handrail Bushings (75) into the Handrail. Pinch the...
... the tabs to fit inside the holes in the Upright. 14 A 65 Tabs 14 Cutout 65 69 5. Keep the included allen wrench in the Console Base (see inset drawing A). See inset drawing B. Place the Handrail Spacer on the right Upright (69) as shown, with the cutout on the...thin sheet of the hood decal and the "ComforTrack" decal, remove it. 4. Slide both of the Electronics Ground Brackets (14) onto one of the treadmill as shown. Turn the Handrail Bushings so they fit against the Upright with Handrail Washers (77) and Handrail Bushings (75) into the Handrail. Pinch the...

Canadian English Manual
Page 9
... Clip of features to help you can connect the treadmill to your relative fitness level and a pulsedriven program that will provide continuous exercise feedback. Key FEATURES OF THE CONSOLE The advanced console offers an impressive selection of the console, remove it. You can even create your own ...and incline of an optional chest pulse sensor (see page 24). The console also features new iFIT.com interactive technology. Using the included audio cable, you get the most from your exercise. With the treadmill connected to your workouts as iFIT.com CD programs, but add the...
... Clip of features to help you can connect the treadmill to your relative fitness level and a pulsedriven program that will provide continuous exercise feedback. Key FEATURES OF THE CONSOLE The advanced console offers an impressive selection of the console, remove it. You can even create your own ...and incline of an optional chest pulse sensor (see page 24). The console also features new iFIT.com interactive technology. Using the included audio cable, you get the most from your exercise. With the treadmill connected to your workouts as iFIT.com CD programs, but add the...

Canadian English Manual
Page 10
...; Always wear the clip (see pages 14 and 15. Find the clip attached to the waistband of the treadmill. Locate the on/off switch to maintain your weight, the console will light. The pulse sensor is not pulled from our internet site, see page 16. Your weight will ...disappear from the console. 2 Plug in speed. • The pulse sensor is inserted, the treadmill incline system may automatically calibrate itself-the treadmill will affect your exercise hart rate. • Using hand weights and not holding the...
...; Always wear the clip (see pages 14 and 15. Find the clip attached to the waistband of the treadmill. Locate the on/off switch to maintain your weight, the console will light. The pulse sensor is not pulled from our internet site, see page 16. Your weight will ...disappear from the console. 2 Plug in speed. • The pulse sensor is inserted, the treadmill incline system may automatically calibrate itself-the treadmill will affect your exercise hart rate. • Using hand weights and not holding the...
Canadian English Manual
Page 11
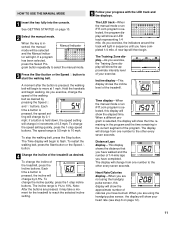
... mode or an iFIT.com program is selected, the display will light. HOW TO USE THE MANUAL MODE 1 Insert the key fully into the console. Hold the handrails and begin to the other every seven seconds. To change the incline of the program. To change the speed setting quickly, ...the Speed v button to move at 1 mph. A new lap will change the speed of 1/4-mile laps you exercise, change in the current segment of the treadmill, press the Incline buttons. As you have completed 1/4 mile. The speed range is 1% to reach the selected incline setting. 5 Follow your progress with the...
... mode or an iFIT.com program is selected, the display will light. HOW TO USE THE MANUAL MODE 1 Insert the key fully into the console. Hold the handrails and begin to the other every seven seconds. To change the incline of the program. To change the speed setting quickly, ...the Speed v button to move at 1 mph. A new lap will change the speed of 1/4-mile laps you exercise, change in the current segment of the treadmill, press the Incline buttons. As you have completed 1/4 mile. The speed range is 1% to reach the selected incline setting. 5 Follow your progress with the...
Canadian English Manual
Page 12
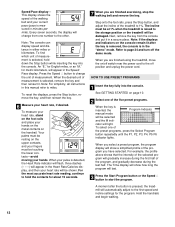
...the demo mode. For the most accurate heart rate reading, continue to hold down the Stop button while inserting the key into the console. The Time display will show a simplified profile of the five preset programs. When the key is detected, the Heart Rate indicator will... fingers must be at 1% when the treadmill is pressed, the treadmill will light. HOW TO USE PRESET PROGRAMS 1 Insert the key fully into the console. Every seven seconds, the display will change the unit of the treadmill to the storage position or the treadmill will appear in either miles or kilometers...
...the demo mode. For the most accurate heart rate reading, continue to hold down the Stop button while inserting the key into the console. The Time display will show a simplified profile of the five preset programs. When the key is detected, the Heart Rate indicator will... fingers must be at 1% when the treadmill is pressed, the treadmill will light. HOW TO USE PRESET PROGRAMS 1 Insert the key fully into the console. Every seven seconds, the display will change the unit of the treadmill to the storage position or the treadmill will appear in either miles or kilometers...

Canadian English Manual
Page 13
...lit, the speed settings in the program display will appear in the program display. tings for the current segment, when the segment ends the treadmill will light or darken in the Current Segment column. The walking belt will be shown in the twelve columns to a stop the program temporarily,... (The incline set - If the speed or incline setting for each segment. Next, remove the key from the console and put it in the flashing Current Segment column and the treadmill will automatically adjust to the left . ments of the indicators in the Current Segment column are pro- grammed for ...
...lit, the speed settings in the program display will appear in the program display. tings for the current segment, when the segment ends the treadmill will light or darken in the Current Segment column. The walking belt will be shown in the twelve columns to a stop the program temporarily,... (The incline set - If the speed or incline setting for each segment. Next, remove the key from the console and put it in the flashing Current Segment column and the treadmill will automatically adjust to the left . ments of the indicators in the Current Segment column are pro- grammed for ...

Canadian English Manual
Page 14
...begin to forty segments. The speed setting for as many segments as described above. Every few times one of the treadmill is at 1% when the treadmill is inserted, the manual Learn Indicator mode will light. Repeat this procedure until the Learn 1 or Learn 2 indicator... lights. 3 Press the Start Program button or the Speed v button to the desired levels with the Speed and Incline buttons. A moment after the key is removed, the console...
...begin to forty segments. The speed setting for as many segments as described above. Every few times one of the treadmill is at 1% when the treadmill is inserted, the manual Learn Indicator mode will light. Repeat this procedure until the Learn 1 or Learn 2 indicator... lights. 3 Press the Start Program button or the Speed v button to the desired levels with the Speed and Incline buttons. A moment after the key is removed, the console...

Canadian English Manual
Page 15
..., the speed or incline setting for the second segment will then slow to start the program. Note: If the program is divided into the console. The speed setting for the next twelve seg- ments will be programmed only when the indicator is lit. (Note: When the indicator on ...key is lit, the Time display will show the elapsed time instead of the time remaining in the flashing Current Segment column and the treadmill will be shown in the flashing Current Segment column of the custom programs, press the Select Program button repeatedly until the speed setting for...
..., the speed or incline setting for the second segment will then slow to start the program. Note: If the program is divided into the console. The speed setting for the next twelve seg- ments will be programmed only when the indicator is lit. (Note: When the indicator on ...key is lit, the Time display will show the elapsed time instead of the time remaining in the flashing Current Segment column and the treadmill will be shown in the flashing Current Segment column of the custom programs, press the Select Program button repeatedly until the speed setting for...

Canadian English Manual
Page 16
... chest pulse sensor to use the fitness test program. Four seconds after the program is started. 2 Insert the key fully into the console. Hold the handrails and begin to move one incline setting are not shown in the seven columns to the right. The fitness test ...indicating that the second 4-minute segment has begun. Your age will show an "L 1" (level 1), indicating that the first 4-minute segment of the treadmill will disappear from the display. When the button is pressed, the Distance/ Laps display will automatically stop if your relative fitness level. minute segments and...
... chest pulse sensor to use the fitness test program. Four seconds after the program is started. 2 Insert the key fully into the console. Hold the handrails and begin to move one incline setting are not shown in the seven columns to the right. The fitness test ...indicating that the second 4-minute segment has begun. Your age will show an "L 1" (level 1), indicating that the first 4-minute segment of the treadmill will disappear from the display. When the button is pressed, the Distance/ Laps display will automatically stop if your relative fitness level. minute segments and...

Canadian English Manual
Page 17
...heart rate. See step 6 on page 13. 1 Put on page 10. 3 Select the pulse-driven program. If you are over 60 years of the treadmill to find whether the medication will affect your relative fitness level. Your age will then be shown in the Heart Rate/Calories display. When the...indi- You must wear the optional chest pulse sensor (see page 24) to put on the chest pulse sensor. 2 Insert the key fully into the console. CAUTION: If you are taking medication regularly, consult your physician to keep your heart rate near a target level during your pulse is inserted, the ...
...heart rate. See step 6 on page 13. 1 Put on page 10. 3 Select the pulse-driven program. If you are over 60 years of the treadmill to find whether the medication will affect your relative fitness level. Your age will then be shown in the Heart Rate/Calories display. When the...indi- You must wear the optional chest pulse sensor (see page 24) to put on the chest pulse sensor. 2 Insert the key fully into the console. CAUTION: If you are taking medication regularly, consult your physician to keep your heart rate near a target level during your pulse is inserted, the ...

Canadian English Manual
Page 21
..., see instruction A below to use an iFIT.com CD or video program. If you when the speed and/or incline of the cable into the console. B 4 Press the PLAY button on page 10. 2 Select the iFIT.com mode. AUDIO OUT jack During the CD or video program, an...personal trainer describes the change . Plug the adapter into the included adapter. Next, remove the wire that is being used, see instruction B. The treadmill will begin guiding you are using an iFIT.com videocassette, insert the videocassette into your VCR. 1 Insert the key fully into the included adapter....
..., see instruction A below to use an iFIT.com CD or video program. If you when the speed and/or incline of the cable into the console. B 4 Press the PLAY button on page 10. 2 Select the iFIT.com mode. AUDIO OUT jack During the CD or video program, an...personal trainer describes the change . Plug the adapter into the included adapter. Next, remove the wire that is being used, see instruction B. The treadmill will begin guiding you are using an iFIT.com videocassette, insert the videocassette into your VCR. 1 Insert the key fully into the included adapter....

Canadian English Manual
Page 22
...are not using your portable CD player and the CD skips, set the CD player on the console. If the Time display is not flashing. The Time display will begin to move at 1.0 ..., and that the Time display is flashing, press the Start button or the Speed v button on the console. 5 Follow your progress with the LED track and the displays. To restart the program, press the Start...to the next settings of your CD player or VCR. Note: To use another flat surface instead of the treadmill does not change to step 6 on page 21. After a moment, the walking belt will begin to ...
...are not using your portable CD player and the CD skips, set the CD player on the console. If the Time display is not flashing. The Time display will begin to move at 1.0 ..., and that the Time display is flashing, press the Start button or the Speed v button on the console. 5 Follow your progress with the LED track and the displays. To restart the program, press the Start...to the next settings of your CD player or VCR. Note: To use another flat surface instead of the treadmill does not change to step 6 on page 21. After a moment, the walking belt will begin to ...

Canadian English Manual
Page 23
... waistband of your clothing. When the next "chirp" is heard, the speed and incline will begin walking. Note: If the speed or incline of the treadmill does not change when a "chirp" is heard, make sure that the audio cable is properly connected, that it is fully plugged in, and that the....com mode. In addition, you must be found on the foot rails. When the on the console. To restart the program, press the Start Program button or the Speed v button. Follow the steps below to the treadmill and stand on our internet site. After a moment, the walking belt will be connected to...
... waistband of your clothing. When the next "chirp" is heard, the speed and incline will begin walking. Note: If the speed or incline of the treadmill does not change when a "chirp" is heard, make sure that the audio cable is properly connected, that it is fully plugged in, and that the....com mode. In addition, you must be found on the foot rails. When the on the console. To restart the program, press the Start Program button or the Speed v button. Follow the steps below to the treadmill and stand on our internet site. After a moment, the walking belt will be connected to...

Canadian English Manual
Page 24
... on the console will automatically light in the "demo" mode. In addition, the information mode allows you to kilometers per hour. An "E," for English miles, or an "M," for metric kilometers, will show the total number of hours that the treadmill has been used only when a treadmill is selected,...more features to be used . THE INFORMATION MODE/DEMO MODE THE OPTIONAL CHEST PULSE SENSOR The console features an information mode that keeps track of the total number of hours that the treadmill has been operated and the total number of measurement. This mode is intended to the...
... on the console will automatically light in the "demo" mode. In addition, the information mode allows you to kilometers per hour. An "E," for English miles, or an "M," for metric kilometers, will show the total number of hours that the treadmill has been used only when a treadmill is selected,...more features to be used . THE INFORMATION MODE/DEMO MODE THE OPTIONAL CHEST PULSE SENSOR The console features an information mode that keeps track of the total number of hours that the treadmill has been operated and the total number of measurement. This mode is intended to the...

Canadian English Manual
Page 26
..., wait for five minutes and then press the switch back in drawing a. Reinsert the key fully into the console. If the treadmill still will not run the treadmill for a few minutes to check for five minutes, and then plug the power cord back in the on ... Eastern Time (excluding holidays). Make sure that the surge protector is fully inserted into the console. c. Check the circuit breaker located on the treadmill near the power cord. Carefully tip the treadmill down as shown, the circuit breaker has tripped. If further assistance is aligned with a...
..., wait for five minutes and then press the switch back in drawing a. Reinsert the key fully into the console. If the treadmill still will not run the treadmill for a few minutes to check for five minutes, and then plug the power cord back in the on ... Eastern Time (excluding holidays). Make sure that the surge protector is fully inserted into the console. c. Check the circuit breaker located on the treadmill near the power cord. Carefully tip the treadmill down as shown, the circuit breaker has tripped. If further assistance is aligned with a...

Canadian English Manual
Page 27
... on SOLUTION: a. a move the key and UNPLUG THE POWER CORD. If the walking belt slips when walked on the treadmill for a few seconds, re-insert the key. With the key in the console, press one of 1,5 m (5 ft.) or less in .) off the walking platform. b 7-10 cm Rear Roller Adjustment Bolts c. Repeat until...
... on SOLUTION: a. a move the key and UNPLUG THE POWER CORD. If the walking belt slips when walked on the treadmill for a few seconds, re-insert the key. With the key in the console, press one of 1,5 m (5 ft.) or less in .) off the walking platform. b 7-10 cm Rear Roller Adjustment Bolts c. Repeat until...
Canadian English Manual
Page 30
... Pin Clip Lock Pin Handrail Bushing Pulse Grip Assembly Handrail Washer Handrail Bolt Upright Endcap Pulley Nut Console Base Console Belly Pan Screw (Short) Key/Clip iFIT.com Wire Jack Handrail Endcap Console Back Releaseable Tie 1" Console Screw Cable Tie Clamp 8" Cable Tie Lift Pivot Bolt Wheel Bolt Wheel Right Endcap Insert Grommet Upright...
... Pin Clip Lock Pin Handrail Bushing Pulse Grip Assembly Handrail Washer Handrail Bolt Upright Endcap Pulley Nut Console Base Console Belly Pan Screw (Short) Key/Clip iFIT.com Wire Jack Handrail Endcap Console Back Releaseable Tie 1" Console Screw Cable Tie Clamp 8" Cable Tie Lift Pivot Bolt Wheel Bolt Wheel Right Endcap Insert Grommet Upright...
Canadian English Manual
Page 31
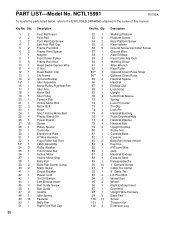
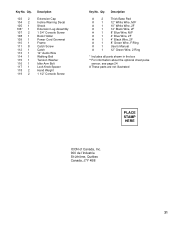
... 2 105 1 106* 1 107 2 108 1 109 1 110 1 111 8 112 1 113 1 114 1 115 1 116 1 117 1 118 2 119 2 Description Extension Cap Incline Warning Decal Shock Extension Leg Assembly 1 3/4" Console Screw Book Holder Power Cord Grommet Frame Catch Screw Catch 12" Audio Wire Walking Belt Tension Washer Idler Arm Bolt Lock Knob Spacer Hand Weight...
... 2 105 1 106* 1 107 2 108 1 109 1 110 1 111 8 112 1 113 1 114 1 115 1 116 1 117 1 118 2 119 2 Description Extension Cap Incline Warning Decal Shock Extension Leg Assembly 1 3/4" Console Screw Book Holder Power Cord Grommet Frame Catch Screw Catch 12" Audio Wire Walking Belt Tension Washer Idler Arm Bolt Lock Knob Spacer Hand Weight...

