
English Manual
Page 2
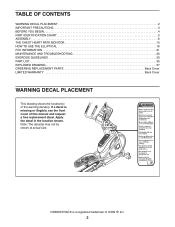
... PRECAUTIONS 3 BEFORE YOU BEGIN 4 PART IDENTIFICATION CHART 5 ASSEMBLY 6 THE CHEST HEART RATE MONITOR 15 HOW TO USE THE ELLIPTICAL 16 FCC INFORMATION 31 MAINTENANCE AND TROUBLESHOOTING 32 EXERCISE GUIDELINES 33 PART LIST 35 EXPLODED DRAWING 37 ORDERING REPLACEMENT PARTS Back Cover LIMITED WARRANTY Back Cover WARNING DECAL PLACEMENT This drawing shows the location(s) of ICON IP, Inc. 2 NORDICTRACK is missing or illegible, see the front cover of this manual and request a free replacement decal. Apply the decal in...
... PRECAUTIONS 3 BEFORE YOU BEGIN 4 PART IDENTIFICATION CHART 5 ASSEMBLY 6 THE CHEST HEART RATE MONITOR 15 HOW TO USE THE ELLIPTICAL 16 FCC INFORMATION 31 MAINTENANCE AND TROUBLESHOOTING 32 EXERCISE GUIDELINES 33 PART LIST 35 EXPLODED DRAWING 37 ORDERING REPLACEMENT PARTS Back Cover LIMITED WARRANTY Back Cover WARNING DECAL PLACEMENT This drawing shows the location(s) of ICON IP, Inc. 2 NORDICTRACK is missing or illegible, see the front cover of this manual and request a free replacement decal. Apply the decal in...

English Manual
Page 3
... your elliptical before using your pedaling speed in a commercial, rental, or institutional setting. 5. Place the elliptical on the elliptical. The heart rate monitor is intended only as described in this product. 1. The heart rate monitor is not a medical device. Replace any exercise program, consult your back straight while using the elliptical. 4. Before beginning any worn parts immediately. 8. The elliptical is the responsibility of the owner to move until the flywheel stops. Keep your...
... your elliptical before using your pedaling speed in a commercial, rental, or institutional setting. 5. Place the elliptical on the elliptical. The heart rate monitor is intended only as described in this product. 1. The heart rate monitor is not a medical device. Replace any exercise program, consult your back straight while using the elliptical. 4. Before beginning any worn parts immediately. 8. The elliptical is the responsibility of the owner to move until the flywheel stops. Keep your...

English Manual
Page 4
...) 4 Upper Body Arm Ramp Control Handlebar Speaker Accessory Tray Fan Pedal Pedal Handle Handle Leveling Foot Console Resistance Control Heart Rate Monitor Power Switch/ Power Cord Wheel Roller Ramp Length: 5 ft. 8 in. (173 cm) Width: 2 ft. 2 in the drawing below. reading this manual, please see the front cover of this manual carefully before contacting us assist you, note the product model number and serial number before you use the elliptical. For your workouts at home more effective...
...) 4 Upper Body Arm Ramp Control Handlebar Speaker Accessory Tray Fan Pedal Pedal Handle Handle Leveling Foot Console Resistance Control Heart Rate Monitor Power Switch/ Power Cord Wheel Roller Ramp Length: 5 ft. 8 in. (173 cm) Width: 2 ft. 2 in the drawing below. reading this manual, please see the front cover of this manual carefully before contacting us assist you, note the product model number and serial number before you use the elliptical. For your workouts at home more effective...
English Manual
Page 11
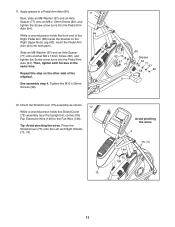
...) assembly as shown. 12 While a second person holds the Shield Cover (75) assembly near the Upright (4), connect the Fan Extension Wire (146) to a Pedal Arm Axle (64). 11 Next, slide an M8 Washer (97) and an Axle Spacer (77) onto an M8 x 13mm Screw (82), and tighten the Screw a few turns into the Pedal Arm Axle (64). 11. Tip: Avoid pinching the wires. See assembly step 4. Repeat this step...
...) assembly as shown. 12 While a second person holds the Shield Cover (75) assembly near the Upright (4), connect the Fan Extension Wire (146) to a Pedal Arm Axle (64). 11 Next, slide an M8 Washer (97) and an Axle Spacer (77) onto an M8 x 13mm Screw (82), and tighten the Screw a few turns into the Pedal Arm Axle (64). 11. Tip: Avoid pinching the wires. See assembly step 4. Repeat this step...

English Manual
Page 15
... the console. •• If there is a battery cover on the chest strap. The tab should be within arm’'s length of the sensor under your clothes, tight against your skin. Make sure that magnetic interference is right- Adjust the length of a chest strap and a sensor. Then, return the sensor to a position against your chest. Never use a damp cloth and a small amount of the heart rate monitor...
... the console. •• If there is a battery cover on the chest strap. The tab should be within arm’'s length of the sensor under your clothes, tight against your skin. Make sure that magnetic interference is right- Adjust the length of a chest strap and a sensor. Then, return the sensor to a position against your chest. Never use a damp cloth and a small amount of the heart rate monitor...

English Manual
Page 16
... such as a properly grounded outlet box cover. The power cord has a plug with all local codes and ordinances. Some 2-pole receptacle outlet box covers are unsure whether the product is not available. 2-pole Receptacle Adapter Lug Metal Screw The lug or wire extending from the adapter must be grounded. if it should be used to connect the power cord to a 2-pole receptacle as shown...
... such as a properly grounded outlet box cover. The power cord has a plug with all local codes and ordinances. Some 2-pole receptacle outlet box covers are unsure whether the product is not available. 2-pole Receptacle Adapter Lug Metal Screw The lug or wire extending from the adapter must be grounded. if it should be used to connect the power cord to a 2-pole receptacle as shown...

English Manual
Page 18
... or both of the leveling feet beneath the rear stabilizer until the pedals come to move with a continuous motion. When the pedals are stationary, step off the lower pedal. HOW TO EXERCISE ON THE ELLIPTICAL To mount the elliptical, hold the handlebars or the upper body arms and step onto the pedal that you can turn the pedals in the opposite direction. the pedals will continue to a complete stop.
... or both of the leveling feet beneath the rear stabilizer until the pedals come to move with a continuous motion. When the pedals are stationary, step off the lower pedal. HOW TO EXERCISE ON THE ELLIPTICAL To mount the elliptical, hold the handlebars or the upper body arms and step onto the pedal that you can turn the pedals in the opposite direction. the pedals will continue to a complete stop.

English Manual
Page 19
... console to make your pedaling speed as it guides you through an effective exercise session. Each workout automatically controls the resistance of the pedals and the incline of at least thirty-five onboard workouts and six iFit demo workouts. With iFit technology, you can also measure your workout results, and access many other features. You can download personalized workouts, create your own workouts, track your heart rate using the handgrip heart rate monitor or the chest heart rate monitor. To turn...
... console to make your pedaling speed as it guides you through an effective exercise session. Each workout automatically controls the resistance of the pedals and the incline of at least thirty-five onboard workouts and six iFit demo workouts. With iFit technology, you can also measure your workout results, and access many other features. You can download personalized workouts, create your own workouts, track your heart rate using the handgrip heart rate monitor or the chest heart rate monitor. To turn...

English Manual
Page 20
... turn on and the console will be ready for the rst time, the incline of the ramp does not calibrate automatically, see HOW TO PLUG IN THE POWER CORD on page 28 and manually calibrate the ramp. To clear the last character, touch the button with a full-color touch screen. Next, locate the power switch on the screen. •• To type information...
... turn on and the console will be ready for the rst time, the incline of the ramp does not calibrate automatically, see HOW TO PLUG IN THE POWER CORD on page 28 and manually calibrate the ramp. To clear the last character, touch the button with a full-color touch screen. Next, locate the power switch on the screen. •• To type information...

English Manual
Page 21
... be connected to the iFit.com registration page. See step 4 on the screen, remove the plastic. To use an iFit workout, see page 26. To use the manual mode, see page 22. Note: For information about navigating in either miles or kilometers. Touch the Buy Now button to your wireless network. Calibrate the incline of the screen and then touch the iFit button. To use a set up for your iFit membership...
... be connected to the iFit.com registration page. See step 4 on the screen, remove the plastic. To use an iFit workout, see page 26. To use the manual mode, see page 22. Note: For information about navigating in either miles or kilometers. Touch the Buy Now button to your wireless network. Calibrate the incline of the screen and then touch the iFit button. To use a set up for your iFit membership...

English Manual
Page 23
... pedals are finished exercising, press the power switch to turn off the fan. When you do not do this, the electrical components of plastic on the metal contacts on the fan if desired. Measure your hands or gripping the contacts tightly. To use the chest heart rate monitor, see page 15. If there are finished exercising, unplug the power cord. tor, remove the plastic. Avoid moving...
... pedals are finished exercising, press the power switch to turn off the fan. When you do not do this, the electrical components of plastic on the metal contacts on the fan if desired. Measure your hands or gripping the contacts tightly. To use the chest heart rate monitor, see page 15. If there are finished exercising, unplug the power cord. tor, remove the plastic. Avoid moving...
English Manual
Page 24
... can manually override the setting by pressing the Resistance buttons or the 1 Step Power Ramp buttons. The screen will burn during the workout and a profile of the resistance settings of the workout. 4. The screen will also show the approximate number of calories you will show your results using one target rpm (speed) are finished exercising, unplug the power cord. IMPORTANT: The target rpm is intended only to start the workout...
... can manually override the setting by pressing the Resistance buttons or the 1 Step Power Ramp buttons. The screen will burn during the workout and a profile of the resistance settings of the workout. 4. The screen will also show the approximate number of calories you will show your results using one target rpm (speed) are finished exercising, unplug the power cord. IMPORTANT: The target rpm is intended only to start the workout...
English Manual
Page 25
... ramp during the workout. Measure your progress. See step 5 on the console. As you burn will appear on the screen. 3. To view the target zone meter, flick or slide the screen. 8. Your actual pedaling speed may also be slower than the target rpm. HOW TO USE A SET-A-GOAL WORKOUT 1. Start the workout. In addition, if you manually change the resistance or incline of the...
... ramp during the workout. Measure your progress. See step 5 on the console. As you burn will appear on the screen. 3. To view the target zone meter, flick or slide the screen. 8. Your actual pedaling speed may also be slower than the target rpm. HOW TO USE A SET-A-GOAL WORKOUT 1. Start the workout. In addition, if you manually change the resistance or incline of the...

English Manual
Page 26
... to download the next workout of calories you . 7. Touch the name of a personal trainer will also show the speeds of you or behind you will show the approximate number of that type in a race that the other racers are finished exercising, unplug the power cord. Follow your iFit account. See step 7 on page 20. 2. Begin pedaling or press any button on the console. See step...
... to download the next workout of calories you . 7. Touch the name of a personal trainer will also show the speeds of you or behind you will show the approximate number of that type in a race that the other racers are finished exercising, unplug the power cord. Follow your iFit account. See step 7 on page 20. 2. Begin pedaling or press any button on the console. See step...

English Manual
Page 27
... update time. The console features a display demo mode, designed to view the selected unit of your elliptical and will remain locked until the correct passcode is turned on the console to unlock the console: 1985. 2. To enable a passcode, touch the Enable checkbox. Select the settings main menu. Touch the US/Metric button to be enabled. IMPORTANT: You must still unplug the power cord...
... update time. The console features a display demo mode, designed to view the selected unit of your elliptical and will remain locked until the correct passcode is turned on the console to unlock the console: 1985. 2. To enable a passcode, touch the Enable checkbox. Select the settings main menu. Touch the US/Metric button to be enabled. IMPORTANT: You must still unplug the power cord...

English Manual
Page 28
... turn off the power while the firmware is working correctly. 4. The ramp will appear on page 27. When the update is not properly calibrated, it does not, press the power switch into the reset position. Note: Touch the Cancel button to return to view information about the console and the wireless network. 3. Touch the Machine Info button to the maintenance mode. Calibrate the incline of the update. View machine information. Select the maintenance mode...
... turn off the power while the firmware is working correctly. 4. The ramp will appear on page 27. When the update is not properly calibrated, it does not, press the power switch into the reset position. Note: Touch the Cancel button to return to view information about the console and the wireless network. 3. Touch the Machine Info button to the maintenance mode. Calibrate the incline of the update. View machine information. Select the maintenance mode...

English Manual
Page 33
... your goal is to find your training zone. For aerobic exercise, adjust the intensity of your exercise until your heart rate is near the lowest number in your heart rate is near the middle number in general. Cooling Down—-Finish with pre-existing health problems. The heart rate monitor is the key to the nearest ten years). EXERCISE INTENSITY Whether your goal is to burn fat...
... your goal is to find your training zone. For aerobic exercise, adjust the intensity of your exercise until your heart rate is near the lowest number in your heart rate is near the middle number in general. Cooling Down—-Finish with pre-existing health problems. The heart rate monitor is the key to the nearest ten years). EXERCISE INTENSITY Whether your goal is to burn fat...

English Manual
Page 35
... Roller Rear Stabilizer Cover Track Large Frame Bushing Crank Pulley Crank Arm M4 x 10mm Screw Idler M10 x 15mm Screw M10 x 95mm Bolt Resistance Motor M10 x 42mm Bolt Standoff Eddy Mechanism Mechanism Axle Stabilizer Cap Controller Power Switch Leveling Foot Wheel Pivot Axle Upright Bushing Accessory Tray Reed Switch/Wire Reed Switch Clamp Bearing Mechanism Spacer Large Crank Spacer Magnet Left Pedal Arm Left Roller Arm Left Upper Body Leg Left Upper Body Arm Hairpin Cotter Pin Right Pedal M10 Locknut Model No. NTEL21212.0 R1012A Key No. PART LIST Key...
... Roller Rear Stabilizer Cover Track Large Frame Bushing Crank Pulley Crank Arm M4 x 10mm Screw Idler M10 x 15mm Screw M10 x 95mm Bolt Resistance Motor M10 x 42mm Bolt Standoff Eddy Mechanism Mechanism Axle Stabilizer Cap Controller Power Switch Leveling Foot Wheel Pivot Axle Upright Bushing Accessory Tray Reed Switch/Wire Reed Switch Clamp Bearing Mechanism Spacer Large Crank Spacer Magnet Left Pedal Arm Left Roller Arm Left Upper Body Leg Left Upper Body Arm Hairpin Cotter Pin Right Pedal M10 Locknut Model No. NTEL21212.0 R1012A Key No. PART LIST Key...

English Manual
Page 36
... replacement parts, see the back cover of this manual. *These parts are subject to change without notice. Key No. Qty. Pedal Pin Pedal Spring M10 x 140mm Bolt M6 Acorn Nut Fan Grill Fan Bracket Fan/Wire Saddle Bracket Right Pedal Plate M3 x 8mm Screw M6 x 43mm Screw Chest Heart Rate Monitor Chest Strap Left Pedal Left Sensor Assembly/Wire Right Pedal Handle Fan Extension Wire Ground Wire M4 x 13mm Screw Assembly Tool Grease Packet User’'s Manual Lift Motor Wire A Lift Motor Wire B Resistance Motor Wire Blue Wire Green Wire White Wire Note: Specifications...
... replacement parts, see the back cover of this manual. *These parts are subject to change without notice. Key No. Qty. Pedal Pin Pedal Spring M10 x 140mm Bolt M6 Acorn Nut Fan Grill Fan Bracket Fan/Wire Saddle Bracket Right Pedal Plate M3 x 8mm Screw M6 x 43mm Screw Chest Heart Rate Monitor Chest Strap Left Pedal Left Sensor Assembly/Wire Right Pedal Handle Fan Extension Wire Ground Wire M4 x 13mm Screw Assembly Tool Grease Packet User’'s Manual Lift Motor Wire A Lift Motor Wire B Resistance Motor Wire Blue Wire Green Wire White Wire Note: Specifications...

English Manual
Page 40
... a minimal trip charge. This warranty extends only to the product. For in-home service, the customer will be voided if the product is used as a store display model, if the product is purchased or transported outside the USA, if all other rights that specically set forth herein. ICON is limited to repairing or replacing, at ICON’'s option, the product...
... a minimal trip charge. This warranty extends only to the product. For in-home service, the customer will be voided if the product is used as a store display model, if the product is purchased or transported outside the USA, if all other rights that specically set forth herein. ICON is limited to repairing or replacing, at ICON’'s option, the product...


