

Uk Manual
Page 1
... using this manual for reference. NTEVEL87910.1 Serial No. Serial Number Decal (under frame) QUESTIONS? Model No. If you have questions, or if there are missing parts, please contact us: UK Call: 08457 089 009 From Ireland: 053 92 36102 Website: www.iconsupport.eu E-mail: [email protected] Write: ICON Health & Fitness...
... using this manual for reference. NTEVEL87910.1 Serial No. Serial Number Decal (under frame) QUESTIONS? Model No. If you have questions, or if there are missing parts, please contact us: UK Call: 08457 089 009 From Ireland: 053 92 36102 Website: www.iconsupport.eu E-mail: [email protected] Write: ICON Health & Fitness...

Uk Manual
Page 2
... PLACEMENT 2 IMPORTANT PRECAUTIONS 3 BEFORE YOU BEGIN 4 ASSEMBLY 5 HOW TO USE THE ELLIPTICAL 14 MAINTENANCE AND TROUBLESHOOTING 22 EXERCISE GUIDELINES 24 PART LIST 27 EXPLODED DRAWING 29 ORDERING REPLACEMENT PARTS Back Cover RECYCLING INFORMATION Back Cover WARNING DECAL PLACEMENT This drawing shows the location(s) of... ICON IP, Inc. 2 Note: The decal(s) may not be shown at actual size. NordicTrack is missing...
... PLACEMENT 2 IMPORTANT PRECAUTIONS 3 BEFORE YOU BEGIN 4 ASSEMBLY 5 HOW TO USE THE ELLIPTICAL 14 MAINTENANCE AND TROUBLESHOOTING 22 EXERCISE GUIDELINES 24 PART LIST 27 EXPLODED DRAWING 29 ORDERING REPLACEMENT PARTS Back Cover RECYCLING INFORMATION Back Cover WARNING DECAL PLACEMENT This drawing shows the location(s) of... ICON IP, Inc. 2 Note: The decal(s) may not be shown at actual size. NordicTrack is missing...

Uk Manual
Page 3
... straight while using the elliptical. 4. The pulse sensor is not a medical device. Keep your elliptical. This is intended for foot protection while exercising. 3. The elliptical should not be used by or through the use of serious injury, read all parts regularly. Do not put the elliptical in a controlled way.... 14. Hold the handlebars or the upper body arms when mounting, dismounting, or using the elliptical; Reduce your back. 7. If you feel faint or if you...
... straight while using the elliptical. 4. The pulse sensor is not a medical device. Keep your elliptical. This is intended for foot protection while exercising. 3. The elliptical should not be used by or through the use of serious injury, read all parts regularly. Do not put the elliptical in a controlled way.... 14. Hold the handlebars or the upper body arms when mounting, dismounting, or using the elliptical; Reduce your back. 7. If you feel faint or if you...

Uk Manual
Page 4
...Latch Leveling Foot Latch Button 4 If you , note the product model number and serial number before you for selecting the revolutionary NordicTrack® E 7.0 elliptical. manual. For your benefit, read this manual carefully before contacting us assist you have questions after reading this manual, please ...see the front cover of this manual. The E 7.0 elliptical provides an impressive selection of this Before reading further, please familiarize yourself with the parts that are shown on the front cover of features designed to make your workouts at ...
...Latch Leveling Foot Latch Button 4 If you , note the product model number and serial number before you for selecting the revolutionary NordicTrack® E 7.0 elliptical. manual. For your benefit, read this manual carefully before contacting us assist you have questions after reading this manual, please ...see the front cover of this manual. The E 7.0 elliptical provides an impressive selection of this Before reading further, please familiarize yourself with the parts that are shown on the front cover of features designed to make your workouts at ...
Uk Manual
Page 5
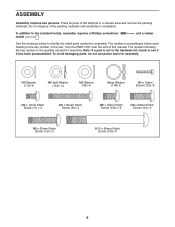
... Screw (121)-2 M8 x 35mm Patch Screw (137)-2 M10 x 95mm Patch Screw (100)-4 5 To avoid damaging parts, do not use power tools for assembly. Note: If a part is completed. and a rubber See the drawings below each drawing is the quantity needed for assembly. ASSEMBLY Assembly requires two... persons. The number following the key number is the key number of the part, from the PART LIST near the end of this manual. Do not dispose of the elliptical in the hardware kit, check to the included tool(s), assembly requires a Phillips screwdriver mallet ...
... Screw (121)-2 M8 x 35mm Patch Screw (137)-2 M10 x 95mm Patch Screw (100)-4 5 To avoid damaging parts, do not use power tools for assembly. Note: If a part is completed. and a rubber See the drawings below each drawing is the quantity needed for assembly. ASSEMBLY Assembly requires two... persons. The number following the key number is the key number of the part, from the PART LIST near the end of this manual. Do not dispose of the elliptical in the hardware kit, check to the included tool(s), assembly requires a Phillips screwdriver mallet ...
Uk Manual
Page 13
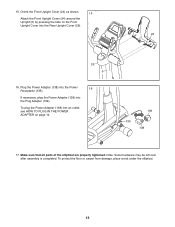
... (138) into the Plug Adapter (139). Plug the Power Adapter (138) into the Rear Upright Cover (25). 24 25 5 16. Make sure that all parts of the elliptical are properly tightened. Orient the Front Upright Cover (24) as shown. 15 Attach the Front Upright Cover (24) around the Upright (5) by pressing the...
... (138) into the Plug Adapter (139). Plug the Power Adapter (138) into the Rear Upright Cover (25). 24 25 5 16. Make sure that all parts of the elliptical are properly tightened. Orient the Front Upright Cover (24) as shown. 15 Attach the Front Upright Cover (24) around the Upright (5) by pressing the...
Uk Manual
Page 22
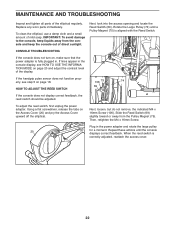
Replace any worn parts immediately. Next, look into the access opening and locate the Reed Switch (69). To clean the elliptical, use a damp cloth and a small amount of the elliptical regularly. If the handgrip pulse sensor does not function properly, see HOW TO USE THE INFORMATION MODE on ... in the console display, see step 5 on the Access Cover (20) and pry the Access Cover upward off the elliptical. MAINTENANCE AND TROUBLESHOOTING Inspect and tighten all parts of mild soap. To adjust the reed switch, first unplug the power adapter. Then, retighten the M4 x 16mm Screw...
Replace any worn parts immediately. Next, look into the access opening and locate the Reed Switch (69). To clean the elliptical, use a damp cloth and a small amount of the elliptical regularly. If the handgrip pulse sensor does not function properly, see HOW TO USE THE INFORMATION MODE on ... in the console display, see step 5 on the Access Cover (20) and pry the Access Cover upward off the elliptical. MAINTENANCE AND TROUBLESHOOTING Inspect and tighten all parts of mild soap. To adjust the reed switch, first unplug the power adapter. Then, retighten the M4 x 16mm Screw...

Uk Manual
Page 24
... the highest number in general. For aerobic exercise, adjust the intensity of your exercise until your heart rate is to make exercise a regular and enjoyable part of rest between workouts.
... the highest number in general. For aerobic exercise, adjust the intensity of your exercise until your heart rate is to make exercise a regular and enjoyable part of rest between workouts.

Uk Manual
Page 27
... Pin Spring M8 Jam Nut M8 Washer M6 Washer Pivot Screw Motor Bracket Screw Idler Bolt M10 x 95mm Patch Screw 27 NTEVEL87910.1 R0111A Key No. PART LIST Key No.
... Pin Spring M8 Jam Nut M8 Washer M6 Washer Pivot Screw Motor Bracket Screw Idler Bolt M10 x 95mm Patch Screw 27 NTEVEL87910.1 R0111A Key No. PART LIST Key No.
Uk Manual
Page 28
... Plug Adapter M5 Washer Adjustment Nut Assembly Tool Grease Packet Userʼs Manual Note: Specifications are not illustrated. 28 Qty. For information about ordering replacement parts, see the back cover of this manual. *These parts are subject to change without notice. Key No. Qty. Description Key No.
... Plug Adapter M5 Washer Adjustment Nut Assembly Tool Grease Packet Userʼs Manual Note: Specifications are not illustrated. 28 Qty. For information about ordering replacement parts, see the back cover of this manual. *These parts are subject to change without notice. Key No. Qty. Description Key No.
Uk Manual
Page 32
...) • the name of the product (see the front cover of this manual) • the key number and description of the replacement part(s) (see the front cover of this type of waste in municipal waste. To preserve the environment, this product. In doing so, you require... more information about safe and correct disposal methods, please contact your area. ORDERING REPLACEMENT PARTS To order replacement parts, see the PART LIST and the EXPLODED DRAWING near the end of this manual) RECYCLING INFORMATION This electronic product must not be disposed of ...
...) • the name of the product (see the front cover of this manual) • the key number and description of the replacement part(s) (see the front cover of this type of waste in municipal waste. To preserve the environment, this product. In doing so, you require... more information about safe and correct disposal methods, please contact your area. ORDERING REPLACEMENT PARTS To order replacement parts, see the PART LIST and the EXPLODED DRAWING near the end of this manual) RECYCLING INFORMATION This electronic product must not be disposed of ...


