
Uk Manual
Page 2
TABLE OF CONTENTS IMPORTANT PRECAUTIONS 3 BEFORE YOU BEGIN 5 ASSEMBLY 6 HOW TO USE THE CHEST PULSE SENSOR 8 OPERATION AND ADJUSTMENT 9 HOW TO FOLD AND MOVE THE TREADMILL 26 TROUBLESHOOTING 28 CONDITIONING GUIDELINES 31 PART LIST 34 ORDERING REPLACEMENT PARTS Back Cover Note: An EXPLODED DRAWING is a registered trademark of this manual. NordicTrack is attached in the centre of IP, Inc. 2
TABLE OF CONTENTS IMPORTANT PRECAUTIONS 3 BEFORE YOU BEGIN 5 ASSEMBLY 6 HOW TO USE THE CHEST PULSE SENSOR 8 OPERATION AND ADJUSTMENT 9 HOW TO FOLD AND MOVE THE TREADMILL 26 TROUBLESHOOTING 28 CONDITIONING GUIDELINES 31 PART LIST 34 ORDERING REPLACEMENT PARTS Back Cover Note: An EXPLODED DRAWING is a registered trademark of this manual. NordicTrack is attached in the centre of IP, Inc. 2
Uk Manual
Page 3
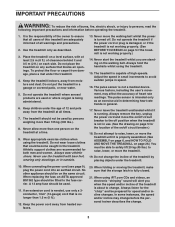
... that the storage latch is not working properly.) 14. It is the responsibility of the owner to the off . Various factors, including the user's movement, may change before operating the treadmill. 1. Always remove the key, unplug the power cord and move the walking belt whilst the power is turned off position when the treadmill is no longer than 135 kg (300 lbs.). 8. When folding or moving the treadmill, make sure...
... that the storage latch is not working properly.) 14. It is the responsibility of the owner to the off . Various factors, including the user's movement, may change before operating the treadmill. 1. Always remove the key, unplug the power cord and move the walking belt whilst the power is turned off position when the treadmill is no longer than 135 kg (300 lbs.). 8. When folding or moving the treadmill, make sure...
Uk Manual
Page 4
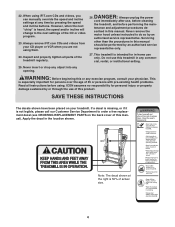
... the location shown. DANGER: 26. Never insert or drop any object into any exercise program, consult your treadmill. This is heard, the speed and/or incline will change to order a free replacement decal (see ORDERING REPLACEMENT PARTS on your physician. ICON assumes no responsibility for in-home use this product. Always unplug the power cord immediately after use of 35 or persons with pre-existing health problems. Read all instructions...
... the location shown. DANGER: 26. Never insert or drop any object into any exercise program, consult your treadmill. This is heard, the speed and/or incline will change to order a free replacement decal (see ORDERING REPLACEMENT PARTS on your physician. ICON assumes no responsibility for in-home use this product. Always unplug the power cord immediately after use of 35 or persons with pre-existing health problems. Read all instructions...
Uk Manual
Page 5
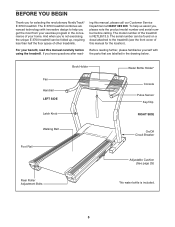
... after read this manual carefully before calling. For your home. Fan Handrail LEFT SIDE Latch Knob Book Holder Water Bottle Holder* Console Pulse Sensor Key/Clip RIGHT SIDE Walking Belt Foot Rail On/Off Circuit Breaker Adjustable Cushion (See page 25) Rear Roller Adjustment Bolts *No water bottle is NETL9513.5. To help you for the location). The E 3700 treadmill combines advanced technology with the parts that are labelled...
... after read this manual carefully before calling. For your home. Fan Handrail LEFT SIDE Latch Knob Book Holder Water Bottle Holder* Console Pulse Sensor Key/Clip RIGHT SIDE Walking Belt Foot Rail On/Off Circuit Breaker Adjustable Cushion (See page 25) Rear Roller Adjustment Bolts *No water bottle is NETL9513.5. To help you for the location). The E 3700 treadmill combines advanced technology with the parts that are labelled...

Uk Manual
Page 8
... the treadmill. • The CR2032 battery may be hand washed and air dried. HOW TO USE THE CHEST PULSE SENSOR HOW TO PUT ON THE CHEST PULSE SENSOR The chest pulse sensor consists of two components: the chest strap and the sensor unit (see page 30). 8 Insert the tab on the treadmill, position yourself near the centre of the walking belt. Press the end of the console. • The chest pulse sensor is...
... the treadmill. • The CR2032 battery may be hand washed and air dried. HOW TO USE THE CHEST PULSE SENSOR HOW TO PUT ON THE CHEST PULSE SENSOR The chest pulse sensor consists of two components: the chest strap and the sensor unit (see page 30). 8 Insert the tab on the treadmill, position yourself near the centre of the walking belt. Press the end of the console. • The chest pulse sensor is...
Uk Manual
Page 9
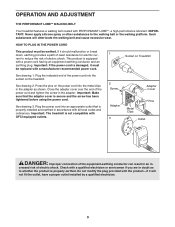
...-equipped outlets. 2 Screw Adapter 3 Adapter Cover Pins Metal Clips Outlet FR DANGER: Improper connection of electric shock. Socket on the power cord into the socket on the treadmill. Close the adapter cover over the end of the power cord into the metal clips in the adapter as to whether the product is properly earthed. OPERATION AND ADJUSTMENT THE PERFORMANT LUBETM WALKING BELT Your treadmill features a walking belt coated with a qualified...
...-equipped outlets. 2 Screw Adapter 3 Adapter Cover Pins Metal Clips Outlet FR DANGER: Improper connection of electric shock. Socket on the power cord into the socket on the treadmill. Close the adapter cover over the end of the power cord into the metal clips in the adapter as to whether the product is properly earthed. OPERATION AND ADJUSTMENT THE PERFORMANT LUBETM WALKING BELT Your treadmill features a walking belt coated with a qualified...
Uk Manual
Page 10
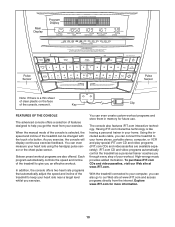
... access programs directly from your heart rate near a target level whilst you exercise, the console will display continuous exercise feedback. In addition, the console offers two heart rate programs that automatically adjust the speed and incline of the treadmill to keep your exercise. Sixteen preset workout programs are available separately). You can even measure your workout. Key Clip FEATURES OF THE CONSOLE The advanced console offers a selection of your heart rate using the handgrip pulse sensor or the chest pulse sensor.
... access programs directly from your heart rate near a target level whilst you exercise, the console will display continuous exercise feedback. In addition, the console offers two heart rate programs that automatically adjust the speed and incline of the treadmill to keep your exercise. Sixteen preset workout programs are available separately). You can even measure your workout. Key Clip FEATURES OF THE CONSOLE The advanced console offers a selection of your heart rate using the handgrip pulse sensor or the chest pulse sensor.
Uk Manual
Page 11
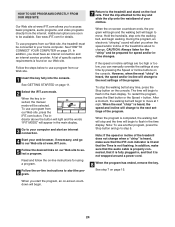
... weight setting will light. The buttons can use a preset program, see the drawing below) whilst operating the treadmill. • Adjust the speed in small increments to enter your weight. To use an iFIT.com program directly from the console. 2 Plug in the main display. To use the heart rate programs. If you enter your clothes. To use the manual mode of the console, follow the steps beginning on /off circuit breaker is intended only as needed...
... weight setting will light. The buttons can use a preset program, see the drawing below) whilst operating the treadmill. • Adjust the speed in small increments to enter your weight. To use an iFIT.com program directly from the console. 2 Plug in the main display. To use the heart rate programs. If you enter your clothes. To use the manual mode of the console, follow the steps beginning on /off circuit breaker is intended only as needed...

Uk Manual
Page 12
... selected incline setting. 5 Follow your exercise. HOW TO USE THE MANUAL MODE 1 Insert the key fully into the console. The Main Display-The main display will light when your current pace, and the time remaining in the main display. 3 Press the Start button or the Speed + button to move at a time, until the words "MANUAL MODE" appear in the current segment of the treadmill. When a program is shown. buttons. Each time a button is used...
... selected incline setting. 5 Follow your exercise. HOW TO USE THE MANUAL MODE 1 Insert the key fully into the console. The Main Display-The main display will light when your current pace, and the time remaining in the main display. 3 Press the Start button or the Speed + button to move at a time, until the words "MANUAL MODE" appear in the current segment of the treadmill. When a program is shown. buttons. Each time a button is used...
Uk Manual
Page 13
... have walked and the number of the main display will appear in the Speed display. Step onto the foot rails, press the Stop button, and adjust the incline of the treadmill to the "off . 8 When you are using the handgrip pulse sensor, the next section of 1/4-mile laps you are finished exercising, stop the walking belt and remove the key. The display will light when the number of measurement. the Laps indicator will change the...
... have walked and the number of the main display will appear in the Speed display. Step onto the foot rails, press the Stop button, and adjust the incline of the treadmill to the "off . 8 When you are using the handgrip pulse sensor, the next section of 1/4-mile laps you are finished exercising, stop the walking belt and remove the key. The display will light when the number of measurement. the Laps indicator will change the...

Uk Manual
Page 15
... walking belt will begin to flash in the Current Segment column are finished using the treadmill, switch the on page 13. 7 When the program has ended, remove the key. See page 25 and turn off " position and unplug the power cord. 15 To stop the program temporarily, press the Stop button. See step 6 on page 13. 6 Turn on the console remain lit after the key is removed, the console is in the "demo" mode...
... walking belt will begin to flash in the Current Segment column are finished using the treadmill, switch the on page 13. 7 When the program has ended, remove the key. See page 25 and turn off " position and unplug the power cord. 15 To stop the program temporarily, press the Stop button. See step 6 on page 13. 6 Turn on the console remain lit after the key is removed, the console is in the "demo" mode...
Uk Manual
Page 19
... display and the speed and incline of the treadmill may automatically change to bring your heart rate to the current target heart rate setting. When the console compares your heart rate closer to the target heart rate setting. See step 5 on page 12. 8 Turn on page 18) and your heart rate is programmed for the program. The walking belt will change to bring your heart rate closer to the target heart rate setting. The words "ENTER PULSE" and the current target heart rate setting...
... display and the speed and incline of the treadmill may automatically change to bring your heart rate to the current target heart rate setting. When the console compares your heart rate closer to the target heart rate setting. See step 5 on page 12. 8 Turn on page 18) and your heart rate is programmed for the program. The walking belt will change to bring your heart rate closer to the target heart rate setting. The words "ENTER PULSE" and the current target heart rate setting...
Uk Manual
Page 22
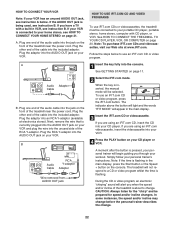
... COMPUTER on the console. The treadmill will appear in the main display. 3 Insert the iFIT.com CD or videocassette. HOW TO CONNECT YOUR VCR Note: If your personal trainer's instructions. IN VIDEO AUDIO IN CH 34 OUT RF OUT Audio Cable RCA Y-adapter Adapter B Wire removed from AUDIO OUT jack B HOW TO USE IFIT.COM CD AND VIDEO PROGRAMS To use an iFIT.com CD or video program, press the iFIT.com button. To use iFIT.com CDs or...
... COMPUTER on the console. The treadmill will appear in the main display. 3 Insert the iFIT.com CD or videocassette. HOW TO CONNECT YOUR VCR Note: If your personal trainer's instructions. IN VIDEO AUDIO IN CH 34 OUT RF OUT Audio Cable RCA Y-adapter Adapter B Wire removed from AUDIO OUT jack B HOW TO USE IFIT.COM CD AND VIDEO PROGRAMS To use an iFIT.com CD or video program, press the iFIT.com button. To use iFIT.com CDs or...
Uk Manual
Page 23
... the audio cable is properly connected, that it is completed, remove the key. See step 6 on page 13. 7 Turn on page 15. 23 To restart the program, press the Start button or the Speed + button. After a moment, the walking belt will begin to the next settings of on the console. Note: To use another flat surface instead of the CD or video program. The time will begin to move. See step 7 on...
... the audio cable is properly connected, that it is completed, remove the key. See step 6 on page 13. 7 Turn on page 15. 23 To restart the program, press the Start button or the Speed + button. After a moment, the walking belt will begin to the next settings of on the console. Note: To use another flat surface instead of the CD or video program. The time will begin to move. See step 7 on...
Uk Manual
Page 24
... the iFIT.com mode. To use a program from our Web site, press the iFIT.com button. When the program is completed, the walking belt will change to the next settings of your web browser, if necessary, and go to change when a "chirp" is heard, make sure that the audio cable is properly connected, that it is fully plugged in the time display. See www.iFIT.com for speed and/or incline changes...
... the iFIT.com mode. To use a program from our Web site, press the iFIT.com button. When the program is completed, the walking belt will change to the next settings of your web browser, if necessary, and go to change when a "chirp" is heard, make sure that the audio cable is properly connected, that it is fully plugged in the time display. See www.iFIT.com for speed and/or incline changes...
Uk Manual
Page 28
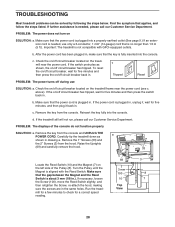
... holes. Remove the key from the console. Remove the key from the console and UNPLUG THE POWER CORD. Reinsert the key fully into the console. PROBLEM: The displays of the Pulley (8). Make sure that applies, and follow the steps listed. c Tripped Reset PROBLEM: The power turns off circuit breaker located on /off circuit breaker has tripped. Remove the 1" Screws (33) and the 2" Screws (3) from the hood. Check the on the treadmill frame near the power cord. d. If...
... holes. Remove the key from the console. Remove the key from the console and UNPLUG THE POWER CORD. Reinsert the key fully into the console. PROBLEM: The displays of the Pulley (8). Make sure that applies, and follow the steps listed. c Tripped Reset PROBLEM: The power turns off circuit breaker located on /off circuit breaker has tripped. Remove the 1" Screws (33) and the 2" Screws (3) from the hood. Check the on the treadmill frame near the power cord. d. If...
Uk Manual
Page 29
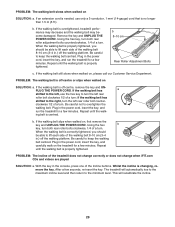
Remove the key and UNPLUG THE POWER CORD. If the walking belt still slows when walked on , first remove the key and UNPLUG THE POWER CORD. clockwise 1/2 of a turn. ing belt is changing, remove the key. Using the hex b key, turn . Plug in the console, press one of a turn both rear roller adjustment bolts counterclockwise, 1/4 of the Incline buttons. With the key in the power cord, insert the key, and carefully walk on the treadmill for a few minutes. Whilst the incline is centred. This will automatically rise...
Remove the key and UNPLUG THE POWER CORD. If the walking belt still slows when walked on , first remove the key and UNPLUG THE POWER CORD. clockwise 1/2 of a turn. ing belt is changing, remove the key. Using the hex b key, turn . Plug in the console, press one of a turn both rear roller adjustment bolts counterclockwise, 1/4 of the Incline buttons. With the key in the power cord, insert the key, and carefully walk on the treadmill for a few minutes. Whilst the incline is centred. This will automatically rise...
Uk Manual
Page 31
... using your everyday life. 31 Aerobic Exercise If your goal is to burn fat, adjust the speed and incline of the treadmill until your heart rate is especially important for aerobic exercise. To find the three numbers above your exercise must exercise at least one day of 35 or individuals with preexisting health problems. The pulse sensor is near the lowest number in your training zone for you exercise...
... using your everyday life. 31 Aerobic Exercise If your goal is to burn fat, adjust the speed and incline of the treadmill until your heart rate is especially important for aerobic exercise. To find the three numbers above your exercise must exercise at least one day of 35 or individuals with preexisting health problems. The pulse sensor is near the lowest number in your training zone for you exercise...
Uk Manual
Page 35
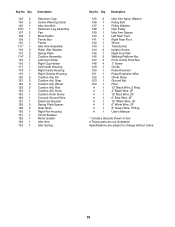
... Arm Nylon Washer Pulley Bolt Pulley Washer Idler Pulley Idler Arm Spacer Left Rear Foot Right Rear Foot Shock Transformer Isolator Screw Right Foot Rail Walking Platform Nut Front Incline Pivot Nut 1" Screw Choke Pulse Receiver Pulse Extension Wire Chest Strap Ground Nut Filter 12" Black Wire, 2 Ring 4" Black Wire, 2F 12" Blue Wire, 2F 6" Blue Wire, 2F 12" White Wire, 2F 6" White Wire, 2F 8" Green Wire, F/Ring User's Manual * Includes all parts shown in box # These parts...
... Arm Nylon Washer Pulley Bolt Pulley Washer Idler Pulley Idler Arm Spacer Left Rear Foot Right Rear Foot Shock Transformer Isolator Screw Right Foot Rail Walking Platform Nut Front Incline Pivot Nut 1" Screw Choke Pulse Receiver Pulse Extension Wire Chest Strap Ground Nut Filter 12" Black Wire, 2 Ring 4" Black Wire, 2F 12" Blue Wire, 2F 6" Blue Wire, 2F 12" White Wire, 2F 6" White Wire, 2F 8" Green Wire, F/Ring User's Manual * Includes all parts shown in box # These parts...
Uk Manual
Page 38
...; The SERIAL NUMBER OF THE PRODUCT (see the front cover of this manual) • The KEY NUMBER AND DESCRIPTION OF THE PART(S) (see the PART LIST on pages 34 and 35 and the EXPLODED DRAWING attached in the centre of this manual) Part No. 228508 R0505A Printed in USA © 2005 ICON IP, Inc. ORDERING REPLACEMENT PARTS To order replacement parts, contact the ICON Health & Fitness, Ltd. office, or write: ICON Health & Fitness...
...; The SERIAL NUMBER OF THE PRODUCT (see the front cover of this manual) • The KEY NUMBER AND DESCRIPTION OF THE PART(S) (see the PART LIST on pages 34 and 35 and the EXPLODED DRAWING attached in the centre of this manual) Part No. 228508 R0505A Printed in USA © 2005 ICON IP, Inc. ORDERING REPLACEMENT PARTS To order replacement parts, contact the ICON Health & Fitness, Ltd. office, or write: ICON Health & Fitness...


