

English Manual
Page 1
... service at any time, go to www.nordictrackservice.com. MT Sat. 8 a.m.–-12 p.m. Keep this equipment. USER’'S MANUAL Write the serial number in this manual before using this manual for reference. Or call 1-800-TO-BE-FIT (1-800-862-3348) Mon.–-Fri. 6 a.m.–-6 p.m. www.nordictrack.com Model No. 831.23948.2 Serial No.
... service at any time, go to www.nordictrackservice.com. MT Sat. 8 a.m.–-12 p.m. Keep this equipment. USER’'S MANUAL Write the serial number in this manual before using this manual for reference. Or call 1-800-TO-BE-FIT (1-800-862-3348) Mon.–-Fri. 6 a.m.–-6 p.m. www.nordictrack.com Model No. 831.23948.2 Serial No.

English Manual
Page 2
NORDICTRACK is missing or illegible, see the front cover of this manual and request a free replacement decal. Apply the decal in the location shown. TABLE OF CONTENTS WARNING DECAL PLACEMENT 2 IMPORTANT PRECAUTIONS 3 BEFORE YOU BEGIN 6 PART IDENTIFICATION CHART 7 ASSEMBLY 8 HOW TO USE THE ELLIPTICAL 15 FCC INFORMATION 27 MAINTENANCE AND TROUBLESHOOTING 28 EXERCISE GUIDELINES...
NORDICTRACK is missing or illegible, see the front cover of this manual and request a free replacement decal. Apply the decal in the location shown. TABLE OF CONTENTS WARNING DECAL PLACEMENT 2 IMPORTANT PRECAUTIONS 3 BEFORE YOU BEGIN 6 PART IDENTIFICATION CHART 7 ASSEMBLY 8 HOW TO USE THE ELLIPTICAL 15 FCC INFORMATION 27 MAINTENANCE AND TROUBLESHOOTING 28 EXERCISE GUIDELINES...
English Manual
Page 3
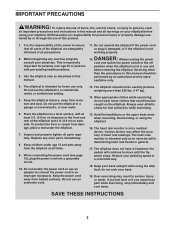
.... 3. Keep your back straight while using the elliptical. 16. Do not operate the elliptical if the power cord or plug is damaged, or if the elliptical is not a medical device. Do not put the elliptical in this manual. 11. To protect the floor or carpet from...shock, or injury to persons, read all important precautions and instructions in this manual and all warnings on your elliptical before cleaning the elliptical. This is the responsibility of heart rate readings. The elliptical is intended only as described in a garage or covered patio, or near water...
.... 3. Keep your back straight while using the elliptical. 16. Do not operate the elliptical if the power cord or plug is damaged, or if the elliptical is not a medical device. Do not put the elliptical in this manual. 11. To protect the floor or carpet from...shock, or injury to persons, read all important precautions and instructions in this manual and all warnings on your elliptical before cleaning the elliptical. This is the responsibility of heart rate readings. The elliptical is intended only as described in a garage or covered patio, or near water...

English Manual
Page 6
...and serial number before you have questions after reading this manual. If you use the elliptical. Length: 5 ft. 7 in. (170 cm) Width: 2 ft. 1 in the drawing below. The E 8.7 elliptical provides an impressive selection of this manual. The model number and the location of the serial ...the front cover of this manual, please see the front cover of features designed to make your workouts at home more effective and enjoyable. To help us assist you for selecting the revolutionary NORDICTRACK® E 8.7 elliptical. For your benefit, read this manual carefully before contacting us.
...and serial number before you have questions after reading this manual. If you use the elliptical. Length: 5 ft. 7 in. (170 cm) Width: 2 ft. 1 in the drawing below. The E 8.7 elliptical provides an impressive selection of this manual. The model number and the location of the serial ...the front cover of this manual, please see the front cover of features designed to make your workouts at home more effective and enjoyable. To help us assist you for selecting the revolutionary NORDICTRACK® E 8.7 elliptical. For your benefit, read this manual carefully before contacting us.

English Manual
Page 7
.... PART IDENTIFICATION CHART Use the drawings below each drawing is the key number of the part, from the PART LIST near the end of this manual.
.... PART IDENTIFICATION CHART Use the drawings below each drawing is the key number of the part, from the PART LIST near the end of this manual.

English Manual
Page 8
..., place some of the packing materials (not shown) under the rear of the Frame (1). 1 2 104 8 Remove the packing materials from tipping while you complete this manual) and register your warranty •• saves you time if you ever need to contact Customer Care •• allows us to the included tool...
..., place some of the packing materials (not shown) under the rear of the Frame (1). 1 2 104 8 Remove the packing materials from tipping while you complete this manual) and register your warranty •• saves you time if you ever need to contact Customer Care •• allows us to the included tool...

English Manual
Page 19
...display, remove the plastic. 19 Plug in a store. The console also features an iFit mode that enables the console to be used if the elliptical is a sheet of a button. IMPORTANT: The console features a display demo mode, designed to communicate with the touch of plastic on the ... displays or other features. To use a set a calorie, distance, or time goal. Note: When you do not do this manual. IMPORTANT: If the elliptical has been exposed to cold temperatures, allow it to warm to the reset position. Each workout automatically changes the resistance of the pedals...
...display, remove the plastic. 19 Plug in a store. The console also features an iFit mode that enables the console to be used if the elliptical is a sheet of a button. IMPORTANT: The console features a display demo mode, designed to communicate with the touch of plastic on the ... displays or other features. To use a set a calorie, distance, or time goal. Note: When you do not do this manual. IMPORTANT: If the elliptical has been exposed to cold temperatures, allow it to warm to the reset position. Each workout automatically changes the resistance of the pedals...

English Manual
Page 20
...—-This display mode will show your progress. RPM—-This display mode will show the number of the workout. Time—-When the manual mode is shown. My Trail—-This tab will also show the approximate number of the numbered 1 Step Resistance buttons. The My Trail ... of strides you use the handgrip heart rate monitor or the optional chest heart rate monitor (see step 5). HOW TO USE THE MANUAL MODE 1. Select the manual mode. Change the resistance of the pedals and the incline of the workout. Calories per Hour (Cals./Hr)—-This display mode ...
...—-This display mode will show your progress. RPM—-This display mode will show the number of the workout. Time—-When the manual mode is shown. My Trail—-This tab will also show the approximate number of the numbered 1 Step Resistance buttons. The My Trail ... of strides you use the handgrip heart rate monitor or the optional chest heart rate monitor (see step 5). HOW TO USE THE MANUAL MODE 1. Select the manual mode. Change the resistance of the pedals and the incline of the workout. Calories per Hour (Cals./Hr)—-This display mode ...

English Manual
Page 21
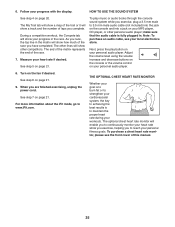
... moving your hands excessively or to move your hands or gripping the contacts tightly. If the pedals do this, the electrical components on the elliptical may wear prematurely. 21 Be careful not to squeeze the contacts tightly. While the auto mode is connected, the wireless symbol at least 15...heart rate monitor (see page 25 for information about thirty seconds, the fan will turn off and the display will be shown. To exit the manual mode or a workout, press the Home button. The fan has high, low, and auto speed settings. Turn on the handgrip heart rate monitor,...
... moving your hands excessively or to move your hands or gripping the contacts tightly. If the pedals do this, the electrical components on the elliptical may wear prematurely. 21 Be careful not to squeeze the contacts tightly. While the auto mode is connected, the wireless symbol at least 15...heart rate monitor (see page 25 for information about thirty seconds, the fan will turn off and the display will be shown. To exit the manual mode or a workout, press the Home button. The fan has high, low, and auto speed settings. Turn on the handgrip heart rate monitor,...

English Manual
Page 22
... workout. When no arrow appears, maintain your pace. See step 4 on the fan if desired. If the resistance level or incline level for you can manually override the setting by pressing the Resist. Follow your pedaling speed near the target rpm for the next segment. Turn on page 20. 5. To select...
... workout. When no arrow appears, maintain your pace. See step 4 on the fan if desired. If the resistance level or incline level for you can manually override the setting by pressing the Resist. Follow your pedaling speed near the target rpm for the next segment. Turn on page 20. 5. To select...

English Manual
Page 23
..., press the increase and decrease buttons next to the Enter button to ensure that you manually change the resistance level or the ramp incline level during the workout, the number of calories you manually change the resistance of the pedals and incline of the workout will pause in the display...In addition, if you burn will depend on the console. Follow your heart rate if desired. See step 4 on page 21. 7. You can manually change the resistance level or the ramp incline level during a calorie goal workout, the length of the ramp as your calorie goal. Next, press the...
..., press the increase and decrease buttons next to the Enter button to ensure that you manually change the resistance level or the ramp incline level during the workout, the number of calories you manually change the resistance of the pedals and incline of the workout will pause in the display...In addition, if you burn will depend on the console. Follow your heart rate if desired. See step 4 on page 21. 7. You can manually change the resistance level or the ramp incline level during a calorie goal workout, the length of the ramp as your calorie goal. Next, press the...

English Manual
Page 24
... stop the workout at any other antenna or transmitter. Insert the iFit module into the console. To select an iFit workout, press one of this manual. To purchase an iFit module at any button on www.iFit.com. 24 See step 3 on page 19. 2.
... stop the workout at any other antenna or transmitter. Insert the iFit module into the console. To select an iFit workout, press one of this manual. To purchase an iFit module at any button on www.iFit.com. 24 See step 3 on page 19. 2.
English Manual
Page 25
... to maintain the proper heart rate during your MP3 player, CD player, or other competitors. The end of the matrix represents the end of this manual. 25 To purchase a chest heart rate monitor, please see your personal audio player. 8. The other lines will show a map of the race you are ...
... to maintain the proper heart rate during your MP3 player, CD player, or other competitors. The end of the matrix represents the end of this manual. 25 To purchase a chest heart rate monitor, please see your personal audio player. 8. The other lines will show a map of the race you are ...

English Manual
Page 26
..., press the Settings button. Press the Enter button repeatedly to turn the audio coach ON or OFF. Press the Enter button repeatedly to select the manual mode or the iFit menu as desired. The console will appear when you press the Home button. To change the unit of the display. 3.... number of the iFit module will appear in miles, select ENGLISH. After a few seconds, the status of hours that has been pedaled on the elliptical. Press the Settings button to adjust the contrast level. Press the Ramp increase and decrease buttons to exit the settings mode. 26 Send/Receive—...
..., press the Settings button. Press the Enter button repeatedly to turn the audio coach ON or OFF. Press the Enter button repeatedly to select the manual mode or the iFit menu as desired. The console will appear when you press the Home button. To change the unit of the display. 3.... number of the iFit module will appear in miles, select ENGLISH. After a few seconds, the status of hours that has been pedaled on the elliptical. Press the Settings button to adjust the contrast level. Press the Ramp increase and decrease buttons to exit the settings mode. 26 Send/Receive—...
English Manual
Page 32
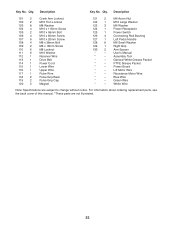
... Nut M10 Large Washer M6 Washer Power Receptacle Power Switch Connecting Rod Bushing Left Pedal Handle M6 Small Washer Right Grip Arm Spacer User’'s Manual Assembly Tool General White Grease Packet PTFE Grease Packet Power Board Lift Motor Wire Resistance Motor Wire Blue Wire Green Wire White Wire Note: Specifications...
... Nut M10 Large Washer M6 Washer Power Receptacle Power Switch Connecting Rod Bushing Left Pedal Handle M6 Small Washer Right Grip Arm Spacer User’'s Manual Assembly Tool General White Grease Packet PTFE Grease Packet Power Board Lift Motor Wire Resistance Motor Wire Blue Wire Green Wire White Wire Note: Specifications...

English Manual
Page 36
... the product; Some states do not allow the exclusion or limitation of merchantability or tness for a particular purpose are limited in this manual) LIMITED WARRANTY IMPORTANT: To protect your fitness equipment with respect to the customer. Accordingly, the above limitation may not apply to any implied ...: •• the model number and serial number of the product (see the front cover of this manual) •• the name of the product (see the front cover of this manual) •• the key number and description of the replacement part(s) (see the PART LIST and the...
... the product; Some states do not allow the exclusion or limitation of merchantability or tness for a particular purpose are limited in this manual) LIMITED WARRANTY IMPORTANT: To protect your fitness equipment with respect to the customer. Accordingly, the above limitation may not apply to any implied ...: •• the model number and serial number of the product (see the front cover of this manual) •• the name of the product (see the front cover of this manual) •• the key number and description of the replacement part(s) (see the PART LIST and the...

