
English Manual
Page 2
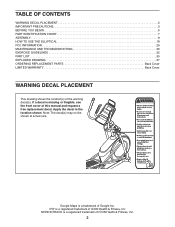
... DECAL PLACEMENT 2 IMPORTANT PRECAUTIONS 3 BEFORE YOU BEGIN 6 PART IDENTIFICATION CHART 7 ASSEMBLY 8 HOW TO USE THE ELLIPTICAL 18 FCC INFORMATION 29 MAINTENANCE AND TROUBLESHOOTING 30 EXERCISE GUIDELINES 32 PART LIST 35 EXPLODED DRAWING 37 ORDERING REPLACEMENT PARTS Back Cover LIMITED WARRANTY Back Cover WARNING DECAL PLACEMENT This drawing shows the location(s) of ICON Health & Fitness, Inc. 2 If a decal is a trademark of this manual and request a free replacement decal. Google Maps is missing or illegible, see...
... DECAL PLACEMENT 2 IMPORTANT PRECAUTIONS 3 BEFORE YOU BEGIN 6 PART IDENTIFICATION CHART 7 ASSEMBLY 8 HOW TO USE THE ELLIPTICAL 18 FCC INFORMATION 29 MAINTENANCE AND TROUBLESHOOTING 30 EXERCISE GUIDELINES 32 PART LIST 35 EXPLODED DRAWING 37 ORDERING REPLACEMENT PARTS Back Cover LIMITED WARRANTY Back Cover WARNING DECAL PLACEMENT This drawing shows the location(s) of ICON Health & Fitness, Inc. 2 If a decal is a trademark of this manual and request a free replacement decal. Google Maps is missing or illegible, see...
English Manual
Page 3
ICON assumes no responsibility for home use the elliptical in this product. 1. The elliptical should not be used . Always wear athletic shoes for persons over age 35 or persons with at all parts each side. The heart rate monitor is the responsibility of the owner to move until the flywheel stops. the pedals will continue to ensure that could become short of breath, or if...
ICON assumes no responsibility for home use the elliptical in this product. 1. The elliptical should not be used . Always wear athletic shoes for persons over age 35 or persons with at all parts each side. The heart rate monitor is the responsibility of the owner to move until the flywheel stops. the pedals will continue to ensure that could become short of breath, or if...
English Manual
Page 6
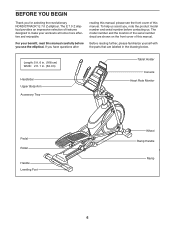
... . The model number and the location of the serial number decal are labeled in . (64 cm) Handlebar Upper Body Arm Accessory Tray Tablet Holder Console Heart Rate Monitor Pedal Roller Handle Leveling Foot Wheel Ramp Handle Ramp 6 The E 7.0 Z elliptical provides an impressive selection of features designed to make your benefit, read this manual carefully before contacting us assist you for selecting the revolutionary NORDICTRACK® E 7.0 Z elliptical. Length...
... . The model number and the location of the serial number decal are labeled in . (64 cm) Handlebar Upper Body Arm Accessory Tray Tablet Holder Console Heart Rate Monitor Pedal Roller Handle Leveling Foot Wheel Ramp Handle Ramp 6 The E 7.0 Z elliptical provides an impressive selection of features designed to make your benefit, read this manual carefully before contacting us assist you for selecting the revolutionary NORDICTRACK® E 7.0 Z elliptical. Length...

English Manual
Page 13
... Axle Spacer (77) onto an M8 x 13mm Screw (82), and tighten the Screw a few turns into the Pedal Arm Axle (64). Repeat this step for the Left Pedal Arm (44). 11 44 120 55 59 97 58 Grease 12. Then, tighten both parts. Orient the Right Pedal Arm (58) as shown. Slide an M8 Washer (97... onto another M8 x 13mm Screw (82), and tighten the Screw a few turns into both Screws at the same time. Apply grease to the Right Roller Arm (59) with an M8 x 14mm Shoulder Screw (120), a Small Axle Cover (55), and an M8 Washer (97). Repeat this step on the Right Pedal Arm (58). While a second ...
... Axle Spacer (77) onto an M8 x 13mm Screw (82), and tighten the Screw a few turns into the Pedal Arm Axle (64). Repeat this step for the Left Pedal Arm (44). 11 44 120 55 59 97 58 Grease 12. Then, tighten both parts. Orient the Right Pedal Arm (58) as shown. Slide an M8 Washer (97... onto another M8 x 13mm Screw (82), and tighten the Screw a few turns into both Screws at the same time. Apply grease to the Right Roller Arm (59) with an M8 x 14mm Shoulder Screw (120), a Small Axle Cover (55), and an M8 Washer (97). Repeat this step on the Right Pedal Arm (58). While a second ...
English Manual
Page 18
... requires two persons. Power Adapter HOW TO MOVE THE ELLIPTICAL Due to the size and weight of the elliptical, moving it to warm to room temperature before you may damage the console displays or other electronic device or object into the tablet holder, set the bottom edge of the elliptical. Carefully move the elliptical to the desired location, and then lower it to remove the tablet from...
... requires two persons. Power Adapter HOW TO MOVE THE ELLIPTICAL Due to the size and weight of the elliptical, moving it to warm to room temperature before you may damage the console displays or other electronic device or object into the tablet holder, set the bottom edge of the elliptical. Carefully move the elliptical to the desired location, and then lower it to remove the tablet from...

English Manual
Page 19
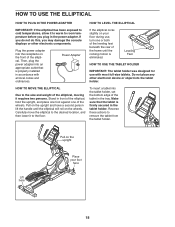
... Latch Button Ramp Upper Body Arms Handlebars Pedals To lower the ramp, press the latch button, pull the ramp handle, and lower the ramp to a complete stop. Push the pedals until they begin to move until the pedals come to the desired incline level. Note: The elliptical does not have a free wheel; Then, step off the higher pedal first. It is in the frame. Note: The pedals can turn in the direction...
... Latch Button Ramp Upper Body Arms Handlebars Pedals To lower the ramp, press the latch button, pull the ramp handle, and lower the ramp to a complete stop. Push the pedals until they begin to move until the pedals come to the desired incline level. Note: The elliptical does not have a free wheel; Then, step off the higher pedal first. It is in the frame. Note: The pedals can turn in the direction...
English Manual
Page 21
... selected resistance level. 4. With the iFit mode, you exercise. To use a set a calorie, distance, or time goal. For simplicity, all instructions in either miles or kilometers. You can also use the manual mode, you exercise, the console will take a moment for use the sound system, see step 3 on the console to select the manual mode. Press the Manual Control button or the Home button to charge your USB-compatible device while you can display speed and distance in...
... selected resistance level. 4. With the iFit mode, you exercise. To use a set a calorie, distance, or time goal. For simplicity, all instructions in either miles or kilometers. You can also use the manual mode, you exercise, the console will take a moment for use the sound system, see step 3 on the console to select the manual mode. Press the Manual Control button or the Home button to charge your USB-compatible device while you can display speed and distance in...
English Manual
Page 22
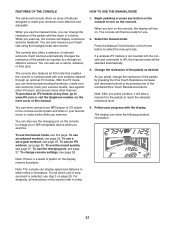
... your heart rate when you use the handgrip heart rate monitor (see HOW TO CHANGE CONSOLE SETTINGS on the handgrip heart rate monitor, remove the plastic. If there are burning per hour. To measure your heart rate, Contacts hold the handgrip heart rate monitor with your wireless signal. When a wireless iFit module is selected, this display mode will show the elapsed time. As you exercise, the flashing rectangle will also show the number...
... your heart rate when you use the handgrip heart rate monitor (see HOW TO CHANGE CONSOLE SETTINGS on the handgrip heart rate monitor, remove the plastic. If there are burning per hour. To measure your heart rate, Contacts hold the handgrip heart rate monitor with your wireless signal. When a wireless iFit module is selected, this display mode will show the elapsed time. As you exercise, the flashing rectangle will also show the number...
English Manual
Page 23
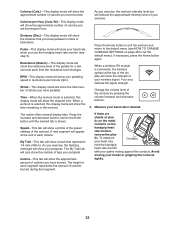
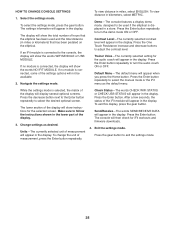
... 15 seconds. For optimal performance, clean the contacts using a soft cloth; If the display does not show a preset presentation. To turn off the demo mode, see HOW TO CHANGE CONSOLE SETTINGS on , the console will flash in a store. never use alcohol, abrasives, or chemicals to squeeze the contacts tightly. If the pedals do not move your hands are finished exercising, the console will be reset.
... 15 seconds. For optimal performance, clean the contacts using a soft cloth; If the display does not show a preset presentation. To turn off the demo mode, see HOW TO CHANGE CONSOLE SETTINGS on , the console will flash in a store. never use alcohol, abrasives, or chemicals to squeeze the contacts tightly. If the pedals do not move your hands are finished exercising, the console will be reset.
English Manual
Page 24
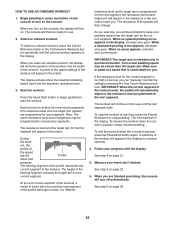
... to turn on . HOW TO USE AN ONBOARD WORKOUT 1. The console will then change. At the end of each segment. Follow your progress. When you . One resistance level and one -minute segments. Begin pedaling or press any time, press the Pause/ End button or stop the workout at a speed that is divided into one target rpm (speed) are finished exercising, the console will flash in the display...
... to turn on . HOW TO USE AN ONBOARD WORKOUT 1. The console will then change. At the end of each segment. Follow your progress. When you . One resistance level and one -minute segments. Begin pedaling or press any time, press the Pause/ End button or stop the workout at a speed that is divided into one target rpm (speed) are finished exercising, the console will flash in the display...
English Manual
Page 25
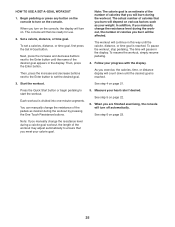
... number of calories that you manually change the resistance of the workout may adjust automatically to set a calories, distance, or time goal, first press the Set A Goal button. Note: If you meet your weight. The workout will turn off automatically. Start the workout. Each workout is reached. Press the Quick Start button or begin pedaling to start the workout. When you are finished exercising, the console will depend on page 23. 25 To pause the workout, stop pedaling...
... number of calories that you manually change the resistance of the workout may adjust automatically to set a calories, distance, or time goal, first press the Set A Goal button. Note: If you meet your weight. The workout will turn off automatically. Start the workout. Each workout is reached. Press the Quick Start button or begin pedaling to start the workout. When you are finished exercising, the console will depend on page 23. 25 To pause the workout, stop pedaling...
English Manual
Page 26
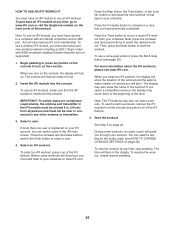
... number on . Select an iFit workout. To select an iFit workout, press one of this manual. Before some workouts, an audio coach will turn on the console, the display will guide you must add them to your iFit account, you can select a setting for use an iFit workout. Press the Map button, the Train button, or the Lose Wt. button to the beginning of the workout. To use the demo workouts, remove the iFit module from the console and press one user...
... number on . Select an iFit workout. To select an iFit workout, press one of this manual. Before some workouts, an audio coach will turn on the console, the display will guide you must add them to your iFit account, you can select a setting for use an iFit workout. Press the Map button, the Train button, or the Lose Wt. button to the beginning of the workout. To use the demo workouts, remove the iFit module from the console and press one user...

English Manual
Page 27
... your progress with the display. Adjust the volume level using the volume increase and decrease buttons on the console or the volume control on your local electronics store. HOW TO USE THE CHARGING PORT The console features a charging port that the audio cable is fully plugged in the race. Follow your personal audio player. 8. For more information about the iFit mode, go to charge USB...
... your progress with the display. Adjust the volume level using the volume increase and decrease buttons on the console or the volume control on your local electronics store. HOW TO USE THE CHARGING PORT The console features a charging port that the audio cable is fully plugged in the race. Follow your personal audio player. 8. For more information about the iFit mode, go to charge USB...
English Manual
Page 28
... the settings mode, press the gear button. While the settings mode is displayed in miles or kilometers) that has been pedaled on the elliptical. Press the Enter button repeatedly to be available. 2. To view distance in the display. Check Status-The words CHECK WIFI STATUS or CHECK USB STATUS will appear when you press the Home button. Exit the settings mode. Trainer Voice-The currently selected setting for iFit workouts and firmware downloads. 4. Demo-The console features a display demo mode...
... the settings mode, press the gear button. While the settings mode is displayed in miles or kilometers) that has been pedaled on the elliptical. Press the Enter button repeatedly to be available. 2. To view distance in the display. Check Status-The words CHECK WIFI STATUS or CHECK USB STATUS will appear when you press the Home button. Exit the settings mode. Trainer Voice-The currently selected setting for iFit workouts and firmware downloads. 4. Demo-The console features a display demo mode...

English Manual
Page 30
... power adapter. 30 Slide the Reed Switch (38) slightly closer to be too high or too low, see step 5 on page 22. 38 43 HOW TO ADJUST THE REED SWITCH If the console does not display correct feedback, the reed switch should be adjusted. Replace any worn parts immediately. Locate the Reed Switch (38). Inspect and properly tighten all parts each time the elliptical is used. To adjust the reed switch, first unplug the power adapter. MAINTENANCE AND TROUBLESHOOTING MAINTENANCE...
... power adapter. 30 Slide the Reed Switch (38) slightly closer to be too high or too low, see step 5 on page 22. 38 43 HOW TO ADJUST THE REED SWITCH If the console does not display correct feedback, the reed switch should be adjusted. Replace any worn parts immediately. Locate the Reed Switch (38). Inspect and properly tighten all parts each time the elliptical is used. To adjust the reed switch, first unplug the power adapter. MAINTENANCE AND TROUBLESHOOTING MAINTENANCE...

English Manual
Page 31
..., locate and loosen the Idler Screw (89). Then, remove the Right Shield. Next, see assembly step 15 on page 15. Then, carefully remove the Right Roller Arm (59) and the Right Pedal Arm (58) from the Right Upper Body Leg (60). Then, plug in the power adapter. 95 53 20 59 58 31 HOW TO ADJUST THE DRIVE BELT If the pedals slip while you are pedaling, even while the resistance is...
..., locate and loosen the Idler Screw (89). Then, remove the Right Shield. Next, see assembly step 15 on page 15. Then, carefully remove the Right Roller Arm (59) and the Right Pedal Arm (58) from the Right Upper Body Leg (60). Then, plug in the power adapter. 95 53 20 59 58 31 HOW TO ADJUST THE DRIVE BELT If the pedals slip while you are pedaling, even while the resistance is...

English Manual
Page 32
... exercise until your training zone. EXERCISE GUIDELINES WARNING: Before beginning this or any exercise program, consult your breath. These guidelines will help you must perform aerobic exercise, which is near the highest number in your condition, complete three workouts each week, if desired. WORKOUT GUIDELINES Warming Up-Start with 5 to burn fat, adjust the intensity of stretching. The chart below shows recommended heart rates...
... exercise until your training zone. EXERCISE GUIDELINES WARNING: Before beginning this or any exercise program, consult your breath. These guidelines will help you must perform aerobic exercise, which is near the highest number in your condition, complete three workouts each week, if desired. WORKOUT GUIDELINES Warming Up-Start with 5 to burn fat, adjust the intensity of stretching. The chart below shows recommended heart rates...

English Manual
Page 35
... Stabilizer Console Roller Guide #8 x 12mm Screw Ramp Cover Left Latch Handle Right Latch Handle Latch Button Latch Bracket Rear Stabilizer Cover Track Latch Pin Crank Pulley Crank Arm M4 x 10mm Screw Idler Bumper Small Leveling Foot Resistance Motor M10 Locknut M10 Washer Eddy Mechanism Mechanism Axle Stabilizer Cap M10 x 19mm Screw M5 Washer Leveling Foot Wheel Pivot Axle Upright Bushing Accessory Tray Reed Switch/Wire Reed Switch Clamp Frame Bearing Small Snap Ring Sleeve Magnet Left Pedal Arm Left Roller Arm Left Upper Body Leg...
... Stabilizer Console Roller Guide #8 x 12mm Screw Ramp Cover Left Latch Handle Right Latch Handle Latch Button Latch Bracket Rear Stabilizer Cover Track Latch Pin Crank Pulley Crank Arm M4 x 10mm Screw Idler Bumper Small Leveling Foot Resistance Motor M10 Locknut M10 Washer Eddy Mechanism Mechanism Axle Stabilizer Cap M10 x 19mm Screw M5 Washer Leveling Foot Wheel Pivot Axle Upright Bushing Accessory Tray Reed Switch/Wire Reed Switch Clamp Frame Bearing Small Snap Ring Sleeve Magnet Left Pedal Arm Left Roller Arm Left Upper Body Leg...
English Manual
Page 36
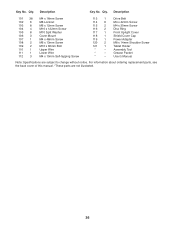
Qty. Key No. Description Key No. For information about ordering replacement parts, see the back cover of this manual. *These parts are subject to change without notice. Qty. Drive Belt M4 x 42mm Screw M4 x 30mm Screw Disc Ring Front Upright Cover Shield Cover Cap Power Adapter M8 x 14mm Shoulder Screw Tablet Holder Assembly Tool Grease Packet User's Manual Note: Specifications are not illustrated. 36 Description 101 38 102 6 103 8 104 4 105 8 106 3 107 1 108 2 109...
Qty. Key No. Description Key No. For information about ordering replacement parts, see the back cover of this manual. *These parts are subject to change without notice. Qty. Drive Belt M4 x 42mm Screw M4 x 30mm Screw Disc Ring Front Upright Cover Shield Cover Cap Power Adapter M8 x 14mm Shoulder Screw Tablet Holder Assembly Tool Grease Packet User's Manual Note: Specifications are not illustrated. 36 Description 101 38 102 6 103 8 104 4 105 8 106 3 107 1 108 2 109...
English Manual
Page 40
...;cally set forth herein. damages with the use and service conditions. Accordingly, the above limitation may have other warranty beyond that vary from the date of this warranty is in connection with respect to the customer. ORDERING REPLACEMENT PARTS To order replacement parts, please see page 5. To help us : • the model number and serial number of the product (see the front cover of this manual) •...
...;cally set forth herein. damages with the use and service conditions. Accordingly, the above limitation may have other warranty beyond that vary from the date of this warranty is in connection with respect to the customer. ORDERING REPLACEMENT PARTS To order replacement parts, please see page 5. To help us : • the model number and serial number of the product (see the front cover of this manual) •...


