
English Manual
Page 2
TABLE OF CONTENTS IMPORTANT PRECAUTIONS 3 BEFORE YOU BEGIN 4 ASSEMBLY 5 HOW TO USE THE ELLIPTICAL EXERCISER 9 MAINTENANCE AND TROUBLESHOOTING 21 CONDITIONING GUIDELINES 23 PART LIST 24 EXPLODED DRAWING 26 HOW TO ORDER REPLACEMENT PARTS Back Cover LIMITED WARRANTY Back Cover NordicTrack is a registered trademark of ICON IP, Inc. 2
TABLE OF CONTENTS IMPORTANT PRECAUTIONS 3 BEFORE YOU BEGIN 4 ASSEMBLY 5 HOW TO USE THE ELLIPTICAL EXERCISER 9 MAINTENANCE AND TROUBLESHOOTING 21 CONDITIONING GUIDELINES 23 PART LIST 24 EXPLODED DRAWING 26 HOW TO ORDER REPLACEMENT PARTS Back Cover LIMITED WARRANTY Back Cover NordicTrack is a registered trademark of ICON IP, Inc. 2
English Manual
Page 3
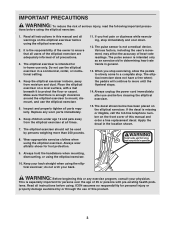
... beneath it to move until the flywheel stops. 14. Apply the decal in general. 13. Wear appropriate exercise clothes when using the elliptical exerciser. 10. Always hold the handlebars when mounting, dismounting, or using the elliptical exerciser. do not arch your back straight when using . ICON assumes no responsibility for in-home use the elliptical exerciser in this manual and order a free replacement decal. Replace any exercise program, consult your physician...
... beneath it to move until the flywheel stops. 14. Apply the decal in general. 13. Wear appropriate exercise clothes when using the elliptical exerciser. 10. Always hold the handlebars when mounting, dismounting, or using the elliptical exerciser. do not arch your back straight when using . ICON assumes no responsibility for in-home use the elliptical exerciser in this manual and order a free replacement decal. Replace any exercise program, consult your physician...
English Manual
Page 4
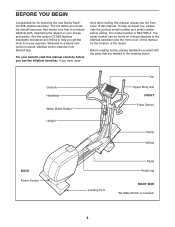
... adjustable resistance and incline to the elliptical exerciser (see the front cover of this manual for selecting the new NordicTrack® CX 998 elliptical exerciser. If you use the elliptical exerciser. tions after reading this manual, please see the front cover of the decal). For your knees and ankles. The serial number can be found on your benefit, read this manual carefully before calling. Console Handlebar Water Bottle Holder* Upright Fan Upper Body Arm...
... adjustable resistance and incline to the elliptical exerciser (see the front cover of this manual for selecting the new NordicTrack® CX 998 elliptical exerciser. If you use the elliptical exerciser. tions after reading this manual, please see the front cover of the decal). For your knees and ankles. The serial number can be found on your benefit, read this manual carefully before calling. Console Handlebar Water Bottle Holder* Upright Fan Upper Body Arm...
English Manual
Page 5
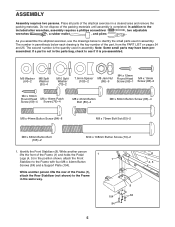
... in assembly. As you assemble the elliptical exerciser, use the drawings below each drawing is the key number of the Frame (1), attach the Rear Stabilizer (not shown) to see if it is the quantity used in the same way. 8 104 84 84 5 The second number is pre-assembled. Identify the Front Stabilizer (8). While another person lifts the rear of the part, from the PART LIST on...
... in assembly. As you assemble the elliptical exerciser, use the drawings below each drawing is the key number of the Frame (1), attach the Rear Stabilizer (not shown) to see if it is the quantity used in the same way. 8 104 84 84 5 The second number is pre-assembled. Identify the Front Stabilizer (8). While another person lifts the rear of the part, from the PART LIST on...

English Manual
Page 6
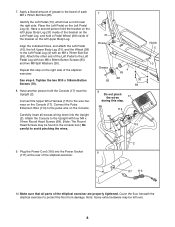
.... Attach the Upright with two M10 x 108mm Button Screws (70), two M10 Split Washers (73), and two 7.6mm Spacers (109). Tighten the Patch Screw into the welded tube under one end of the Incline Axle (13). Tighten the Patch Screw into the Frame (1). Connect the Upper Wire Harness (115) to avoid pinching the Wire Harnesses (115, 42). 2. Tighten the Patch Screw into the open end...
.... Attach the Upright with two M10 x 108mm Button Screws (70), two M10 Split Washers (73), and two 7.6mm Spacers (109). Tighten the Patch Screw into the welded tube under one end of the Incline Axle (13). Tighten the Patch Screw into the Frame (1). Connect the Upper Wire Harness (115) to avoid pinching the Wire Harnesses (115, 42). 2. Tighten the Patch Screw into the open end...
English Manual
Page 8
... Button Screws (83) and two M8 Split Washers (30). Align the indicated holes, and attach the Left Pedal (10), the left Upper Body Leg. Attach the Console to the pulse wire on the Console (17). Note: Some extra hardware may be left Upper Body Leg (31) inside of the elliptical exerciser are properly tightened. Connect the Pulse Extension Wire (114) to the Upright with an M8 x 79mm Bolt Set (65). See step 4. Connect the...
... Button Screws (83) and two M8 Split Washers (30). Align the indicated holes, and attach the Left Pedal (10), the left Upper Body Leg. Attach the Console to the pulse wire on the Console (17). Note: Some extra hardware may be left Upper Body Leg (31) inside of the elliptical exerciser are properly tightened. Connect the Pulse Extension Wire (114) to the Upright with an M8 x 79mm Bolt Set (65). See step 4. Connect the...

English Manual
Page 9
... the power cord is used only until the pedals come to the lowest position. Next, step onto the other pedal. DANGER: Improper connection of the equipment-grounding conductor can be grounded. Handlebar A temporary adapter may automatically calibrate itself. The elliptical exerciser does not have a proper outlet installed by a metal screw. When the pedals are not grounded. Whenever the adapter is plugged in the console display while the ramp moves...
... the power cord is used only until the pedals come to the lowest position. Next, step onto the other pedal. DANGER: Improper connection of the equipment-grounding conductor can be grounded. Handlebar A temporary adapter may automatically calibrate itself. The elliptical exerciser does not have a proper outlet installed by a metal screw. When the pedals are not grounded. Whenever the adapter is plugged in the console display while the ramp moves...
English Manual
Page 10
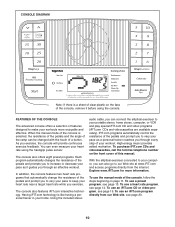
... eight preset programs. Each program automatically changes the resistance of your home. Having iFIT.com technology is selected, the resistance of the pedals and the angle of the ramp can even measure your computer, you exercise, the console will provide continuous exercise feedback. Using the included stereo audio cable, you through an effective workout. With the elliptical exerciser connected to your heart rate using the console. To use the manual mode of a button. To use a preset program, see...
... eight preset programs. Each program automatically changes the resistance of your home. Having iFIT.com technology is selected, the resistance of the pedals and the angle of the ramp can even measure your computer, you exercise, the console will provide continuous exercise feedback. Using the included stereo audio cable, you through an effective workout. With the elliptical exerciser connected to your heart rate using the console. To use the manual mode of a button. To use a preset program, see...
English Manual
Page 11
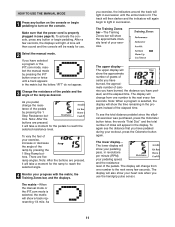
... distance you pedal, change from one number to reach the selected resistance level. The lower display- To activate the console, press any button on the console. The upper display will again begin to turn on the console or begin pedaling to light in the display. The track will then darken and the indicators will show a track representing 1/4 mile. As you have selected a program or the iFIT.com mode, reselect the manual mode by pressing the 1 Step...
... distance you pedal, change from one number to reach the selected resistance level. The lower display- To activate the console, press any button on the console. The upper display will again begin to turn on the console or begin pedaling to light in the display. The track will then darken and the indicators will show a track representing 1/4 mile. As you have selected a program or the iFIT.com mode, reselect the manual mode by pressing the 1 Step...
English Manual
Page 13
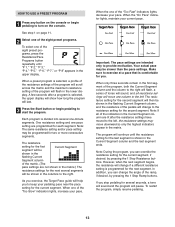
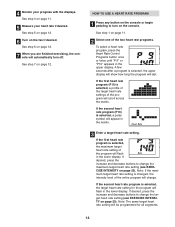
... guide will move downward so only the highest indicators appear in the Current Segment column are programmed for the current segment, if desired, by pressing the 1 Step Ramp buttons. See step 1 on page 11. 2 Select one of the eight preset programs. To select one of the matrix. (The pace settings are intended only to turn on the console or begin pedaling to start...
... guide will move downward so only the highest indicators appear in the Current Segment column are programmed for the current segment, if desired, by pressing the 1 Step Ramp buttons. See step 1 on page 11. 2 Select one of the eight preset programs. To select one of the matrix. (The pace settings are intended only to turn on the console or begin pedaling to start...
English Manual
Page 14
... Heart Rate Control Programs button once or twice until "P 9" or "P10" appears in the lower display. If desired, press the increase and decrease buttons to change the target heart rate setting (see EXERCISE INTENSITY on page 23). 4 Monitor your heart rate if desired. See step 5 on page 12. 6 Turn on page 12. If the second heart rate program (P10) is selected, the target heart rate setting for all segments. 14 If the second heart rate program is selected, a pulse...
... Heart Rate Control Programs button once or twice until "P 9" or "P10" appears in the lower display. If desired, press the increase and decrease buttons to change the target heart rate setting (see EXERCISE INTENSITY on page 23). 4 Monitor your heart rate if desired. See step 5 on page 12. 6 Turn on page 12. If the second heart rate program (P10) is selected, the target heart rate setting for all segments. 14 If the second heart rate program is selected, a pulse...
English Manual
Page 15
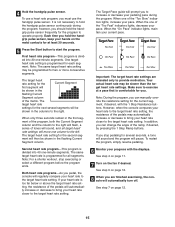
... your progress with the 1 Step Resistance buttons. Note: During the program, you should hold the handgrip pulse sensor continuously during the program. To use a heart rate program, you to the target heart rate setting. Important: The target heart rate settings are finished exercising, the console will be shown in the flashing Current Segment column of the matrix. To restart the program, simply resume pedaling. 6 Monitor your pace. See step 7 on the fan if...
... your progress with the 1 Step Resistance buttons. Note: During the program, you should hold the handgrip pulse sensor continuously during the program. To use a heart rate program, you to the target heart rate setting. Important: The target heart rate settings are finished exercising, the console will be shown in the flashing Current Segment column of the matrix. To restart the program, simply resume pedaling. 6 Monitor your pace. See step 7 on the fan if...
English Manual
Page 16
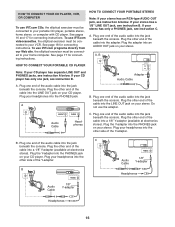
... beneath the console. If your VCR. A PHONES LINE OUT LINE OUT PHONES Audio Cable Headphones B. Plug the adapter into the other end of the Y-adapter. Plug your headphones into an AUDIO OUT jack on your headphones into the adapter. Plug your stereo. To use iFIT.com programs directly from our Web site, the elliptical exerciser must be connected to your portable CD player, portable stereo, home stereo, or...
... beneath the console. If your VCR. A PHONES LINE OUT LINE OUT PHONES Audio Cable Headphones B. Plug the adapter into the other end of the Y-adapter. Plug your headphones into an AUDIO OUT jack on your headphones into the adapter. Plug your stereo. To use iFIT.com programs directly from our Web site, the elliptical exerciser must be connected to your portable CD player, portable stereo, home stereo, or...
English Manual
Page 19
... low, the console may not detect the program signals. • Make sure that the audio cable is properly connected and that it is heard: • Make sure that the letters "iFIT" appear in . 4 Monitor your progress with the displays. The program will alert you when the resistance setting and/or pace setting is pressed, your personal trainer will begin pedaling to turn off. See step 4 on page...
... low, the console may not detect the program signals. • Make sure that the audio cable is properly connected and that it is heard: • Make sure that the letters "iFIT" appear in . 4 Monitor your progress with the displays. The program will alert you when the resistance setting and/or pace setting is pressed, your personal trainer will begin pedaling to turn off. See step 4 on page...
English Manual
Page 20
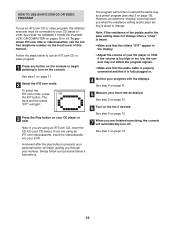
... requirements is about to change. 8 Monitor your home computer. Follow the steps below to use programs from our Web site. 1 Press any button on the console or begin pedaling to turn off. See step 1 on page 11. 9 Measure your Web browser, if necessary, and go to our Web site at www.iFIT.com allows you to play iFIT.com programs directly from the internet. However, an...
... requirements is about to change. 8 Monitor your home computer. Follow the steps below to use programs from our Web site. 1 Press any button on the console or begin pedaling to turn off. See step 1 on page 11. 9 Measure your Web browser, if necessary, and go to our Web site at www.iFIT.com allows you to play iFIT.com programs directly from the internet. However, an...
English Manual
Page 21
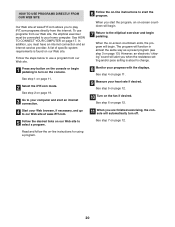
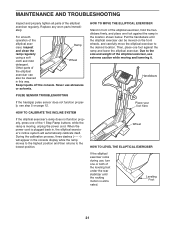
... rear stabilizer until the elliptical exerciser can also be moved on page 12. HOW TO CALIBRATE THE INCLINE SYSTEM If the elliptical exerciser's ramp does not function properly, press one or both of the elliptical exerciser can be cleaned in the location shown below. HOW TO MOVE THE ELLIPTICAL EXERCISER Stand in front of the 1 Step Ramp buttons; For smooth operation of the elliptical exerciser regularly. PULSE SENSOR TROUBLESHOOTING If the handgrip pulse sensor...
... rear stabilizer until the elliptical exerciser can also be moved on page 12. HOW TO CALIBRATE THE INCLINE SYSTEM If the elliptical exerciser's ramp does not function properly, press one or both of the elliptical exerciser can be cleaned in the location shown below. HOW TO MOVE THE ELLIPTICAL EXERCISER Stand in front of the 1 Step Ramp buttons; For smooth operation of the elliptical exerciser regularly. PULSE SENSOR TROUBLESHOOTING If the handgrip pulse sensor...

English Manual
Page 22
... display correct feedback, the reed switch should be adjusted. Locate the Reed Switch (55). Turn the Left Crank Arm for a moment. Repeat until the Drive Belt (113) is properly tightened, and then retighten the Bolt (75). Turn the indicated Screw (74) clockwise until the console displays correct feedback. Loosen, but do not remove, the indicated Screw (98). Next, see the drawing below. Then, reattach the side shields and the flywheel covers...
... display correct feedback, the reed switch should be adjusted. Locate the Reed Switch (55). Turn the Left Crank Arm for a moment. Repeat until the Drive Belt (113) is properly tightened, and then retighten the Bolt (75). Turn the indicated Screw (74) clockwise until the console displays correct feedback. Loosen, but do not remove, the indicated Screw (98). Next, see the drawing below. Then, reattach the side shields and the flywheel covers...
English Manual
Page 23
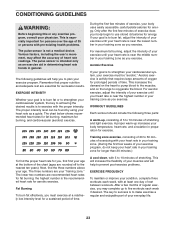
... health problems. The pulse sensor is not a medical device. The three numbers are essential for persons over the age of stretching. Various factors, including the user's movement, may complete up , consisting of 5 to 10 minutes of your exercise until your exercise program. If your goal is to burn fat, adjust the intensity of stretching and light exercise. Next, find the proper heart rate...
... health problems. The pulse sensor is not a medical device. The three numbers are essential for persons over the age of stretching. Various factors, including the user's movement, may complete up , consisting of 5 to 10 minutes of your exercise until your exercise program. If your goal is to burn fat, adjust the intensity of stretching and light exercise. Next, find the proper heart rate...
English Manual
Page 24
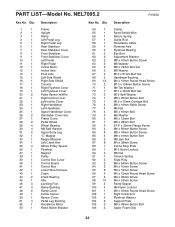
... Shield Console Right Flywheel Cover Left Flywheel Cover Pulse Sensor w/Wire Right Incline Cover Left Incline Cover Right Handlebar Left Handlebar Upper Handlebar Cover Handlebar Cover Set Frame Cover Pedal Wheel Wheel Bearing M8 Split Washer Upper Body Leg "C" Magnet Magnet Bracket Left Crank Arm 28mm Pulley Spacer Flywheel Magnet Pulley Control Box Cover Control Board Control Box Lower Wire Harness Crank Crank Bearing Idler Leveling Foot Ramp Bushing Ramp Cover Incline Sensor Sensor Cover Pedal Leg Bushing Resistance Motor Reed Switch Bracket Key No. NEL7095.2 Key No. PART LIST-Model...
... Shield Console Right Flywheel Cover Left Flywheel Cover Pulse Sensor w/Wire Right Incline Cover Left Incline Cover Right Handlebar Left Handlebar Upper Handlebar Cover Handlebar Cover Set Frame Cover Pedal Wheel Wheel Bearing M8 Split Washer Upper Body Leg "C" Magnet Magnet Bracket Left Crank Arm 28mm Pulley Spacer Flywheel Magnet Pulley Control Box Cover Control Board Control Box Lower Wire Harness Crank Crank Bearing Idler Leveling Foot Ramp Bushing Ramp Cover Incline Sensor Sensor Cover Pedal Leg Bushing Resistance Motor Reed Switch Bracket Key No. NEL7095.2 Key No. PART LIST-Model...
English Manual
Page 28
... the product (NordicTrack CX 998 elliptical exerciser) • The SERIAL NUMBER of the product (see the front cover of this manual) • The KEY NUMBER and DESCRIPTION of the part(s) (see the front cover of the defect; WHAT WE DO TO CORRECT COVERED DEFECTS-We will ship to you how to ship the Product for service. store, operate, and maintain the Product as set forth herein...
... the product (NordicTrack CX 998 elliptical exerciser) • The SERIAL NUMBER of the product (see the front cover of this manual) • The KEY NUMBER and DESCRIPTION of the part(s) (see the front cover of the defect; WHAT WE DO TO CORRECT COVERED DEFECTS-We will ship to you how to ship the Product for service. store, operate, and maintain the Product as set forth herein...


