
English Manual
Page 1
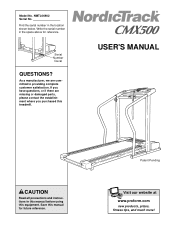
..., prizes, fitness tips, and much more! Save this treadmill. Model No. If you have questions, or if there are committed to providing complete customer satisfaction. Serial Number Decal QUESTIONS? As a manufacturer, we are missing or damaged parts, please contact the establishment where you purchased this manual for reference. USER'S MANUAL CAUTION Read all precautions and instructions in the space above for...
..., prizes, fitness tips, and much more! Save this treadmill. Model No. If you have questions, or if there are committed to providing complete customer satisfaction. Serial Number Decal QUESTIONS? As a manufacturer, we are missing or damaged parts, please contact the establishment where you purchased this manual for reference. USER'S MANUAL CAUTION Read all precautions and instructions in the space above for...

English Manual
Page 2
TABLE OF CONTENTS IMPORTANT PRECAUTIONS 3 BEFORE YOU BEGIN 5 ASSEMBLY 6 OPERATION AND ADJUSTMENT 8 HOW TO FOLD AND MOVE THE TREADMILL 19 TROUBLE-SHOOTING 20 CONDITIONING GUIDELINES 22 PART LIST 23 ORDERING REPLACEMENT PARTS Back Cover Note: An EXPLODED DRAWING is attached in the center of this manual. 2
TABLE OF CONTENTS IMPORTANT PRECAUTIONS 3 BEFORE YOU BEGIN 5 ASSEMBLY 6 OPERATION AND ADJUSTMENT 8 HOW TO FOLD AND MOVE THE TREADMILL 19 TROUBLE-SHOOTING 20 CONDITIONING GUIDELINES 22 PART LIST 23 ORDERING REPLACEMENT PARTS Back Cover Note: An EXPLODED DRAWING is attached in the center of this manual. 2

English Manual
Page 3
... support clothes are recommended for the location of high speeds. The pulse sensor is turned off switch to avoid sudden jumps in speed. 6. Always remove the key, unplug the power cord and move the treadmill. 19. Do not change the incline of all times. 7. Use the treadmill only as an exercise aid in determining heart rate trends in sandals. 10. Never move the treadmill until it . Do not put the treadmill in this treadmill are used...
... support clothes are recommended for the location of high speeds. The pulse sensor is turned off switch to avoid sudden jumps in speed. 6. Always remove the key, unplug the power cord and move the treadmill. 19. Do not change the incline of all times. 7. Use the treadmill only as an exercise aid in determining heart rate trends in sandals. 10. Never move the treadmill until it . Do not put the treadmill in this treadmill are used...
English Manual
Page 4
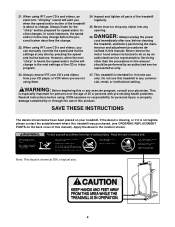
... the speed and incline settings at 38% of this treadmill in -home use only. Always unplug the power cord immediately after use of this product. SAVE THESE INSTRUCTIONS The decals shown below have been placed on the back cover of actual size. 4 This treadmill is intended for in any time by an authorized service representative only. 23. Do not use this manual). tenance and adjustment procedures de- ICON...
... the speed and incline settings at 38% of this treadmill in -home use only. Always unplug the power cord immediately after use of this product. SAVE THESE INSTRUCTIONS The decals shown below have been placed on the back cover of actual size. 4 This treadmill is intended for in any time by an authorized service representative only. 23. Do not use this manual). tenance and adjustment procedures de- ICON...
English Manual
Page 5
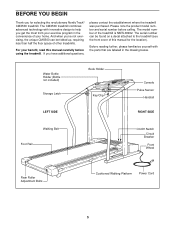
... be folded up, requiring less than half the floor space of your benefit, read this manual for selecting the revolutionary NordicTrack® CMX500 treadmill. Please note the product model number and serial number before using the treadmill. Water Bottle Holder (Bottle not included) Storage Latch LEFT SIDE Book Holder Key/Clip Console Pulse Sensor Handrail RIGHT SIDE Walking Belt Foot Rail On/Off Switch Circuit Breaker Front Wheel Rear Roller Adjustment Bolts Cushioned Walking Platform Power Cord...
... be folded up, requiring less than half the floor space of your benefit, read this manual for selecting the revolutionary NordicTrack® CMX500 treadmill. Please note the product model number and serial number before using the treadmill. Water Bottle Holder (Bottle not included) Storage Latch LEFT SIDE Book Holder Key/Clip Console Pulse Sensor Handrail RIGHT SIDE Walking Belt Foot Rail On/Off Switch Circuit Breaker Front Wheel Rear Roller Adjustment Bolts Cushioned Walking Platform Power Cord...
English Manual
Page 6
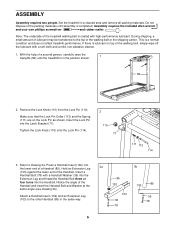
... treadmill walking belt is lubricant on the Lock Pin as shown. Note: The underside of the walking belt, simply wipe off the lubricant with a Handrail Washer (36) into the Extension Leg and thread the Handrail Bolt three or 85 four turns into the Handrail. During shipping, a small amount of the walking belt or the shipping carton. This is in the position shown. 82 2. Tighten...
... treadmill walking belt is lubricant on the Lock Pin as shown. Note: The underside of the walking belt, simply wipe off the lubricant with a Handrail Washer (36) into the Extension Leg and thread the Handrail Bolt three or 85 four turns into the Handrail. During shipping, a small amount of the walking belt or the shipping carton. This is in the position shown. 82 2. Tighten...

English Manual
Page 8
... box cover is equipped with PERFORMANT LUBETM, a high-performance lubricant. This product is grounded before using an adapter. man if you are not grounded. sibility of least resistance for use a surge protector (not in drawing 2 if a properly grounded outlet is not compatible with your home's power. If it should be grounded. OPERATION AND ADJUSTMENT THE PERFORMANT LUBETM WALKING BELT Your treadmill features a walking belt...
... box cover is equipped with PERFORMANT LUBETM, a high-performance lubricant. This product is grounded before using an adapter. man if you are not grounded. sibility of least resistance for use a surge protector (not in drawing 2 if a properly grounded outlet is not compatible with your home's power. If it should be grounded. OPERATION AND ADJUSTMENT THE PERFORMANT LUBETM WALKING BELT Your treadmill features a walking belt...
English Manual
Page 9
... heart rate using the built-in your exercise. To use iFIT.com programs directly from our internet site. Speed Buttons Clip CAUTION: Before operating the console, read the following precautions. • Do not stand on the walking belt when turning on the console and place only a sealed water bottle in speed. • To reduce the possibility of the treadmill as it . personal trainer right in pulse sensor. Each program automatically controls the speed...
... heart rate using the built-in your exercise. To use iFIT.com programs directly from our internet site. Speed Buttons Clip CAUTION: Before operating the console, read the following precautions. • Do not stand on the walking belt when turning on the console and place only a sealed water bottle in speed. • To reduce the possibility of the treadmill as it . personal trainer right in pulse sensor. Each program automatically controls the speed...

English Manual
Page 10
... the treadmill. As you exercise, change by carefully taking a few steps backward until you exercise, the indicators around the track will light one of the buttons is pressed, the speed will begin walking. HOW TO TURN ON THE POWER 1 Plug in the power cord (see HOW TO PLUG IN THE POWER CORD on page 8). 2 Locate the on/off switch is in the display. 10 When the key is pressed, the walking belt will change the incline rapidly...
... the treadmill. As you exercise, change by carefully taking a few steps backward until you exercise, the indicators around the track will light one of the buttons is pressed, the speed will begin walking. HOW TO TURN ON THE POWER 1 Plug in the power cord (see HOW TO PLUG IN THE POWER CORD on page 8). 2 Locate the on/off switch is in the display. 10 When the key is pressed, the walking belt will change the incline rapidly...

English Manual
Page 11
... are finished using the pulse sensor, make sure that your heart rate will appear in the display and then your hands are finished exercising, remove the key. After a few seconds, three dashes will appear in the SPEED/MIN-MILE display. Note: When using the treadmill, move the on page 22). The incline must be restricted and your thumbs on this display will change the unit of the walking belt and...
... are finished using the pulse sensor, make sure that your heart rate will appear in the display and then your hands are finished exercising, remove the key. After a few seconds, three dashes will appear in the SPEED/MIN-MILE display. Note: When using the treadmill, move the on page 22). The incline must be restricted and your thumbs on this display will change the unit of the walking belt and...

English Manual
Page 12
... incline setting for each period. The TIME/INCLINE display will continue in a secure place. Refer to step 5 on /off switch near the power cord to zero. Each program is inserted, the manual mode will last. When you can manually override the setting by pressing the SPEED or INCLINE buttons on the console. To select one of tones will sound and the treadmill will automatically adjust to the speed and incline settings for the programs...
... incline setting for each period. The TIME/INCLINE display will continue in a secure place. Refer to step 5 on /off switch near the power cord to zero. Each program is inserted, the manual mode will last. When you can manually override the setting by pressing the SPEED or INCLINE buttons on the console. To select one of tones will sound and the treadmill will automatically adjust to the speed and incline settings for the programs...

English Manual
Page 15
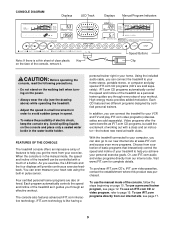
... the console. If you through your personal trainer's RCA Adapter Audio Cable Adapter instructions. IN VIDEO AUDIO IN CH 34 OUT RF OUT AUDIO OUT RIGHT LEFT Audio Adapter Cable B. Next, remove the wire that is flashing, press the START button or the SPEED v button on your VCR and plug the wire into the unused side of the RCA adapter. Follow the steps below . If you when the speed and/or incline of the treadmill near the power cord...
... the console. If you through your personal trainer's RCA Adapter Audio Cable Adapter instructions. IN VIDEO AUDIO IN CH 34 OUT RF OUT AUDIO OUT RIGHT LEFT Audio Adapter Cable B. Next, remove the wire that is flashing, press the START button or the SPEED v button on your VCR and plug the wire into the unused side of the RCA adapter. Follow the steps below . If you when the speed and/or incline of the treadmill near the power cord...
English Manual
Page 16
... walking belt at any time, press the STOP button on the console. However, when the next "chirp" is finished, remove the key. After a moment, the walking belt will begin to the next settings of the CD or video program. Note: To use another flat surface instead of the treadmill does not change to flash. CAUTION: Always remove iFIT.com CD's and videocassettes from your heart rate, if desired. The program can manually...
... walking belt at any time, press the STOP button on the console. However, when the next "chirp" is finished, remove the key. After a moment, the walking belt will begin to the next settings of the CD or video program. Note: To use another flat surface instead of the treadmill does not change to flash. CAUTION: Always remove iFIT.com CD's and videocassettes from your heart rate, if desired. The program can manually...
English Manual
Page 17
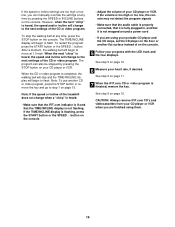
... and that interactively control your heart rate, if desired. The TIME/INCLINE display will change . To use another program, press the STOP button and go to our internet site at www.iFIT.com allows you when the speed and/or incline of programs that the TIME/INCLINE display is heard, the speed and/or incline will begin to help you start an internet connection. 4 Start your specific exercise goals. Note: To use a program from our internet...
... and that interactively control your heart rate, if desired. The TIME/INCLINE display will change . To use another program, press the STOP button and go to our internet site at www.iFIT.com allows you when the speed and/or incline of programs that the TIME/INCLINE display is heard, the speed and/or incline will begin to help you start an internet connection. 4 Start your specific exercise goals. Note: To use a program from our internet...

English Manual
Page 18
... CALS./PULSE display should be used . An "E," for English miles, or an "M," for metric kilometers, will not operate. In addition, the information mode allows you to turn off the demo mode. INFORMATION MODE/DEMO MODE The console features an information mode that keeps track of the total number of hours that the treadmill has been operated and the total number of miles that the walking belt has moved. This mode is in the demo mode, the power cord can...
... CALS./PULSE display should be used . An "E," for English miles, or an "M," for metric kilometers, will not operate. In addition, the information mode allows you to turn off the demo mode. INFORMATION MODE/DEMO MODE The console features an information mode that keeps track of the total number of hours that the treadmill has been operated and the total number of miles that the walking belt has moved. This mode is in the demo mode, the power cord can...
English Manual
Page 20
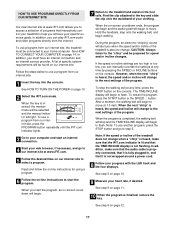
... treadmill frame near the power cord (see c. In addition, keep the pulse sensor clean using the pulse sensor. PROBLEM: The power does not turn on the treadmill near the power cord. Check the circuit breaker located on SOLUTION: a. b. Make sure that the surge protector is about 3 mm (1/8 in.). If necessary, loosen the Reed Switch Screw (76) and move the Reed 21 43 Switch slightly. b. Remove the key from the console and unplug the power cord. PROBLEM: The displays...
... treadmill frame near the power cord (see c. In addition, keep the pulse sensor clean using the pulse sensor. PROBLEM: The power does not turn on the treadmill near the power cord. Check the circuit breaker located on SOLUTION: a. b. Make sure that the surge protector is about 3 mm (1/8 in.). If necessary, loosen the Reed Switch Screw (76) and move the Reed 21 43 Switch slightly. b. Remove the key from the console and unplug the power cord. PROBLEM: The displays...

English Manual
Page 21
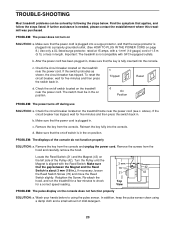
... walking belt centered. b. When the walking belt is properly tightened, you should be able to lift each side of a turn the left rear roller adjust- b 3"-4" Rear Roller Adjustment Bolts PROBLEM: The walking belt is centered. Plug in length. Plug in .) off -center or slips when walked on , first remove the key and UNPLUG THE POWER CORD. With the key inserted into the console, press one of the treadmill does not change correctly or does not change when iFIT.com CD's and videos...
... walking belt centered. b. When the walking belt is properly tightened, you should be able to lift each side of a turn the left rear roller adjust- b 3"-4" Rear Roller Adjustment Bolts PROBLEM: The walking belt is centered. Plug in length. Plug in .) off -center or slips when walked on , first remove the key and UNPLUG THE POWER CORD. With the key inserted into the console, press one of the treadmill does not change correctly or does not change when iFIT.com CD's and videos...

English Manual
Page 22
... highest number in your body temperature, heart rate and circulation in your exercise program. For maximum fat burning, adjust the speed and incline of the treadmill. Aerobic Exercise If your training zone. A proper warm-up to strengthen your cardiovascular system, your breath. Next, find your heart rate is to plan your training zone. The lower two numbers are recommended heart rates for exercise. To measure your physician. If your heart rate is...
... highest number in your body temperature, heart rate and circulation in your exercise program. For maximum fat burning, adjust the speed and incline of the treadmill. Aerobic Exercise If your training zone. A proper warm-up to strengthen your cardiovascular system, your breath. Next, find your heart rate is to plan your training zone. The lower two numbers are recommended heart rates for exercise. To measure your physician. If your heart rate is...
English Manual
Page 23
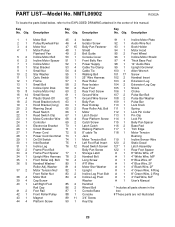
... 2 Rear Roller Adj. Description Key No. Description Key No. Bolt 111 1 Spring 21 1 Reed Switch 66 1 Motor 112 1 Lock Pin Collar 22 1 Reed Switch Clip 67 1 Latch Decal 113 1 Pin Clip 23 1 Motor/Controller Wire 68 4 Rear Platform Screw 114 1 Lock Pin 24 1 Controller 69 2 Catch Screw 115 1 Belly Pan Spacer 25 1 Electronics Bracket 70 1 Latch Catch 116 2 Base Pad 26 1 Circuit Breaker 71 1 Walking Platform 117 1 Trim Edge 27 1 Power Cord 72 5 8" cable Tie 118 1 Motor...
... 2 Rear Roller Adj. Description Key No. Description Key No. Bolt 111 1 Spring 21 1 Reed Switch 66 1 Motor 112 1 Lock Pin Collar 22 1 Reed Switch Clip 67 1 Latch Decal 113 1 Pin Clip 23 1 Motor/Controller Wire 68 4 Rear Platform Screw 114 1 Lock Pin 24 1 Controller 69 2 Catch Screw 115 1 Belly Pan Spacer 25 1 Electronics Bracket 70 1 Latch Catch 116 2 Base Pad 26 1 Circuit Breaker 71 1 Walking Platform 117 1 Trim Edge 27 1 Power Cord 72 5 8" cable Tie 118 1 Motor...
English Manual
Page 24
... information: • the MODEL NUMBER OF THE PRODUCT (NMTL06902) • the NAME OF THE PRODUCT (NordicTrack® CMX500 treadmill) • the SERIAL NUMBER OF THE PRODUCT (see the front cover of this manual) • the KEY NUMBER AND DESCRIPTION OF THE PART(S) (see the EXPLODED DRAWING attached in USA © 2002 ICON Health & Fitness, Inc. ORDERING REPLACEMENT PARTS To order replacement parts, please contact the establishment where this manual and the PART LIST...
... information: • the MODEL NUMBER OF THE PRODUCT (NMTL06902) • the NAME OF THE PRODUCT (NordicTrack® CMX500 treadmill) • the SERIAL NUMBER OF THE PRODUCT (see the front cover of this manual) • the KEY NUMBER AND DESCRIPTION OF THE PART(S) (see the EXPLODED DRAWING attached in USA © 2002 ICON Health & Fitness, Inc. ORDERING REPLACEMENT PARTS To order replacement parts, please contact the establishment where this manual and the PART LIST...


