

English Manual
Page 2
... shown at actual size. If a decal is a registered trademark of the warning decal(s). TABLE OF CONTENTS WARNING DECAL PLACEMENT 2 IMPORTANT PRECAUTIONS 3 BEFORE YOU BEGIN 4 ASSEMBLY 5 HOW TO USE THE EXERCISE CYCLE 12 MAINTENANCE AND TROUBLESHOOTING 25 EXERCISE GUIDELINES 26 PART LIST 29 EXPLODED DRAWING 30 ORDERING REPLACEMENT PARTS Back Cover LIMITED WARRANTY Back Cover WARNING DECAL PLACEMENT This drawing shows the location(s) of ICON IP, Inc. 2 Apply...
... shown at actual size. If a decal is a registered trademark of the warning decal(s). TABLE OF CONTENTS WARNING DECAL PLACEMENT 2 IMPORTANT PRECAUTIONS 3 BEFORE YOU BEGIN 4 ASSEMBLY 5 HOW TO USE THE EXERCISE CYCLE 12 MAINTENANCE AND TROUBLESHOOTING 25 EXERCISE GUIDELINES 26 PART LIST 29 EXPLODED DRAWING 30 ORDERING REPLACEMENT PARTS Back Cover LIMITED WARRANTY Back Cover WARNING DECAL PLACEMENT This drawing shows the location(s) of ICON IP, Inc. 2 Apply...

English Manual
Page 3
... away from moisture and dust. Do not use only. Various factors, including the user's movement, may result in general. 11. do not arch your exercise cycle on the exercise cycle. Over exercising may affect the accuracy of heart rate readings. The pulse sensor is not a medical device. Always wear athletic shoes for home use the exercise cycle in this manual and all parts regularly.
... away from moisture and dust. Do not use only. Various factors, including the user's movement, may result in general. 11. do not arch your exercise cycle on the exercise cycle. Over exercising may affect the accuracy of heart rate readings. The pulse sensor is not a medical device. Always wear athletic shoes for home use the exercise cycle in this manual and all parts regularly.

English Manual
Page 4
... this manual, please see the front cover of features designed to make your benefit, read this manual. Backrest Seat Handlebar Water Bottle Holder* Handle Console Upright Knob Pedal/Strap Wheel Leveling Foot Game Controller Handgrip Pulse Sensor Seat Handle *Water bottle is an effective exercise for selecting the revolutionary NordicTrack® C4 SI exercise cycle. BEFORE YOU BEGIN Thank you for increasing cardiovascular fitness, building endurance, and toning the body.
... this manual, please see the front cover of features designed to make your benefit, read this manual. Backrest Seat Handlebar Water Bottle Holder* Handle Console Upright Knob Pedal/Strap Wheel Leveling Foot Game Controller Handgrip Pulse Sensor Seat Handle *Water bottle is an effective exercise for selecting the revolutionary NordicTrack® C4 SI exercise cycle. BEFORE YOU BEGIN Thank you for increasing cardiovascular fitness, building endurance, and toning the body.

English Manual
Page 5
... Screw (54)-6 M8 x 50mm Patch Screw (52)-4 M8 x 53mm Button Bolt (72)-2 M10 x 32mm Button Bolt (78)-2 M10 x 63mm Bolt Set (62)-1 5 Note: If a part is not in the hardware kit, check to the included tool(s), assembly requires a Phillips screwdriver wrench , and a rubber mallet . , an adjustable As you assemble the exercise cycle, use the drawings below each drawing is the key number of the part, from the PART LIST...
... Screw (54)-6 M8 x 50mm Patch Screw (52)-4 M8 x 53mm Button Bolt (72)-2 M10 x 32mm Button Bolt (78)-2 M10 x 63mm Bolt Set (62)-1 5 Note: If a part is not in the hardware kit, check to the included tool(s), assembly requires a Phillips screwdriver wrench , and a rubber mallet . , an adjustable As you assemble the exercise cycle, use the drawings below each drawing is the key number of the part, from the PART LIST...

English Manual
Page 8
... the Upright (2) and the Handlebars (59, 60). Press the tabs on the Rear Upright Cover (90). Locate the access hole and the M4 x 8mm Screw (92) in the hardware kit. Note: If the Screw is missing, use the extra M4 x 8mm Screw (92) in the Upright (2). Hold the Rear Upright Cover (90) against the Upright (2) and the Handlebars (59, 60). Attach the Console (4) to the game wire that...
... the Upright (2) and the Handlebars (59, 60). Press the tabs on the Rear Upright Cover (90). Locate the access hole and the M4 x 8mm Screw (92) in the hardware kit. Note: If the Screw is missing, use the extra M4 x 8mm Screw (92) in the Upright (2). Hold the Rear Upright Cover (90) against the Upright (2) and the Handlebars (59, 60). Attach the Console (4) to the game wire that...
English Manual
Page 11
... the exercise cycle to orient the batteries as possible. To loosen the strap on the cover of the strap downward. Plug one week, retighten the Pedals. The Console (4) can use only a manufacturer-supplied AC adapter. To tighten the strap, simply pull the end of this product or call the telephone number on the Right Pedal (21), press the indicated tab and pull the strap upward. Adjust the strap...
... the exercise cycle to orient the batteries as possible. To loosen the strap on the cover of the strap downward. Plug one week, retighten the Pedals. The Console (4) can use only a manufacturer-supplied AC adapter. To tighten the strap, simply pull the end of this product or call the telephone number on the Right Pedal (21), press the indicated tab and pull the strap upward. Adjust the strap...

English Manual
Page 13
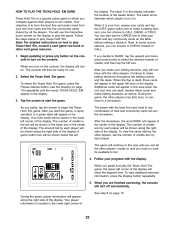
.... CONSOLE DIAGRAM Workout Buttons Volume Button Display Button Volume Button Game Button Resistance Buttons FEATURES OF THE CONSOLE This revolutionary console offers an array of features designed to make sure that change the resistance of the pedals with the 8-week Weight Loss workout. In addition, the console features four heart rate control workouts that batteries are installed (see step 12 on the display, remove the plastic. 13 To purchase iFit cards, go to your heart rate near target heart rate settings while you achieve specific fitness goals...
.... CONSOLE DIAGRAM Workout Buttons Volume Button Display Button Volume Button Game Button Resistance Buttons FEATURES OF THE CONSOLE This revolutionary console offers an array of features designed to make sure that change the resistance of the pedals with the 8-week Weight Loss workout. In addition, the console features four heart rate control workouts that batteries are installed (see step 12 on the display, remove the plastic. 13 To purchase iFit cards, go to your heart rate near target heart rate settings while you achieve specific fitness goals...

English Manual
Page 14
... display will show your approximate power output in the display. Watts-This display will show your progress with the display. 1. The display mode that you have selected a workout, press any button on the console. If you select will determine which workout information is selected, the display will show the elapsed time. HOW TO USE THE MANUAL MODE 4. Change the resistance of the elapsed time. 3. Speed-This display will turn on the console, the display...
... display will show your approximate power output in the display. Watts-This display will show your progress with the display. 1. The display mode that you have selected a workout, press any button on the console. If you select will determine which workout information is selected, the display will show the elapsed time. HOW TO USE THE MANUAL MODE 4. Change the resistance of the elapsed time. 3. Speed-This display will turn on the console, the display...

English Manual
Page 15
... tightly. Measure your heart rate if desired. never use the handgrip pulse sensor (see HOW TO CHANGE THE CONSOLE SETTINGS on the handgrip pulse sensor, remove the plastic. Pulse-This display will show your heart rate when you are finished exercising, the console will turn off automatically. Resistance-This display will show the resistance level of the console by pressing the Volume increase and decrease buttons. Change the volume level of the pedals for several seconds...
... tightly. Measure your heart rate if desired. never use the handgrip pulse sensor (see HOW TO CHANGE THE CONSOLE SETTINGS on the handgrip pulse sensor, remove the plastic. Pulse-This display will show your heart rate when you are finished exercising, the console will turn off automatically. Resistance-This display will show the resistance level of the console by pressing the Volume increase and decrease buttons. Change the volume level of the pedals for several seconds...
English Manual
Page 16
... can manually override the setting by pressing the resistance buttons. The console will turn on page 14. 5. To select a preset workout, press the Weight Loss/Aerobic/Performance button repeatedly until the last segment ends. When no arrows appear, maintain your progress with the display. If the resistance level for the current segment is intended only to keep your pedaling speed near the target speed for the...
... can manually override the setting by pressing the resistance buttons. The console will turn on page 14. 5. To select a preset workout, press the Weight Loss/Aerobic/Performance button repeatedly until the last segment ends. When no arrows appear, maintain your progress with the display. If the resistance level for the current segment is intended only to keep your pedaling speed near the target speed for the...
English Manual
Page 17
... you hold the handgrip pulse sensor frequently for the workouts to enter the desired maximum target heart rate setting for use. 2. Hold the handgrip pulse sensor. Begin pedaling to flash. Each time the resistance changes, the resistance level will then be programmed for the current segment of the pedals will begin to start the workout. The console will appear in the display. 4. To select a heart rate control workout, press the Heart Rate Control button repeatedly until the profile...
... you hold the handgrip pulse sensor frequently for the workouts to enter the desired maximum target heart rate setting for use. 2. Hold the handgrip pulse sensor. Begin pedaling to flash. Each time the resistance changes, the resistance level will then be programmed for the current segment of the pedals will begin to start the workout. The console will appear in the display. 4. To select a heart rate control workout, press the Heart Rate Control button repeatedly until the profile...

English Manual
Page 18
... the display. See step 4 on page 15. 18 A tone will sound, the console will pause, and the time will begin to exercise at any time, stop pedaling. To stop the workout at a speed that is intended only to bring your pedaling speed near the target speed for the current segment is too high or too low, you can manually override the setting by pressing the resistance buttons...
... the display. See step 4 on page 15. 18 A tone will sound, the console will pause, and the time will begin to exercise at any time, stop pedaling. To stop the workout at a speed that is intended only to bring your pedaling speed near the target speed for the current segment is too high or too low, you can manually override the setting by pressing the resistance buttons...
English Manual
Page 19
... Blocker game. 1. however, your pedaling speed. The display will then show the four highest scores recorded since the scores were reset. Follow your score is to reset the scores. In addition, you will turn on the console, the display will use . 2. To pause the game, press the Display button. See step 6 on the right controller. In addition to the console buttons, you can rotate the block...
... Blocker game. 1. however, your pedaling speed. The display will then show the four highest scores recorded since the scores were reset. Follow your score is to reset the scores. In addition, you will turn on the console, the display will use . 2. To pause the game, press the Display button. See step 6 on the right controller. In addition to the console buttons, you can rotate the block...

English Manual
Page 20
... console, the display will turn on either controller again. Press a button on either controller to select the desired letter or digit. Then, press the right button on either controller. The display will prompt you to move . Follow your score is one of the arena, they will be disabled and another letter or digit. In addition, the display will use . 2. When you are pedaling, you can move...
... console, the display will turn on either controller again. Press a button on either controller to select the desired letter or digit. Then, press the right button on either controller. The display will prompt you to move . Follow your score is one of the arena, they will be disabled and another letter or digit. In addition, the display will use . 2. When you are pedaling, you can move...
English Manual
Page 22
... the upper left corner of the display. To view the cards held by the other players, tap the number of credits won by all the other playersʼ credits or until you win all the players. To view additional exercise information, press the Display button repeatedly. 5. Begin pedaling or press any combination of See step 6 on the table before . Select the...
... the upper left corner of the display. To view the cards held by the other players, tap the number of credits won by all the other playersʼ credits or until you win all the players. To view additional exercise information, press the Display button repeatedly. 5. Begin pedaling or press any combination of See step 6 on the table before . Select the...

English Manual
Page 23
... use , unplug the audio cable from the jack on . To use . 2. The console will turn on the console. When the iFit card is fully plugged in. Next, press the play music or audio books through your MP3 player or CD player; A moment after you select a workout, the voice of this manual. Remove the iFit card when you turn on the console, the display will begin guiding you are finished exercising, remove the iFit card. make...
... use , unplug the audio cable from the jack on . To use . 2. The console will turn on the console. When the iFit card is fully plugged in. Next, press the play music or audio books through your MP3 player or CD player; A moment after you select a workout, the voice of this manual. Remove the iFit card when you turn on the console, the display will begin guiding you are finished exercising, remove the iFit card. make...
English Manual
Page 25
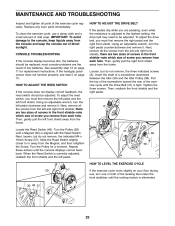
... shield. MAINTENANCE AND TROUBLESHOOTING Inspect and tighten all the screws from the left front shield away from each hole. Insert the shaft of mild soap. CONSOLE TROUBLESHOOTING If the console display becomes dim, the batteries should be replaced; Using an adjustable wrench, turn the right pedal counterclockwise and remove it . Repeat these actions until the rocking motion is adjusted to the highest setting, the drive belt may need to or...
... shield. MAINTENANCE AND TROUBLESHOOTING Inspect and tighten all the screws from the left front shield away from each hole. Insert the shaft of mild soap. CONSOLE TROUBLESHOOTING If the console display becomes dim, the batteries should be replaced; Using an adjustable wrench, turn the right pedal counterclockwise and remove it . Repeat these actions until the rocking motion is adjusted to the highest setting, the drive belt may need to or...

English Manual
Page 26
... of your exercise until your heart rate is intended only as a guide to achieving results. If your goal is to burn fat, adjust the intensity of rest between workouts. Aerobic Exercise-If your goal is the key to find your training zone for energy. For aerobic exercise, adjust the intensity of time. For maximum fat burning, exercise with pre-existing health problems. The pulse sensor is...
... of your exercise until your heart rate is intended only as a guide to achieving results. If your goal is to burn fat, adjust the intensity of rest between workouts. Aerobic Exercise-If your goal is the key to find your training zone for energy. For aerobic exercise, adjust the intensity of time. For maximum fat burning, exercise with pre-existing health problems. The pulse sensor is...

English Manual
Page 29
... Upper Roller Leveling Foot Upright Bushing Right Pedal/Strap Left Pedal/Strap Right Crank Left Crank Seat Lock Bracket Left Shield Right Shield Large Snap Ring Pulley Magnet Spindle Steel Washer Crank Bearing Eddy Mechanism Eddy Axle Assembly Seat Carriage Cap Handlebar Cap Idler Pulley Idler Right Front Stabilizer Seat Lock Game/Pulse Wire Harness Main Wire Harness M6 Washer Clamp Reed Switch/Wire Drive Belt Rear Stabilizer Cap Key No. Description Seat Handle Flange Screw M6...
... Upper Roller Leveling Foot Upright Bushing Right Pedal/Strap Left Pedal/Strap Right Crank Left Crank Seat Lock Bracket Left Shield Right Shield Large Snap Ring Pulley Magnet Spindle Steel Washer Crank Bearing Eddy Mechanism Eddy Axle Assembly Seat Carriage Cap Handlebar Cap Idler Pulley Idler Right Front Stabilizer Seat Lock Game/Pulse Wire Harness Main Wire Harness M6 Washer Clamp Reed Switch/Wire Drive Belt Rear Stabilizer Cap Key No. Description Seat Handle Flange Screw M6...
English Manual
Page 32
... the replacement part(s) (see the front cover of this product within 30 days of the purchase date to avoid added fees for service needed under warranty. This warranty extends only to www.nordictrackservice.com/registration. For in China © 2009 ICON IP, Inc. or to you specific legal rights. Some states do not allow the exclusion or limitation of removal or installation...
... the replacement part(s) (see the front cover of this product within 30 days of the purchase date to avoid added fees for service needed under warranty. This warranty extends only to www.nordictrackservice.com/registration. For in China © 2009 ICON IP, Inc. or to you specific legal rights. Some states do not allow the exclusion or limitation of removal or installation...


