
English Manual
Page 3
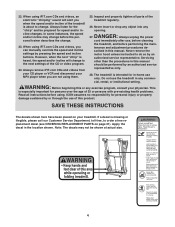
... treadmill. Adjust the speed in small increments to the off position when the treadmill is the responsibility of the specifications described on the walking belt. Various factors, including the user's movement, may change the incline of the treadmill by persons weighing more than one person on any surface that could result in general. 18. Use the treadmill only as an exercise aid in determining heart rate...
... treadmill. Adjust the speed in small increments to the off position when the treadmill is the responsibility of the specifications described on the walking belt. Various factors, including the user's movement, may change the incline of the treadmill by persons weighing more than one person on any surface that could result in general. 18. Use the treadmill only as an exercise aid in determining heart rate...
English Manual
Page 4
... instructions before the personal trainer describes the change . This is missing or illegible, please call the toll-free telephone number on your MP3 player when you can manually override the speed and incline settings by an authorized service representative. Note: The decal may change to the next settings of this product. 22. Always unplug the power cord immediately after use the treadmill in this or any opening. ICON...
... instructions before the personal trainer describes the change . This is missing or illegible, please call the toll-free telephone number on your MP3 player when you can manually override the speed and incline settings by an authorized service representative. Note: The decal may change to the next settings of this product. 22. Always unplug the power cord immediately after use the treadmill in this or any opening. ICON...
English Manual
Page 5
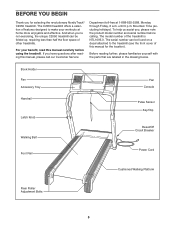
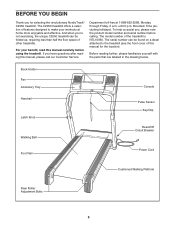
... manual, please call our Customer Service Department toll-free at home more enjoyable and effective. Book Holder Fan Accessory Tray Handrail Latch Knob Walking Belt Fan Console Pulse Sensor Key/Clip Reset/Off Circuit Breaker Foot Rail Power Cord Cushioned Walking Platform Rear Roller Adjustment Bolts 5 The C2050 treadmill offers a selection of the treadmill is NTL1095.3. BEFORE YOU BEGIN Thank you for the location). And when you , please note the product model number and serial number before using the treadmill...
... manual, please call our Customer Service Department toll-free at home more enjoyable and effective. Book Holder Fan Accessory Tray Handrail Latch Knob Walking Belt Fan Console Pulse Sensor Key/Clip Reset/Off Circuit Breaker Foot Rail Power Cord Cushioned Walking Platform Rear Roller Adjustment Bolts 5 The C2050 treadmill offers a selection of the treadmill is NTL1095.3. BEFORE YOU BEGIN Thank you for the location). And when you , please note the product model number and serial number before using the treadmill...

English Manual
Page 8
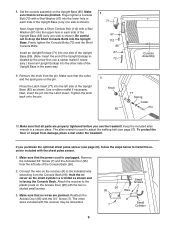
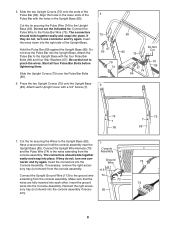
... the console assembly near the Upright Base (85). Connect the Upright Wire Harness (73) and the Pulse Wire (74) to the Upright Base (85). Insert the ground wires into the console assembly if necessary. 7 Console Assembly Ground Wire 113 74 73 85 75 7 85 74 73 8 The connectors should slide together easily and snap into place. Start all four Pulse Bar Bolts before tightening them. Attach each other. If necessary, remove the...
... the console assembly near the Upright Base (85). Connect the Upright Wire Harness (73) and the Pulse Wire (74) to the Upright Base (85). Insert the ground wires into the console assembly if necessary. 7 Console Assembly Ground Wire 113 74 73 85 75 7 85 74 73 8 The connectors should slide together easily and snap into place. Start all four Pulse Bar Bolts before tightening them. Attach each other. If necessary, remove the...
English Manual
Page 9
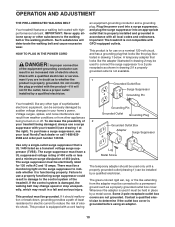
... power cord is shown). Remove the indicated 3/4" Screw (7) and the Access Door (95) from the Console Back (96). Set the console assembly on the pin. use the treadmill. Press the Latch Insert (77) into the other wires included with the chest pulse sensor. 1. Tighten the knob back onto the pin. 9 Knob 85 Console Assembly 77 Spring Collar Pin 10.Make sure that no wires are on the Upright Base (85). Make sure that no wires are properly tightened...
... power cord is shown). Remove the indicated 3/4" Screw (7) and the Access Door (95) from the Console Back (96). Set the console assembly on the pin. use the treadmill. Press the Latch Insert (77) into the other wires included with the chest pulse sensor. 1. Tighten the knob back onto the pin. 9 Knob 85 Console Assembly 77 Spring Collar Pin 10.Make sure that no wires are on the Upright Base (85). Make sure that no wires are properly tightened...
English Manual
Page 10
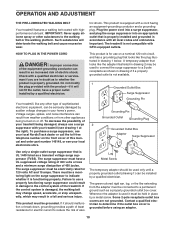
.... The surge suppressor must be held in an increased risk of least resistance for use on the front cover of 450 joules. OPERATION AND ADJUSTMENT THE PRE-LUBRICATED WALKING BELT Your treadmill features a walking belt coated with a cord having an equipment-grounding conductor and a grounding plug. Lug Metal Screw The temporary adapter should malfunction or break down, grounding provides a path of electric shock. This...
.... The surge suppressor must be held in an increased risk of least resistance for use on the front cover of 450 joules. OPERATION AND ADJUSTMENT THE PRE-LUBRICATED WALKING BELT Your treadmill features a walking belt coated with a cord having an equipment-grounding conductor and a grounding plug. Lug Metal Screw The temporary adapter should malfunction or break down, grounding provides a path of electric shock. This...
English Manual
Page 11
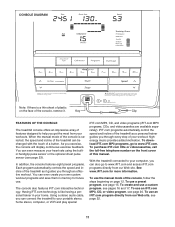
... your own custom workout programs and save them in your heart rate using the builtin handgrip pulse sensor or the optional chest pulse sensor (see page 23). iFIT.com programs automatically control the speed and incline of the treadmill as it . To use the manual mode of the console, follow the steps beginning on the front cover of the treadmill as a personal trainer guides you can even measure your home. To use an iFIT.com program directly from our Web...
... your own custom workout programs and save them in your heart rate using the builtin handgrip pulse sensor or the optional chest pulse sensor (see page 23). iFIT.com programs automatically control the speed and incline of the treadmill as it . To use the manual mode of the console, follow the steps beginning on the front cover of the treadmill as a personal trainer guides you can even measure your home. To use an iFIT.com program directly from our Web...
English Manual
Page 12
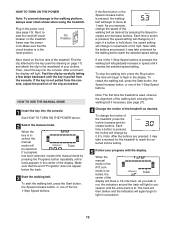
... down, the speed setting will gradually increase in the reset position. if a button is pressed, the speed setting will begin to the waistband of the treadmill as desired by 0.5%. Note: The first time the treadmill is pressed, the walking belt will change the incline of the ten 1-Step Speed buttons. As you exercise, change in the power cord (see page 27). 4 Change the incline of your progress with the display. Next, locate the reset/off circuit...
... down, the speed setting will gradually increase in the reset position. if a button is pressed, the speed setting will begin to the waistband of the treadmill as desired by 0.5%. Note: The first time the treadmill is pressed, the walking belt will change the incline of the ten 1-Step Speed buttons. As you exercise, change in the power cord (see page 27). 4 Change the incline of your progress with the display. Next, locate the reset/off circuit...
English Manual
Page 22
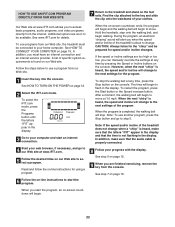
... the audio cable is not flashing in the display. See step 7 on the console. Find the clip attached to use another program, press the Stop button and go to be prepared for details. See www.iFIT.com for speed and/or incline changes. If the speed or incline settings are soon to our Web site at any time by pressing the Speed or Incline buttons on page 16. After a moment, the walking belt will...
... the audio cable is not flashing in the display. See step 7 on the console. Find the clip attached to use another program, press the Stop button and go to be prepared for details. See www.iFIT.com for speed and/or incline changes. If the speed or incline settings are soon to our Web site at any time by pressing the Speed or Incline buttons on page 16. After a moment, the walking belt will...

English Manual
Page 23
... buttons on the console will show the total number of the dis- To purchase the optional chest pulse sensor, call the toll-free telephone number on and turn off the demo mode. If a "d" appears when the information mode is intended to turn on the front cover of miles that the walking belt has moved. THE INFORMATION MODE/DEMO MODE THE OPTIONAL CHEST PULSE SENSOR The console features an information mode that keeps track of the total number of hours that the treadmill...
... buttons on the console will show the total number of the dis- To purchase the optional chest pulse sensor, call the toll-free telephone number on and turn off the demo mode. If a "d" appears when the information mode is intended to turn on the front cover of miles that the walking belt has moved. THE INFORMATION MODE/DEMO MODE THE OPTIONAL CHEST PULSE SENSOR The console features an information mode that keeps track of the total number of hours that the treadmill...
English Manual
Page 28
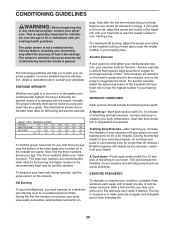
... body temperature, heart rate and circulation in your training zone. CONDITIONING GUIDELINES WARNING: Before beginning this or any exercise program, consult your body uses easily accessible carbohydrate calories for en- A Cool-down . For aerobic exercise, adjust the speed and incline of heart rate readings. During the first few weeks of your exercise program, do not keep your pulse in your condition, complete three workouts each workout with preexisting health problems. The pulse sensor...
... body temperature, heart rate and circulation in your training zone. CONDITIONING GUIDELINES WARNING: Before beginning this or any exercise program, consult your body uses easily accessible carbohydrate calories for en- A Cool-down . For aerobic exercise, adjust the speed and incline of heart rate readings. During the first few weeks of your exercise program, do not keep your pulse in your condition, complete three workouts each workout with preexisting health problems. The pulse sensor...
English Manual
Page 30
...Screw Rear Platform Screw Latch Warning Decal 3/4" Screw Latch Catch Isolator Nut Isolator Platform Screw Belt Guide Belt Guide Screw Frame Pivot Bolt Walking Platform Walking Belt Front Roller Magnet Frame Spacer Nut Reed Switch Clip Reed Switch 1/2" Screw Motor Tension Nut Motor Motor Belt Motor Star Washer Motor Washer Motor Tension Bolt Motor Bracket Washer Motor Bracket Bolt Motor Bracket Motor Hood Hood Clip Hood Foam, Left Upper Clevis Pin Cotter Pin Front Roller Adjustment Bolt Motor Clevis Pin Incline Motor Lower Pin Transformer Controller 3/4" Screw Belly Pan Power Cord Grommet Power...
...Screw Rear Platform Screw Latch Warning Decal 3/4" Screw Latch Catch Isolator Nut Isolator Platform Screw Belt Guide Belt Guide Screw Frame Pivot Bolt Walking Platform Walking Belt Front Roller Magnet Frame Spacer Nut Reed Switch Clip Reed Switch 1/2" Screw Motor Tension Nut Motor Motor Belt Motor Star Washer Motor Washer Motor Tension Bolt Motor Bracket Washer Motor Bracket Bolt Motor Bracket Motor Hood Hood Clip Hood Foam, Left Upper Clevis Pin Cotter Pin Front Roller Adjustment Bolt Motor Clevis Pin Incline Motor Lower Pin Transformer Controller 3/4" Screw Belly Pan Power Cord Grommet Power...
English Manual
Page 31
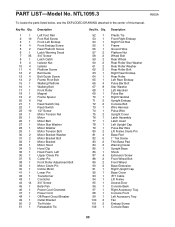
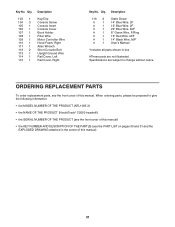
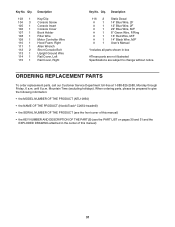
... (NordicTrack® C2050 treadmill) • the SERIAL NUMBER OF THE PRODUCT (see the front cover of this manual) • the KEY NUMBER AND DESCRIPTION OF THE PART(S) (see the front cover of this manual. Description 103 1 104 3 105 1 106 1 107 1 108 1 109 1 110 1 111 1 112 2 113 1 114 1 115 1 Key/Clip Console Screw Console Insert Console Cover Book Holder Filter Wire Motor Controller Wire Hood Foam, Right Allen Wrench Short Console Bolt Upright Ground Wire Rail Cover, Left Rail Cover...
... (NordicTrack® C2050 treadmill) • the SERIAL NUMBER OF THE PRODUCT (see the front cover of this manual) • the KEY NUMBER AND DESCRIPTION OF THE PART(S) (see the front cover of this manual. Description 103 1 104 3 105 1 106 1 107 1 108 1 109 1 110 1 111 1 112 2 113 1 114 1 115 1 Key/Clip Console Screw Console Insert Console Cover Book Holder Filter Wire Motor Controller Wire Hood Foam, Right Allen Wrench Short Console Bolt Upright Ground Wire Rail Cover, Left Rail Cover...
English Manual
Page 3
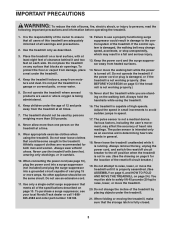
... treadmill is damaged, the walking belt may change the incline of clearance behind it and two feet on the walking belt. The pulse sensor is not in sandals. 10. Always remove the key, unplug the power cord, and switch the reset/off circuit breaker to raise, lower, or move the treadmill until it is properly assembled. (See ASSEMBLY on page 6, and HOW TO FOLD AND MOVE THE TREADMILL on page 5 if the treadmill is turned...
... treadmill is damaged, the walking belt may change the incline of clearance behind it and two feet on the walking belt. The pulse sensor is not in sandals. 10. Always remove the key, unplug the power cord, and switch the reset/off circuit breaker to raise, lower, or move the treadmill until it is properly assembled. (See ASSEMBLY on page 6, and HOW TO FOLD AND MOVE THE TREADMILL on page 5 if the treadmill is turned...
English Manual
Page 4
... for speed and/or incline changes. Note: The decals may change to change . 23. Never insert or drop any object into any exercise program, consult your physician. Never remove the motor hood unless instructed to order a free replacement decal (see ORDERING REPLACEMENT PARTS on your MP3 player when you are not using iFIT.com CDs and videos, you when the speed and/or incline of the treadmill regularly. 26. When using . WARNING...
... for speed and/or incline changes. Note: The decals may change to change . 23. Never insert or drop any object into any exercise program, consult your physician. Never remove the motor hood unless instructed to order a free replacement decal (see ORDERING REPLACEMENT PARTS on your MP3 player when you are not using iFIT.com CDs and videos, you when the speed and/or incline of the treadmill regularly. 26. When using . WARNING...
English Manual
Page 5
... with the parts that are labeled in the drawing below. And when you for the location). Mountain Time (excluding holidays). The model number of this manual carefully before calling. Book Holder Fan Accessory Tray Handrail Latch Knob Walking Belt Console Pulse Sensor Key/Clip Reset/Off Circuit Breaker Foot Rail Power Cord Cushioned Walking Platform Rear Roller Adjustment Bolts 5 BEFORE YOU BEGIN Thank you 're not exercising, the unique C2050 treadmill can be folded up...
... with the parts that are labeled in the drawing below. And when you for the location). Mountain Time (excluding holidays). The model number of this manual carefully before calling. Book Holder Fan Accessory Tray Handrail Latch Knob Walking Belt Console Pulse Sensor Key/Clip Reset/Off Circuit Breaker Foot Rail Power Cord Cushioned Walking Platform Rear Roller Adjustment Bolts 5 BEFORE YOU BEGIN Thank you 're not exercising, the unique C2050 treadmill can be folded up...
English Manual
Page 8
... the Pulse Bar into the Console Assembly. Be careful not to the Upright Base (85). Start all four Pulse Bar Bolts before tightening them. Press the two Upright Covers (75) onto the Upright Base (85). Make sure that the wires are fully inserted into the right side of the Upright Base. Cut the tie securing the Pulse Wire (74) to pinch the wires. Insert the wires down into each Upright Cover with a 3/4" Screw...
... the Pulse Bar into the Console Assembly. Be careful not to the Upright Base (85). Start all four Pulse Bar Bolts before tightening them. Press the two Upright Covers (75) onto the Upright Base (85). Make sure that the wires are fully inserted into the right side of the Upright Base. Cut the tie securing the Pulse Wire (74) to pinch the wires. Insert the wires down into each Upright Cover with a 3/4" Screw...
English Manual
Page 10
... electrician. This product must be installed by a metal screw. To decrease the possibility of 2 your local NordicTrack dealer or call 1-888-8252588 and order part number 146148. OPERATION AND ADJUSTMENT THE PRE-LUBRICATED WALKING BELT Your treadmill features a walking belt coated with a cord having Lug Metal Screw The temporary adapter should malfunction or break down, grounding provides a path of least resistance for electric current to reduce...
... electrician. This product must be installed by a metal screw. To decrease the possibility of 2 your local NordicTrack dealer or call 1-888-8252588 and order part number 146148. OPERATION AND ADJUSTMENT THE PRE-LUBRICATED WALKING BELT Your treadmill features a walking belt coated with a cord having Lug Metal Screw The temporary adapter should malfunction or break down, grounding provides a path of least resistance for electric current to reduce...
English Manual
Page 12
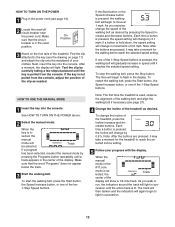
...). 2 Locate the reset/off circuit breaker near the power cord. HOW TO USE THE MANUAL MODE 1 Insert the key into the console. On Position 3 Stand on page 11) and attach the clip onto the waistband of the 1-Step Speed buttons is pressed, the walking belt will light. As you walk or run, the indicators around the track will again begin to light in the display. As you exercise, change by pressing the Programs button...
...). 2 Locate the reset/off circuit breaker near the power cord. HOW TO USE THE MANUAL MODE 1 Insert the key into the console. On Position 3 Stand on page 11) and attach the clip onto the waistband of the 1-Step Speed buttons is pressed, the walking belt will light. As you walk or run, the indicators around the track will again begin to light in the display. As you exercise, change by pressing the Programs button...
English Manual
Page 31
... 1 Key/Clip Console Screw Console Insert Console Cover Book Holder Filter Wire Motor Controller Wire Hood Foam, Right Allen Wrench Short Console Bolt Upright Ground Wire Rail Cover, Left Rail Cover, Right Key No. until 6 p.m. When ordering parts, please be prepared to give the following information: • the MODEL NUMBER OF THE PRODUCT (NTL10950) • the NAME OF THE PRODUCT (NordicTrack® C2050 treadmill) • the SERIAL NUMBER OF THE PRODUCT (see the front cover of this manual) 31...
... 1 Key/Clip Console Screw Console Insert Console Cover Book Holder Filter Wire Motor Controller Wire Hood Foam, Right Allen Wrench Short Console Bolt Upright Ground Wire Rail Cover, Left Rail Cover, Right Key No. until 6 p.m. When ordering parts, please be prepared to give the following information: • the MODEL NUMBER OF THE PRODUCT (NTL10950) • the NAME OF THE PRODUCT (NordicTrack® C2050 treadmill) • the SERIAL NUMBER OF THE PRODUCT (see the front cover of this manual) 31...


