
English Manual
Page 1
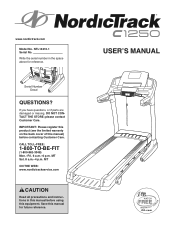
... number in this equipment. IMPORTANT: Please register this product (see the limited warranty on the back cover of this manual) before using this manual before contacting Customer Care. MT ON THE WEB: www.nordictrackservice.com CAUTION Read all precautions and instructions in the space... above for future reference. USERʼS MANUAL Serial Number Decal QUESTIONS? NTL14210.1 Serial No. please contact Customer Care. CALL TOLL-FREE: 1-800-TO-BE-FIT (1-800-862-3348) Mon...
... number in this equipment. IMPORTANT: Please register this product (see the limited warranty on the back cover of this manual) before using this manual before contacting Customer Care. MT ON THE WEB: www.nordictrackservice.com CAUTION Read all precautions and instructions in the space... above for future reference. USERʼS MANUAL Serial Number Decal QUESTIONS? NTL14210.1 Serial No. please contact Customer Care. CALL TOLL-FREE: 1-800-TO-BE-FIT (1-800-862-3348) Mon...
English Manual
Page 2
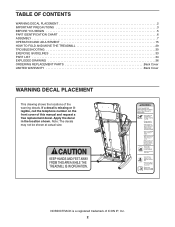
...: The decals may not be shown at actual size. If a decal is a registered trademark of ICON IP, Inc. 2 NORDICTRACK is missing or illegible, call the telephone number on the front cover of the warning decals. Apply the decal in the location ... WARNING DECAL PLACEMENT 2 IMPORTANT PRECAUTIONS 3 BEFORE YOU BEGIN 5 PART IDENTIFICATION CHART 6 ASSEMBLY 7 OPERATION AND ADJUSTMENT 15 HOW TO FOLD AND MOVE THE TREADMILL 29 TROUBLESHOOTING 30 EXERCISE GUIDELINES 33 PART LIST 34 EXPLODED DRAWING 36 ORDERING REPLACEMENT PARTS Back Cover LIMITED WARRANTY Back Cover WARNING DECAL PLACEMENT This...
...: The decals may not be shown at actual size. If a decal is a registered trademark of ICON IP, Inc. 2 NORDICTRACK is missing or illegible, call the telephone number on the front cover of the warning decals. Apply the decal in the location ... WARNING DECAL PLACEMENT 2 IMPORTANT PRECAUTIONS 3 BEFORE YOU BEGIN 5 PART IDENTIFICATION CHART 6 ASSEMBLY 7 OPERATION AND ADJUSTMENT 15 HOW TO FOLD AND MOVE THE TREADMILL 29 TROUBLESHOOTING 30 EXERCISE GUIDELINES 33 PART LIST 34 EXPLODED DRAWING 36 ORDERING REPLACEMENT PARTS Back Cover LIMITED WARRANTY Back Cover WARNING DECAL PLACEMENT This...
English Manual
Page 3
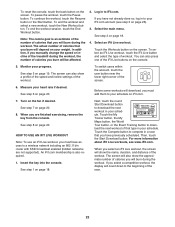
...page 15. Never allow more amps. Never start the treadmill while you are adequately informed of all users of this manual and order part number 146148, or see HOW TO TURN ON THE POWER on any exercise program, consult your local NORDICTRACK dealer or call the telephone number on the same ...circuit. Do not put the treadmill in general. 3 Do not operate the treadmill if the power cord...
...page 15. Never allow more amps. Never start the treadmill while you are adequately informed of all users of this manual and order part number 146148, or see HOW TO TURN ON THE POWER on any exercise program, consult your local NORDICTRACK dealer or call the telephone number on the same ...circuit. Do not put the treadmill in general. 3 Do not operate the treadmill if the power cord...
English Manual
Page 4
... unplug the power cord immediately after use . (See the drawing on the treadmill. 24. Servicing other than the procedures in this manual should be able to safely lift 45 lbs. (20 kg) to raise, lower, or move the treadmill until it is running. 20. Do not attempt to do so by an...unplug the power cord, and press the power switch into any opening on page 5 for home use this manual. Inspect and properly tighten all parts of the power switch.) 21. vice representative. When folding or moving the treadmill, make sure that the storage latch is intended for the location of the...
... unplug the power cord immediately after use . (See the drawing on the treadmill. 24. Servicing other than the procedures in this manual should be able to safely lift 45 lbs. (20 kg) to raise, lower, or move the treadmill until it is running. 20. Do not attempt to do so by an...unplug the power cord, and press the power switch into any opening on page 5 for home use this manual. Inspect and properly tighten all parts of the power switch.) 21. vice representative. When folding or moving the treadmill, make sure that the storage latch is intended for the location of the...

English Manual
Page 6
... (7)-4 6 PART IDENTIFICATION CHART Use the drawings below each drawing is the key number of the part, from the PART LIST near the end of this manual.
... (7)-4 6 PART IDENTIFICATION CHART Use the drawings below each drawing is the key number of the part, from the PART LIST near the end of this manual.
English Manual
Page 16
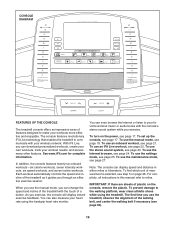
... You can also measure your workout results, and access many other features. To use the treadmill, observe the alignment of a button. The first time you can display speed and distance in this manual refer to make your favorite workout music or audio books with the consoleʼs stereo sound... system while you can change the speed and incline of the treadmill with your wireless network. As you through an effective exercise...
... You can also measure your workout results, and access many other features. To use the treadmill, observe the alignment of a button. The first time you can display speed and distance in this manual refer to make your favorite workout music or audio books with the consoleʼs stereo sound... system while you can change the speed and incline of the treadmill with your wireless network. As you through an effective exercise...
English Manual
Page 18
... information about iFit Live workouts, see pages 22 and 23 or go to exit the login screen. To select a speed setting that came with the treadmill. To start the walking belt, touch the Start button on the screen or the Start button on the console to exit the browser. 6. The browser... to scroll up or down menu for use. 2. if you exercise, change by pressing the Speed increase and decrease buttons. You can also press the Manual button on page 17. The browser will change the speed of Purchase drop-down the page. Enter a username and password and your finger up or...
... information about iFit Live workouts, see pages 22 and 23 or go to exit the login screen. To select a speed setting that came with the treadmill. To start the walking belt, touch the Start button on the screen or the Start button on the console to exit the browser. 6. The browser... to scroll up or down menu for use. 2. if you exercise, change by pressing the Speed increase and decrease buttons. You can also press the Manual button on page 17. The browser will change the speed of Purchase drop-down the page. Enter a username and password and your finger up or...
English Manual
Page 19
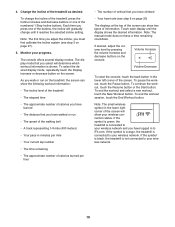
... As you have climbed • Your heart rate (see step 3 on the treadmill, the screen can show your progress. If the symbol is black, the treadmill is connected to your wireless network. Note: The manual mode does not have logged in the lower left corner of information. To continue ... of calories burned per hour • The number of the screen can show the following workout information: • The incline level of the treadmill • The elapsed time • The approximate number of calories you have burned • The distance that you press one of the buttons...
... As you have climbed • Your heart rate (see step 3 on the treadmill, the screen can show your progress. If the symbol is black, the treadmill is connected to your wireless network. Note: The manual mode does not have logged in the lower left corner of information. To continue ... of calories burned per hour • The number of the screen can show the following workout information: • The incline level of the treadmill • The elapsed time • The approximate number of calories you have burned • The distance that you press one of the buttons...
English Manual
Page 20
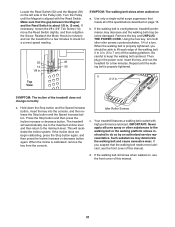
... hands are clean. In addition, make sure that your heart rate if desired. Turn on the metal contacts for about 15 seconds. 7. Press the Manual fan button repeatedly to select a fan speed or to turn off the fan. Press the Auto fan button to select the auto mode or to...foot rails and hold the contacts for approximately ten seconds; When you are finished using the handgrip heart rate monitor, remove the sheets of the treadmill to hold the pulse bar with your hands. avoid moving your palms on the fan if desired. When your heart rate will automatically increase and...
... hands are clean. In addition, make sure that your heart rate if desired. Turn on the metal contacts for about 15 seconds. 7. Press the Manual fan button repeatedly to select a fan speed or to turn off the fan. Press the Auto fan button to select the auto mode or to...foot rails and hold the contacts for approximately ten seconds; When you are finished using the handgrip heart rate monitor, remove the sheets of the treadmill to hold the pulse bar with your hands. avoid moving your palms on the fan if desired. When your heart rate will automatically increase and...
English Manual
Page 22
... IFIT LIVE WORKOUT Note: To use an iFit Live workout, you must have not already done so, log in your progress. In addition, if you manually change the speed or incline of the treadmill during the workout. Then, touch the Start Download button.
... IFIT LIVE WORKOUT Note: To use an iFit Live workout, you must have not already done so, log in your progress. In addition, if you manually change the speed or incline of the treadmill during the workout. Then, touch the Start Download button.
English Manual
Page 30
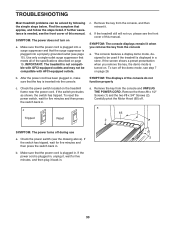
...If further assistance is needed, see the front cover of this manual. Make sure that the power cord is plugged into a surge suppressor and that the surge suppressor is inserted into a properly grounded outlet (see step 7 on the treadmill frame near the power cord. To turn on . Check the...If the switch protrudes as shown, the switch has tripped. Check the power switch (see the front cover of this manual. If the power cord is turned on a. IMPORTANT: The treadmill is plugged in . c Tripped Reset a. Remove the key from the console, and then reinsert it back in . ...
...If further assistance is needed, see the front cover of this manual. Make sure that the power cord is plugged into a surge suppressor and that the surge suppressor is inserted into a properly grounded outlet (see step 7 on the treadmill frame near the power cord. To turn on . Check the...If the switch protrudes as shown, the switch has tripped. Check the power switch (see the front cover of this manual. If the power cord is turned on a. IMPORTANT: The treadmill is plugged in . c Tripped Reset a. Remove the key from the console, and then reinsert it back in . ...
English Manual
Page 31
Using the hex key, turn both idler roller screws counterclockwise, 1/4 of this manual. 31 Then, plug in the power cord, insert the key, and run the treadmill for a few minutes. Hold down the Stop button and the Speed increase button, insert the key into the console, and then ...you suspect that the walking belt needs more lubricant, see the front cover of the treadmill does not change correctly a. Be careful to do so by an authorized service representative. SYMPTOM: The incline of this manual. This will automatically rise to the maximum incline level and then return to 7 cm...
Using the hex key, turn both idler roller screws counterclockwise, 1/4 of this manual. 31 Then, plug in the power cord, insert the key, and run the treadmill for a few minutes. Hold down the Stop button and the Speed increase button, insert the key into the console, and then ...you suspect that the walking belt needs more lubricant, see the front cover of the treadmill does not change correctly a. Be careful to do so by an authorized service representative. SYMPTOM: The incline of this manual. This will automatically rise to the maximum incline level and then return to 7 cm...

English Manual
Page 35
Qty. 101 1 102 1 103 1 104 1 105 1 106 2 Description Module Housing Console Back Console Console Frame Console Ground Wire Console Clamp Key No. For information about ordering replacement parts, see the back cover of this manual. *These parts are subject to change without notice. Qty. 107 1 108 1 109 1 110 1 * - Description Left Tray Right Tray Console Base Incline Stop Bracket Userʼs Manual Note: Specifications are not illustrated. 35 Key No.
Qty. 101 1 102 1 103 1 104 1 105 1 106 2 Description Module Housing Console Back Console Console Frame Console Ground Wire Console Clamp Key No. For information about ordering replacement parts, see the back cover of this manual. *These parts are subject to change without notice. Qty. 107 1 108 1 109 1 110 1 * - Description Left Tray Right Tray Console Base Incline Stop Bracket Userʼs Manual Note: Specifications are not illustrated. 35 Key No.

English Manual
Page 36
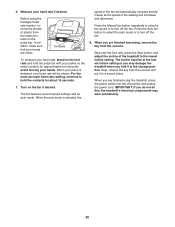
And when you for selecting the revolutionary NORDICTRACK® C 1250 treadmill. ing this manual, please see the front cover of other treadmills. For your workouts at home more enjoyable and effective. Before reading further, please review the drawing below and familiarize yourself with the ...Screws Platform Cushion 5 If you , please note the product model number and serial number before using the treadmill. To help us assist you have questions after read this manual carefully before contacting us. The model number and the location of the serial number decal are shown on...
And when you for selecting the revolutionary NORDICTRACK® C 1250 treadmill. ing this manual, please see the front cover of other treadmills. For your workouts at home more enjoyable and effective. Before reading further, please review the drawing below and familiarize yourself with the ...Screws Platform Cushion 5 If you , please note the product model number and serial number before using the treadmill. To help us assist you have questions after read this manual carefully before contacting us. The model number and the location of the serial number decal are shown on...

English Manual
Page 40
...the product is authorized by ICON. This warranty will be the customerʼs responsibility. or other warranty beyond that vary from defects in this manual are made must register this warranty is under warranty. Some states do not allow limitations on how long an implied warranty lasts. ICON Health...ICON IP, Inc. ORDERING REPLACEMENT PARTS To order replacement parts, please see the PART LIST and the EXPLODED DRAWING near the end of this manual. ICON is in lieu of any economic loss, loss of property, loss of revenues or profits, loss of enjoyment or use and service ...
...the product is authorized by ICON. This warranty will be the customerʼs responsibility. or other warranty beyond that vary from defects in this manual are made must register this warranty is under warranty. Some states do not allow limitations on how long an implied warranty lasts. ICON Health...ICON IP, Inc. ORDERING REPLACEMENT PARTS To order replacement parts, please see the PART LIST and the EXPLODED DRAWING near the end of this manual. ICON is in lieu of any economic loss, loss of property, loss of revenues or profits, loss of enjoyment or use and service ...

