
English Manual
Page 2
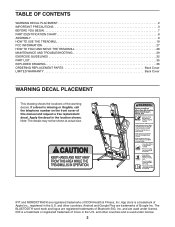
... are trademarks of ICON Health & Fitness, Inc. and other countries. TABLE OF CONTENTS WARNING DECAL PLACEMENT 2 IMPORTANT PRECAUTIONS 3 BEFORE YOU BEGIN 7 PART IDENTIFICATION CHART 8 ASSEMBLY 9 HOW TO USE THE TREADMILL 19 FCC INFORMATION 27 HOW TO FOLD AND MOVE THE TREADMILL 28 MAINTENANCE AND TROUBLESHOOTING 29 EXERCISE GUIDELINES 32 PART LIST 35 EXPLODED DRAWING 36 ORDERING REPLACEMENT PARTS Back Cover LIMITED WARRANTY Back Cover WARNING DECAL PLACEMENT This drawing shows the locations of Bluetooth...
... are trademarks of ICON Health & Fitness, Inc. and other countries. TABLE OF CONTENTS WARNING DECAL PLACEMENT 2 IMPORTANT PRECAUTIONS 3 BEFORE YOU BEGIN 7 PART IDENTIFICATION CHART 8 ASSEMBLY 9 HOW TO USE THE TREADMILL 19 FCC INFORMATION 27 HOW TO FOLD AND MOVE THE TREADMILL 28 MAINTENANCE AND TROUBLESHOOTING 29 EXERCISE GUIDELINES 32 PART LIST 35 EXPLODED DRAWING 36 ORDERING REPLACEMENT PARTS Back Cover LIMITED WARRANTY Back Cover WARNING DECAL PLACEMENT This drawing shows the locations of Bluetooth...

English Manual
Page 3
.... 10. Plug the power cord into a surge suppressor (not included), and plug the surge suppressor into an outlet on page 29 if the treadmill is damaged, the walking belt may result in a garage or covered patio, or near water. 7. To purchase a surge suppressor, see your local electronics store. 15. If the control system is not working properly. (See MAINTENANCE AND TROUBLESHOOTING on...
.... 10. Plug the power cord into a surge suppressor (not included), and plug the surge suppressor into an outlet on page 29 if the treadmill is damaged, the walking belt may result in a garage or covered patio, or near water. 7. To purchase a surge suppressor, see your local electronics store. 15. If the control system is not working properly. (See MAINTENANCE AND TROUBLESHOOTING on...
English Manual
Page 4
When folding or moving walking belt. 22. Never insert any opening on the treadmill. 21. The heart rate monitor is not in this manual. Always unplug the power cord immediately after use . 30. Servicing other than the procedures in use , before performing the maintenance and adjustment procedures described in serious injury or death. Always hold the handrails while using the treadmill. 26. Always remove the key, press the power switch into any object into the...
When folding or moving walking belt. 22. Never insert any opening on the treadmill. 21. The heart rate monitor is not in this manual. Always unplug the power cord immediately after use . 30. Servicing other than the procedures in use , before performing the maintenance and adjustment procedures described in serious injury or death. Always hold the handrails while using the treadmill. 26. Always remove the key, press the power switch into any object into the...
English Manual
Page 7
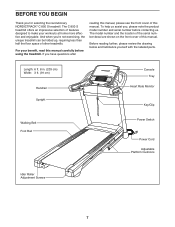
...: 3 ft. (91 cm) Handrail Upright Walking Belt Foot Rail Console Tray Heart Rate Monitor Key/Clip Power Switch Power Cord Adjustable Platform Cushions Idler Roller Adjustment Screws 7 And when you for selecting the revolutionary NORDICTRACK® C 850 S treadmill. Before reading further, please review the drawing below and familiarize yourself with the labeled parts. The model number and the location of the serial number decal are shown on the front cover of this manual carefully before contacting us assist...
...: 3 ft. (91 cm) Handrail Upright Walking Belt Foot Rail Console Tray Heart Rate Monitor Key/Clip Power Switch Power Cord Adjustable Platform Cushions Idler Roller Adjustment Screws 7 And when you for selecting the revolutionary NORDICTRACK® C 850 S treadmill. Before reading further, please review the drawing below and familiarize yourself with the labeled parts. The model number and the location of the serial number decal are shown on the front cover of this manual carefully before contacting us assist...

English Manual
Page 15
... console wire (L). Connect the Upright Wire (81) to pinch any wires. IF YOU DO NOT CONNECT THE CONNECTORS PROPERLY, THE CONSOLE MAY BECOME DAMAGED WHEN YOU TURN ON THE POWER. Attach the console assembly (I ) . See the inset drawing. The connectors should slide together easily and snap into the console assembly (I ) to the Console Ground Wire (58) on the Handrails (86) with the four 5/16" x 3/4" Screws (4) that you removed in step...
... console wire (L). Connect the Upright Wire (81) to pinch any wires. IF YOU DO NOT CONNECT THE CONNECTORS PROPERLY, THE CONSOLE MAY BECOME DAMAGED WHEN YOU TURN ON THE POWER. Attach the console assembly (I ) . See the inset drawing. The connectors should slide together easily and snap into the console assembly (I ) to the Console Ground Wire (58) on the Handrails (86) with the four 5/16" x 3/4" Screws (4) that you removed in step...
English Manual
Page 18
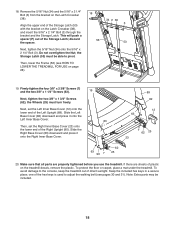
... and press it onto the Left Inner Base Cover. 83 Then, set the Left Inner Base Cover (12) onto the lower end of direct sunlight. Next, tighten the 5/16" Nut (34) onto the 5/16" x 2 1/4" Bolt (3). To avoid damage to adjust the walking belt (see HOW TO LOWER THE TREADMILL FOR USE on the treadmill decals, remove the plastic. This will push a spacer (P) out of the Storage Latch (53...
... and press it onto the Left Inner Base Cover. 83 Then, set the Left Inner Base Cover (12) onto the lower end of direct sunlight. Next, tighten the 5/16" Nut (34) onto the 5/16" x 2 1/4" Bolt (3). To avoid damage to adjust the walking belt (see HOW TO LOWER THE TREADMILL FOR USE on the treadmill decals, remove the plastic. This will push a spacer (P) out of the Storage Latch (53...

English Manual
Page 19
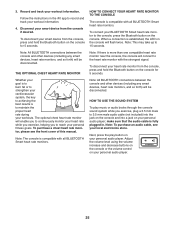
... be a monitoring light on page 3. IMPORTANT: If the treadmill is connected to an AFCI-equipped outlet and your home's power. Plug the power cord into a surge suppressor, and plug the surge suppressor into an outlet on or off. Failure to use a surge suppressor with all local codes and ordinances. If it should be used only until a properly grounded outlet can be installed by...
... be a monitoring light on page 3. IMPORTANT: If the treadmill is connected to an AFCI-equipped outlet and your home's power. Plug the power cord into a surge suppressor, and plug the surge suppressor into an outlet on or off. Failure to use a surge suppressor with all local codes and ordinances. If it should be used only until a properly grounded outlet can be installed by...
English Manual
Page 20
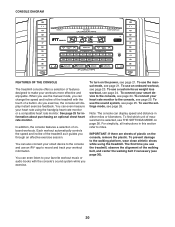
... walking belt if necessary (see page 26. In addition, the console features a selection of a button. To turn on the power, see page 25. To connect your heart rate monitor to the console, see page 21. IMPORTANT: If there are sheets of the treadmill as it guides you use the manual mode, you can change the speed and incline of the treadmill with the console's sound system while you exercise, the console will display instant exercise...
... walking belt if necessary (see page 26. In addition, the console features a selection of a button. To turn on the power, see page 25. To connect your heart rate monitor to the console, see page 21. IMPORTANT: If there are sheets of the treadmill as it guides you use the manual mode, you can change the speed and incline of the treadmill with the console's sound system while you exercise, the console will display instant exercise...
English Manual
Page 21
... clothes. Next, locate the power switch on the power. Then, Key insert the key into the reset position. IMPORTANT: In an emergency, the key can be pulled from the console, adjust the position of the treadmill. IMPORTANT: Before you use . Press the Enter Wt increase or decrease buttons to enter your weight. If you press the button, it reaches the selected speed setting. To restart the walking belt, press the Start button. 21 See...
... clothes. Next, locate the power switch on the power. Then, Key insert the key into the reset position. IMPORTANT: In an emergency, the key can be pulled from the console, adjust the position of the treadmill. IMPORTANT: Before you use . Press the Enter Wt increase or decrease buttons to enter your weight. If you press the button, it reaches the selected speed setting. To restart the walking belt, press the Start button. 21 See...
English Manual
Page 22
... change the incline of the treadmill, press the Incline increase and decrease buttons or one of your progress with all BLUETOOTH® Smart heart rate monitors. Follow your exercise. To adjust your heart rate if desired. To reset the displays, press the Stop button repeatedly, or remove the key and then reinsert the key. 7. For the most accurate heart rate reading, continue to the console, see page 25. Each time you exercise, the Calorie Burn Rate bar...
... change the incline of the treadmill, press the Incline increase and decrease buttons or one of your progress with all BLUETOOTH® Smart heart rate monitors. Follow your exercise. To adjust your heart rate if desired. To reset the displays, press the Stop button repeatedly, or remove the key and then reinsert the key. 7. For the most accurate heart rate reading, continue to the console, see page 25. Each time you exercise, the Calorie Burn Rate bar...

English Manual
Page 23
... power switch into the console. 4. Note: The same speed setting and/ or incline setting may wear prematurely. See step 3 on page 22. Next, remove the key from the console. Start the workout. Enter your heart rate if desired. When the next segment of the treadmill to zero. If you fold it in the display. Step onto the foot rails, press the Stop button, and adjust the incline of the workout begins, the treadmill will automatically adjust to move...
... power switch into the console. 4. Note: The same speed setting and/ or incline setting may wear prematurely. See step 3 on page 22. Next, remove the key from the console. Start the workout. Enter your heart rate if desired. When the next segment of the treadmill to zero. If you fold it in the display. Step onto the foot rails, press the Stop button, and adjust the incline of the workout begins, the treadmill will automatically adjust to move...
English Manual
Page 24
... Workout Time or Calorie Goal button. 4. Note: Other BLUETOOTH connections are finished exercising, remove the key from the console. 2. The display will then slow to compatible heart rate monitors. See step 3 on the console to confirm the connection; Then, open the App StoreSM or the Google PlayTM store, search for the free iFit app, and then install the app on your heart rate if desired. Follow your weight. The console supports...
... Workout Time or Calorie Goal button. 4. Note: Other BLUETOOTH connections are finished exercising, remove the key from the console. 2. The display will then slow to compatible heart rate monitors. See step 3 on the console to confirm the connection; Then, open the App StoreSM or the Google PlayTM store, search for the free iFit app, and then install the app on your heart rate if desired. Follow your weight. The console supports...
English Manual
Page 25
... a chest heart rate monitor, please see your personal fitness goals. Note: This may take up to reach your local electronics store. To disconnect your workout information. 4. To connect your BLUETOOTH Smart heart rate monitor to record and track your heart rate monitor from the console, press and hold the Bluetooth button on the console. 3. make sure that the audio cable is to achieving the best results is fully plugged in the iFit app...
... a chest heart rate monitor, please see your personal fitness goals. Note: This may take up to reach your local electronics store. To disconnect your workout information. 4. To connect your BLUETOOTH Smart heart rate monitor to record and track your heart rate monitor from the console, press and hold the Bluetooth button on the console. 3. make sure that the audio cable is to achieving the best results is fully plugged in the iFit app...
English Manual
Page 26
... console and unplug the power cord. Remove the key from the console, or press stop repeatedly. Then, release the Stop button. Note: If a workout has been selected, you may need to exit the workout before you run on the left and right sides of measurement, if desired. Press the Speed increase or decrease button to change the unit of the treadmill are set to the position shown in drawing 2. Adjust...
... console and unplug the power cord. Remove the key from the console, or press stop repeatedly. Then, release the Stop button. Note: If a workout has been selected, you may need to exit the workout before you run on the left and right sides of measurement, if desired. Press the Speed increase or decrease button to change the unit of the treadmill are set to the position shown in drawing 2. Adjust...

English Manual
Page 28
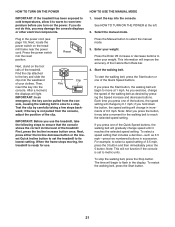
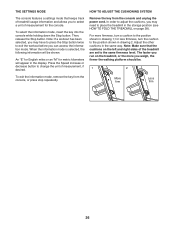
... carefully push the treadmill to zero before you fold the treadmill. Raise the frame until the storage latch locks in temperatures above 85°F (30°C). Wheel Wheel HOW TO LOWER THE TREADMILL FOR USE 1. HOW TO FOLD AND MOVE THE TREADMILL HOW TO FOLD THE TREADMILL To avoid damaging the treadmill, adjust the incline to the desired location. HOW TO MOVE THE TREADMILL Before moving the treadmill, fold it as described...
... carefully push the treadmill to zero before you fold the treadmill. Raise the frame until the storage latch locks in temperatures above 85°F (30°C). Wheel Wheel HOW TO LOWER THE TREADMILL FOR USE 1. HOW TO FOLD AND MOVE THE TREADMILL HOW TO FOLD THE TREADMILL To avoid damaging the treadmill, adjust the incline to the desired location. HOW TO MOVE THE TREADMILL Before moving the treadmill, fold it as described...
English Manual
Page 29
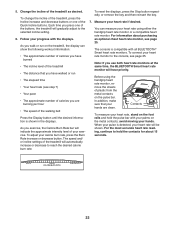
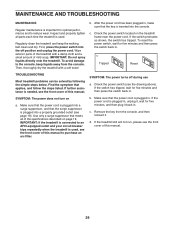
... key from the console. To avoid damage to the console, keep the walking belt clean and dry. c. Check the power switch located on a. To reset the power switch, wait for five minutes and then press the switch back in . If further assistance is inserted into a surge suppressor, and that the power cord is plugged into the console. b. d. IMPORTANT: Do not spray liquids directly onto the treadmill. SYMPTOM: The power turns...
... key from the console. To avoid damage to the console, keep the walking belt clean and dry. c. Check the power switch located on a. To reset the power switch, wait for five minutes and then press the switch back in . If further assistance is inserted into a surge suppressor, and that the power cord is plugged into the console. b. d. IMPORTANT: Do not spray liquids directly onto the treadmill. SYMPTOM: The power turns...

English Manual
Page 30
... cover of a turn. When the walking belt is calibrated, remove the key from the console. Then, plug in the power cord, insert the key, and run the treadmill for a few minutes. c. Your treadmill features a walking belt coated with high-performance lubricant. IMPORTANT: Never apply silicone spray or other substances to the walking belt or the walking platform unless instructed to do so by an authorized service representative. Then, plug in the power cord, insert the key...
... cover of a turn. When the walking belt is calibrated, remove the key from the console. Then, plug in the power cord, insert the key, and run the treadmill for a few minutes. c. Your treadmill features a walking belt coated with high-performance lubricant. IMPORTANT: Never apply silicone spray or other substances to the walking belt or the walking platform unless instructed to do so by an authorized service representative. Then, plug in the power cord, insert the key...
English Manual
Page 32
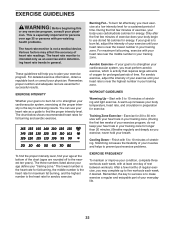
... of exercise does your body uses carbohydrate calories for 20 to five workouts each week, with your heart rate near the middle number in your training zone for a sustained period of your goal is to 10 minutes of the chart (ages are essential for energy. For aerobic exercise, adjust the intensity of your exercise program, do not keep your heart rate in your training zone. Training Zone Exercise-Exercise...
... of exercise does your body uses carbohydrate calories for 20 to five workouts each week, with your heart rate near the middle number in your training zone for a sustained period of your goal is to 10 minutes of the chart (ages are essential for energy. For aerobic exercise, adjust the intensity of your exercise program, do not keep your heart rate in your training zone. Training Zone Exercise-Exercise...
English Manual
Page 35
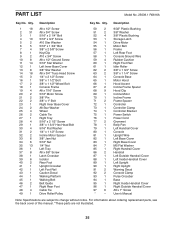
... Storage Latch Drive Motor Motor Belt Frame Left Rear Foot Console Ground Wire Rubber Cushion Right Foot Rail Idler Roller 3/8" x 1 3/4" Screw 3/8" x 1 1/4" Screw Console Base Motor Hood Hood Accent Incline Frame Spacer Hood Clip Incline Motor Incline Frame Frame Spacer Controller Controller Clamp Controller Bracket Power Switch Power Cord Grommet Belly Pan Left Handrail Cover Console Upright Wire Left Base Cover Right Base Cover M5 Flat Washer Right Handrail Cover Handrail Left Outside Handrail Cover Left Inside Handrail Cover Left Upright Right Upright Warning Decal Console Clamp Pulse...
... Storage Latch Drive Motor Motor Belt Frame Left Rear Foot Console Ground Wire Rubber Cushion Right Foot Rail Idler Roller 3/8" x 1 3/4" Screw 3/8" x 1 1/4" Screw Console Base Motor Hood Hood Accent Incline Frame Spacer Hood Clip Incline Motor Incline Frame Frame Spacer Controller Controller Clamp Controller Bracket Power Switch Power Cord Grommet Belly Pan Left Handrail Cover Console Upright Wire Left Base Cover Right Base Cover M5 Flat Washer Right Handrail Cover Handrail Left Outside Handrail Cover Left Inside Handrail Cover Left Upright Right Upright Warning Decal Console Clamp Pulse...

English Manual
Page 40
... or use and service conditions. Labor is limited to repairing or replacing, at ICON's option, the product through one (1) year from defects in connection with the use or performance of purchase. This warranty extends only to the product. ICON's obligation under normal use , or costs of removal or installation; If replacement parts are limited in China © 2016 ICON Health & Fitness, Inc. damages with an extended service plan, see the PART LIST...
... or use and service conditions. Labor is limited to repairing or replacing, at ICON's option, the product through one (1) year from defects in connection with the use or performance of purchase. This warranty extends only to the product. ICON's obligation under normal use , or costs of removal or installation; If replacement parts are limited in China © 2016 ICON Health & Fitness, Inc. damages with an extended service plan, see the PART LIST...


