
English Manual
Page 2
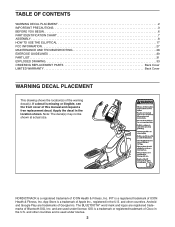
... decal. Apply the decal in the U.S. IFIT is missing or illegible, see the front cover of ICON Health & Fitness, Inc. NORDICTRACK is a trademark or registered trademark of Google Inc. IOS is a registered trademark of Apple Inc., registered in the U.S. and other... 2 IMPORTANT PRECAUTIONS 3 BEFORE YOU BEGIN 6 PART IDENTIFICATION CHART 7 ASSEMBLY 8 HOW TO USE THE ELLIPTICAL 17 FCC INFORMATION 27 MAINTENANCE AND TROUBLESHOOTING 28 EXERCISE GUIDELINES 30 PART LIST 31 EXPLODED DRAWING 33 ORDERING REPLACEMENT PARTS Back Cover LIMITED WARRANTY Back Cover WARNING DECAL PLACEMENT...
... decal. Apply the decal in the U.S. IFIT is missing or illegible, see the front cover of ICON Health & Fitness, Inc. NORDICTRACK is a trademark or registered trademark of Google Inc. IOS is a registered trademark of Apple Inc., registered in the U.S. and other... 2 IMPORTANT PRECAUTIONS 3 BEFORE YOU BEGIN 6 PART IDENTIFICATION CHART 7 ASSEMBLY 8 HOW TO USE THE ELLIPTICAL 17 FCC INFORMATION 27 MAINTENANCE AND TROUBLESHOOTING 28 EXERCISE GUIDELINES 30 PART LIST 31 EXPLODED DRAWING 33 ORDERING REPLACEMENT PARTS Back Cover LIMITED WARRANTY Back Cover WARNING DECAL PLACEMENT...

English Manual
Page 3
... 16. Keep children under the elliptical. 10. ICON assumes no responsibility for use an extension cord. 11. Before beginning any worn parts immediately. 9. Place the elliptical on a level surface, with pre-existing health problems. 3. Do not operate the elliptical if the power cord or plug ...is damaged, or if the elliptical is not a medical device. When connecting the ...
... 16. Keep children under the elliptical. 10. ICON assumes no responsibility for use an extension cord. 11. Before beginning any worn parts immediately. 9. Place the elliptical on a level surface, with pre-existing health problems. 3. Do not operate the elliptical if the power cord or plug ...is damaged, or if the elliptical is not a medical device. When connecting the ...
English Manual
Page 6
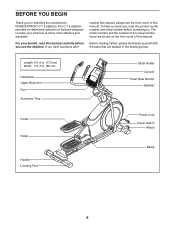
... the product model number and serial number before you for selecting the revolutionary NORDICTRACK® C 7.5 elliptical. For your workouts at home more effective and enjoyable. Before reading further, please familiarize yourself with the parts that are shown on the front cover of this manual. Length: 5 ft.... 8 in. (173 cm) Width: 2 ft. 2 in the drawing below. The C 7.5 elliptical provides an impressive selection of this manual. BEFORE YOU...
... the product model number and serial number before you for selecting the revolutionary NORDICTRACK® C 7.5 elliptical. For your workouts at home more effective and enjoyable. Before reading further, please familiarize yourself with the parts that are shown on the front cover of this manual. Length: 5 ft.... 8 in. (173 cm) Width: 2 ft. 2 in the drawing below. The C 7.5 elliptical provides an impressive selection of this manual. BEFORE YOU...

English Manual
Page 7
... Use the drawings below each drawing is not in parentheses below to see if it has been preassembled. Note: If a part is the key number of the part, from the PART LIST near the end of this manual. Extra parts may be included. The number in the hardware kit, check to identify the small... parts needed for assembly. The number following the key number is the quantity needed for assembly. M5 Washer (94)-2 M8 Washer (97)-8 M10 Split Washer (105)-8 ...
... Use the drawings below each drawing is not in parentheses below to see if it has been preassembled. Note: If a part is the key number of the part, from the PART LIST near the end of this manual. Extra parts may be included. The number in the hardware kit, check to identify the small... parts needed for assembly. The number following the key number is the quantity needed for assembly. M5 Washer (94)-2 M8 Washer (97)-8 M10 Split Washer (105)-8 ...
English Manual
Page 8
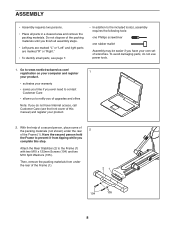
... page 7. • In addition to the Frame (1) with two M10 x 122mm Screws (104) and two M10 Split Washers (105). To avoid damaging parts, do not have your product. 2. Go to www.nordictrackservice.com/ registration on your computer and register 1 your product. • activates your warranty •...to contact Customer Care • allows us to prevent it from under the rear 2 of the packing materials until you finish all parts in a cleared area and remove the packing materials. Attach the Rear Stabilizer (2) to the included tool(s), assembly requires the following tools: ...
... page 7. • In addition to the Frame (1) with two M10 x 122mm Screws (104) and two M10 Split Washers (105). To avoid damaging parts, do not have your product. 2. Go to www.nordictrackservice.com/ registration on your computer and register 1 your product. • activates your warranty •...to contact Customer Care • allows us to prevent it from under the rear 2 of the packing materials until you finish all parts in a cleared area and remove the packing materials. Attach the Rear Stabilizer (2) to the included tool(s), assembly requires the following tools: ...
English Manual
Page 13
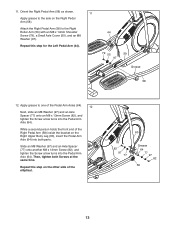
... Axle Spacer (77) onto an M8 x 13mm Screw (82), and tighten the Screw a few turns into both Screws at the same time. Then, tighten both parts. Repeat this step for the Left Pedal Arm (44). 44 79 55 97 59 Grease 58 12. Orient the Right Pedal Arm (58) as shown...) with an M8 x 14mm Shoulder Screw (79), a Small Axle Cover (55), and an M8 Washer (97). While a second person holds the front end of the elliptical. 60 82 97 77 Grease 64 77 97 82 58 13 Repeat this step on the Right Pedal Arm (58). 11.
... Axle Spacer (77) onto an M8 x 13mm Screw (82), and tighten the Screw a few turns into both Screws at the same time. Then, tighten both parts. Repeat this step for the Left Pedal Arm (44). 44 79 55 97 59 Grease 58 12. Orient the Right Pedal Arm (58) as shown...) with an M8 x 14mm Shoulder Screw (79), a Small Axle Cover (55), and an M8 Washer (97). While a second person holds the front end of the elliptical. 60 82 97 77 Grease 64 77 97 82 58 13 Repeat this step on the Right Pedal Arm (58). 11.

English Manual
Page 16
Make sure that all the 18 Screws, and then tighten them. 9 7 111 19. Attach the Tablet Holder (9) to protect the floor. 16 Extra parts may be included. Place a mat beneath the elliptical to the Console (7) with four #8 x 12mm Screws (111); start all parts are properly tightened before you use the elliptical. 18.
Make sure that all the 18 Screws, and then tighten them. 9 7 111 19. Attach the Tablet Holder (9) to protect the floor. 16 Extra parts may be included. Place a mat beneath the elliptical to the Console (7) with four #8 x 12mm Screws (111); start all parts are properly tightened before you use the elliptical. 18.

English Manual
Page 27
... void the user's authority to operate this equipment does cause harmful interference to be determined by turning the equipment off and on the elliptical. 4. Exit the settings mode. These limits are designed to correct the interference by the party responsible for help. Make sure to... selected unit of the display. 3. The ramp will appear in miles or kilometers) that to follow the instructions shown in the lower part of measurement will move upward and downward as desired. Contrast Level-The currently selected contrast level will appear in a particular installation. This ...
... void the user's authority to operate this equipment does cause harmful interference to be determined by turning the equipment off and on the elliptical. 4. Exit the settings mode. These limits are designed to correct the interference by the party responsible for help. Make sure to... selected unit of the display. 3. The ramp will appear in miles or kilometers) that to follow the instructions shown in the lower part of measurement will move upward and downward as desired. Contrast Level-The currently selected contrast level will appear in a particular installation. This ...
English Manual
Page 28
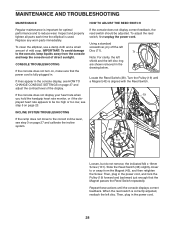
... the handgrip heart rate monitor, or if the displayed heart rate appears to be adjusted. Then, plug in . Inspect and properly tighten all parts each time the elliptical is important for optimal performance and to or away from the console and keep liquids away from the Magnet (43), and then retighten the... Reed Switch. 19 INCLINE SYSTEM TROUBLESHOOTING If the ramp does not move to the console, keep the console out of mild soap. To clean the elliptical, use a damp cloth and a small amount of direct sunlight.
... the handgrip heart rate monitor, or if the displayed heart rate appears to be adjusted. Then, plug in . Inspect and properly tighten all parts each time the elliptical is important for optimal performance and to or away from the console and keep liquids away from the Magnet (43), and then retighten the... Reed Switch. 19 INCLINE SYSTEM TROUBLESHOOTING If the ramp does not move to the console, keep the console out of mild soap. To clean the elliptical, use a damp cloth and a small amount of direct sunlight.
English Manual
Page 29
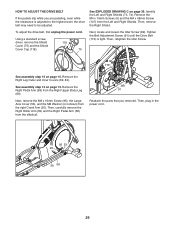
... Leg (60). Identify the Left and Right Shields (73, 74). Remove the M4 x 19mm Screws (5) and the M4 x 48mm Screw (107) from the elliptical. 89 91 Reattach the parts that you are pedaling, even while the resistance is tight. Next, locate and loosen the Idler Screw (89). HOW TO ADJUST THE DRIVE...
... Leg (60). Identify the Left and Right Shields (73, 74). Remove the M4 x 19mm Screws (5) and the M4 x 48mm Screw (107) from the elliptical. 89 91 Reattach the parts that you are pedaling, even while the resistance is tight. Next, locate and loosen the Idler Screw (89). HOW TO ADJUST THE DRIVE...

English Manual
Page 30
... number is the heart rate for energy. You can use stored fat calories for 20 to 30 minutes with 5 to make exercise a regular and enjoyable part of rest between workouts. EXERCISE GUIDELINES WARNING: Before beginning this or any exercise program, consult your everyday life. 30 The heart rate monitor is near...
... number is the heart rate for energy. You can use stored fat calories for 20 to 30 minutes with 5 to make exercise a regular and enjoyable part of rest between workouts. EXERCISE GUIDELINES WARNING: Before beginning this or any exercise program, consult your everyday life. 30 The heart rate monitor is near...

English Manual
Page 31
... x 12mm Screw M5 Washer M8 x 16mm Screw M8 x 38mm Bolt M8 Washer M8 x 18mm Washer M10 x 25mm Screw Leg Bearing 31 NTEL07915.0 R1115B Key No. PART LIST Key No. Qty. 1 1 2 1 3 1 4 1 5 8 6 1 7 1 8 2 9 1 10 1 11 1 12 1 13 1 14 1 15 1 16 2 17 2 18 1 19 1 20 2 21 4 22 1 23 1 24 1 25 1 26 1 27 4 28 1 29 1 30...
... x 12mm Screw M5 Washer M8 x 16mm Screw M8 x 38mm Bolt M8 Washer M8 x 18mm Washer M10 x 25mm Screw Leg Bearing 31 NTEL07915.0 R1115B Key No. PART LIST Key No. Qty. 1 1 2 1 3 1 4 1 5 8 6 1 7 1 8 2 9 1 10 1 11 1 12 1 13 1 14 1 15 1 16 2 17 2 18 1 19 1 20 2 21 4 22 1 23 1 24 1 25 1 26 1 27 4 28 1 29 1 30...

English Manual
Page 32
... #8 x 12mm Screw Grommet Drive Belt M4 x 40mm Screw Controller Bracket Disc Ring 117 1 118 1 119 1 120 1 121 6 122 1 123 1 124 2 * - * - * - * - * - * - * - * - For information about ordering replacement parts, see the back cover of this manual. *These...
... #8 x 12mm Screw Grommet Drive Belt M4 x 40mm Screw Controller Bracket Disc Ring 117 1 118 1 119 1 120 1 121 6 122 1 123 1 124 2 * - * - * - * - * - * - * - * - For information about ordering replacement parts, see the back cover of this manual. *These...
English Manual
Page 36
... damages with the use , or costs of removal or installation; Some states do not allow limitations on how long an implied warranty lasts. Parts are warranted for indirect, special, or consequential damages arising out of or in -home service, the customer will be the customer's responsibility. For...8226; the name of the product (see the front cover of this manual) • the key number and description of the replacement part(s) (see the PART LIST and the EXPLODED DRAWING near the end of this warranty is warranted for the lifetime of the original purchaser (customer). This warranty ...
... damages with the use , or costs of removal or installation; Some states do not allow limitations on how long an implied warranty lasts. Parts are warranted for indirect, special, or consequential damages arising out of or in -home service, the customer will be the customer's responsibility. For...8226; the name of the product (see the front cover of this manual) • the key number and description of the replacement part(s) (see the PART LIST and the EXPLODED DRAWING near the end of this warranty is warranted for the lifetime of the original purchaser (customer). This warranty ...


