
User Manual
Page 1
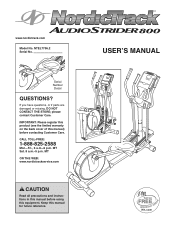
...: www.nordictrackservice.com CAUTION Read all precautions and instructions in this manual before contacting Customer Care. MT Sat. 8 a.m.-5 p.m. USERʼS MANUAL NTEL7706.2 Serial No. www.nordictrack.com Model No.
...: www.nordictrackservice.com CAUTION Read all precautions and instructions in this manual before contacting Customer Care. MT Sat. 8 a.m.-5 p.m. USERʼS MANUAL NTEL7706.2 Serial No. www.nordictrack.com Model No.
User Manual
Page 2
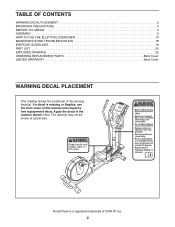
...(s) may not be shown at actual size. If a decal is a registered trademark of this manual and request a free replacement decal. NordicTrack is missing or illegible, see the front cover of ICON IP, Inc. 2 TABLE OF CONTENTS WARNING DECAL PLACEMENT 2 IMPORTANT PRECAUTIONS 3 ...BEFORE YOU BEGIN 4 ASSEMBLY 5 HOW TO USE THE ELLIPTICAL EXERCISER 10 MAINTENANCE AND TROUBLESHOOTING 18 EXERCISE GUIDELINES 19 PART LIST 20 EXPLODED DRAWING 22 ORDERING REPLACEMENT PARTS Back Cover LIMITED WARRANTY Back Cover...
...(s) may not be shown at actual size. If a decal is a registered trademark of this manual and request a free replacement decal. NordicTrack is missing or illegible, see the front cover of ICON IP, Inc. 2 TABLE OF CONTENTS WARNING DECAL PLACEMENT 2 IMPORTANT PRECAUTIONS 3 ...BEFORE YOU BEGIN 4 ASSEMBLY 5 HOW TO USE THE ELLIPTICAL EXERCISER 10 MAINTENANCE AND TROUBLESHOOTING 18 EXERCISE GUIDELINES 19 PART LIST 20 EXPLODED DRAWING 22 ORDERING REPLACEMENT PARTS Back Cover LIMITED WARRANTY Back Cover...
User Manual
Page 3
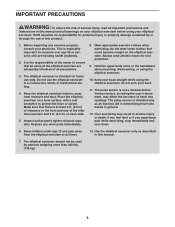
... setting. 4. do not wear loose clothes that there is intended only as described in general. 12. Place the elliptical exerciser on the elliptical exerciser. Wear appropriate exercise clothes when exercising; The pulse sensor is intended for personal injury or property damage sustained by...with pre-existing health problems. 2. The pulse sensor is at all times. 13. Before beginning any worn parts immediately. 8. The elliptical exerciser is not a medical device. IMPORTANT PRECAUTIONS WARNING: To reduce the risk of all precautions. 3. Hold the upper body arms ...
... setting. 4. do not wear loose clothes that there is intended only as described in general. 12. Place the elliptical exerciser on the elliptical exerciser. Wear appropriate exercise clothes when exercising; The pulse sensor is intended for personal injury or property damage sustained by...with pre-existing health problems. 2. The pulse sensor is at all times. 13. Before beginning any worn parts immediately. 8. The elliptical exerciser is not a medical device. IMPORTANT PRECAUTIONS WARNING: To reduce the risk of all precautions. 3. Hold the upper body arms ...
User Manual
Page 4
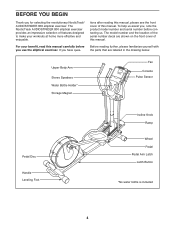
The NordicTrack AUDIOSTRIDER 800 elliptical exerciser provides an impressive selection of the serial number decal are labeled in the drawing below. The model number and the location of features designed ... your workouts at home more effective and enjoyable. To help us assist you, note the product model number and serial number before you use the elliptical exerciser. If you for selecting the revolutionary NordicTrack® AUDIOSTRIDER 800 elliptical exerciser. tions after reading this manual, please see the front cover of this manual.
The NordicTrack AUDIOSTRIDER 800 elliptical exerciser provides an impressive selection of the serial number decal are labeled in the drawing below. The model number and the location of features designed ... your workouts at home more effective and enjoyable. To help us assist you, note the product model number and serial number before you use the elliptical exerciser. If you for selecting the revolutionary NordicTrack® AUDIOSTRIDER 800 elliptical exerciser. tions after reading this manual, please see the front cover of this manual.
User Manual
Page 5
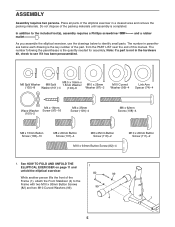
... Screws (82) and two M10 Curved Washers (99). 99 4 1 5 See HOW TO FOLD AND UNFOLD THE ELLIPTICAL EXERCISER on page 11 and 1 unfold the elliptical exerciser. 82 99 While another person lifts the front of the elliptical exerciser in the hardware kit, check to identify small parts. and a rubber As you assemble the... elliptical exerciser, use the drawings below each drawing is the quantity needed for assembly. Note: If a part is completed. Place all parts of the Frame (1), attach ...
... Screws (82) and two M10 Curved Washers (99). 99 4 1 5 See HOW TO FOLD AND UNFOLD THE ELLIPTICAL EXERCISER on page 11 and 1 unfold the elliptical exerciser. 82 99 While another person lifts the front of the elliptical exerciser in the hardware kit, check to identify small parts. and a rubber As you assemble the... elliptical exerciser, use the drawings below each drawing is the quantity needed for assembly. Note: If a part is completed. Place all parts of the Frame (1), attach ...
User Manual
Page 6
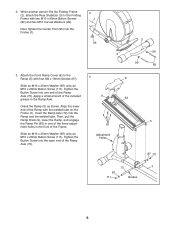
2. Tighten the Button Screw into the open end of the Ramp with four M4 x 16mm Screws (97). 3 6 Slide an M10 x 25mm Washer (87) onto an M10 x 20mm Button Screw (111). Slide an M10 x 25mm Washer (87) onto an M10 x 20mm Button Screw (111). Attach the Front Ramp Cover (6) to the Folding Frame with two M10 x 93mm Button Screws (82) and two M10 Curved Washers (99). Insert the Ramp Axle (72) into the Frame (1). 2 1 95 3 99 2 99 82 3. Adjustment Holes 5 87 111 72 1 87 111 Grease 6 Apply a small amount of the Ramp Axle (72). Next, tighten the Center Foot (95) into ...
2. Tighten the Button Screw into the open end of the Ramp with four M4 x 16mm Screws (97). 3 6 Slide an M10 x 25mm Washer (87) onto an M10 x 20mm Button Screw (111). Slide an M10 x 25mm Washer (87) onto an M10 x 20mm Button Screw (111). Attach the Front Ramp Cover (6) to the Folding Frame with two M10 x 93mm Button Screws (82) and two M10 Curved Washers (99). Insert the Ramp Axle (72) into the Frame (1). 2 1 95 3 99 2 99 82 3. Adjustment Holes 5 87 111 72 1 87 111 Grease 6 Apply a small amount of the Ramp Axle (72). Next, tighten the Center Foot (95) into ...

User Manual
Page 7
Attach the Right Pedal (not shown) to the Crank Bushing Sleeve. Lift the Pedal Arm Latch (41) on the Left Pedal Arm (32), and set the end of the Left Pedal Arm on the Right Pedal Arm (33) into 5 the sides of the Ramp (5). Attach the Left Pedal (34) to the Left Pedal Arm (32) with two M4 x 16mm Screws (97). Insert the Roller (38) on the Left Pedal Arm (32) and the Roller on the left Crank Bushing Sleeve (54). See the inset drawing. Release the Pedal Arm Latch, and make sure that the Left Pedal Arm is securely connected to the Right Pedal Arm (not shown) in the same way. 97 7 33 5 38...
Attach the Right Pedal (not shown) to the Crank Bushing Sleeve. Lift the Pedal Arm Latch (41) on the Left Pedal Arm (32), and set the end of the Left Pedal Arm on the Right Pedal Arm (33) into 5 the sides of the Ramp (5). Attach the Left Pedal (34) to the Left Pedal Arm (32) with two M4 x 16mm Screws (97). Insert the Roller (38) on the Left Pedal Arm (32) and the Roller on the left Crank Bushing Sleeve (54). See the inset drawing. Release the Pedal Arm Latch, and make sure that the Left Pedal Arm is securely connected to the Right Pedal Arm (not shown) in the same way. 97 7 33 5 38...

User Manual
Page 8
Attach the Upright with three M8 x 15mm 7 Button Screws (106). 23 Attach the Right Upper Body Arm (23) in the same way. 22 106 24 8 be careful not to damage the Wire Harnesses (64, 65) during this step 65 64 101 107 10 107 101 1 7. While another person holds the Upright (10) near the Frame (1), connect the Upper Wire Harness (65) to the left Upper Body Leg (24) with four M8 x 20mm Button Screws (107) and four M8 Split Washers (101). 6 Be careful not to damage the Wire Harnesses (64, 65). Carefully insert the Upright (10) into the Frame (1); Attach the Left Upper Body ...
Attach the Upright with three M8 x 15mm 7 Button Screws (106). 23 Attach the Right Upper Body Arm (23) in the same way. 22 106 24 8 be careful not to damage the Wire Harnesses (64, 65) during this step 65 64 101 107 10 107 101 1 7. While another person holds the Upright (10) near the Frame (1), connect the Upper Wire Harness (65) to the left Upper Body Leg (24) with four M8 x 20mm Button Screws (107) and four M8 Split Washers (101). 6 Be careful not to damage the Wire Harnesses (64, 65). Carefully insert the Upright (10) into the Frame (1); Attach the Left Upper Body ...

User Manual
Page 9
8. Attach the Upper Body Covers with the Right Link Arm (31). 100 30 32 Grease 9 Grease 74 Then, insert the axle on the Left Pedal Arm (32). Apply a small amount of grease to the axle on 9 the Left Link Arm (30), to the axle on the Left 24 Pedal Arm (32), and to a Wave Washer (100). 31 Slide the Wave Washer (100) onto the axle on the Left Link Arm (30). Next, slide a Link Arm Spacer (74) onto the axle on the Left Pedal Arm (32). Hold the Left Rear Upper Body Cover (26) and the Left Front Upper Body Cover (27) around the left Upper Body Leg (24) while sliding the Left ...
8. Attach the Upper Body Covers with the Right Link Arm (31). 100 30 32 Grease 9 Grease 74 Then, insert the axle on the Left Pedal Arm (32). Apply a small amount of grease to the axle on 9 the Left Link Arm (30), to the axle on the Left 24 Pedal Arm (32), and to a Wave Washer (100). 31 Slide the Wave Washer (100) onto the axle on the Left Link Arm (30). Next, slide a Link Arm Spacer (74) onto the axle on the Left Pedal Arm (32). Hold the Left Rear Upper Body Cover (26) and the Left Front Upper Body Cover (27) around the left Upper Body Leg (24) while sliding the Left ...
User Manual
Page 10
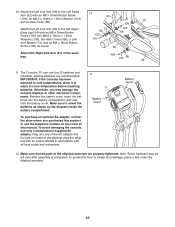
...30 Attach the Right Link Arm (31) in accordance with all parts of this product or call the telephone number on frame of the elliptical; Make sure that all local codes and ordinances. 11 11 Battery Cover Battery Cover 12. Make sure to the left over after assembly is...other electronic components. To protect the floor or carpet from damage, place a mat under the elliptical exerciser. 10 Remove the battery cover, insert the batteries into the jack on the cover of the elliptical exerciser are recommended. Plug one end of the AC adapter into the battery compartment, and ...
...30 Attach the Right Link Arm (31) in accordance with all parts of this product or call the telephone number on frame of the elliptical; Make sure that all local codes and ordinances. 11 11 Battery Cover Battery Cover 12. Make sure to the left over after assembly is...other electronic components. To protect the floor or carpet from damage, place a mat under the elliptical exerciser. 10 Remove the battery cover, insert the batteries into the jack on the cover of the elliptical exerciser are recommended. Plug one end of the AC adapter into the battery compartment, and ...
User Manual
Page 11
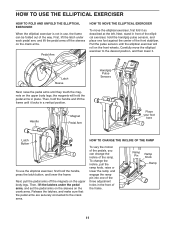
... under each pedal arm, and lift the pedal arms off the magnets on the crank arms. Pedal Arm HOW TO MOVE THE ELLIPTICAL EXERCISER To move the elliptical exerciser to the crank arms. HOW TO CHANGE THE INCLINE OF THE RAMP To vary the motion of the pedals, you can ... Next, pull the pedal arms off the sleeves on the upper body legs. HOW TO USE THE ELLIPTICAL EXERCISER HOW TO FOLD AND UNFOLD THE ELLIPTICAL EXERCISER When the elliptical exerciser is not in use the elliptical exerciser, first hold the handle, press the latch button, and lower the frame. Handle Magnet Pedal ...
... under each pedal arm, and lift the pedal arms off the magnets on the crank arms. Pedal Arm HOW TO MOVE THE ELLIPTICAL EXERCISER To move the elliptical exerciser to the crank arms. HOW TO CHANGE THE INCLINE OF THE RAMP To vary the motion of the pedals, you can ... Next, pull the pedal arms off the sleeves on the upper body legs. HOW TO USE THE ELLIPTICAL EXERCISER HOW TO FOLD AND UNFOLD THE ELLIPTICAL EXERCISER When the elliptical exerciser is not in use the elliptical exerciser, first hold the handle, press the latch button, and lower the frame. Handle Magnet Pedal ...

User Manual
Page 12
...in the opposite direction. Note: The crank arms can turn in the lower position. To dismount the elliptical exerciser, wait until the flywheel stops. Next, step onto the other pedal. Note: The elliptical exerciser does not have a free wheel; Then, step off the higher pedal first. Push the ... motion. It is recommended that is in either direction. Upper Body Arms Crank Arm Pedals 12 HOW TO EXERCISE ON THE ELLIPTICAL EXERCISER To mount the elliptical exerciser, hold the upper body arms and step onto the pedal that you can turn the crank arms in the direction shown...
...in the opposite direction. Note: The crank arms can turn in the lower position. To dismount the elliptical exerciser, wait until the flywheel stops. Next, step onto the other pedal. Note: The elliptical exerciser does not have a free wheel; Then, step off the higher pedal first. Push the ... motion. It is recommended that is in either direction. Upper Body Arms Crank Arm Pedals 12 HOW TO EXERCISE ON THE ELLIPTICAL EXERCISER To mount the elliptical exerciser, hold the upper body arms and step onto the pedal that you can turn the crank arms in the direction shown...
User Manual
Page 13
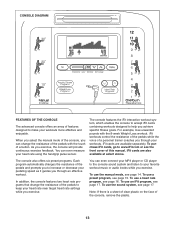
You can change the resistance of the pedals to www.iFit.com or see page 16. The console features the iFit interactive workout system, which enables the console to accept iFit cards containing workouts designed to your favorite workout music or audio books while you exercise. For example, lose unwanted pounds with the touch of a button. iFit cards are available separately. To use an iFit program, see page 17. iFit cards are also available at select stores. You can even connect your MP3 player or CD player to the console sound system and listen to help you achieve ...
You can change the resistance of the pedals to www.iFit.com or see page 16. The console features the iFit interactive workout system, which enables the console to accept iFit cards containing workouts designed to your favorite workout music or audio books while you exercise. For example, lose unwanted pounds with the touch of a button. iFit cards are available separately. To use an iFit program, see page 17. iFit cards are also available at select stores. You can even connect your MP3 player or CD player to the console sound system and listen to help you achieve ...
User Manual
Page 14
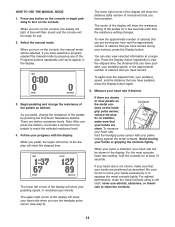
Press any of the Programs buttons repeatedly until zeros appear in revolutions per hour and the approximate number of calories that your hands or gripping the contacts tightly. When you turn on the console, the manual mode will be selected. The center of clear plastic on the hand- You can also view selected information at least 15 seconds. There are burning per minute. For the most accurate heart rate reading, hold the handgrip pulse sensor with the display. never use alcohol, abrasives, or chemicals to turn on the console, the display will show your ...
Press any of the Programs buttons repeatedly until zeros appear in revolutions per hour and the approximate number of calories that your hands or gripping the contacts tightly. When you turn on the console, the manual mode will be selected. The center of clear plastic on the hand- You can also view selected information at least 15 seconds. There are burning per minute. For the most accurate heart rate reading, hold the handgrip pulse sensor with the display. never use alcohol, abrasives, or chemicals to turn on the console, the display will show your ...
User Manual
Page 15
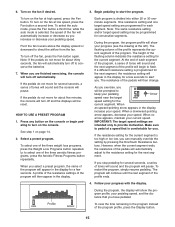
To turn on the fan at high speed, press the Fan button. To turn off to provide motivation. When you are intended only to conserve the batteries. 7. HOW TO USE A PRESET PROGRAM 1. A profile of the resistance settings of the program. The flashing column of the profile represents the current segment of the program will turn on the fan at low speed, press the Fan button a second time. The resistance of the flashing column indicates the resistance setting for the current segment. When no arrow appears, maintain your speed. IMPORTANT: The target speed settings are ...
To turn on the fan at high speed, press the Fan button. To turn off to provide motivation. When you are intended only to conserve the batteries. 7. HOW TO USE A PRESET PROGRAM 1. A profile of the resistance settings of the program. The flashing column of the profile represents the current segment of the program will turn on the fan at low speed, press the Fan button a second time. The resistance of the flashing column indicates the resistance setting for the current segment. When no arrow appears, maintain your speed. IMPORTANT: The target speed settings are ...
User Manual
Page 16
Each time you hold the handgrip pulse sensor continuously during your heart rate to the target heart rate setting for the current segment of the program. See step 6 on page 14. 5. Press any button on the metal contacts for at least 30 seconds. Heart rate program 1 is divided into 30 oneminute segments. Heart rate program 2 is too far below or above the target heart rate setting, the resistance of the pedals will regularly compare your workout, press the Display button again. The height of the flashing column indicates the target heart rate setting for consecutive segments. ...
Each time you hold the handgrip pulse sensor continuously during your heart rate to the target heart rate setting for the current segment of the program. See step 6 on page 14. 5. Press any button on the metal contacts for at least 30 seconds. Heart rate program 1 is divided into 30 oneminute segments. Heart rate program 2 is too far below or above the target heart rate setting, the resistance of the pedals will regularly compare your workout, press the Display button again. The height of the flashing column indicates the target heart rate setting for consecutive segments. ...
User Manual
Page 17
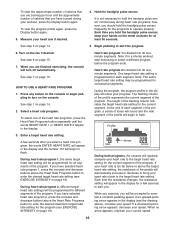
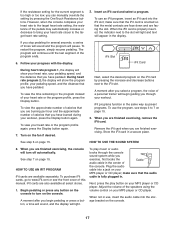
If you can manually override the setting by pressing the increase and decrease buttons next to the target heart rate setting. 2. To view your MP3 player or CD player. iFit programs function in the same way as preset programs. To use the program, see steps 3 to www.iFit.com or see the front cover of this manual. Store the iFit card in use an iFit program, insert an iFit card into a jack on your progress with the display. To purchase iFit cards, go to 7 on your heart rate or the program profile again, press the Display button again. 7. Adjust the volume of the ...
If you can manually override the setting by pressing the increase and decrease buttons next to the target heart rate setting. 2. To view your MP3 player or CD player. iFit programs function in the same way as preset programs. To use the program, see steps 3 to www.iFit.com or see the front cover of this manual. Store the iFit card in use an iFit program, insert an iFit card into a jack on your progress with the display. To purchase iFit cards, go to 7 on your heart rate or the program profile again, press the Display button again. 7. Adjust the volume of the ...
User Manual
Page 18
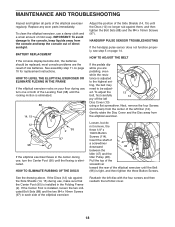
... DISCS Loosen, but do not remove, the three 1/4" x 19mm Button Screws (114). If the Center Foot is installed in each side of the elliptical exerciser regularly. If the Discs (12) rub against them, and then tighten the Bolt Sets (88) and the M4 x 16mm Screws (97).... MAINTENANCE AND TROUBLESHOOTING Inspect and tighten all parts of the elliptical exerciser. BATTERY REPLACEMENT If the console display become dim, the batteries should be adjust- Replace any worn parts immediately. See the drawing above....
... DISCS Loosen, but do not remove, the three 1/4" x 19mm Button Screws (114). If the Center Foot is installed in each side of the elliptical exerciser regularly. If the Discs (12) rub against them, and then tighten the Bolt Sets (88) and the M4 x 16mm Screws (97).... MAINTENANCE AND TROUBLESHOOTING Inspect and tighten all parts of the elliptical exerciser. BATTERY REPLACEMENT If the console display become dim, the batteries should be adjust- Replace any worn parts immediately. See the drawing above....
User Manual
Page 19
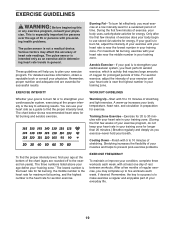
Remember, proper nutrition and adequate rest are rounded off to the nearest ten years). If your goal is to 30 minutes with pre-existing health problems. The pulse sensor is the key to make exercise a regular and enjoyable part of your exercise until your training zone. A warm-up to strengthen your training zone. Training Zone Exercise-Exercise for 20 to burn fat, adjust the intensity of exercise, your physician. The lowest number is the heart rate for fat burning, the middle number is the heart rate for maximum fat burning, and the highest number is near the lowest number ...
Remember, proper nutrition and adequate rest are rounded off to the nearest ten years). If your goal is to 30 minutes with pre-existing health problems. The pulse sensor is the key to make exercise a regular and enjoyable part of your exercise until your training zone. A warm-up to strengthen your training zone. Training Zone Exercise-Exercise for 20 to burn fat, adjust the intensity of exercise, your physician. The lowest number is the heart rate for fat burning, the middle number is the heart rate for maximum fat burning, and the highest number is near the lowest number ...
User Manual
Page 20
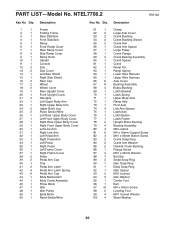
Qty. 1 1 2 1 3 1 4 1 5 1 6 1 7 1 8 2 9 1 10 1 11 1 12 2 13 2 14 1 15 1 16 2 17 2 18 2 19 1 20 1 21 2 22 1 23 1 24 2 25 2 26 1 27 1 28 1 29 1 30 1 31 1 32 1 33 1 34 1 35 1 36 1 37 1 38 2 39 2 40 1 41 2 42 4 43 6 44 1 45 1 46 1 47 1 48 1 49 1 50 1 Description Frame Folding Frame Rear Stabilizer Front Stabilizer Ramp Front Ramp Cover Rear Ramp Cover Side Ramp Cover Ramp Knob Upright Console Disc Disc Cover Left Side Shield Right Side Shield Rear Cap Wheel Wheel Cover Rear Upright Cover Front ...
Qty. 1 1 2 1 3 1 4 1 5 1 6 1 7 1 8 2 9 1 10 1 11 1 12 2 13 2 14 1 15 1 16 2 17 2 18 2 19 1 20 1 21 2 22 1 23 1 24 2 25 2 26 1 27 1 28 1 29 1 30 1 31 1 32 1 33 1 34 1 35 1 36 1 37 1 38 2 39 2 40 1 41 2 42 4 43 6 44 1 45 1 46 1 47 1 48 1 49 1 50 1 Description Frame Folding Frame Rear Stabilizer Front Stabilizer Ramp Front Ramp Cover Rear Ramp Cover Side Ramp Cover Ramp Knob Upright Console Disc Disc Cover Left Side Shield Right Side Shield Rear Cap Wheel Wheel Cover Rear Upright Cover Front ...