
User Manual
Page 1
... Customer Care. Keep this manual) before using this equipment. Serial Number Decal QUESTIONS? MT Sat. 8 a.m.-5 p.m. IMPORTANT: Please register this product (see the limited warranty on the back cover of this manual for future reference. MT ON THE WEB: www.nordictrackservice.com CAUTION Read all precautions and instructions in this manual before contacting Customer Care. USERʼS MANUAL CALL TOLL-FREE: 1-888-825-2588...
... Customer Care. Keep this manual) before using this equipment. Serial Number Decal QUESTIONS? MT Sat. 8 a.m.-5 p.m. IMPORTANT: Please register this product (see the limited warranty on the back cover of this manual for future reference. MT ON THE WEB: www.nordictrackservice.com CAUTION Read all precautions and instructions in this manual before contacting Customer Care. USERʼS MANUAL CALL TOLL-FREE: 1-888-825-2588...
User Manual
Page 2
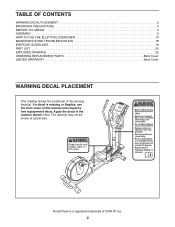
... YOU BEGIN 4 ASSEMBLY 5 HOW TO USE THE ELLIPTICAL EXERCISER 10 MAINTENANCE AND TROUBLESHOOTING 18 EXERCISE GUIDELINES 19 PART LIST 20 EXPLODED DRAWING 22 ORDERING REPLACEMENT PARTS Back Cover LIMITED WARRANTY Back Cover WARNING DECAL PLACEMENT This drawing shows the location(s) of ICON IP, Inc. 2 Note: The decal(s) may not be shown at actual size. NordicTrack is missing or illegible, see the front cover of this manual and request a free replacement decal. If a decal...
... YOU BEGIN 4 ASSEMBLY 5 HOW TO USE THE ELLIPTICAL EXERCISER 10 MAINTENANCE AND TROUBLESHOOTING 18 EXERCISE GUIDELINES 19 PART LIST 20 EXPLODED DRAWING 22 ORDERING REPLACEMENT PARTS Back Cover LIMITED WARRANTY Back Cover WARNING DECAL PLACEMENT This drawing shows the location(s) of ICON IP, Inc. 2 Note: The decal(s) may not be shown at actual size. NordicTrack is missing or illegible, see the front cover of this manual and request a free replacement decal. If a decal...

User Manual
Page 3
... health problems. 2. Keep your back. 11. Wear appropriate exercise clothes when exercising; Hold the upper body arms or the handlebars when mounting, dismounting, or using your physician. Various factors, including the userʼs movement, may result in serious injury or death. The elliptical exerciser is not a medical device. Use the elliptical exerciser only as an exercise aid in determining heart rate trends in general. 12. The pulse sensor...
... health problems. 2. Keep your back. 11. Wear appropriate exercise clothes when exercising; Hold the upper body arms or the handlebars when mounting, dismounting, or using your physician. Various factors, including the userʼs movement, may result in serious injury or death. The elliptical exerciser is not a medical device. Use the elliptical exerciser only as an exercise aid in determining heart rate trends in general. 12. The pulse sensor...
User Manual
Page 4
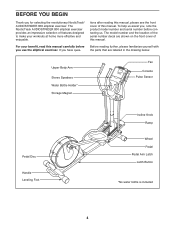
... after reading this manual, please see the front cover of the serial number decal are labeled in the drawing below. If you use the elliptical exerciser. To help us . The model number and the location of this manual. The NordicTrack AUDIOSTRIDER 800 elliptical exerciser provides an impressive selection of this manual. Upper Body Arm Stereo Speakers Water Bottle Holder* Storage Magnet Fan Console Pulse Sensor Pedal Disc Handle Leveling Foot Incline Knob Ramp Wheel Pedal Pedal Arm Latch Latch Button *No water...
... after reading this manual, please see the front cover of the serial number decal are labeled in the drawing below. If you use the elliptical exerciser. To help us . The model number and the location of this manual. The NordicTrack AUDIOSTRIDER 800 elliptical exerciser provides an impressive selection of this manual. Upper Body Arm Stereo Speakers Water Bottle Holder* Storage Magnet Fan Console Pulse Sensor Pedal Disc Handle Leveling Foot Incline Knob Ramp Wheel Pedal Pedal Arm Latch Latch Button *No water...
User Manual
Page 5
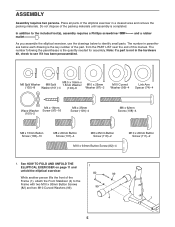
... quantity needed for assembly. The number in parentheses below to see if it has been preassembled. The number following the parentheses is the key number of the part, from the PART LIST near the end of the packing materials until assembly is not in a cleared area and remove the packing materials. See HOW TO FOLD AND UNFOLD THE ELLIPTICAL EXERCISER on page 11 and 1 unfold the elliptical exerciser...
... quantity needed for assembly. The number in parentheses below to see if it has been preassembled. The number following the parentheses is the key number of the part, from the PART LIST near the end of the packing materials until assembly is not in a cleared area and remove the packing materials. See HOW TO FOLD AND UNFOLD THE ELLIPTICAL EXERCISER on page 11 and 1 unfold the elliptical exerciser...
User Manual
Page 6
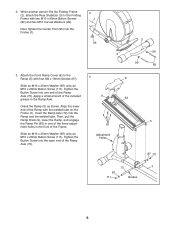
...) onto an M10 x 20mm Button Screw (111). Adjustment Holes 5 87 111 72 1 87 111 Grease 6 Then, pull the Ramp Knob (9), lower the Ramp, and engage the Ramp Pin (62) in one end of the Frame. Tighten the Button Screw into the Ramp and the welded tube. 2. While another person lifts the Folding Frame (2), attach the Rear Stabilizer (3) to the Folding Frame with the welded...
...) onto an M10 x 20mm Button Screw (111). Adjustment Holes 5 87 111 72 1 87 111 Grease 6 Then, pull the Ramp Knob (9), lower the Ramp, and engage the Ramp Pin (62) in one end of the Frame. Tighten the Button Screw into the Ramp and the welded tube. 2. While another person lifts the Folding Frame (2), attach the Rear Stabilizer (3) to the Folding Frame with the welded...

User Manual
Page 8
... this step 65 64 101 107 10 107 101 1 7. Attach the Upright with three M8 x 15mm 7 Button Screws (106). 23 Attach the Right Upper Body Arm (23) in the same way. 22 106 24 8 Carefully insert the Upright (10) into the Frame (1); 6. Attach the Left Upper Body Arm (22) to the Lower Wire Harness (64). While another person holds the Upright (10) near the Frame (1), connect...
... this step 65 64 101 107 10 107 101 1 7. Attach the Upright with three M8 x 15mm 7 Button Screws (106). 23 Attach the Right Upper Body Arm (23) in the same way. 22 106 24 8 Carefully insert the Upright (10) into the Frame (1); 6. Attach the Left Upper Body Arm (22) to the Lower Wire Harness (64). While another person holds the Upright (10) near the Frame (1), connect...
User Manual
Page 10
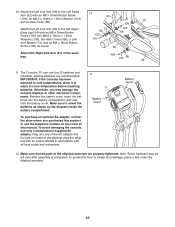
... D batteries (not included); Attach the Left Link Arm (30) to the Left Pedal Arm (32) with all parts of the elliptical exerciser are recommended. alkaline batteries are properly tightened. Remove the battery cover, insert the batteries into the jack on the cover of this product or call the telephone number on frame of the AC adapter into the battery compartment, and reattach the battery cover. 10. Otherwise, you purchased this manual. Plug...
... D batteries (not included); Attach the Left Link Arm (30) to the Left Pedal Arm (32) with all parts of the elliptical exerciser are recommended. alkaline batteries are properly tightened. Remove the battery cover, insert the batteries into the jack on the cover of this product or call the telephone number on frame of the AC adapter into the battery compartment, and reattach the battery cover. 10. Otherwise, you purchased this manual. Plug...
User Manual
Page 11
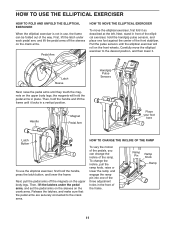
... ELLIPTICAL EXERCISER When the elliptical exerciser is not in use the elliptical exerciser, first hold the handle, press the latch button, and lower the frame. First, lift the latch under the pedal arms, and set the pedal arms on the sleeves on the upper body legs. Handle Magnet Pedal Arm Handgrip Pulse Sensors Place your foot here Latch Button To use , the frame can change the incline, pull the ramp knob, raise or lower the ramp, and engage the ramp pin...
... ELLIPTICAL EXERCISER When the elliptical exerciser is not in use the elliptical exerciser, first hold the handle, press the latch button, and lower the frame. First, lift the latch under the pedal arms, and set the pedal arms on the sleeves on the upper body legs. Handle Magnet Pedal Arm Handgrip Pulse Sensors Place your foot here Latch Button To use , the frame can change the incline, pull the ramp knob, raise or lower the ramp, and engage the ramp pin...

User Manual
Page 12
... stop. the pedals will continue to move with a continuous motion. Then, step off the higher pedal first. Note: The elliptical exerciser does not have a free wheel; When the pedals are stationary, step off the lower pedal. It is recommended that is in the lower position. Upper Body Arms Crank Arm Pedals 12 Next, step onto the other pedal. however, for variety you turn the crank arms in the opposite direction. Note: The crank arms can turn in...
... stop. the pedals will continue to move with a continuous motion. Then, step off the higher pedal first. Note: The elliptical exerciser does not have a free wheel; When the pedals are stationary, step off the lower pedal. It is recommended that is in the lower position. Upper Body Arms Crank Arm Pedals 12 Next, step onto the other pedal. however, for variety you turn the crank arms in the opposite direction. Note: The crank arms can turn in...
User Manual
Page 13
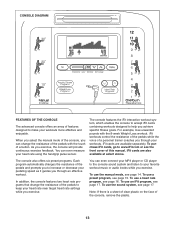
... you exercise. iFit workouts control the resistance of the pedals while the voice of a personal trainer coaches you can change the resistance of the console, you through an effective workout. As you achieve specific fitness goals. To use a preset program, see page 16. To use the manual mode, see page 17. When you select the manual mode of the pedals to increase or decrease your pedaling speed as it guides you through your workouts. The console...
... you exercise. iFit workouts control the resistance of the pedals while the voice of a personal trainer coaches you can change the resistance of the console, you through an effective workout. As you achieve specific fitness goals. To use a preset program, see page 16. To use the manual mode, see page 17. When you select the manual mode of the pedals to increase or decrease your pedaling speed as it guides you through your workouts. The console...
User Manual
Page 14
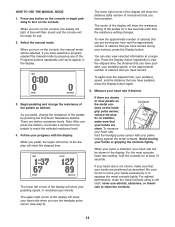
... TO USE THE MANUAL MODE 1. When you have pedaled. The lower right corner of the display will show the distance (total number of the display will show the elapsed time. There are clean. Note: After you press the buttons, it will be selected. Contacts tacts on the console, the display will be ready for a few seconds each time the resistance setting changes. tic. To measure your heart rate...
... TO USE THE MANUAL MODE 1. When you have pedaled. The lower right corner of the display will show the distance (total number of the display will show the elapsed time. There are clean. Note: After you press the buttons, it will be selected. Contacts tacts on the console, the display will be ready for a few seconds each time the resistance setting changes. tic. To measure your heart rate...
User Manual
Page 15
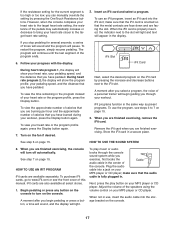
... pedaling to direct the airflow from the fan. Press any button on the console. Select a preset program. When no arrow appears, maintain your progress with the display. When you can manually override the setting by pressing the OneTouch Resistance buttons. Follow your current speed. Turn on page 14. 2. Pivot the fan louvers above the display upward or downward to start the program. Note: If the pedals do not move...
... pedaling to direct the airflow from the fan. Press any button on the console. Select a preset program. When no arrow appears, maintain your progress with the display. When you can manually override the setting by pressing the OneTouch Resistance buttons. Follow your current speed. Turn on page 14. 2. Pivot the fan louvers above the display upward or downward to start the program. Note: If the pedals do not move...
User Manual
Page 16
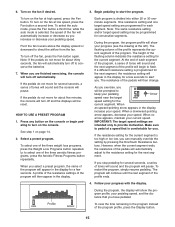
... of the program. Turn on page 19). Note: For a shorter workout, stop exercising or select a different program before the program ends. Each time you have selected heart rate program 2, press the increase and decrease buttons above the target heart rate setting, the resistance of the flashing column indicates the target heart rate setting for consecutive segments. Begin pedaling to hold the handgrip pulse sensor, keep your heart rate to flash. HOW TO USE A HEART RATE PROGRAM 1. To select...
... of the program. Turn on page 19). Note: For a shorter workout, stop exercising or select a different program before the program ends. Each time you have selected heart rate program 2, press the increase and decrease buttons above the target heart rate setting, the resistance of the flashing column indicates the target heart rate setting for consecutive segments. Begin pedaling to hold the handgrip pulse sensor, keep your heart rate to flash. HOW TO USE A HEART RATE PROGRAM 1. To select...
User Manual
Page 17
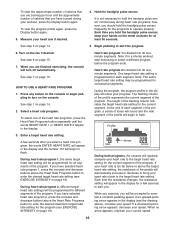
... audio cable into the storage bracket on the console. Remove the iFit card when you have burned during your workout, press the Display button again. HOW TO USE THE SOUND SYSTEM 8. Begin pedaling or press any button on the console to the target heart rate setting, the resistance of the speakers using the volume control on the iFit card by pressing the OneTouch Resistance buttons. However, when the console compares your heart rate to turn off automatically. The program will begin pedaling or press a button...
... audio cable into the storage bracket on the console. Remove the iFit card when you have burned during your workout, press the Display button again. HOW TO USE THE SOUND SYSTEM 8. Begin pedaling or press any button on the console to the target heart rate setting, the resistance of the speakers using the volume control on the iFit card by pressing the OneTouch Resistance buttons. However, when the console compares your heart rate to turn off automatically. The program will begin pedaling or press a button...
User Manual
Page 18
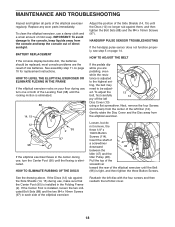
...). BATTERY REPLACEMENT If the console display become dim, the batteries should be adjust- HOW TO ELIMINATE RUBBING OF THE DISCS Loosen, but do not remove, the three 1/4" x 19mm Button Screws (114). HANDGRIP PULSE SENSOR TROUBLESHOOTING If the handgrip pulse sensor does not function properly, see step 5 on page 10 for replacement instructions. Replace any worn parts immediately. HOW TO LEVEL THE ELLIPTICAL EXERCISER OR ELIMINATE FLEXING IN THE FRAME If the elliptical exerciser rocks...
...). BATTERY REPLACEMENT If the console display become dim, the batteries should be adjust- HOW TO ELIMINATE RUBBING OF THE DISCS Loosen, but do not remove, the three 1/4" x 19mm Button Screws (114). HANDGRIP PULSE SENSOR TROUBLESHOOTING If the handgrip pulse sensor does not function properly, see step 5 on page 10 for replacement instructions. Replace any worn parts immediately. HOW TO LEVEL THE ELLIPTICAL EXERCISER OR ELIMINATE FLEXING IN THE FRAME If the elliptical exerciser rocks...
User Manual
Page 19
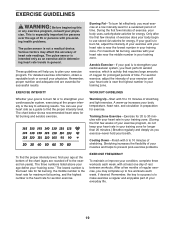
... are essential for energy. The chart below shows recommended heart rates for maximum fat burning, and the highest number is not a medical device. Warming Up-Start with 5 to 10 minutes of your body uses carbohydrate calories for successful results. EXERCISE GUIDELINES WARNING: Before beginning this or any exercise program, consult your condition, complete three workouts each week, if desired. This is...
... are essential for energy. The chart below shows recommended heart rates for maximum fat burning, and the highest number is not a medical device. Warming Up-Start with 5 to 10 minutes of your body uses carbohydrate calories for successful results. EXERCISE GUIDELINES WARNING: Before beginning this or any exercise program, consult your condition, complete three workouts each week, if desired. This is...
User Manual
Page 20
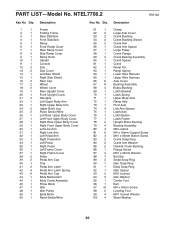
... Side Shield Rear Cap Wheel Wheel Cover Rear Upright Cover Front Upright Cover Handgrip Left Upper Body Arm Right Upper Body Arm Upper Body Leg Pulse Sensor/Wire Left Rear Upper Body Cover Left Front Upper Body Cover Right Rear Upper Body Cover Right Front Upper Body Cover Left Link Arm Right Link Arm Left Pedal Arm Right Pedal Arm Left Pedal Right Pedal Left Frame Cover Right Frame Cover Roller Pedal Arm Cap Tray Pedal Arm Latch Pedal Arm Latch Spring Pedal Arm Cap Eddy Mechanism Eddy Crank Assembly Pillow Block Idler Idler Pulley Eddy Motor Reed Switch/Wire Key No. PART LIST-Model No.
... Side Shield Rear Cap Wheel Wheel Cover Rear Upright Cover Front Upright Cover Handgrip Left Upper Body Arm Right Upper Body Arm Upper Body Leg Pulse Sensor/Wire Left Rear Upper Body Cover Left Front Upper Body Cover Right Rear Upper Body Cover Right Front Upper Body Cover Left Link Arm Right Link Arm Left Pedal Arm Right Pedal Arm Left Pedal Right Pedal Left Frame Cover Right Frame Cover Roller Pedal Arm Cap Tray Pedal Arm Latch Pedal Arm Latch Spring Pedal Arm Cap Eddy Mechanism Eddy Crank Assembly Pillow Block Idler Idler Pulley Eddy Motor Reed Switch/Wire Key No. PART LIST-Model No.
User Manual
Page 21
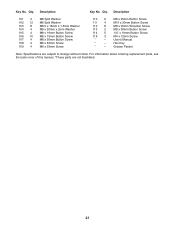
... x 16mm Button Screw M8 x 15mm Button Screw M8 x 20mm Button Screw M6 x 62mm Screw M6 x 35mm Screw 110 6 111 4 112 8 113 2 114 5 115 3 * - * - * - Description Key No. For information about ordering replacement parts, see the back cover of this manual. *These parts are subject to change without notice. Qty. Qty. M8 x 25mm Button Screw M10 x 20mm Button Screw M8 x 25mm Shoulder Screw M8 x 30mm Button Screw 1/4" x 19mm Button Screw M4 x 12mm Screw Userʼs Manual Hex Key Grease Packet Note: Specifications are...
... x 16mm Button Screw M8 x 15mm Button Screw M8 x 20mm Button Screw M6 x 62mm Screw M6 x 35mm Screw 110 6 111 4 112 8 113 2 114 5 115 3 * - * - * - Description Key No. For information about ordering replacement parts, see the back cover of this manual. *These parts are subject to change without notice. Qty. Qty. M8 x 25mm Button Screw M10 x 20mm Button Screw M8 x 25mm Shoulder Screw M8 x 30mm Button Screw 1/4" x 19mm Button Screw M4 x 12mm Screw Userʼs Manual Hex Key Grease Packet Note: Specifications are...
User Manual
Page 24
... or rental purposes or as store display models; ORDERING REPLACEMENT PARTS To order replacement parts, see the PART LIST and the EXPLODED DRAWING near the end of this manual) LIMITED WARRANTY IMPORTANT: You must be the customerʼs responsibility. damages with the use , or costs of removal or installation; This warranty gives you , please be responsible for a lifetime. ICON Health & Fitness, Inc. (ICON) warrants this product to you . For...
... or rental purposes or as store display models; ORDERING REPLACEMENT PARTS To order replacement parts, see the PART LIST and the EXPLODED DRAWING near the end of this manual) LIMITED WARRANTY IMPORTANT: You must be the customerʼs responsibility. damages with the use , or costs of removal or installation; This warranty gives you , please be responsible for a lifetime. ICON Health & Fitness, Inc. (ICON) warrants this product to you . For...


