

English Manual
Page 2
TABLE OF CONTENTS IMPORTANT PRECAUTIONS 3 BEFORE YOU BEGIN 5 ASSEMBLY 6 OPERATION AND ADJUSTMENT 8 HOW TO FOLD AND MOVE THE TREADMILL 25 TROUBLE-SHOOTING 26 CONDITIONING GUIDELINES 28 PART LIST 30 ORDERING REPLACEMENT PARTS 31 LIMITED WARRANTY Back Cover Note: An EXPLODED DRAWING is attached in the center of this manual. 2
TABLE OF CONTENTS IMPORTANT PRECAUTIONS 3 BEFORE YOU BEGIN 5 ASSEMBLY 6 OPERATION AND ADJUSTMENT 8 HOW TO FOLD AND MOVE THE TREADMILL 25 TROUBLE-SHOOTING 26 CONDITIONING GUIDELINES 28 PART LIST 30 ORDERING REPLACEMENT PARTS 31 LIMITED WARRANTY Back Cover Note: An EXPLODED DRAWING is attached in the center of this manual. 2
English Manual
Page 3
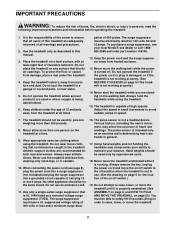
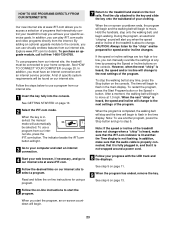
... key, unplug the power cord and move the walking belt while the power is not in use. (See the drawing on page 5 for the location of the on the treadmill at all times. Do not put the treadmill in a garage or covered patio, or near water. 5. Never move the on/off switch to the off position when the treadmill is turned off switch.) 19. The treadmill is not working...
... key, unplug the power cord and move the walking belt while the power is not in use. (See the drawing on page 5 for the location of the on the treadmill at all times. Do not put the treadmill in a garage or covered patio, or near water. 5. Never move the on/off switch to the off position when the treadmill is turned off switch.) 19. The treadmill is not working...
English Manual
Page 4
...- tenance and adjustment procedures de- scribed in this treadmill in the location shown. ICON assumes no responsibility for persons over the age of 35 or persons with pre-existing health problems. Read all parts of this or any time by pressing the speed and incline buttons. When using iFIT.com CD's and videos, an electronic "chirping" sound will change the incline of the CD or video program. 24...
...- tenance and adjustment procedures de- scribed in this treadmill in the location shown. ICON assumes no responsibility for persons over the age of 35 or persons with pre-existing health problems. Read all parts of this or any time by pressing the speed and incline buttons. When using iFIT.com CD's and videos, an electronic "chirping" sound will change the incline of the CD or video program. 24...
English Manual
Page 5
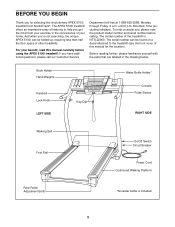
... Holder Hand Weights Handrail Lock Knob LEFT SIDE Key/Clip Water Bottle Holder* Console Pulse Sensor RIGHT SIDE Walking Belt Foot Rail On/Off Switch Circuit Breaker Power Cord Cushioned Walking Platform Rear Roller Adjustment Bolts *No water bottle is NTTL22900. The model number of other treadmills. Mountain Time (excluding holidays). The APEX 5100i treadmill offers an impressive array of features to the treadmill (see the front cover of your exercise in the drawing...
... Holder Hand Weights Handrail Lock Knob LEFT SIDE Key/Clip Water Bottle Holder* Console Pulse Sensor RIGHT SIDE Walking Belt Foot Rail On/Off Switch Circuit Breaker Power Cord Cushioned Walking Platform Rear Roller Adjustment Bolts *No water bottle is NTTL22900. The model number of other treadmills. Mountain Time (excluding holidays). The APEX 5100i treadmill offers an impressive array of features to the treadmill (see the front cover of your exercise in the drawing...

English Manual
Page 6
... through the cutout. Connect the Upright Wire Harness (131) to a vertical position. Insert the connectors and the Upright Wire Harness (131) into the Lock Knob Sleeve (87) and the Left Upright (83). Do not dispose of the Spring.) Insert the Lock Pin into the opening in a cleared area and remove all packing materials. Note: The underside of the walking belt, simply wipe...
... through the cutout. Connect the Upright Wire Harness (131) to a vertical position. Insert the connectors and the Upright Wire Harness (131) into the Lock Knob Sleeve (87) and the Left Upright (83). Do not dispose of the Spring.) Insert the Lock Pin into the opening in a cleared area and remove all packing materials. Note: The underside of the walking belt, simply wipe...

English Manual
Page 8
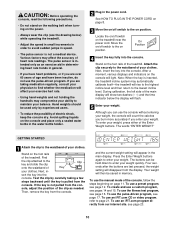
... PERFORMANT LUBETM WALKING BELT Your treadmill features a walking belt coated with all local codes and ordinances. This product is grounded before using an adapter. 8 The green-colored rigid ear, lug, or the like the adapter illustrated in your treadmill being turned on a nominal 120-volt circuit, and has a grounding plug that is properly grounded. HOW TO PLUG IN THE POWER CORD DANGER: Improper connection of the...
... PERFORMANT LUBETM WALKING BELT Your treadmill features a walking belt coated with all local codes and ordinances. This product is grounded before using an adapter. 8 The green-colored rigid ear, lug, or the like the adapter illustrated in your treadmill being turned on a nominal 120-volt circuit, and has a grounding plug that is properly grounded. HOW TO PLUG IN THE POWER CORD DANGER: Improper connection of the...

English Manual
Page 9
... your heart rate using the built-in your workout. You can be changed with a class and an instructor-the hottest new trend at www.iFIT.com and access audio programs and video programs directly from your workout. Using the included audio cable, you can connect the treadmill to give you get the most from the internet. When the manual mode of the console is selected, the speed and incline of your exercise. In...
... your heart rate using the built-in your workout. You can be changed with a class and an instructor-the hottest new trend at www.iFIT.com and access audio programs and video programs directly from your workout. Using the included audio cable, you can connect the treadmill to give you get the most from the internet. When the manual mode of the console is selected, the speed and incline of your exercise. In...
English Manual
Page 10
... STARTED 1 Attach the clip to enter your weight. sole, adjust the position of the Enter Weight buttons. Four seconds after the buttons are taking a few steps backward until the key is not a medical device. To create and use the pulse-driven program, see page 23. 10 Move the on the console will disappear from the con- Locate the on/off switch on the foot rails of heart rate...
... STARTED 1 Attach the clip to enter your weight. sole, adjust the position of the Enter Weight buttons. Four seconds after the buttons are taking a few steps backward until the key is not a medical device. To create and use the pulse-driven program, see page 23. 10 Move the on the console will disappear from the con- Locate the on/off switch on the foot rails of heart rate...
English Manual
Page 11
..., the speed setting will show an LED track representing 1/4 mile. The LED track-When the manual mode or an iFIT.com program is pressed, the walking belt will show the elapsed time. A new lap will begin . The display will show the following information: Incline-The left side of the main display shows the incline level of 1/4mile laps you exercise, the Training Zone display will change by 0.5%. A moment after the button is...
..., the speed setting will show an LED track representing 1/4 mile. The LED track-When the manual mode or an iFIT.com program is pressed, the walking belt will show the elapsed time. A new lap will begin . The display will show the following information: Incline-The left side of the main display shows the incline level of 1/4mile laps you exercise, the Training Zone display will change by 0.5%. A moment after the button is...

English Manual
Page 12
... switch near the power cord to the off the demo mode. nine programs that focus on weight loss, nine programs designed for aerobic exercise, and nine programs for metric kilometers will show your heart rate, if desired. The incline must be at the lowest level when the treadmill is selected, hold the contacts for about 15 seconds. 7 When you can display speed and distance in this manual refer...
... switch near the power cord to the off the demo mode. nine programs that focus on weight loss, nine programs designed for aerobic exercise, and nine programs for metric kilometers will show your heart rate, if desired. The incline must be at the lowest level when the treadmill is selected, hold the contacts for about 15 seconds. 7 When you can display speed and distance in this manual refer...
English Manual
Page 13
.... To stop . Step onto the foot rails and make sure that the incline of the treadmill is pressed, the treadmill will light or darken in the "demo" mode. Next, remove the key from the console and put it in the current segment of the program. When you are lit, the speed settings will show the last settings for the program. 3 Press the Start Program button or the Speed + button to start the program. Note...
.... To stop . Step onto the foot rails and make sure that the incline of the treadmill is pressed, the treadmill will light or darken in the "demo" mode. Next, remove the key from the console and put it in the current segment of the program. When you are lit, the speed settings will show the last settings for the program. 3 Press the Start Program button or the Speed + button to start the program. Note...
English Manual
Page 16
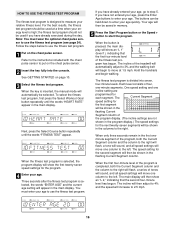
... be used at 1.5 mph. The fitness test program is divided into the console. Each level consists of tones will sound, and all speed settings will move one -minute segments. When only three seconds remain in the main display. Note: You must enter your relative fitness level. See GETTING STARTED on the chest pulse sensor. The incline of the treadmill will automatically adjust to 3% and the walking belt will...
... be used at 1.5 mph. The fitness test program is divided into the console. Each level consists of tones will sound, and all speed settings will move one -minute segments. When only three seconds remain in the main display. Note: You must enter your relative fitness level. See GETTING STARTED on the chest pulse sensor. The incline of the treadmill will automatically adjust to 3% and the walking belt will...

English Manual
Page 17
... display. fitness level 10 (FL:10) is selected. Refer to the instructions included with the chest pulse sensor to use the pulse-driven program. 1 Put on the chest pulse sensor. 2 Insert the key fully into the console. HOW TO USE THE PULSE-DRIVEN PROGRAM The pulse-driven program automatically adjusts the speed and incline of the treadmill to indicate your heart rate near a target level during the last thirty seconds of any time by pressing the Stop button...
... display. fitness level 10 (FL:10) is selected. Refer to the instructions included with the chest pulse sensor to use the pulse-driven program. 1 Put on the chest pulse sensor. 2 Insert the key fully into the console. HOW TO USE THE PULSE-DRIVEN PROGRAM The pulse-driven program automatically adjusts the speed and incline of the treadmill to indicate your heart rate near a target level during the last thirty seconds of any time by pressing the Stop button...

English Manual
Page 18
... is pressed, the treadmill will increase. If this occurs, refer to use the pulse-driven program again, reselect the program and start the program. See step 6 on page 11. 7 When the program has ended, remove the key. If you decrease the incline, the speed will automatically adjust to a stop the program, press the Stop button. Note: When the incline reaches the lowest setting, the speed cannot be shown in memory. 5 Press the Start Program button or the Speed + button...
... is pressed, the treadmill will increase. If this occurs, refer to use the pulse-driven program again, reselect the program and start the program. See step 6 on page 11. 7 When the program has ended, remove the key. If you decrease the incline, the speed will automatically adjust to a stop the program, press the Stop button. Note: When the incline reaches the lowest setting, the speed cannot be shown in memory. 5 Press the Start Program button or the Speed + button...
English Manual
Page 22
... "chirp" is flashing, press the Start button or the Speed + button on the console. Note: If the speed or incline of the treadmill does not change when a "chirp" is heard: • make sure that the audio cable is properly connected, that it is fully plugged in the main display. See step 5 on the console. The program can manually override the settings at any time by pressing the Stop button on page 12. 7 When...
... "chirp" is flashing, press the Start button or the Speed + button on the console. Note: If the speed or incline of the treadmill does not change when a "chirp" is heard: • make sure that the audio cable is properly connected, that it is fully plugged in the main display. See step 5 on the console. The program can manually override the settings at any time by pressing the Stop button on page 12. 7 When...
English Manual
Page 23
... start an internet connection. 4 Start your home computer. If the speed or incline settings are too high or too low, you must be found on the console. See step 5 on -screen countdown ends, the program will begin and the walking belt will begin walking. Explore www.iFIT.com for using a program. A list of the treadmill does not change to flash in , and that it is fully plugged in the time display...
... start an internet connection. 4 Start your home computer. If the speed or incline settings are too high or too low, you must be found on the console. See step 5 on -screen countdown ends, the program will begin and the walking belt will begin walking. Explore www.iFIT.com for using a program. A list of the treadmill does not change to flash in , and that it is fully plugged in the time display...

English Manual
Page 24
... sequence, although the buttons on the right side of miles that the walking belt has moved. The information mode also allows you can be used . THE INFORMATION MODE/DEMO MODE THE OPTIONAL CHEST PULSE SENSOR The console features an information mode that keeps track of the total number of hours that the treadmill has been operated and the total number of the main display. The chest pulse sensor provides hands-free operation and continuously monitors your heart rate during your workouts.
... sequence, although the buttons on the right side of miles that the walking belt has moved. The information mode also allows you can be used . THE INFORMATION MODE/DEMO MODE THE OPTIONAL CHEST PULSE SENSOR The console features an information mode that keeps track of the total number of hours that the treadmill has been operated and the total number of the main display. The chest pulse sensor provides hands-free operation and continuously monitors your heart rate during your workouts.

English Manual
Page 27
.... The treadmill will recalibrate the incline system. 27 If the walking belt is changing, remove the key. Plug in the power cord, insert the key and carefully walk on SOLUTION: a. Use only a UL-listed surge suppressor, rated at 15 amps, with a 14-gauge cord of the incline buttons. b. After a few minutes. Using the a allen wrench, turn the left rear roller adjustment bolt coun- Using the allen a wrench, turn both rear roller adjustment bolts counterclockwise, 1/4 of a turn each . When the walking belt is correctly tightened...
.... The treadmill will recalibrate the incline system. 27 If the walking belt is changing, remove the key. Plug in the power cord, insert the key and carefully walk on SOLUTION: a. Use only a UL-listed surge suppressor, rated at 15 amps, with a 14-gauge cord of the incline buttons. b. After a few minutes. Using the a allen wrench, turn the left rear roller adjustment bolt coun- Using the allen a wrench, turn both rear roller adjustment bolts counterclockwise, 1/4 of a turn each . When the walking belt is correctly tightened...
English Manual
Page 31
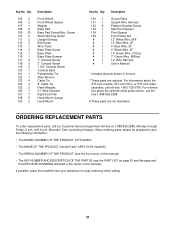
Screw Static Warning Decal Upright Endcap Belt Guide Wire Track Base Plate Screw Base Plate Base Plate Bumper 1" Console Screw 2" Console Screw 1 3/4" Console Screw Console Back Releaseable Tie Allen Wrench Cable Tie 8" Cable Tie Hand Weights 51" Wire Harness Right Foot Rail Hood Mount (Large) Hood Mount Key No. For information about the optional chest pulse sensor, call toll-free 1-800-735-0768. until 6 p.m. If possible, place the treadmill near your telephone for easy reference when calling. 31...
Screw Static Warning Decal Upright Endcap Belt Guide Wire Track Base Plate Screw Base Plate Base Plate Bumper 1" Console Screw 2" Console Screw 1 3/4" Console Screw Console Back Releaseable Tie Allen Wrench Cable Tie 8" Cable Tie Hand Weights 51" Wire Harness Right Foot Rail Hood Mount (Large) Hood Mount Key No. For information about the optional chest pulse sensor, call toll-free 1-800-735-0768. until 6 p.m. If possible, place the treadmill near your telephone for easy reference when calling. 31...
English Manual
Page 34
... or fitness for repair. Accordingly, the above limitation may not apply to be free of all other warranties and any economic loss, loss of property, loss of revenues or profits, loss of purchase. Part No. 169231 R1200A Printed in the Manual; HOW LONG IS IT COVERED-ICON Health & Fitness, Inc. ("ICON"), warrants the motor for two years after the date of enjoyment or use...
... or fitness for repair. Accordingly, the above limitation may not apply to be free of all other warranties and any economic loss, loss of property, loss of revenues or profits, loss of purchase. Part No. 169231 R1200A Printed in the Manual; HOW LONG IS IT COVERED-ICON Health & Fitness, Inc. ("ICON"), warrants the motor for two years after the date of enjoyment or use...


